From Beginner to Pro: Mastering Windows Task Scheduler
Last Updated:
Have you ever wished your computer would just do certain things automatically?
Like run backups, clear temp files, or launch apps on a schedule?
Well buckle up, because it’s time to unleash the power of Windows Task Scheduler.
In a nutshell, Task Scheduler is Windows’ built-in utility for automating…
well, just about anything.
It’s been around since the XP days, quietly toiling away in the background.
With that, Task Scheduler can:
- Launch programs, scripts, and batch files
- Automate any repetitive task
- Schedule tasks to off-peak hours
- Run tasks on a timetable, in response to system events, or on idle
- Much. More.
Basically, if there’s some computer chore you find yourself doing over and over, there’s probably a way to automate it here.
I’m here to guide you with practical demonstration on how to use it like a pro.
Opening Task Scheduler
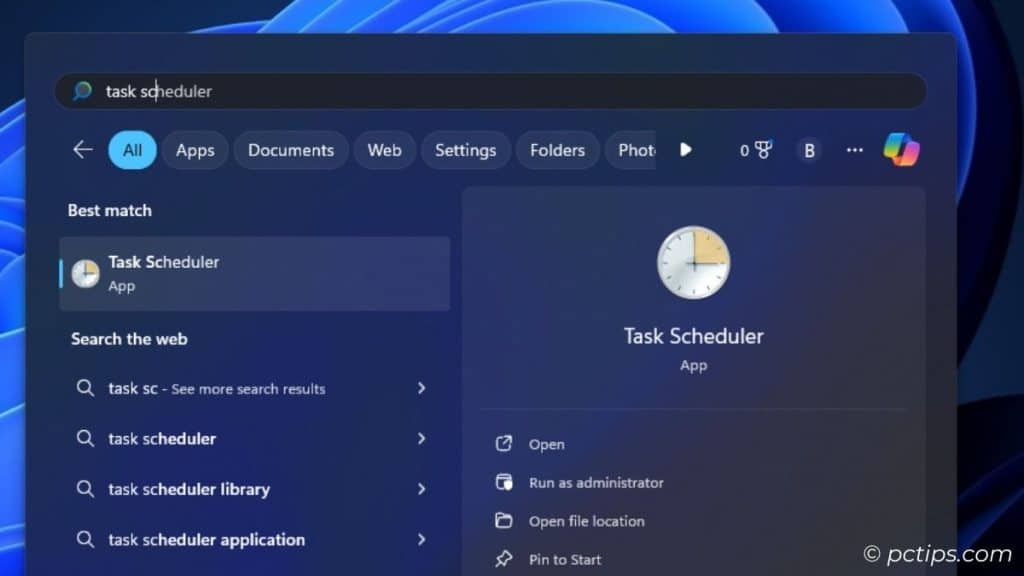
My favorite method to search for any Windows app is using the Start Menu. Always.
So, I don’t think there is any other better option than that.
Windows Key > Type Task Scheduler > Hit Enter. There you go!
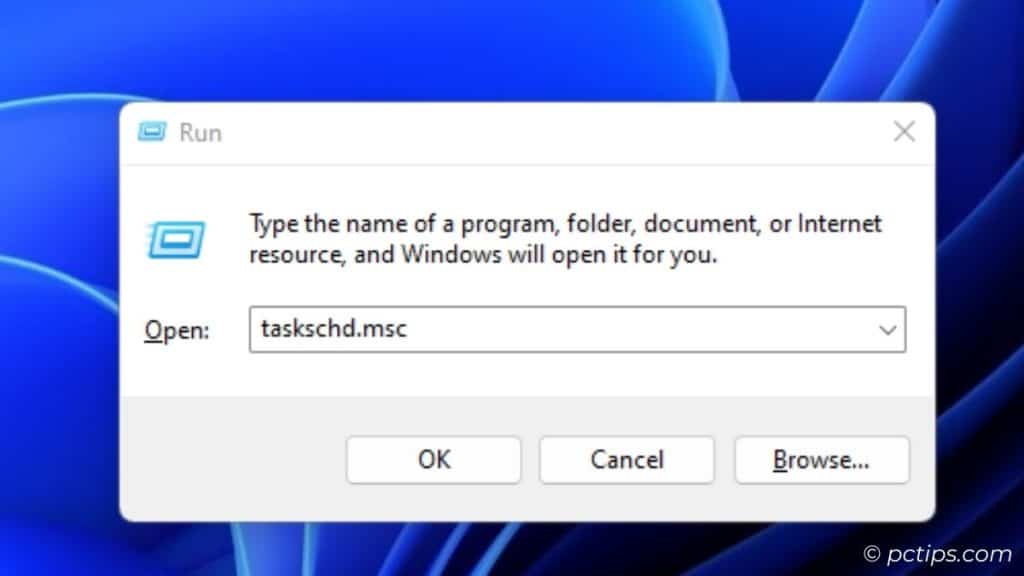
Or, sometimes I go for this Run command:
Run > taskschd.msc > Enter
But if you’re the kind of person who wants to know the exact path of where this hidden Windows feature is located, there are two other possible ways:
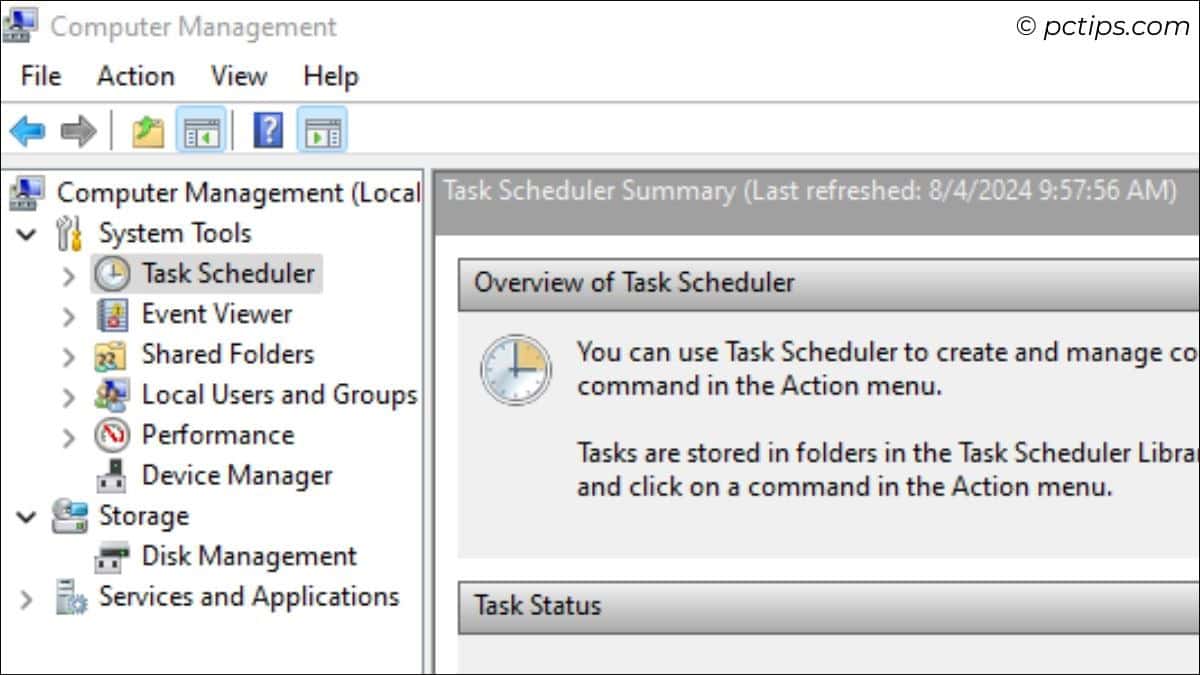
- Launch Computer Management. Look for Task Scheduler under System Tools.
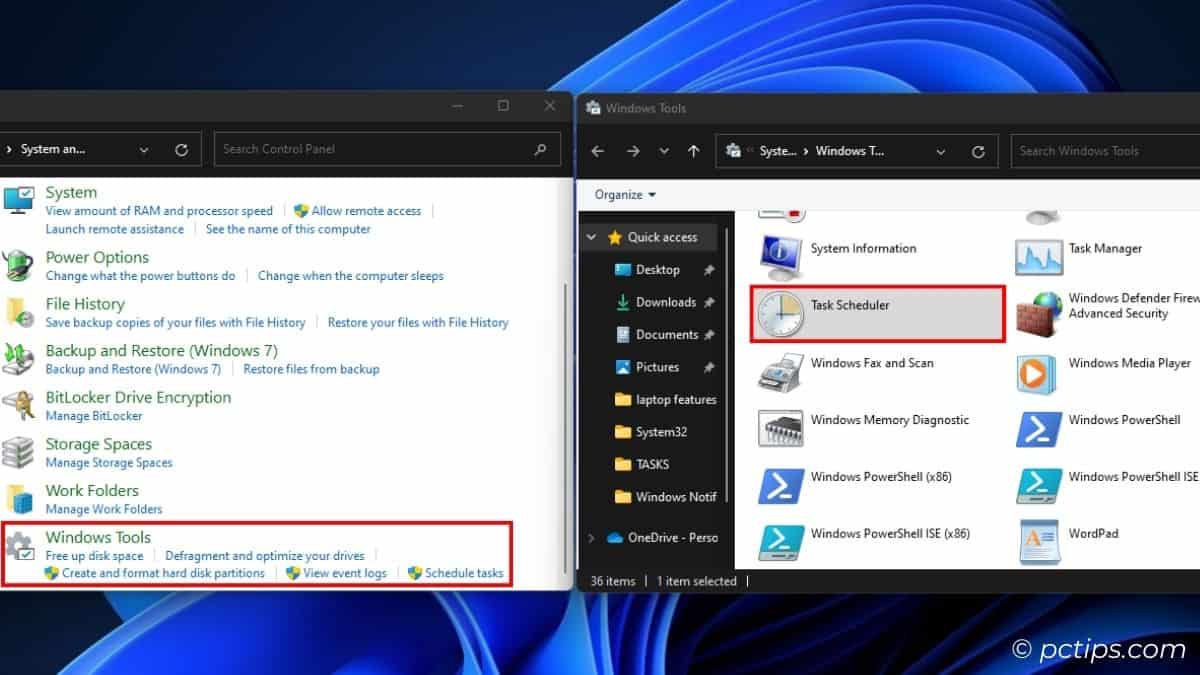
- Control Panel > System and Security > Windows Tools > Task Scheduler
At the end of the day, it’s totally up to you how you’d like to open the application.
Navigating Through Task Scheduler: The Basics
Now that you’re in the window, let’s start getting used to its layout:
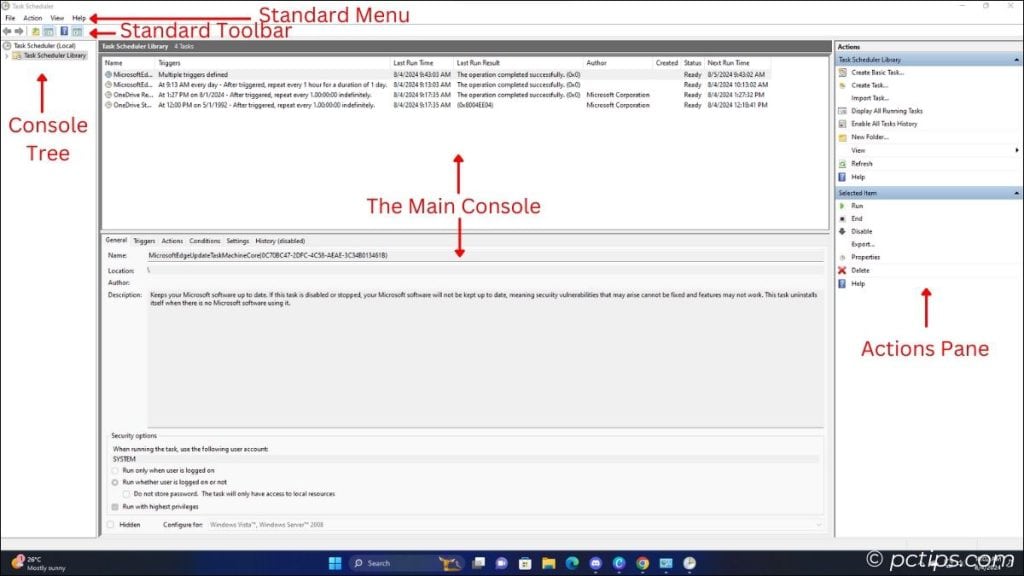
Standard Menu
Just like with any other program, Task Scheduler also comes with its own file menu. It consists of:
- File: Options and Exit
- Action: Lets you run, end, disable, export, delete, or check properties of the tasks
- View: Customize your Task Scheduler window with the available options
- Help: Use this when you’re in trouble (but you won’t need it after reading this article :p)
Standard Toolbar
This menu acts as a shortcut for your Task Scheduler Customization. It comes with:
- Back and Forward buttons: Go back/front from the current to the previous Task Scheduler page
- Up One Level: Come back to the parent directory from child directory
- Show/Hide Console Tree: Hides/shows the left pane
- Help: Takes you the same previous help window
- Show/Hide Action Pane: Hides/shows the right pane
Console Tree
This is the left pane that you’re seeing in the Task Scheduler window.
Many tend to ignore this. But let me tell you that if you want to be a pro in using Task Scheduler, you need to use this pane the appropriate way.
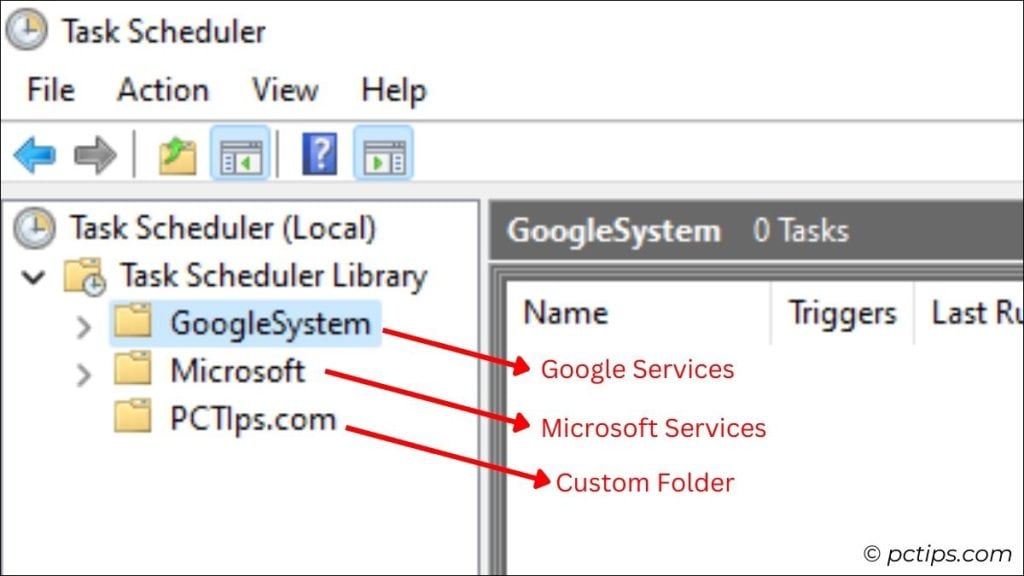
The ‘Task Scheduler’ Library already consists of two default folders:
- GoogleSystem: Tasks that are connected to Google services (e.g.: Google Chrome, Google Drive, Google Updater, etc.)
- Microsoft: Tasks that are linked with Microsoft services (e.g.: Windows Update, Maintenance, Telemetry, etc.)
Now, if you navigate through the folders, you’ll notice that there are already pre-existing tasks running.
Don’t be confused and no headaches. Nobody created them. They are a part of Windows and are operated by default.
You might like reading: Hidden Windows Folders You Never Knew Existed!
The Main Console
This is where you view all your tasks along with their:
- General Info: Name, Location, Author, Description, and also Security Options
- Triggers: Lets you know what action will trigger this task
- Actions: What will happen once the task starts
- Conditions: Specifications that may prevent the tasks to be deployed
- Settings: A few additional settings that you can apply to specific tasks
- History: This is disabled by default. You can enable this from the Actions pane to view the entire history of a desired task.
We’ll look this in detail later when learning how to create task yourself.
By default, the Description bar is disabled. Go to View > Customize > Put a check on ‘Description bar’ > Ok. This bar will show you the number of tasks in the directory.
Actions Pane
This is a complete dedicated panel for the Actions menu that we saw earlier within the Standards menu.
Instead of the Actions menu, I find myself using this the most. And of course, I recommend the same.
From this pane, you can:
- Create basic task: Offers a quick wizard for task creation
- Create Task: A much more advanced dialogue box for task creation
- Import Task: Lets you add a task that you downloaded from a reliable source
- Display All Running Tasks: Shows all the tasks that are presently running
- Enable/Disable All Tasks History: Based on your action, the center pane will show/hide the history
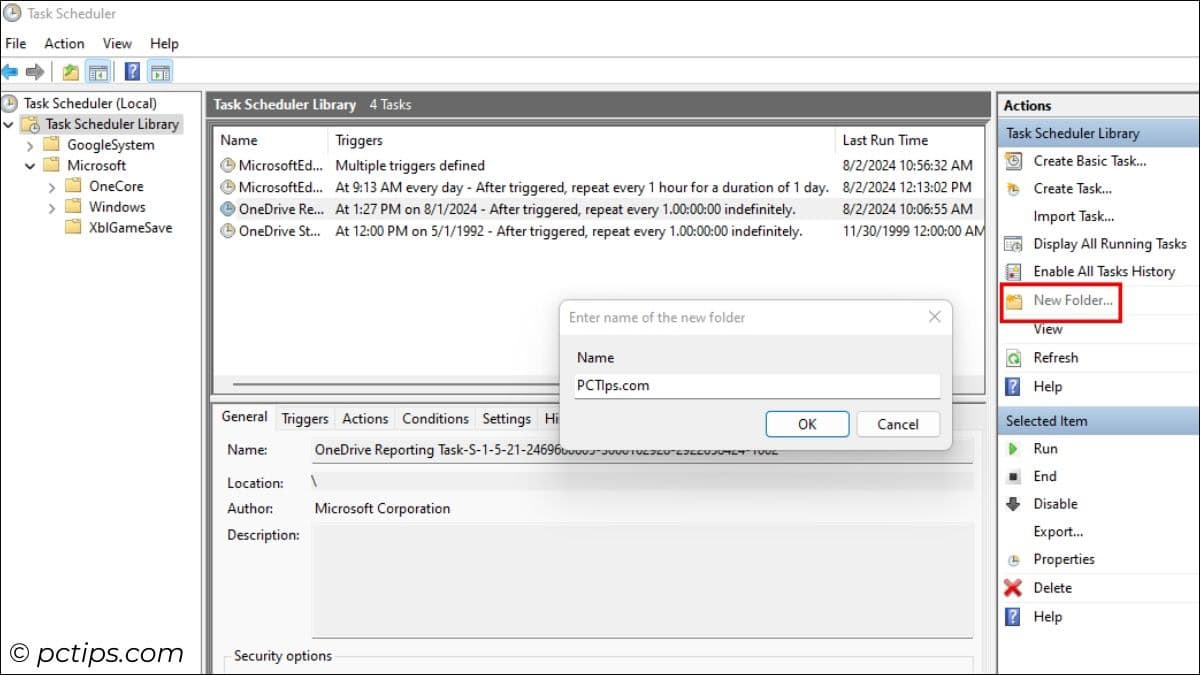
- New Folder: Create a custom folder in the Task Scheduler Library
- View: Lets you customize the columns as well as the Task Scheduler window view
- Refresh: Refreshes the Task Scheduler page
- Help: Use this when you’re in trouble
Along with that, you can even perform actions based on the selected tasks:
- Run: Start a task that’s not running
- End: Stop a task that’s already running
- Disable: Completely disable the task for the time-being (you can ‘Enable’ it later)
- Export: Save this task as a
.xmlfile (you can use it on other Windows PCs for sure) - Properties: View advanced information about the task
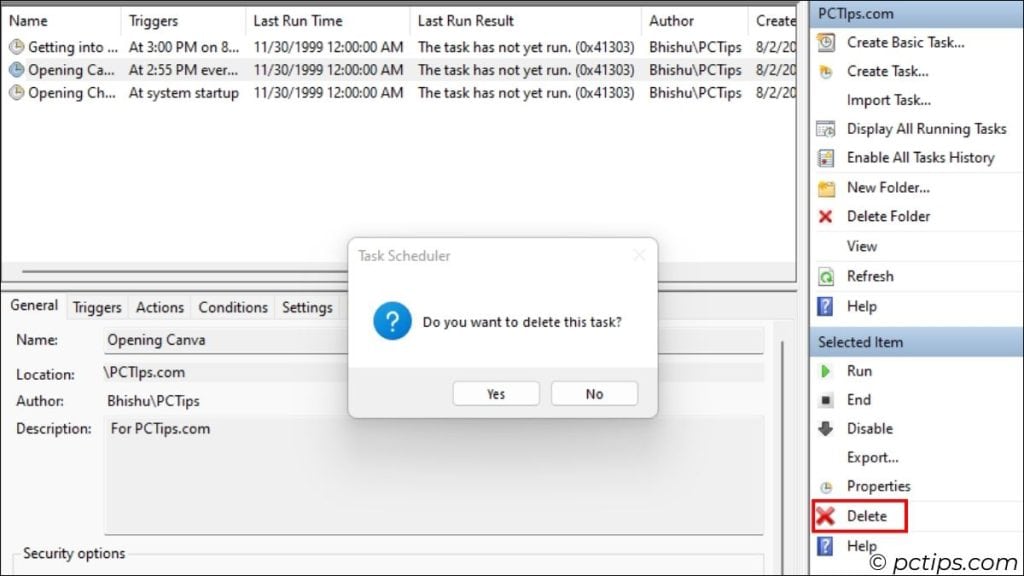
- Delete: Get rid of the task permanently
Now that we’ve learned the basic terminologies and understood what each of the pane as well as the option does, let’s dive into the practical use cases of the Task Scheduler.
Creating Your First Task (BASIC)
I’m an office employee and there are certain apps that I want to launch as soon as I start my PC.
With Task Scheduler, I don’t have to double click or navigate anywhere to open these apps.
Want to open an app at a specific time just like me? Well, here’s you answer:
- Let’s start by creating our own folder. Select New Folder from the Actions pane.
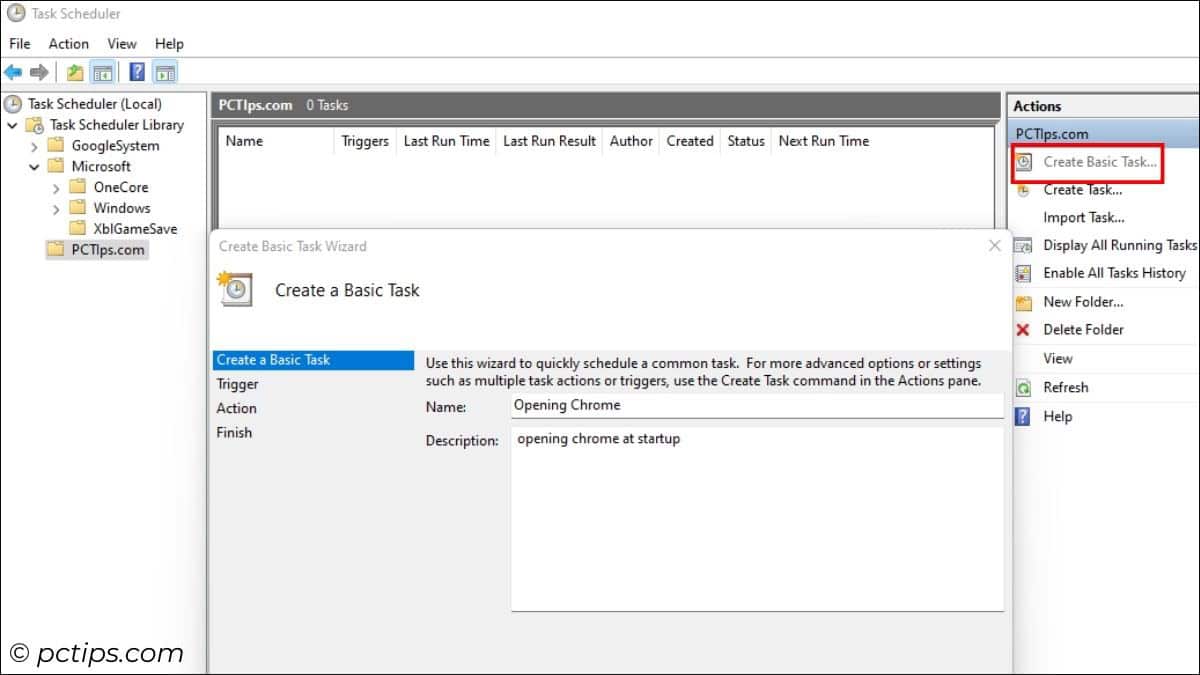
- Now, select the created folder and choose ‘Create Basic Task’.
- Start by giving a name and adding a short description.
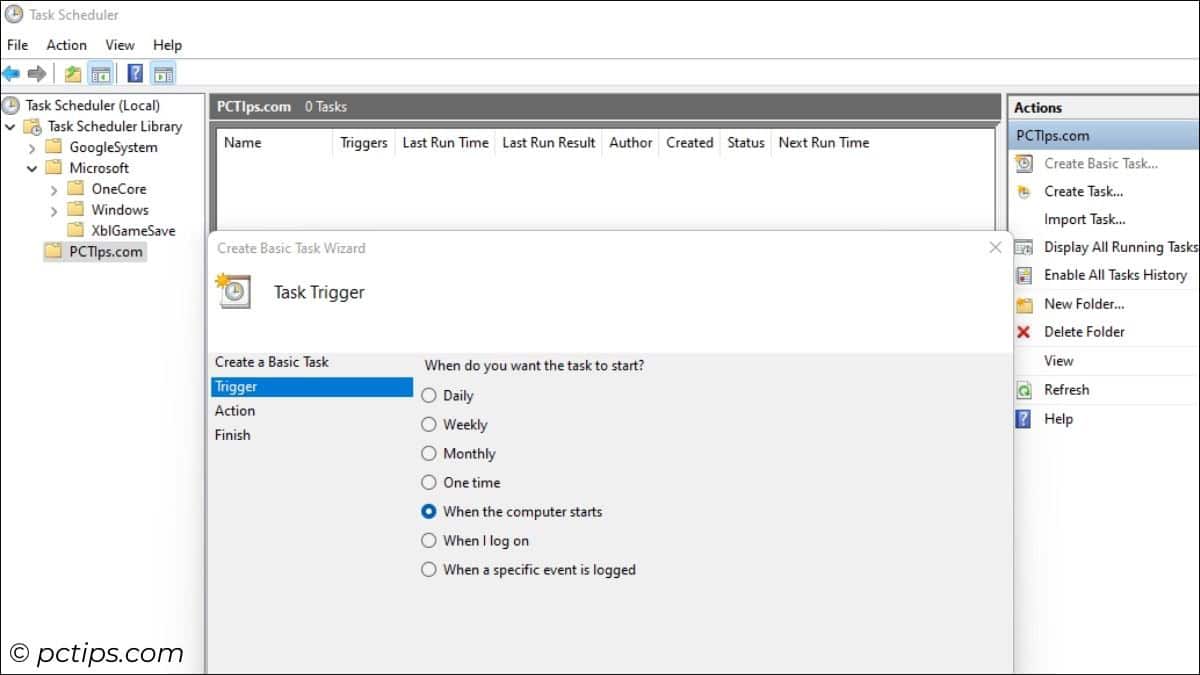
- Choose your trigger. Here, I want my Chrome to start on startup. So, I’ll choose ‘When the computer starts’.
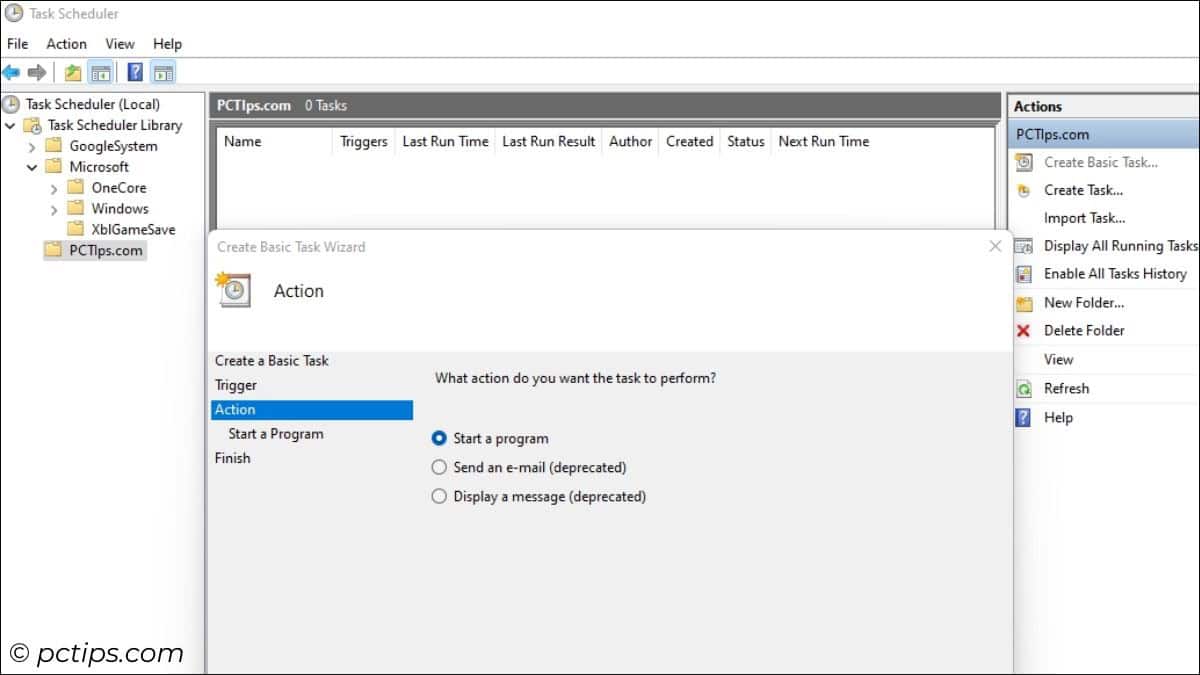
- In Action, you may only choose the first option. The other two (sending an email and displaying a message) are both deprecated.
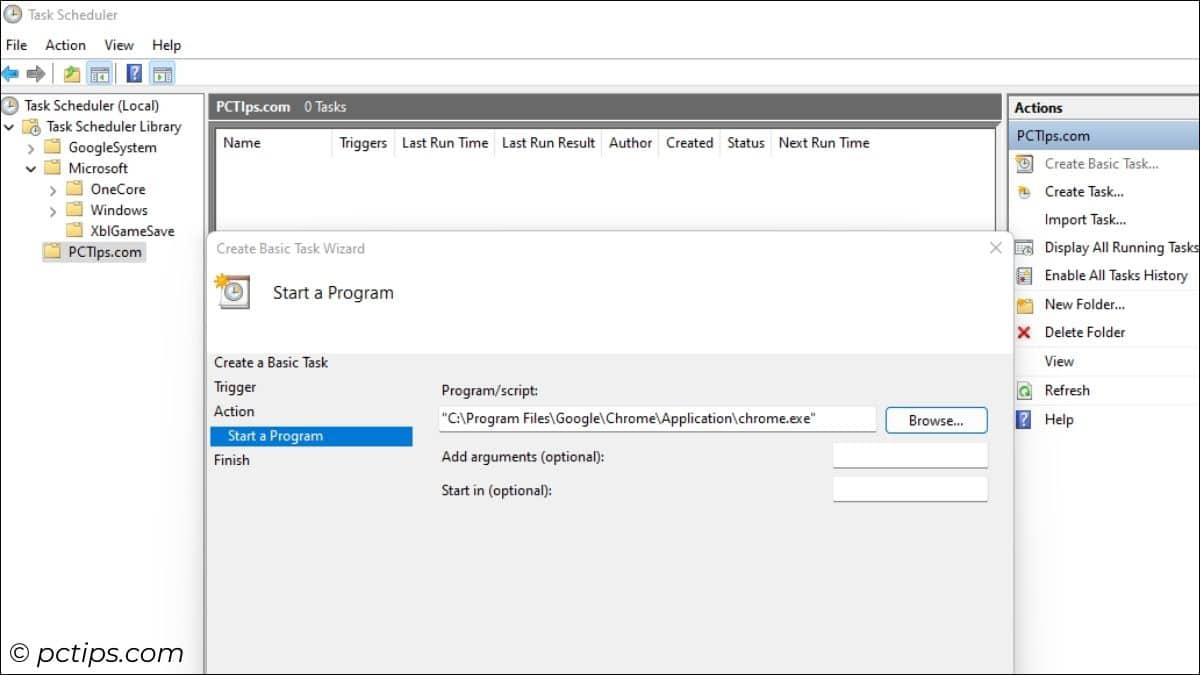
- Hit the Browse button and select the application (here, I’ve selected Chrome).
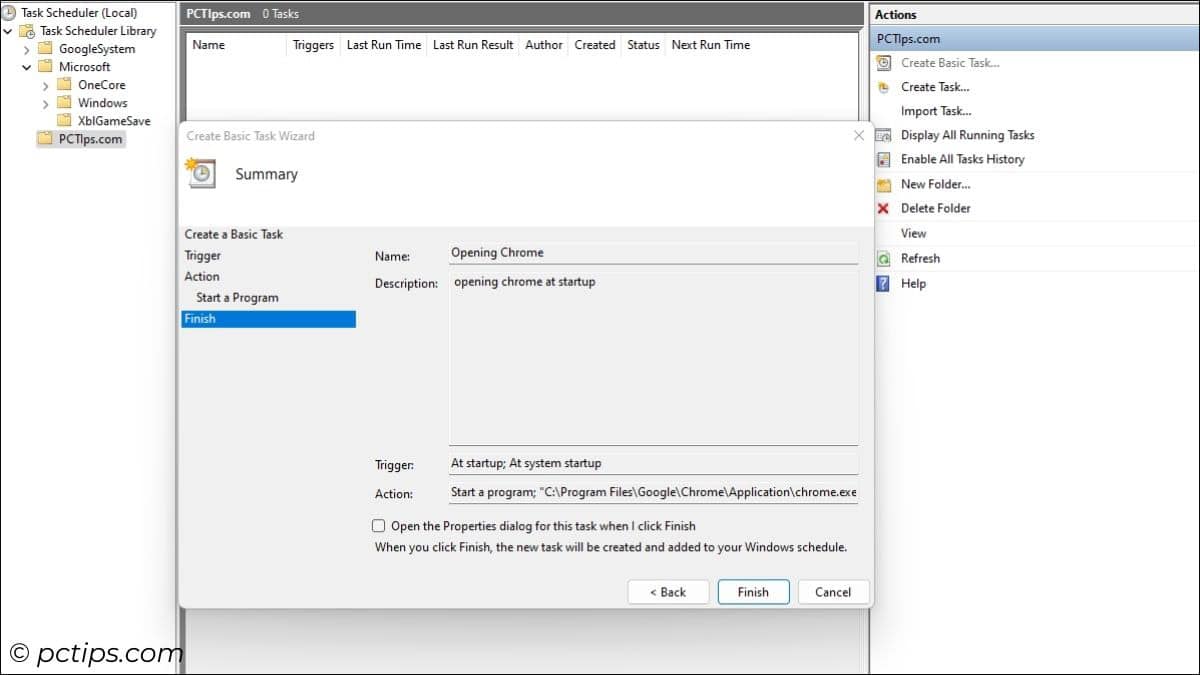
- Verify everything and hit the Finish tab (you can definitely go back and make the changes if you had made any mistake earlier).
- Don’t forget to test. For example, in this case, I will simply restart my PC and see if Chrome starts in startup.
You now have the idea, right? Next, you can start creating simple tasks like these so that they open whenever you need them.
Experiment and let me know if discover something new.
Creating an Advanced Task
Earlier, we saw how easily we created a basic task. But there can be times when you want some additional layer of security or specific conditions for the task to run.
That’s exactly when you should be using the ‘Create Task’ option. Don’t worry! We’ll look into this step-by-step.
- Start by creating a folder and select it before creating the task.
- Add name and description just like we did earlier.
- This time, under Security options, you can change the user or group. For example, I’m going to set this to SYSTEM.
- In case you’ve chosen your user account only, you can even set whether the task would run only when you’re logged in or even when you’re not logged in.
- My suggestion is to tick mark the ‘Run with highest privileges’ option as well.
- Interestingly, you can even choose to hide this task (this time, I’m not going to do this though).
- Also, set the ‘Configure for’ option to Windows 10.

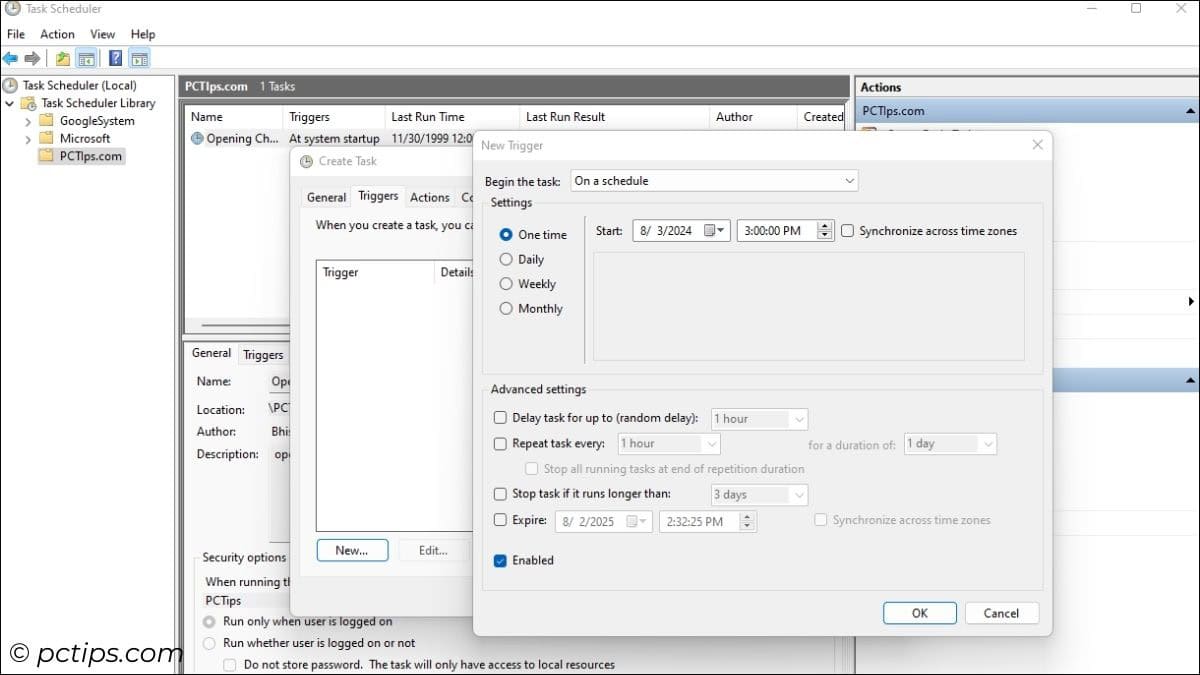
- Move to the Triggers tab and select New.
- Set the ‘Begin the task’ option to when you want the task to be triggered. For example, in my case, I’m running the task only once. So, I’ll let this be at default –‘On a Schedule’.
- Then, I’m gonna pick ‘One time’ and add the date and time as needed.
- You can now make additional changes from the Advanced settings before pressing Ok. Since I’ve nothing to do with it, I’m going to let those be set to default.
- Verify in the Create Task window before moving to the next step. You can use the Edit button to make changes.
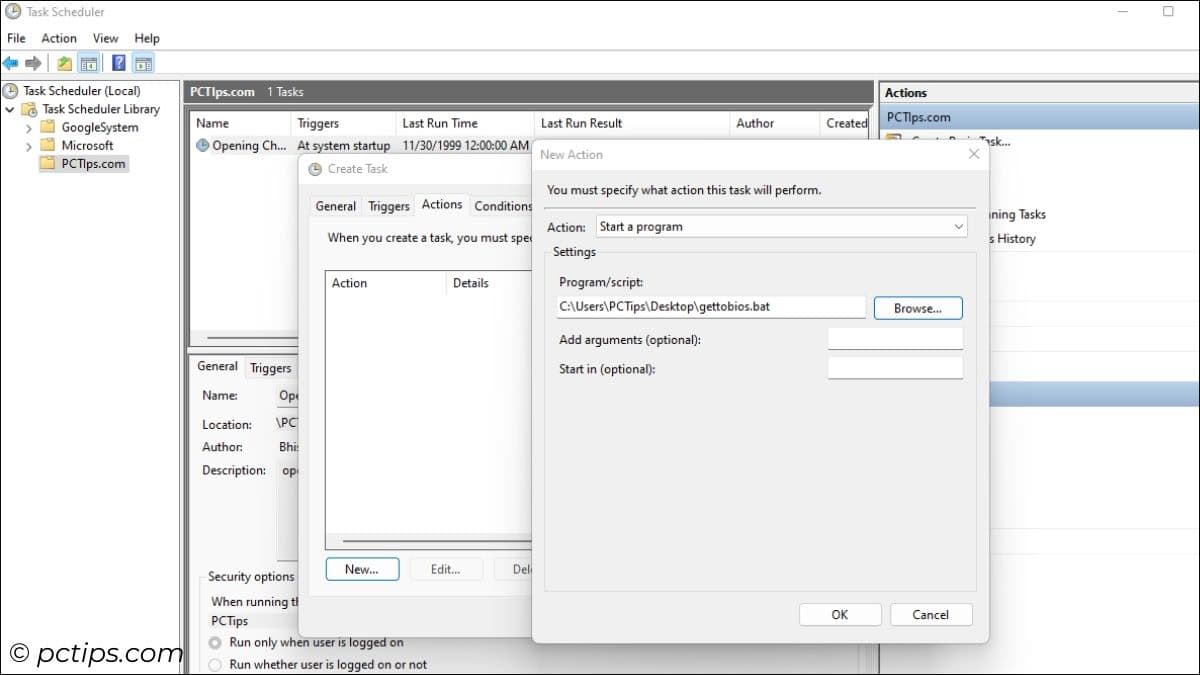
- In the Actions tab, hit the New button. No need to change the ‘Action’ drop-down. Like I mentioned earlier, you can only start a program with Task Scheduler.
- Pick a program/script and hit Ok.
- You can add more programs if you like.
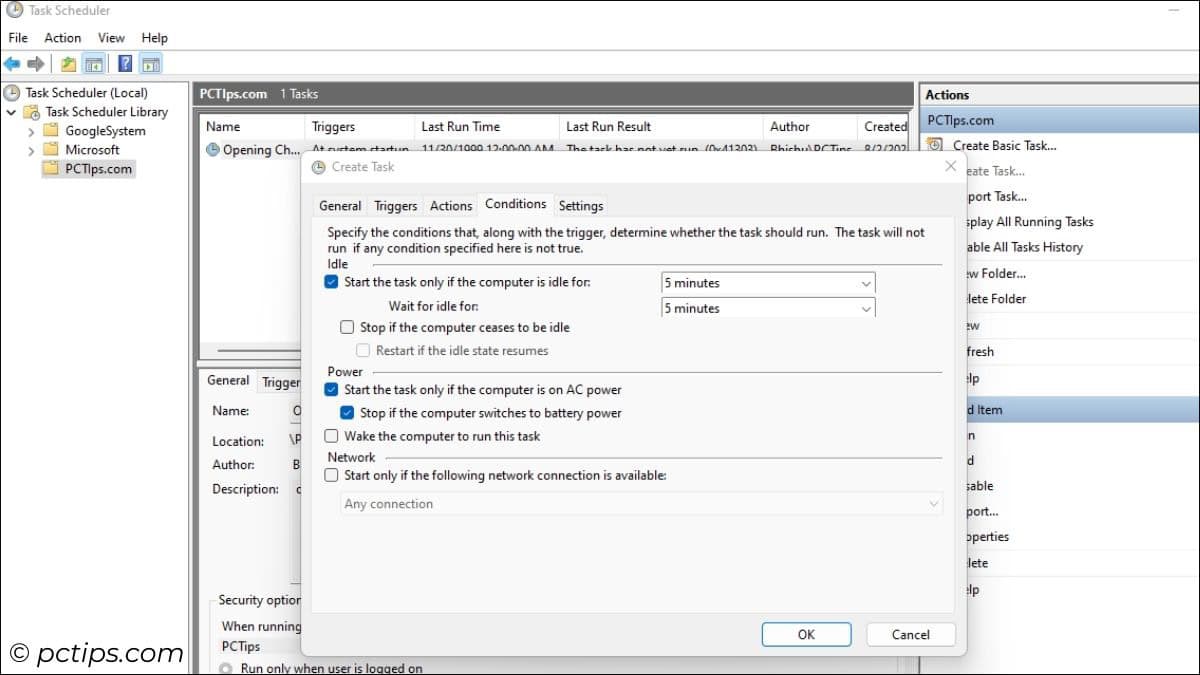
- Now, let’s set required conditions. I certainly don’t want to enter BIOS when I’m at a middle of the task.
- In the Conditions tab, I’m going to start the task only if the computer is idle for 5 minutes.
- And also it will only wait for it to be idle for 5 minutes. By then, I should have completed my task for sure. You can follow your own approach in this one.
- Laptop users can even make further changes. You can let the task to start only if it’s plugged in and stop the task once it’s in battery mode.
- Similarly, you can even add a condition where the task only gets executed when you’re in a certain network. I suggest not to use in public Wi-Fi.
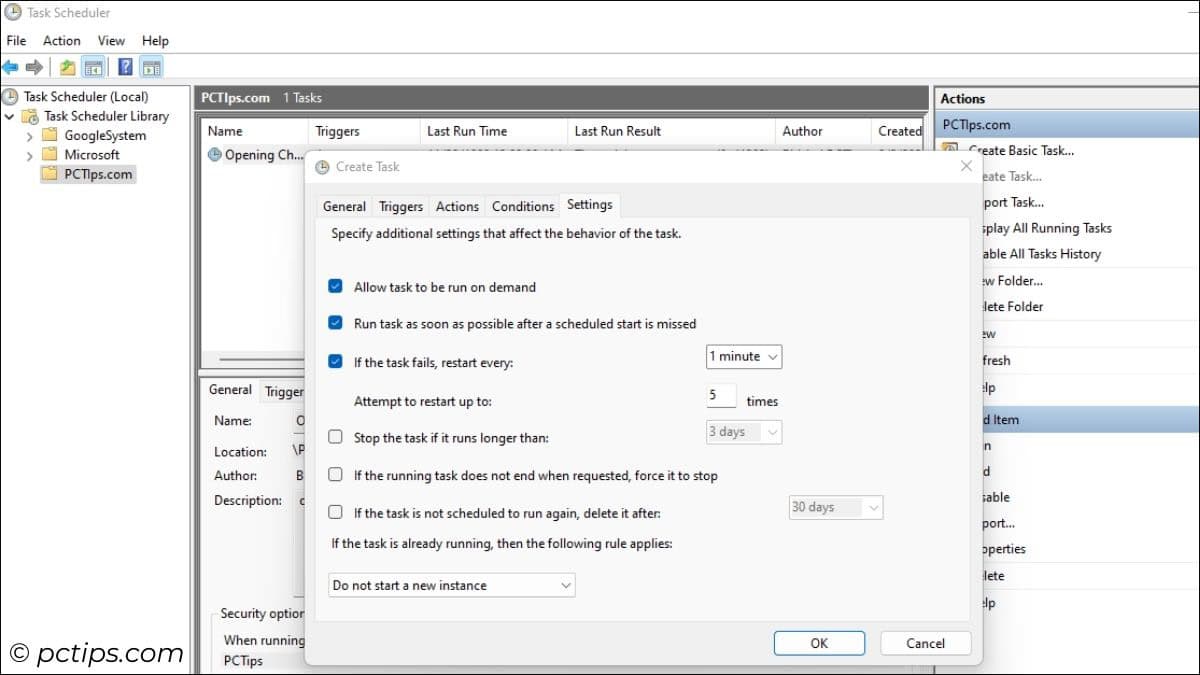
- In the Settings tab, I prefer these to be enabled – Allow task to be run on demand, Run task as soon as possible after a scheduled start is missed, and If the task fails restart every 1 minute 5 or more times.
- Once everything is done, hit Ok. The task should run based on the trigger and action that you’ve set.
You Can Even Export Tasks!
So, you’ve created a new task and now you’d like to use this on another PC? Absolutely, that’s 100% possible!
All you have to do is select the task and pick Export from the right pane (under ‘Selected Items’). Choose the destination and save.
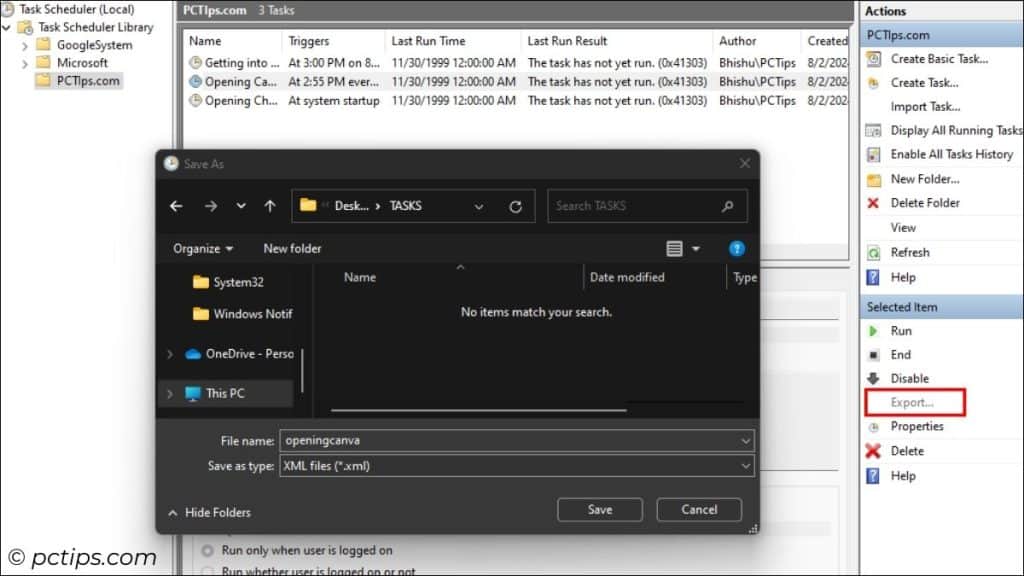
As mentioned earlier, it will save the task as an .xml file.
Here’s How to Import Tasks
Now, you can log into the other computer and easily import this .xml file.
Let me show you how this is done:
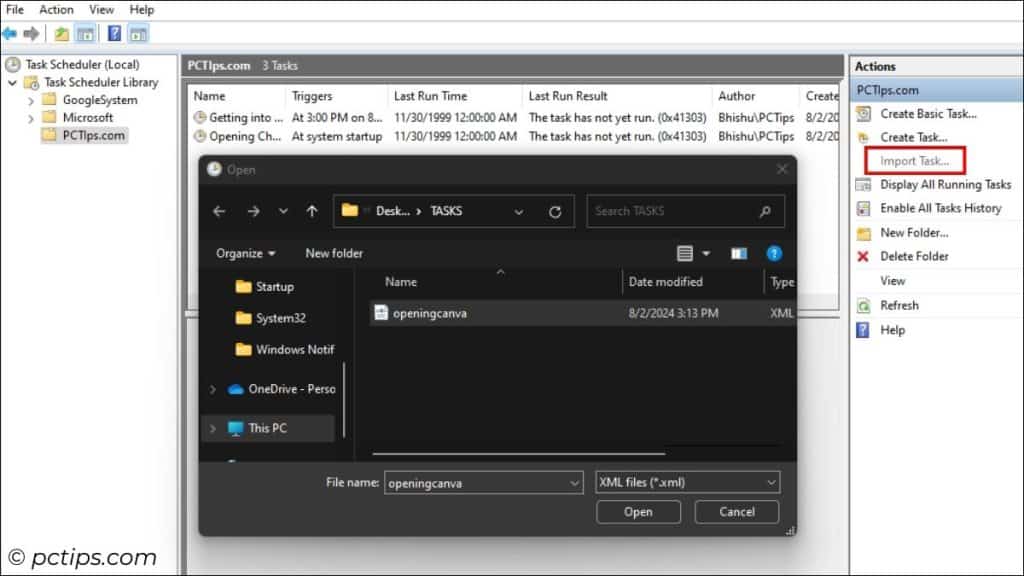
- First, select the folder inside the Task Scheduler Library.
- Choose Import Task from the right pane, select the
.xmlfile, and hit Open. - Review each tab for necessary changes before clicking Ok.
- Wait for the task to run.
Monitoring Your Tasks
Once you’ve mastered Task Scheduler, I’m pretty sure you’re going to create tons of tasks. And managing them can be a little tedious.
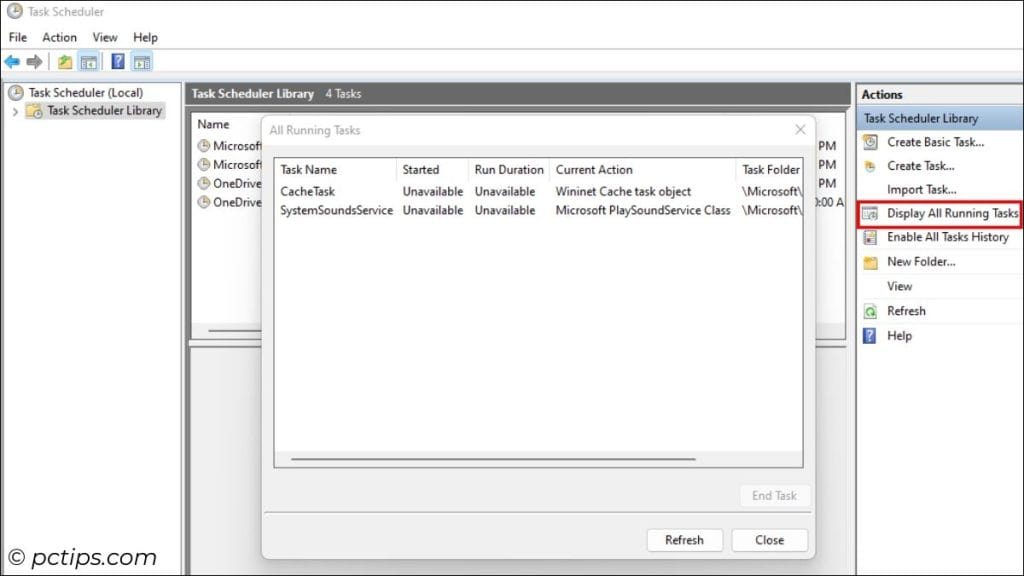
To monitor which tasks are currently running, hit the Display All Running Tasks from the Actions pane.
But if you wish to monitor each task’s status, result, triggers, actions, etc., you need to visit the respective folder and select the task manually.
Unfortunately, Task Scheduler doesn’t offer any search box to make things easier. So, you’ll have to manually visit each folder yourself to manage them.
That’s also the reason why I recommended creating folder in the first place.
Triggers, Last Run Time & Result, Author, Created Date, Status, and the Next Run Time are all shown in columns on the upper part of the Main Console.
To view detailed information (ones that were added when the task was first created), you can check the lower part of the Main Console.
However, I’d like to go a step further to view the properties. Why? So that I can view as well as make changes if required.
Making Changes to the Tasks
As you might have guessed it, the Main Console doesn’t allow editing the tasks.
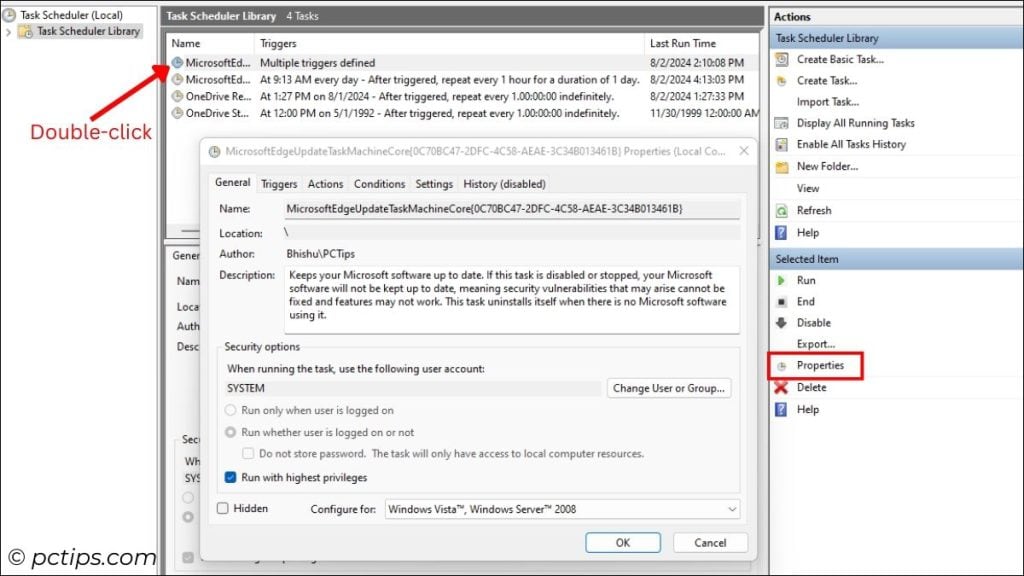
To make changes, you’ll have to open the Properties.
Yes, selecting the dedicated option from the Actions pane is a great idea. However, you can even double click the task and the same dialogue box pops up (all up to you!).
Now, you can make changes just like how you had created the task earlier. It’s that simple!
Increase Disk Space Using ‘Disk Cleanup’ Feature
Did you know? The more tasks you create, the more disk space is utilized.
Well, if you think you’ve created too many unwanted tasks, it’s better that you delete them.
Simply select the task one by one and hit the Del key or choose the Delete option under Selected Item in the Actions pane.
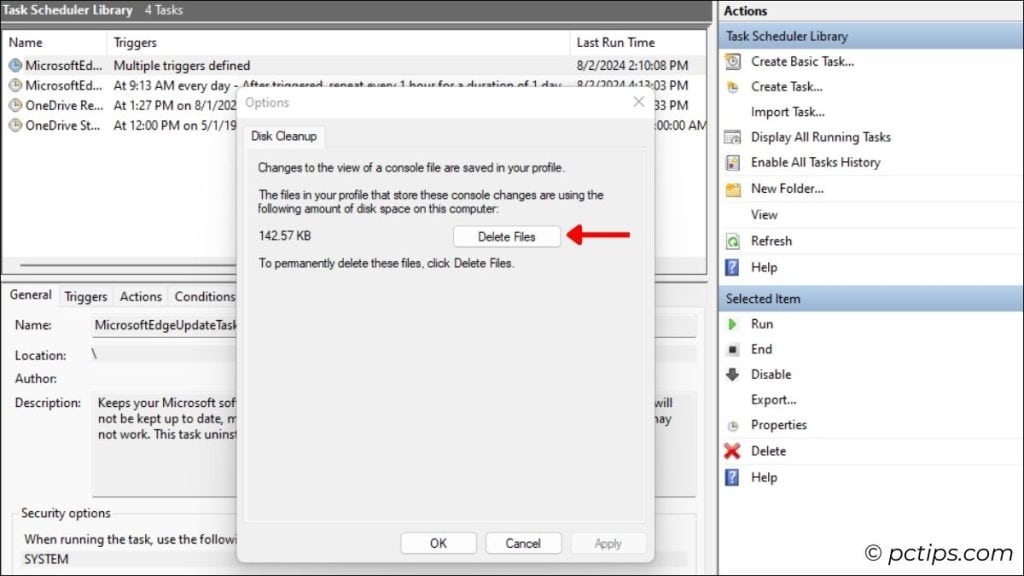
Otherwise, here’s a hidden Task Scheduler feature that’s going to save you life:
File (from the ‘Standard Menus’) > Options > Delete Files
You might want to read: Free up more than 100 GB+ disk space
Wrapping Up
So, my fellow readers, STOP WASTING YOUR TIME just to open up a certain program or run batch script at a specific point in time!
Let go. No need to remember the task you need to perform in the near future.
Windows has always got these cool features (like Task Scheduler) that help you in different points in your everyday life.
Now that you’ve learned how to use Task Scheduler, try creating different and unique tasks on your own.
And don’t forget to share your favorite ones in the comment section below. I’d love to hear from you!
Can I use the task scheduler to prevent certain Norton 360 operations from slowing down or interrupting what I really want to be doing?
Can it be used to do an automatic Defrag, or run virus scans...etc.....
Is there some way I can find a book on how to get all these little tricks.Im filling out many applications for work and would like to file them to know witch ones I have filled out.A guy who knows not much about computers.
Hello there Matthew, you're at the right place! You don't need a book or anything like that. We at PCTips.com are trying our best to help users like you (who have limited knowledge about computers). We are publishing article every single day and I'm damn sure you'll love the posts here. Bookmark our site and I promise that we're going to change your digital life for sure. But if you're seeking help only regarding 'Task Scheduler'. I've written scripts for Rick above (you can read the comment and follow the provided link). And if you can be more specific on the tips and tricks you're looking for, I'd love to help you out!
Hey Rick, automating tasks like defrag, virus scans, and other Windows operations is definitely possible using Task Scheduler. While it might seem daunting to write batch scripts from scratch, there's no need to start from zero. With a bit of research, you can find pre-written scripts online. If you need help with particularly these two tasks, I’ve got you covered: 1. Open Notepad. Copy and paste the script provided here. (Let me know if you want more) 2. Save the file as '.bat' (for e.g.: automaticvirusscan.bat'). 3. Launch Task Scheduler and create task (fill in the details as mentioned in the article). 4. Make sure the 'run with highest privilege' option is check-marked. 5. When choosing the Program/Script, select the bat file that you just created. It's that simple! Just let me know if you run into any issue.