20 Power User Secrets for Mastering Windows Task Manager
Last Updated:
Task Manager is one of those tools you think you know—until you really dig in.
It’s not just Ctrl+Alt+Delete anymore!
Windows 11’s Task Manager is PACKED with power user secrets that’ll make you the master of your PC.
Disclaimer: Some shortcuts or locations might be different on older versions of Windows. This was tested on the latest Windows 11 23H2.
Let’s jump in!
The Ultimate Shortcut
Ctrl+Shift+Esc. Task Manager appears like magic!
But for me, the ultimate shortcut is Windows key + X, then T. Memorize this and thank me later.
I’m so used to the Win+X menu for accessing various tools that I can open Task Manager at lightning speed this way!
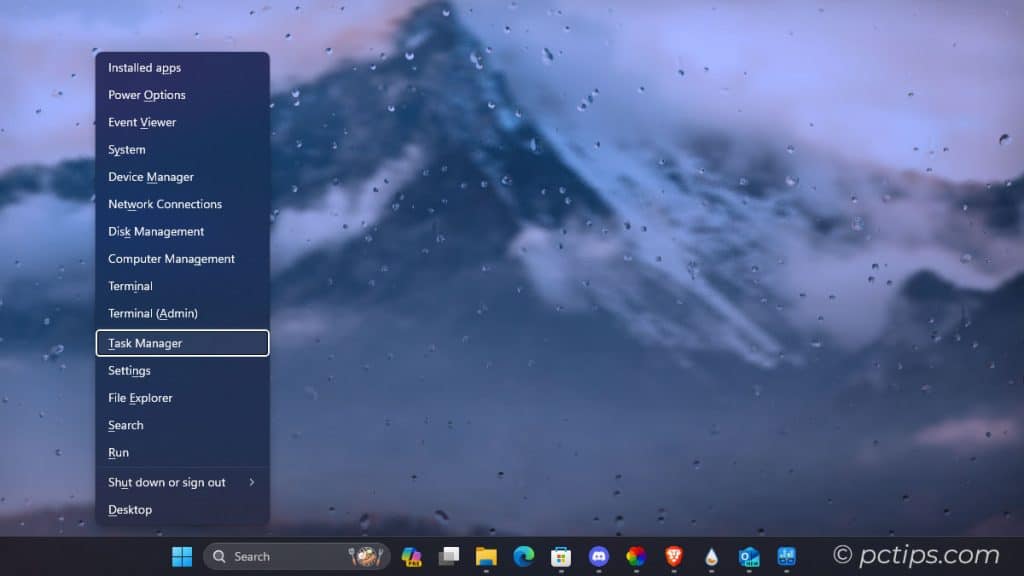
Of course, there are plenty of other ways to open Task Manager.
Here are a few more:
- The Classic Three Finger Salute: CTRL+ALT+DEL, then select Task Manager
- Right-click the Taskbar, then Task Manager
- Start or Run (Win+R) > taskmgr
- Type ‘taskmgr’ in the File Explorer address bar and hit Enter
- Create a shortcut to taskmgr.exe (%windir%\system32\taskmgr.exe)
Speaking of keyboard shortcuts, here’s a bonus tip that I find incredibly useful: CTRL+C!
When you’re in Task Manager, you can select any text (like a process name or details) and hit CTRL+C to copy it to your clipboard.
Paste that info into an email, forum post, or tech support chat to give others a crystal-clear view of what’s going on under the hood.
Supercharge Your Processes Tab
Many folks don’t realize everything the Processes tab can do.
Right-click any column header and enable “Command line” to see what switches and parameters a program was launched with.
Mega useful, for troubleshooting!
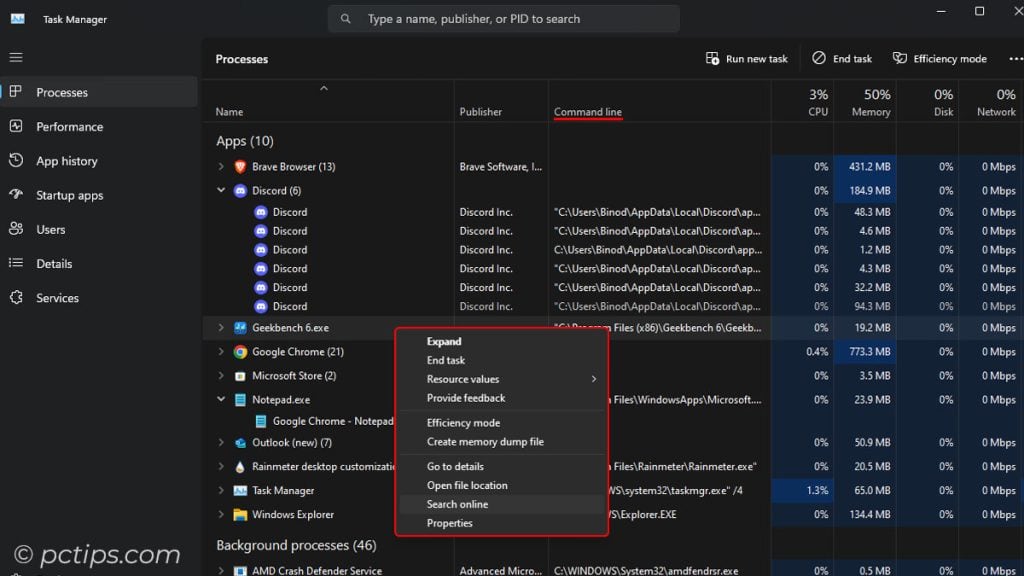
But wait, there’s more! The Processes tab is packed with hidden gems:
- Search online: Right-click a suspicious process and select “Search online” to quickly look it up.
- Group By Type: Use the “Group by type” option to organize processes into categories like Apps, Background processes, and Windows processes.
- Bring to front: Right-click an AWOL process and select “Bring to front” to summon the window to the foreground.
- Toggle Percentage and values: Right-click on the column header, hover over “Resource values“, and take your pick
- End task: The classic. Kills the process with extreme prejudice.
- Create dump file: Captures a snapshot of the process’s memory. Invaluable for debugging!
- Open file location: Whisks you away to the executable’s folder. Perfect for spotting imposters.
Master these techniques and you’ll be the Task Manager titan of your office! (Your coworkers will be lining up for tips.)
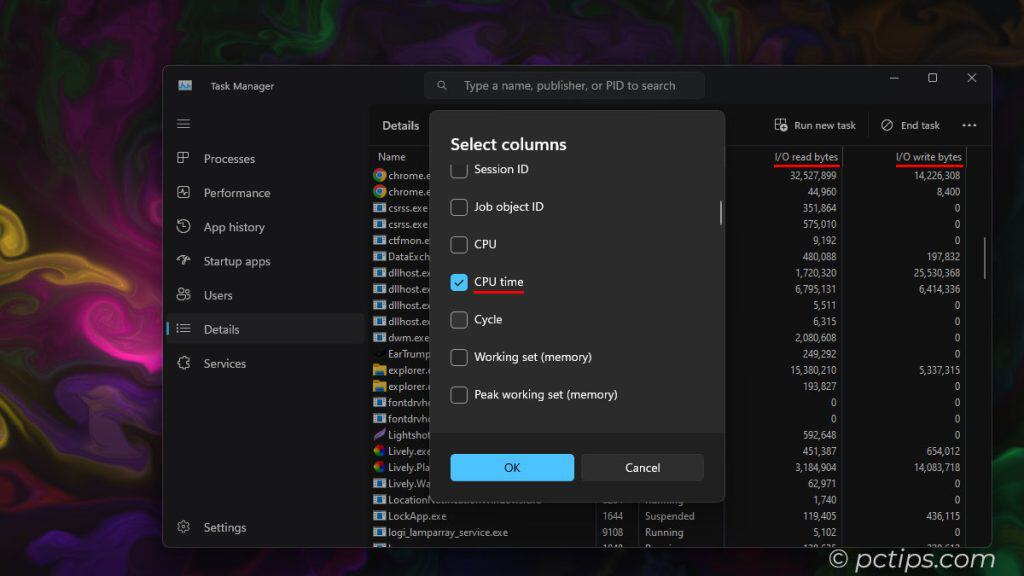
More Columns, Please
The Details tab is where the real magic happens.
It’s a gold mine of information for power users and troubleshooters. At first glance, it might look like a wall of gibberish.
Right-click any column header and you’ll see a big list of extra columns you can enable.
Way more than what you see on the process tab.
I like to add “CPU time” and “I/O reads/writes” to track down resource hogs.
Real-Time Disk Monitoring
Speaking of columns, the “I/O write bytes” column in the Details tab is a hidden gem for monitoring your disk usage in real-time.
If you see a process constantly writing data, it could be the culprit bogging down your whole system.
You can also use the “I/O reads” and “I/O other” columns to get the complete picture of how processes are interacting with your disk.
Perfect for troubleshooting dreaded 100% disk usage issues.
Harness the Power of the Performance Tab
The Performance tab is your mission control for system resources. CPU, memory, disk, network—it’s all here. (And it’s not just pretty graphs!)
This is your go-to spot for hunting performance bottlenecks.
System feeling sluggish? Pop open the Performance tab and start sleuthing!
Here’s what to look for:
- CPU Graph: Pinned at 100%? Processor bottleneck. See which tasks are hogging the cycles.
- Memory Graph: “In use” close to total RAM? Memory bottleneck. Upgrading might help.
- Disk Graph: “Active time” hitting 100%? A Hard drive can’t keep up. Consider an SSD.
- Ethernet/Wi-Fi Graphs: Maxed out? Network bottleneck. Upgrade hardware or call your ISP.
The key is to look for sustained high usage.
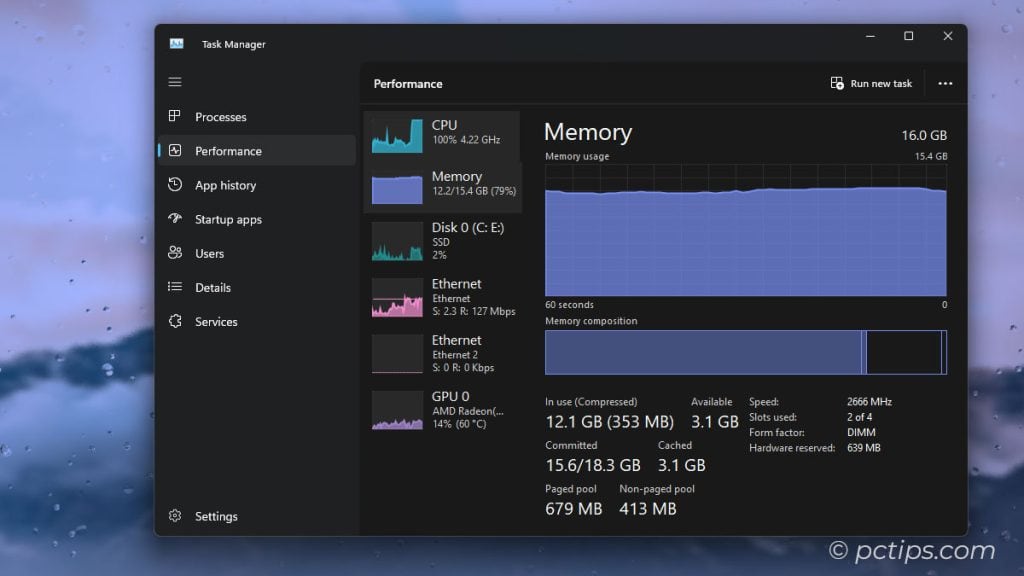
Brief spikes are normal, but if a resource is constantly pegged, you’ve found your bottleneck. (Gotcha!)
Oh and see that “Uptime” counter in the CPU tab? If it’s been months, it might be time for a reboot my friend
Double-Click Magic
Double-clicking any field in the Performance tab creates a floating widget.
The same trick works for any graph on the Summary page.
I often have these floating widgets running on my second monitor to get a closer look at resource usage spikes without the clutter of other graphs.
See All Your Cores
By default, Task Manager groups your CPU usage into one graph.
But if you want to see how each individual core is performing, just right-click the graph and select “Change graph to > Logical processors“.
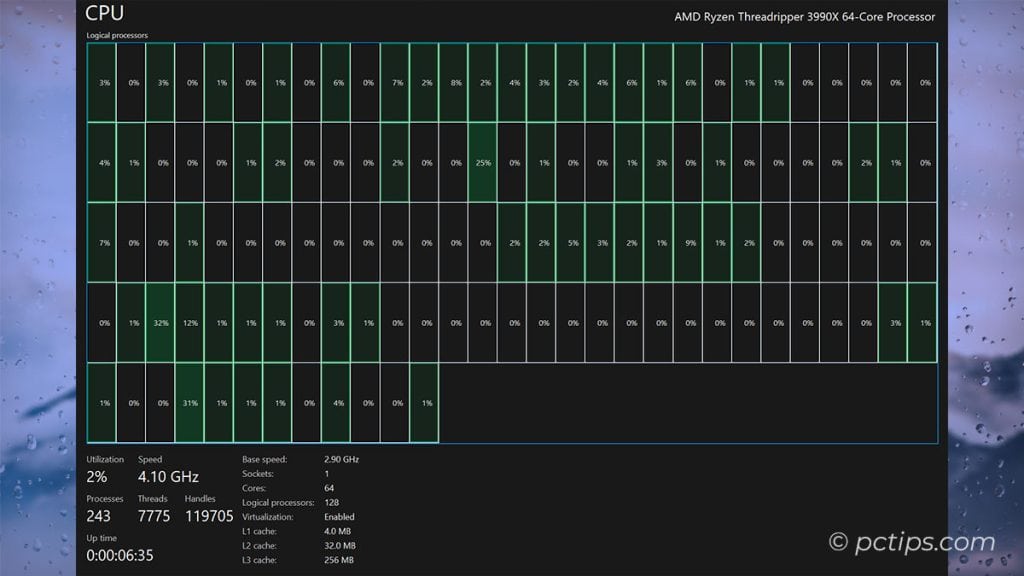
Now you’ve got a separate graph for each core (or thread if you’ve got a fancy-pants processor with hyperthreading).
This is super handy for spotting if a single core is getting maxed out while the others are just chillin’.
Check GPU temperature
Gamers and video editors, this one’s for you.
Task Manager can keep tabs on your GPU temperature!
Just head to the Performance tab, select your GPU in the left sidebar, and – you’ll see the current temp.
If it’s pushing past 80°C under load, it might be time to check your cooling or consider undervolting.
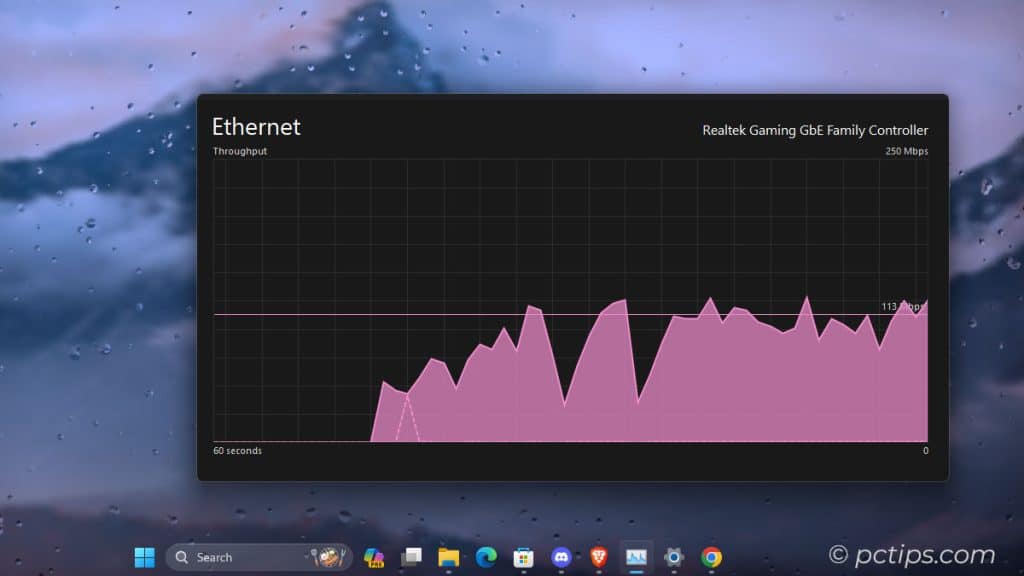
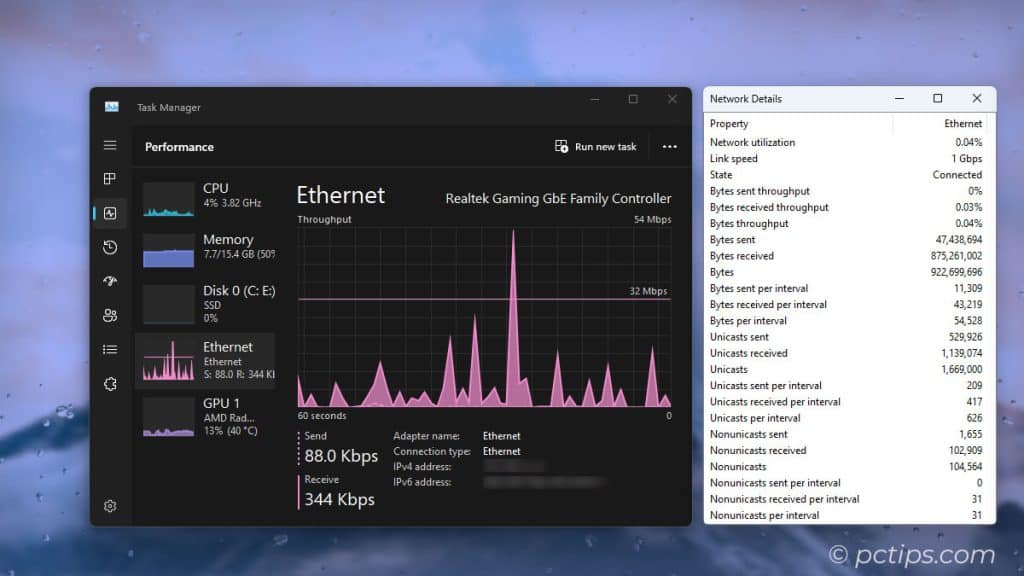
Get Network Insights
Click on your Ethernet or Wi-Fi adapter in the left sidebar.
You’ll be greeted with a real-time graph of your network usage.
But the real magic happens when you right-click the graph and select “View network details“.
This opens up a whole new world of network insights!
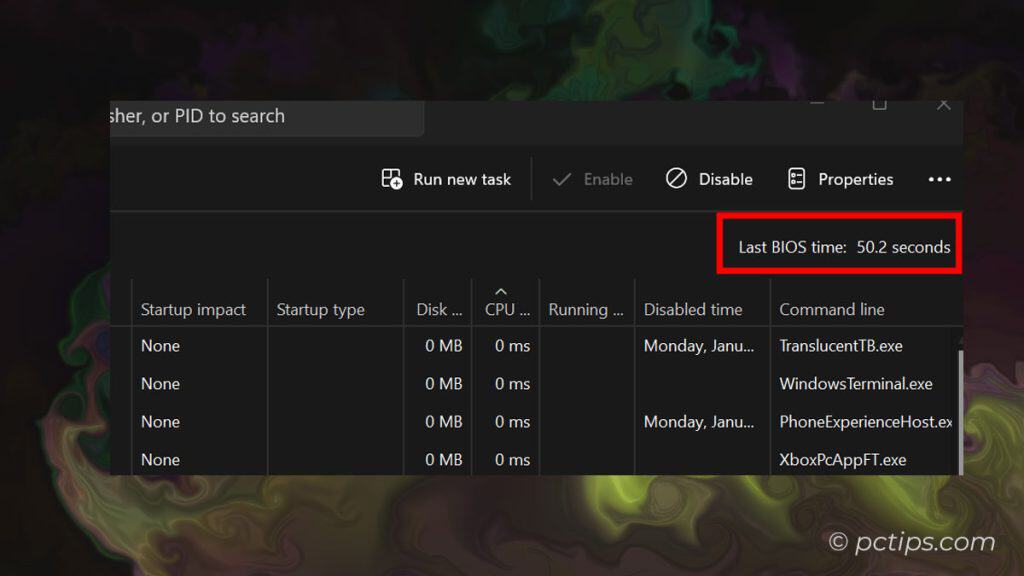
Measuring Boot Speed
Want to know exactly how long your PC takes to boot up?
Head over to the Startup.
Look for the “Last BIOS time” entry at the top – this tells you in seconds how long your BIOS/UEFI takes to initialize before handing it off to Windows.
If this number is high (over 10-15 seconds), there could be a problem with your hardware or BIOS settings. Time to investigate!
Startup Speedup
While you’re in the Startup tab, look for any unnecessary programs that launch on boot.
Disabling resource-hogging startup items can dramatically improve boot times and overall system performance.
To disable a startup item, right-click it and choose Disable.
Pay close attention to the “Startup impact” column – anything marked as “High” is worth scrutinizing.
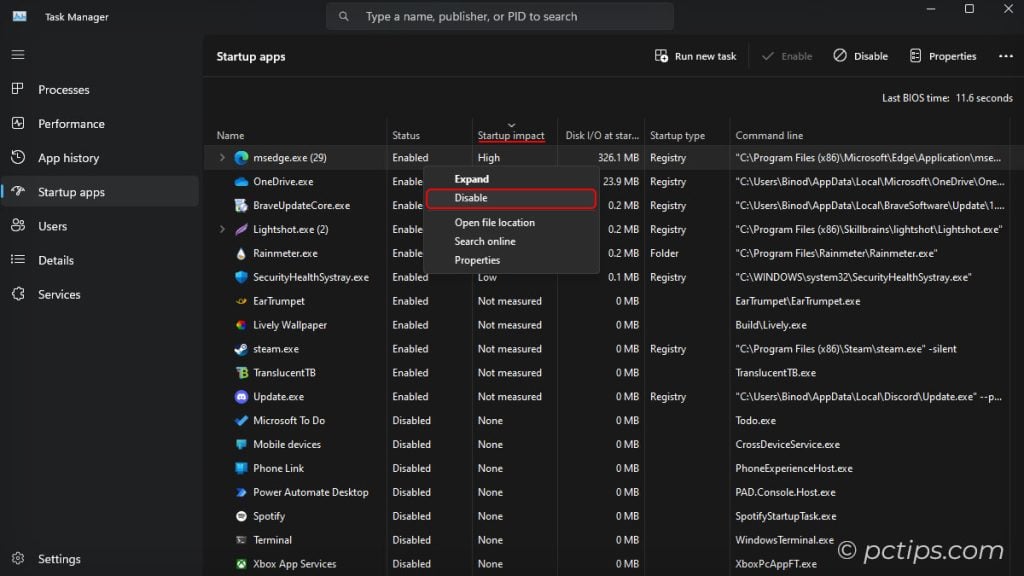
You can also right-click an item to open its file location or check its properties. Handy for investigating mysterious startup entries!
I find other columns like “Disk I/O at startup“, “Startup type“, and “Command line” very useful for optimizing the boot process further.
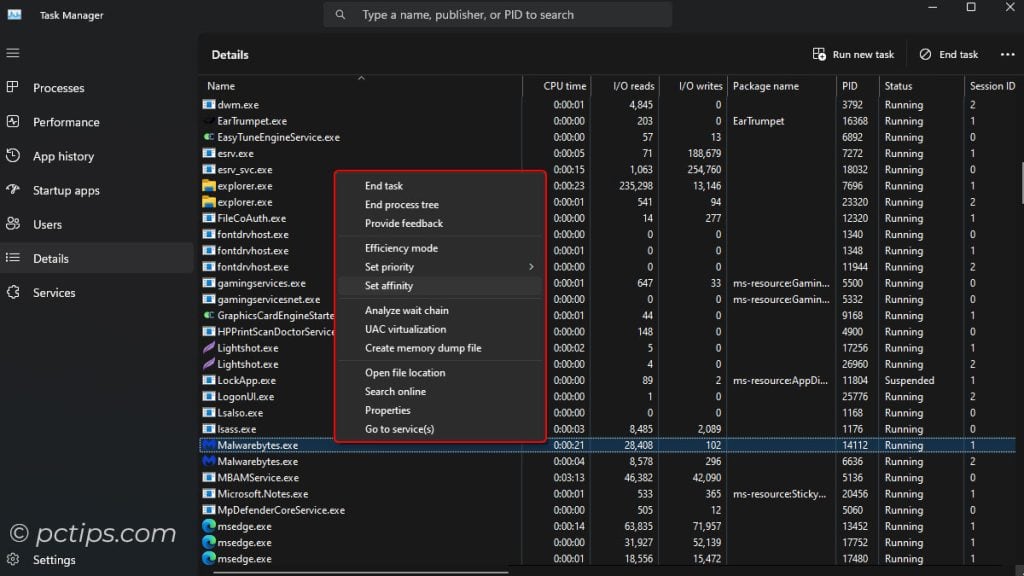
Fix Frozen Apps
Ever had an app freeze on you, leaving you staring at a spinning pinwheel of death?
First, switch to the Details tab and find the stuck process. Then, right-click it and choose “Analyze wait chain“.
This will show you what’s causing the hang-up.
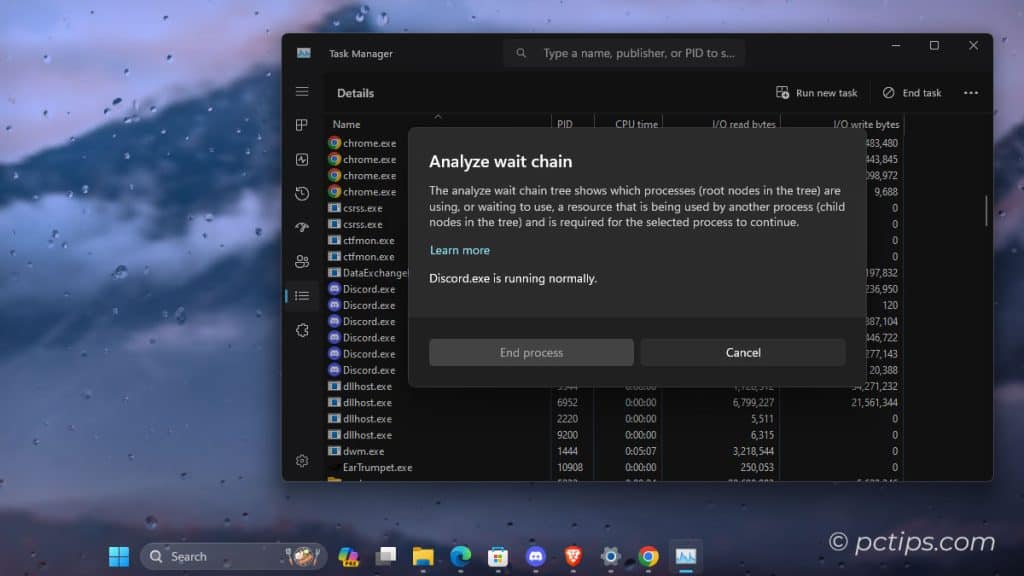
Armed with this info, you can close the offending processes and get back to business.
Or, if all else fails, you can always go nuclear with “End process tree“.
Just switch to the Details tab, right-click the stubborn process, and choose “End process tree“.
Hunt Down Resource Hogs
Some programs spawn a bunch of sub-processes that can be tricky to track down.
To see everything an app is running, click the arrow next to its name in the Processes tab.
Sorting by resource usage makes it easy to pinpoint which processes are bogging things down.
Found the hog?
Right-click it and select “End task” to put it out of its misery. Instant performance boost!
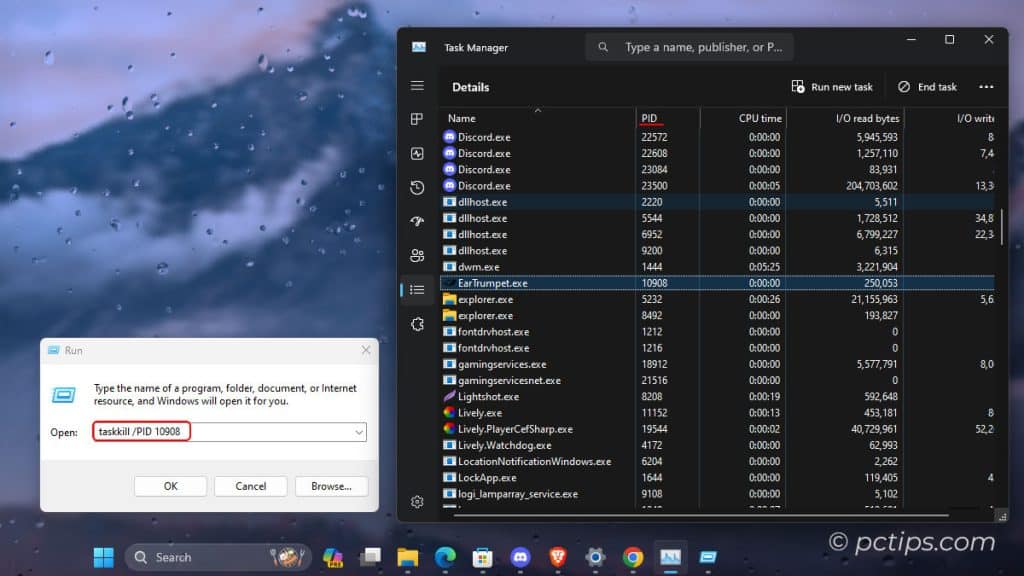
PID Power
Noticed that PID column in the Details or Process tab?
It stands for Process Identifier, and it’s crazy useful for advanced troubleshooting.
You can type a PID in a command prompt to control that process directly.
Wanna end process 10908 without even opening Task Manager?
Just hit Win+R, type “taskkill /PID 10908” and you’re done.
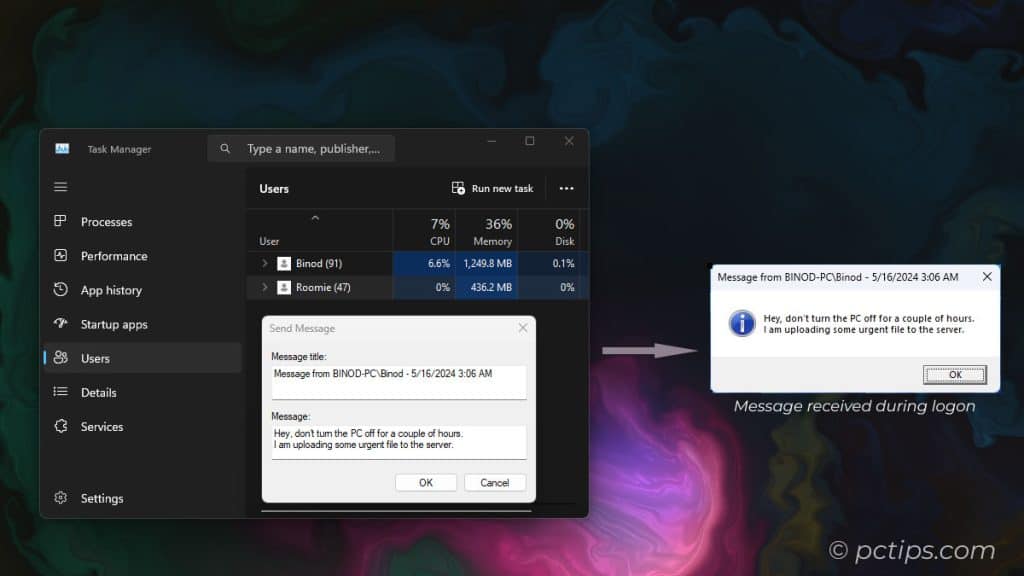
Sending Messages to Other Users
Under the Users tab, you can right-click another logged-in user and send them a quick message.
Great for telling your kid/spouse/roommate to stop hogging all the bandwidth downloading Linux ISOs without leaving your chair.
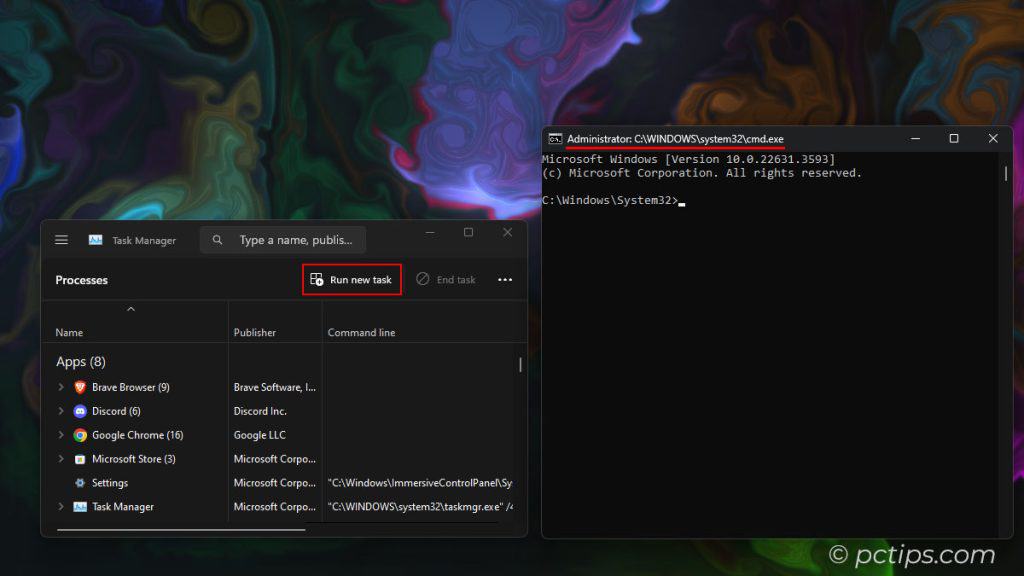
Get Admin Rights
The “Run new task” option lets you spawn new processes, right from Task Manager with admin privilege.
But did you know that Ctrl+clicking this option launches an elevated command prompt.
Handy for quickly opening tools to troubleshoot whatever issue Task Manager has helped you sniff out.
Choosing the Default Tab
Task Manager always opens to the Processes tab.
But what if you’d prefer it to start on another tab, like Performance or App History? Easy!
Click the Settings icon (the little gear in the bottom-right corner), then choose your preferred tab from the “Default start page” dropdown.
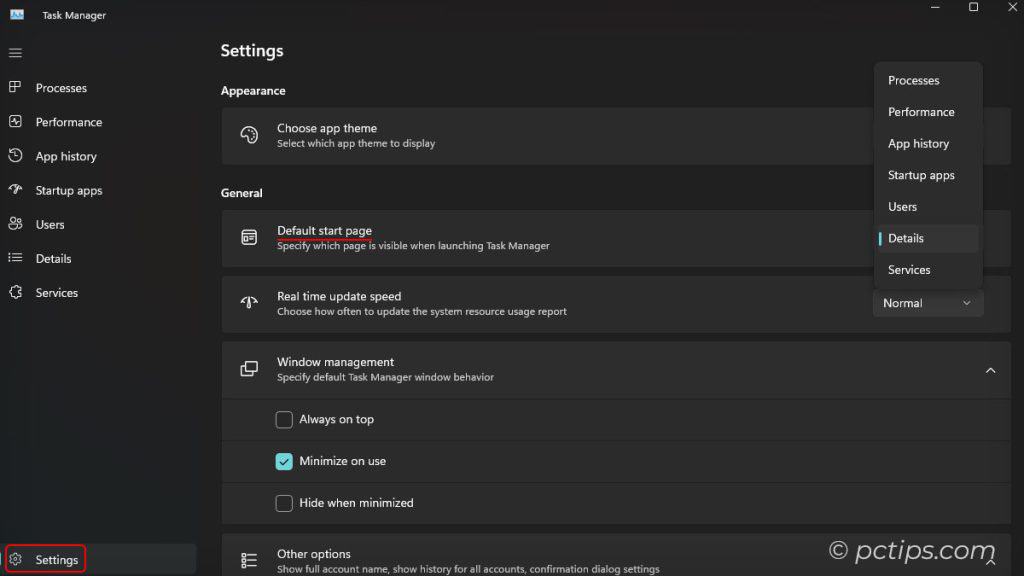
Personally, I’m a big fan of the Details tab.
It’s got all those juicy columns that let you dive deep into process stats and behavior.
Freeze the Action
Sometimes Task Manager’s realtime updates can be a bit…dizzying.
Especially on the Performance tab, with all those bouncing graphs.
If you want a moment of zen to truly analyze what’s going on, just hold down the Ctrl key.
Everything will freeze, letting you take a closer look without the distraction of constant updates.
Release the Ctrl key when you’re ready to jump back into the fray.
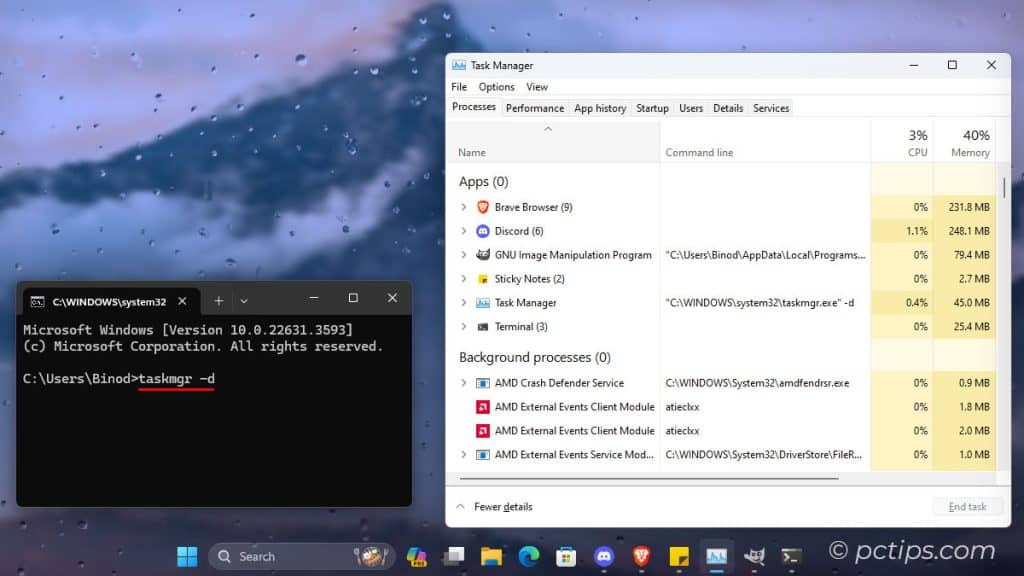
Bring Back the Old Task Manager
Windows 11 has a shiny new Task Manager, but what if you’re feeling nostalgic for the old-school Windows 10 look?
Open a command prompt and type “taskmgr -d” (without quotes) to revel in the glory of Task Manager.
More Task Manager Magic
- Is File Explorer misbehaving? Fret not! Just find “Windows Explorer” in the Processes tab, right-click it, and hit “Restart”. Explorer will relaunch without closing your other apps.
- Process acting up but you don’t want to kill it entirely? Try right-clicking it and setting “Efficiency mode” instead of ending the task. This will deprioritize the process, reduce its system resource usage, and potentially resolve issues without a hard kill.
- For ultimate control, use the “Set priority” and “Set affinity” options. Priority controls how much CPU time a process gets relative to others. Affinity lets you restrict a process to specific CPU cores. Power-user move!
- Don’t forget about the App History tab. This is incredibly useful for pinpointing which apps quietly sipping data in the background or tracking down battery drain.
- The Services tab is another secret weapon, especially for sysadmins or advanced users. You can view and control all Windows services right from Task Manager. No need to fire up services.msc!
- If you see a process marked with “UAC Virtualization“, that means it’s being virtualized for compatibility reasons. Useful to know if you’re troubleshooting wonky app behavior!
- While Task Manager is great, don’t forget about Sysinternals tools like Process Explorer and Process Monitor for even deeper insights. They’re like Task Manager on steroids!
Fun Fact
Task Manager’s main man, Dave Plummer, designed it primarily for monitoring – an inspection tool more than a control panel.
The first version launched way back in Windows NT 4.0, replacing a janky old tool called, well, Task List (Search “task list” Page S3).
Found This Helpful?
Share this article with your friends, coworkers, or anyone who could benefit from becoming a Windows troubleshooting pro.
Have a killer Task Manager tip I missed?
Drop it in the comments and let’s build the ultimate troubleshooting resource together.
Now it’s time to put your new skills to the test.
Fire up Task Manager and show those unruly processes who’s boss!
I have administrator rights, but someone else seems to have all rights. A friend helped me set up the computer initially & controls the computer, but has since passed away. I can’t update. How do I delete them?
Hi Bobbie, To delete the account of the person who initially set up your computer you need to have administrative rights. Once you have it, login with your Administrative Account. Then press "Windows+R" and open run dialog box. There, type "control userpasswords2" and press enter. Now, in the User Accounts Window, you will see the list of all users on your computer. Select the account you want to delete and click on Remove button. Confirm the action. You'll also be asked to choose if you want to keep or delete the user's files. Proceed accordingly. There, you go ! The user will get deleted and you will have full control over your pc. If you encounter any issues or need further assistance, don’t hesitate to reach out. Take care.