36 Windows Search Tricks to Find Any File in Seconds
Last Updated:
Windows Search is incredibly powerful…if you know how to use it.
Most people only scratch the surface of what’s possible, but with a few tricks up your sleeve, you can hours single day.
Consider this:
- Knowledge workers spend 19% of their workweek searching for information (Source)
- Employees spend an average of 7.6 hours per week searching for and gathering information (Source)
I’ve spent a lot of time discovering these hidden search techniques that make finding files insanely fast.
And today, I’m sharing my top 36 tips with you.
Master these, and you’ll be able to locate any file, app, or setting in seconds flat.
Ready? Let’s dive in!
Search Basics Everyone Should Know
Before we get to the really juicy stuff, let’s cover some search basics that everyone should know.
The search bar is accessible from multiple locations in Windows, including the Start menu and File Explorer.
It works across files, settings, and even the web.
Here are a few tips to get you started:
- Press the Windows key to instantly access the search bar
- Use the taskbar search box for quick access
- Use Keyboard shortcuts
Windows + QorWindows + Sto open the search bar. - Right-click search results for additional options
For example, type “wi-fi” to quickly access network settings, or search for “notepad” to launch the application instantly.
The search bar adapts to your most frequent searches, so the more you use it, the smarter it gets.
Exact Phrase Search With Quotes
If you’re looking for a specific phrase, enclose it in quotation marks.
For example, searching for “project proposal” (with quotes) will find files that contain that exact phrase, rather than files that contain the individual words “project” and “proposal” somewhere in the file.
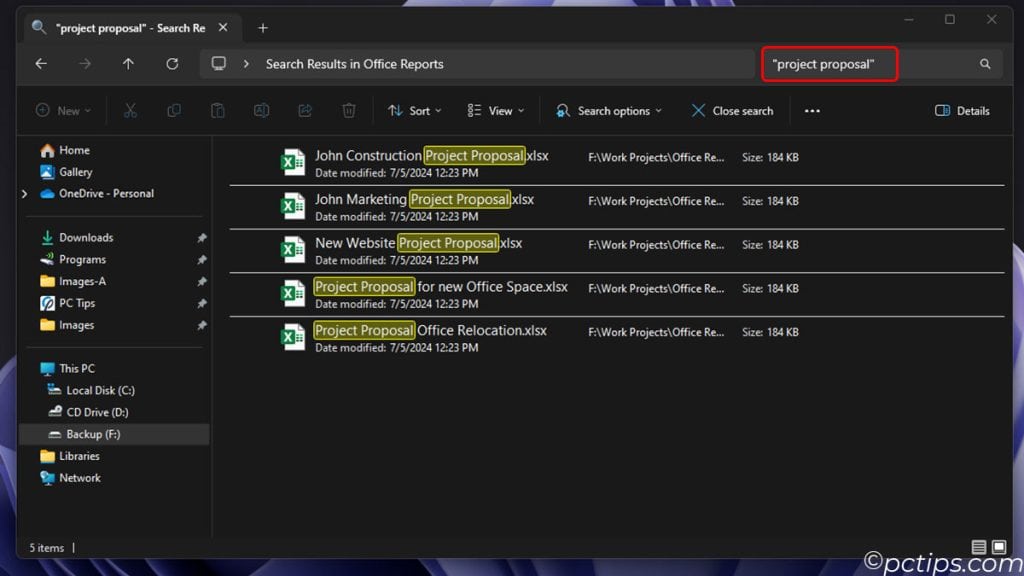
This is incredibly useful when you’re looking for a specific document and you remember a unique phrase from it.
Exclude Terms With NOT
Have you ever searched for a term and gotten a ton of irrelevant results?
You can filter those out by using the NOT operator.
For example, if you want to find all your photos from your beach vacation but don’t want to include any sunset photos, you could search for:
beach NOT sunset
This will give you all the files that contain the word “beach” but exclude any that also contain the word “sunset“.
You can string together multiple NOT terms too, like beach NOT sunset NOT sand.
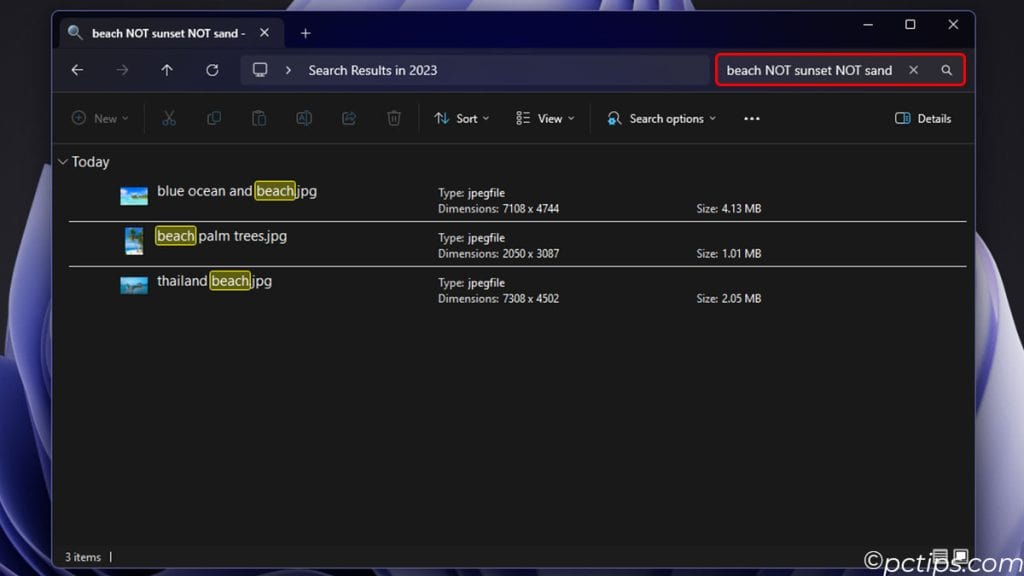
Note: Make sure to use all caps for NOT, or it won’t work properly.
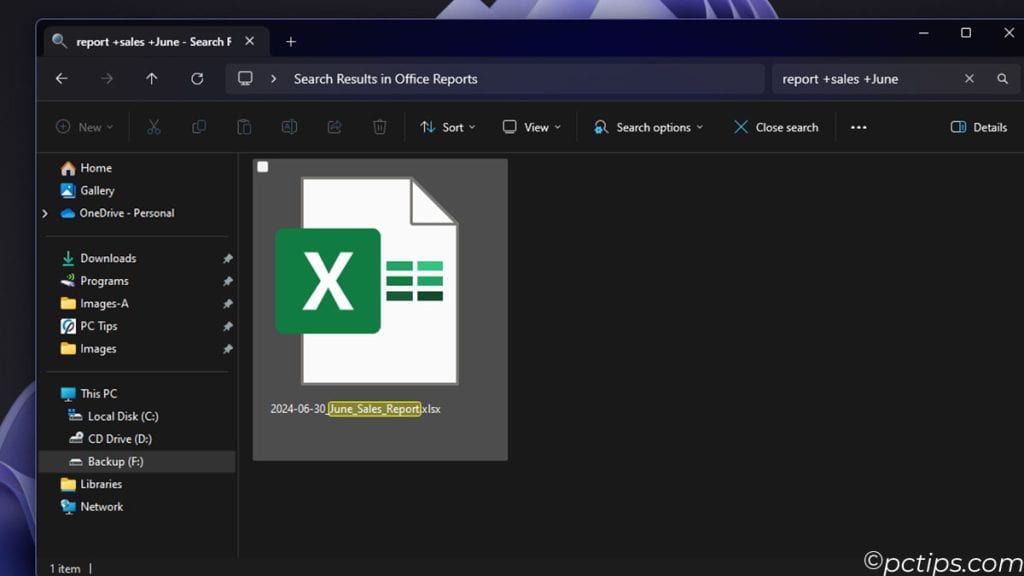
Required Words With +
Sometimes you might have a search term that’s yielding too many results, and you want to narrow it down to only include files that also contain another specific word.
You can do this by using the + symbol before the required word.
For instance, let’s say you’re looking for a report about sales figures for the month of June. You could search for:
report +sales +June
This will give you files that contain the word “report” and also must include both “sales” and “June” somewhere in the file.
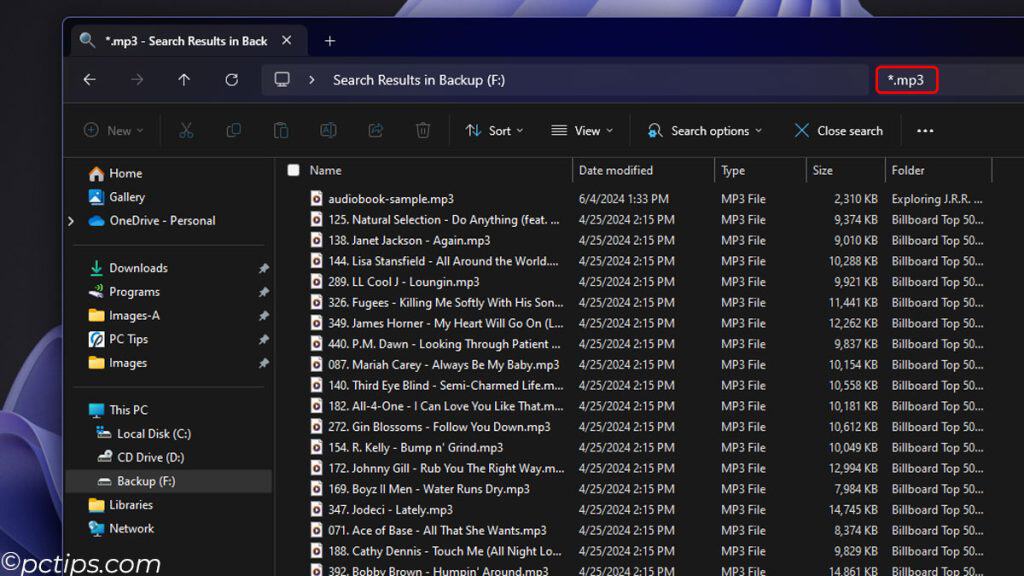
Wildcard Matching With *
The asterisk (*) is a powerful wildcard that can stand in for any other character.
This is useful in a few scenarios:
- When you can only remember part of a filename. E.g. “
report*” will find “report.doc“, “report_final.doc“, “report_june2023.doc“, etc. - When you want to find all files with a certain extension. E.g. “
*.mp3” will find all your MP3 audio files. - When you’re looking for files that have a specific word as part of the filename. E.g. “
sales*” will find “june_sales_report.doc“, “sales_presentation.ppt“, “sales_team_contact_list.xls“, etc.
Find Huge Files Eating Up Disk Space
Running out of disk space? Use search to quickly find the largest files on your drive:
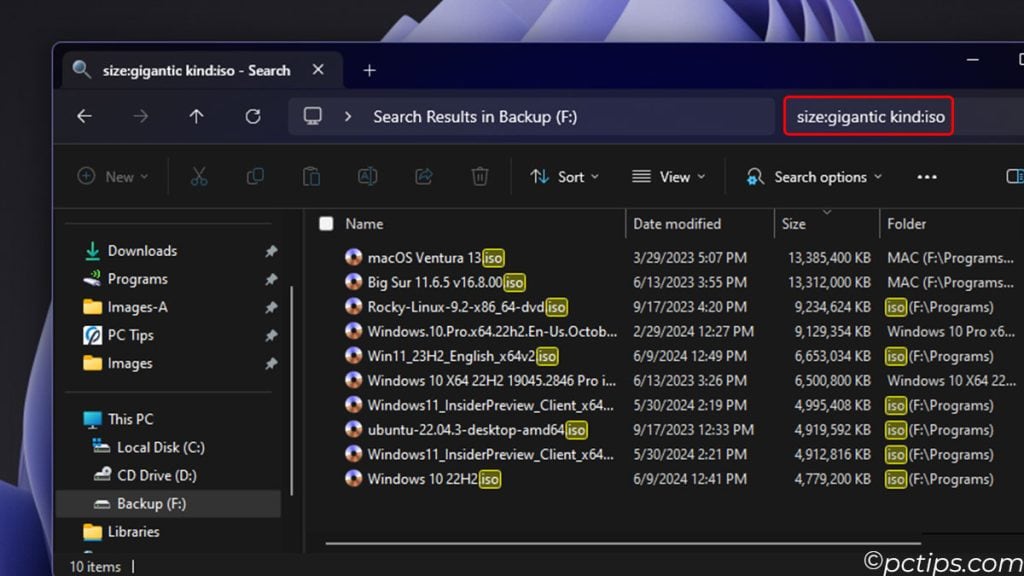
size:gigantic
Yep, “gigantic” is a real search filter!
This will show you all files over 4GB in size.
You can also use:
size:emptyfor 0 byte filessize:tinyfor under 16KBsize:smallfor 16KB to 1MBsize:mediumfor 1MB to 128MBsize:largefor 128MB to 1GBsize:hugefor 1GB to 4GB- Use
size:>100MBfor a custom-size
Pair it with a file type search like size:gigantic kind:=video to find massive video files.
Works great for freeing up space in a pinch!
Tip: You can sort the results by size to put the largest files at the top. Just click on the “Size” column header.
I frequently use these to identify videos, ISOs, and large files that can be archived or deleted.
Check out my guide on How to FREE Up More than 100GB+ Of Disk Space for more tips.
Do Math With Number Ranges
For numeric searches, you can use >, >=, <, <=, or even mathematical expressions:
width:1200 height:>650
That finds images that are exactly 1200 pixels wide and over 650 pixels tall.
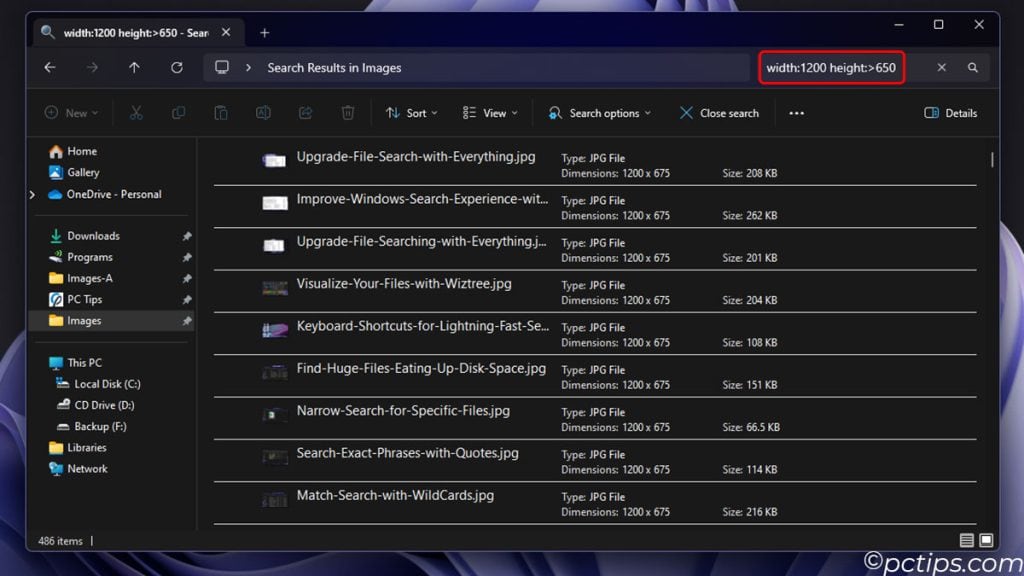
((width:>1000 height:>1000)AND(width:<2000 height:<2000))
Amazingly, that matches images between 1000 and 2000 pixels in both dimensions.
Perfect for finding high-res photos!
Searching File Contents
So far we’ve looked at searching based on a file’s name and metadata.
What if you can’t remember what you called a file, but you know it had certain words in it?
That’s where content-based searches come in.
Windows Search can look inside certain types of files (like text documents, PDFs, HTML files, and more) for specific words or phrases.
This is extremely powerful when you’re trying to find something based on what it was about, rather than what it was called.
To search file contents, just use the “content:” operator followed by your search term:
- “
content:budget” finds files that contain the word “budget” anywhere inside - “
content:'project proposal'” finds files containing that exact phrase - “
content:design AND content:client” finds files that have both “design” and “client” somewhere in their contents

One Caveat: Content searches only work on files that have been indexed by Windows Search.
Find Files by Date
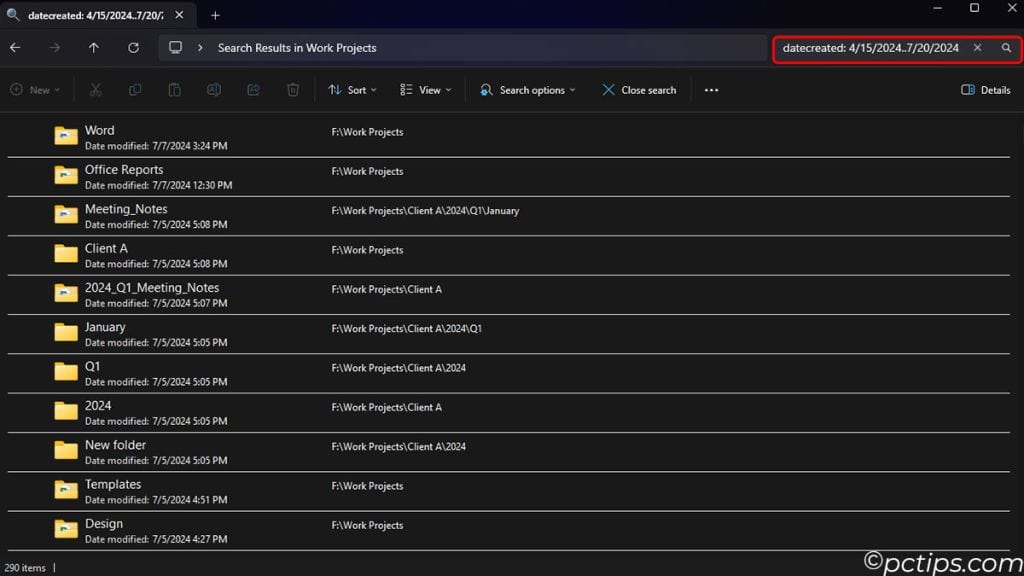
You can search for files based on when they were created or modified using the “datecreated:” and “datemodified:” operators.
To find files created in the last week, use:
datecreated:thisweek
You can also use “today“, “yesterday“, “thismonth“, “lastmonth“, “thisyear“, and “lastyear“.
For a custom date range, use “datecreated:4/15/2024..7/20/2024” to find files created between April 15, 2024 and July 20, 2024.
Find Files by Type
To find files of a specific type (like all your JPG photos or MP3 music files), use the “ext:” operator followed by the file extension.
For example:
ext:jpgfinds all JPG imagesext:docORext:docxfinds all Word documents (both old.docand new.docxformats)ext:pdffinds all PDF filesext:pptORext:pptxfinds all PowerPoint presentationsext:xlsORext:xlsxfinds all Excel spreadsheets
Note: These also work for system and hidden file types. E.g. ext:dll finds all DLL files, ext:ini finds all INI configuration files, etc.
Search File Properties
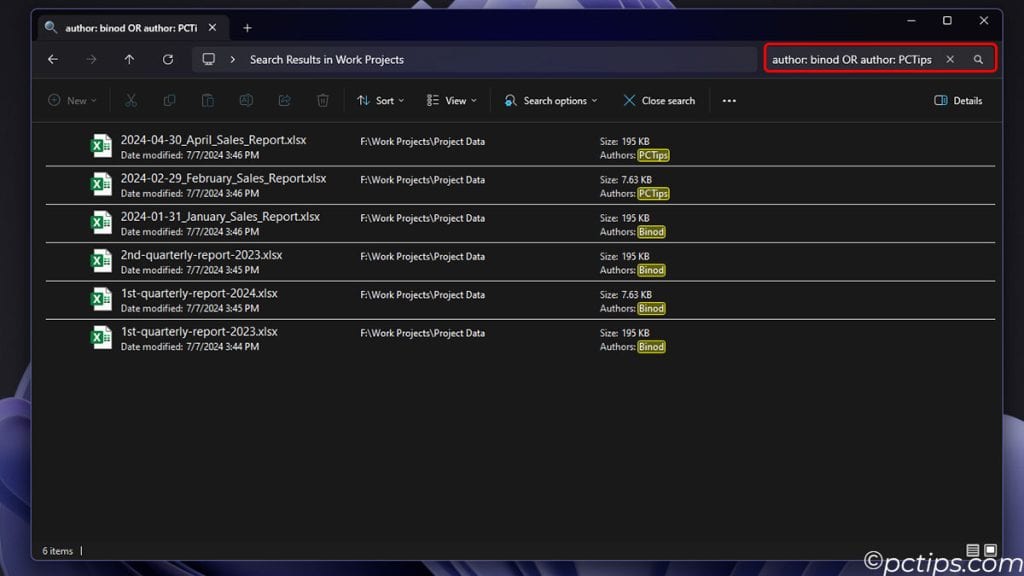
In addition to filenames and contents, you can also search the properties of your files, like author, title, subject, tags, etc.
For example:
author:billfinds all files authored by someone named Billtitle:budgetfinds all files with “budget” in the title fieldtags:workfinds all files tagged with “work“subject:meeting agendafinds all files with “meeting agenda” as the subject
Tip: These also work for music and photo properties like artist, album, genre, camera model, f-stop, etc!
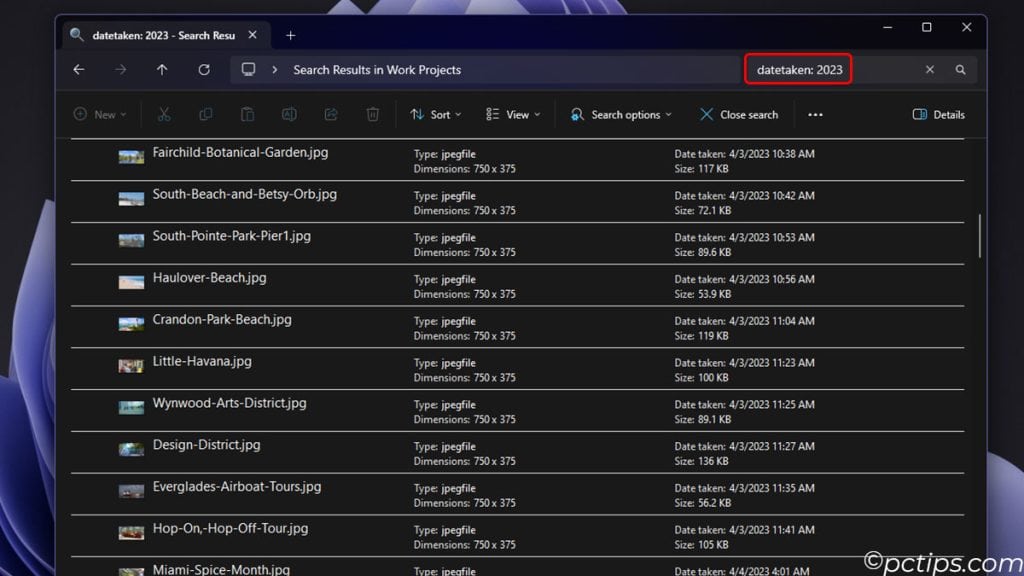
Finding Images Based on Metadata
Most image files contain metadata like the camera model, aperture setting, or GPS coordinates.
There’s also a wealth of metadata about where, when, and how each photo was taken.
Try these examples:
cameramodel:"Pixel 4a"finds photos taken with a Google Pixel 4a phonedatetaken:2023finds photos taken in 2023orientation:landscapefinds horizontally-oriented photosorientation:portraitfinds vertically-oriented photosfstop:>5finds photos taken with an aperture smaller than f/5exposuretime:<1/500finds photos with a shutter speed faster than 1/500th of a second
Pro Tip: You can view all the searchable photo properties by opening a photo in the Photos app, clicking the “…” button, and choosing “File info”.
Exclude Folders From Search
Sometimes you’ve got a folder that’s cluttering your search results with irrelevant files.
You can exclude that whole folder by adding it to the search query with a minus sign.
For example:
project_files -sales_data
…will search for files containing “project_files” but exclude anything in the “sales_data” folder.
You can exclude multiple folders:
work_documents -temp -archive -backup
This will find your work docs but exclude anything in temp, archive, or backup folders.
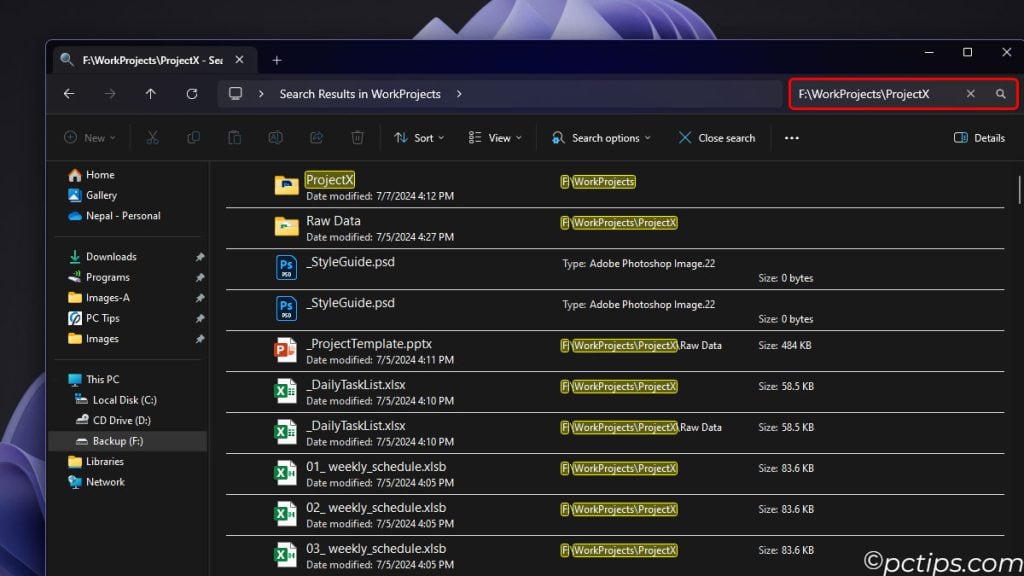
Narrow Results by Folder
Just like excluding folders, you can also restrict your search to only look in certain folders.
To do this, just include the folder path in quotes as part of your search query:
"D:\Photos" vacation
This will find all files containing the word “vacation” but only in the D:\Photos folder.
You can include multiple folders by separating them with OR:
projectx "C:\Work\ProjectX" OR "F:\WorkProjects\ProjectX"
This searches for ProjectX files in both your C:\Work and F:\WorkProjects folders.
Find Duplicate Files
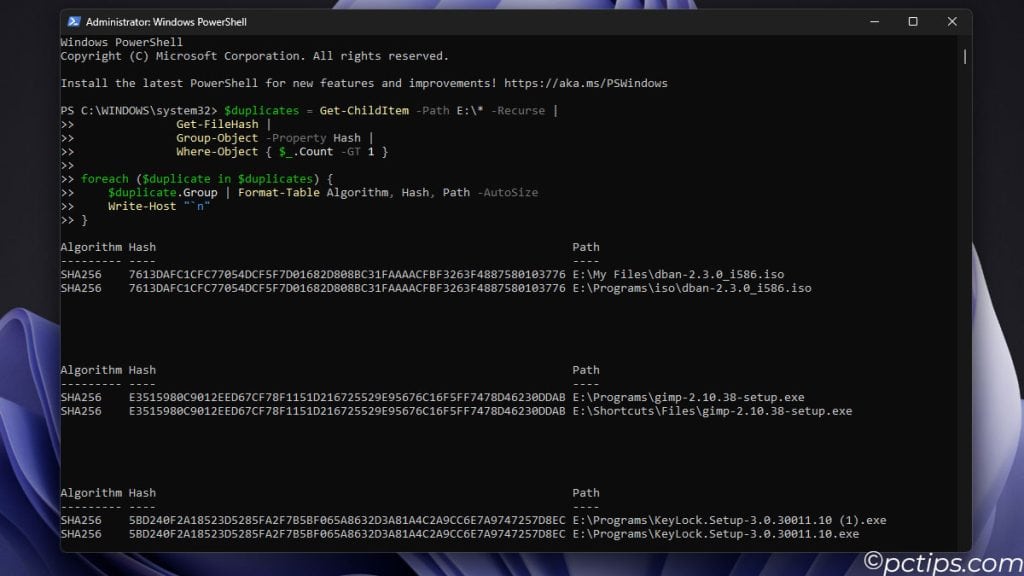
While Windows doesn’t have a built-in dupe detector (yet), PowerShell can pitch in for simple searches:
Here’s a little power shell script I wrote to find duplicates
$duplicates = Get-ChildItem -Path D:\* -Recurse |
              Get-FileHash |
              Group-Object -Property Hash |
              Where-Object { $_.Count -GT 1 }

foreach ($duplicate in $duplicates) {
    $duplicate.Group | Format-Table Algorithm, Hash, Path -AutoSize
    Write-Host "`n"
}
This will spit out a report showing any files with matching hashes (i.e. duplicates).
For more robust comparisons, check out the free dupeGuru utility.
Advanced Search Filters in a Click
While all these search operators are incredibly powerful, sometimes you just want to do a quick search without having to remember the exact syntax.
That’s where Advanced Search comes in!
From any search results window, click the “Search Options” button in the toolbar.
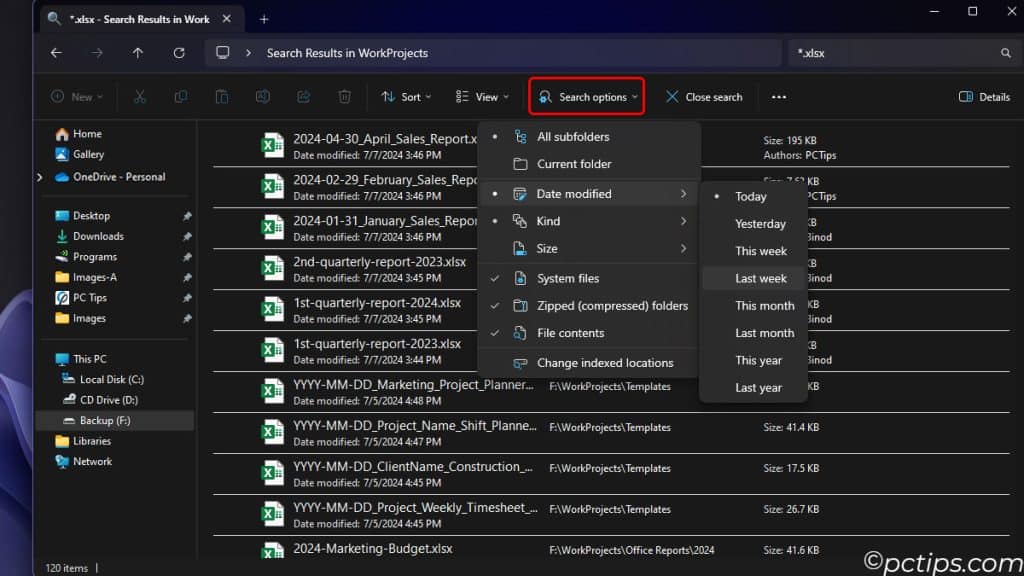
This opens a panel with fields and checkboxes for the most common search criteria – kind of file, size, date modified, etc.
These options are perfect for whittling a search down to a neat result set.
Search Hidden Files and Folders
By default, Windows hides system files to prevent accidental changes. But sometimes you need to search those hidden files.
Here’s how:
- Open File Explorer and click the ‘View‘ tab
- Check the ‘Hidden items‘ box to make hidden files visible
- Search as usual – your results will include matches in hidden files and folders
Alternatively, you can use the Command Prompt.
Enter this command to unhide the hidden files matching the given search criteria:
attrib -h -s /s /d *search_term*
The /s switch includes subdirectories and /d searches the current directory.
FYI, they’re usually hidden for a reason (like being critical to Windows) so tread carefully.
Pin Key Searches to Quick Access
Do you have certain searches that you run all the time?
Maybe you’re always looking for files related to a particular project, or photos from your last vacation, or documents modified in the last week.
You can save these searches and pin them to your Start menu for easy one-click access:
- Enter your search in the File Explorer search box.
- Click the “…” menu in the search toolbar.
- Choose “Pin current search to Quick Access“.
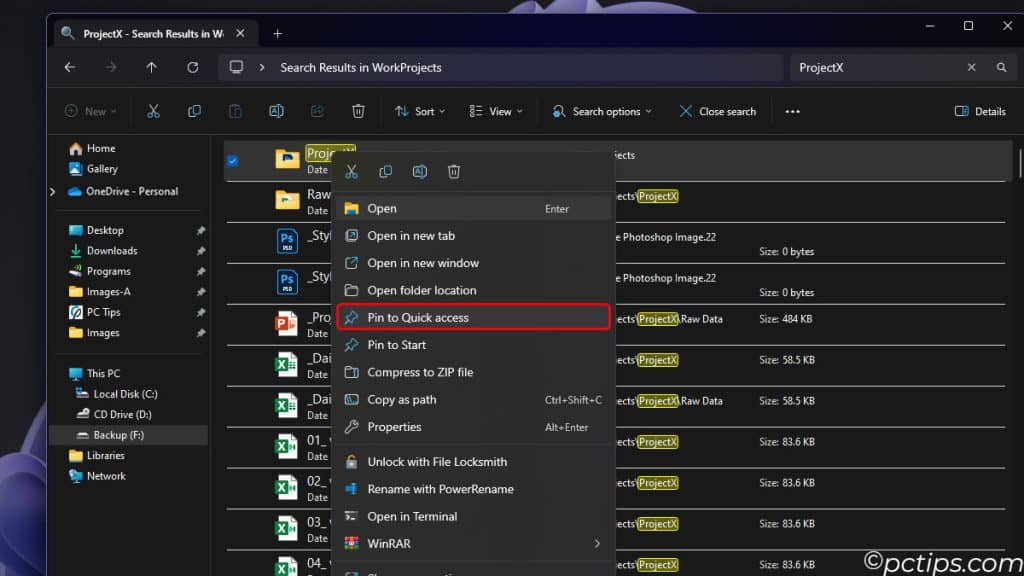
Now you’ve got one-click access to that search right in the File Explorer sidebar!
Save Searches You Use All The Time
In addition to pinning searches to Quick Access, you can also save them as reusable files.
This is handy if you need to do the same search on different computers, or share your search query with a coworker.
- Enter your search in the File Explorer search box.
- Right-click in the search results area.
- Choose “Save search“.
- Give the search a name and choose where to save it.
- Click “Save” to create the
.search-msfile.
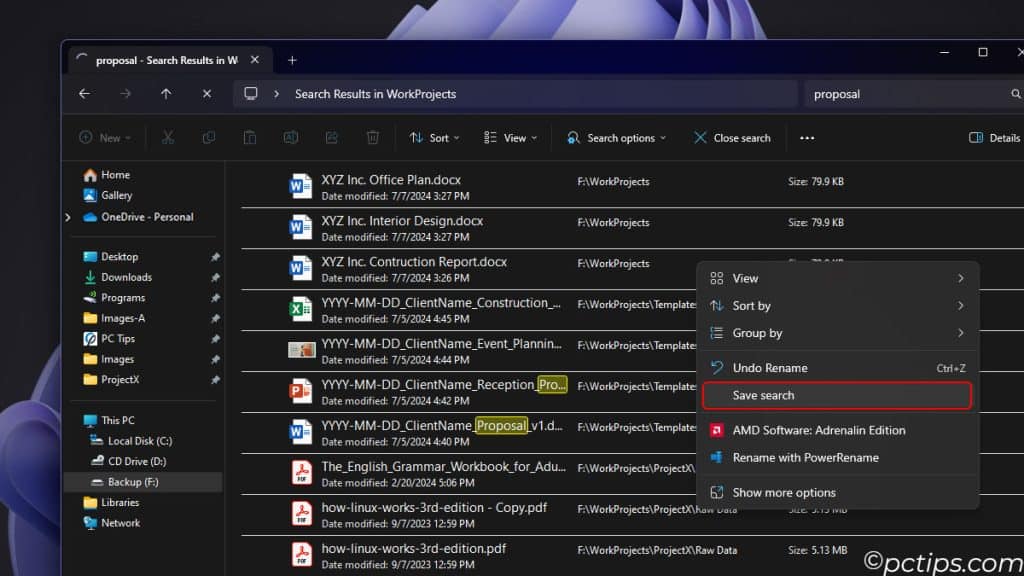
You can then double-click that .search-ms file to instantly re-run the search with all the advanced operators and filters already set up!
Tip: To quickly access all your saved searches in one place, open File Explorer and type shell:searches in the address bar. You’ll jump straight to the Searches folder containing all your .search-ms files!
Customize Search Settings
Windows Search has a lot of options you can customize to make it work better for your needs.
To find these settings:
- Open the Start menu and start typing “search settings“.
- Click on “windows search settings” in the results.
Here you can do things like:
- Choose which folders are included in your search index
- Exclude folders you don’t want to search
- Add non-indexed locations to search (slower but more comprehensive)
- Rebuild your search index from scratch
Play around with these to dial in Windows Search to your liking!
Folders to Include in the Search Index
Speaking of indexed locations, pay close attention to which folders Windows Search is monitoring.
By default it tracks common areas like your documents, pictures, and desktop.
But if you keep files in other places, they won’t be included in search results until you manually add them to the index.
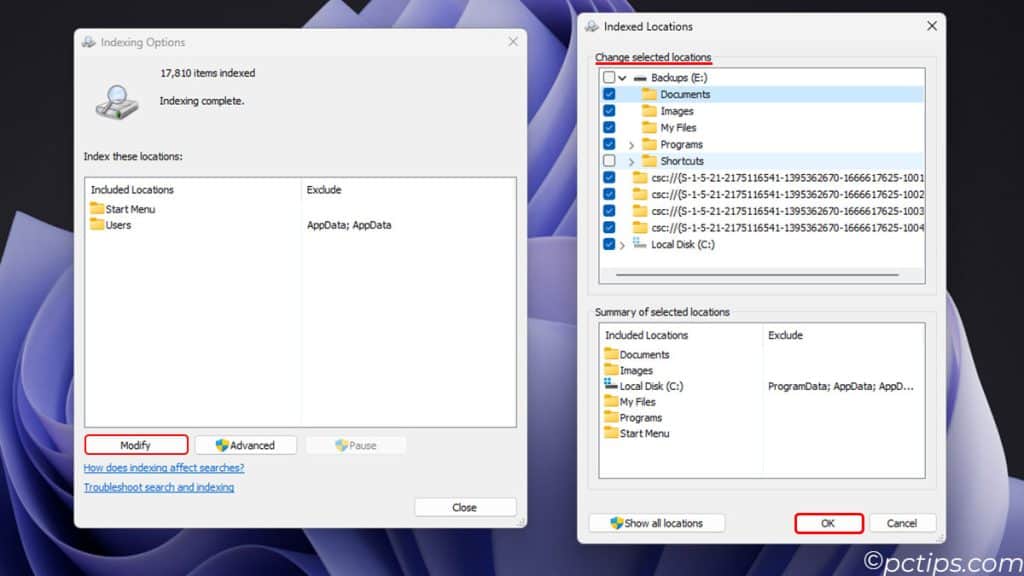
Here’s how:
- Open the Indexing Options (search for it in the Start menu)
- Click Modify
- Choose the folders you want to add
- Click OK
- Let Windows rebuild the index (slower PCs might take a coffee break)
Caution: Adding too many locations, especially large folders on slow drives, can make searches take longer and use more disk space for the index. Be selective!
Fix Search Issues by Rebuilding Your Index
If your searches aren’t finding files you know exist, or if search is taking a long time or crashing, there may be a problem with your search index.
Luckily, Windows makes it easy to delete and rebuild the index from scratch.
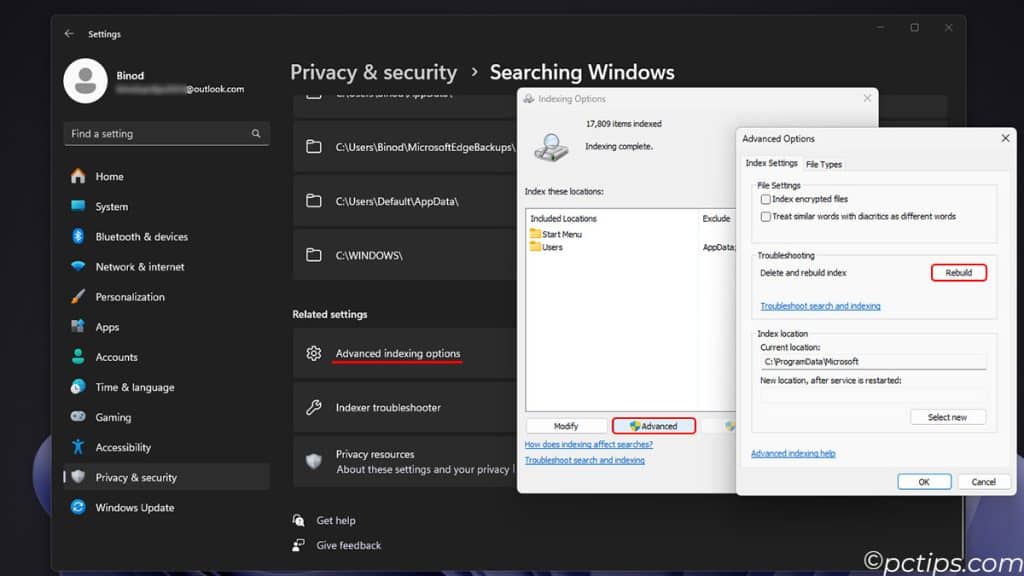
Just follow these steps:
- Open Indexing Options
- Click the “Advanced” button
- On the “Index Settings” tab, click “Rebuild“
- Click OK to the warning, and let it run
This process can take a while (hours or even days) depending on how many files you have.
But when it’s done, your searches should be much faster and more reliable!
Optimize PC for Faster Searches
If your searches feel sluggish, a few simple tweaks can dramatically improve performance:
- Use an SSD for your Windows drive. SSDs can search up to 20x faster than spinning hard drives!
- Exclude unneeded folders from indexing to keep the database lean
- Bump up the RAM in your PC.
- Make sure Windows is on the latest build and has all updates
Check out my post on 16 Proven Tips to Make Your Slow Computer Run Faster for more ways to crank up speed.
Organize Files to Improve Searchability
You can also speed up searches by organizing your files with some simple naming conventions:
- Use descriptive names – Including a few choice keywords in your filenames makes them much easier to search for later.
- Name consistently – Establish a standard convention and stick to it. For example, always put the date at the beginning of the filename in YYYY-MM-DD format.
- Use hyphens or underscores – Avoid blank spaces and special characters which can trip up search.
- Include version numbers – Append v1, v2, etc. to track revisions.
- Avoid unnecessary folders – Use a flat folder structure so files are quicker to find. Very deep nested folders slow down searches.
Customizing Search Results Display
The File Explorer search results screen has several helpful customization options.
Tweak it to perfection with these tips:
- Switch the view between icons, list, details, and more with the View menu
- Add or remove columns by right-clicking the headings and picking More
- Click column headers to sort by name, size, date, etc.
- Group and stack results by clicking the “Group by” option
- Resize columns by dragging the dividers left or right
I usually roll with Details view, sorted by date modified with plenty of columns to see all the file metadata.
Customize it to taste based on what you’re searching for and how you like to browse.
You might also like: 50 Windows File Explorer Secrets You NEED to Know
Don’t Fear the Command Line
Most folks do all their searching in File Explorer, but the Command Prompt’s DIR command has a lot to offer.
Check this out:
dir /s /b *.docx
The /s switch tells it to search subdirectories, and /b shows results in bare format without the extra file details.
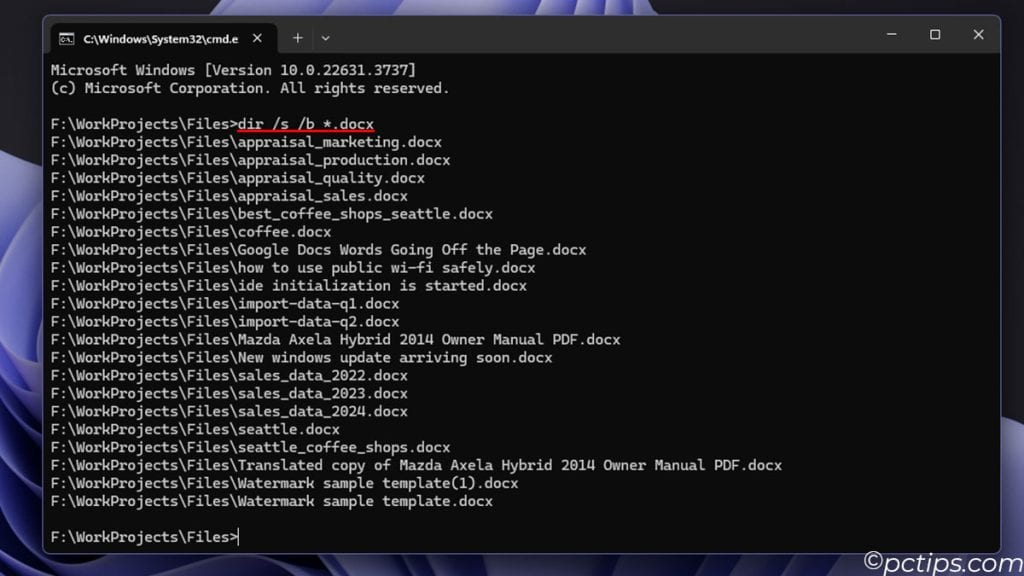
You can search for a certain extension like *.docx or a specific filename in quotes.
Advanced users can pipe the results into other commands for more complex searches:
dir /s /b | find /c /i "project"
This counts the number of files with “project” in the name.
CLI searching takes a bit of practice, but it can be super speedy once you get the hang of it.
Supercharge Searches With PowerShell
For the ultimate search experience, PowerShell is the way to go.
It combines the speed of command line searches with the filtering finesse of File Explorer.
A basic search with the Get-ChildItem cmdlet looks like this:
Get-ChildItem -Path $env:USERPROFILE\Documents -Recurse -Filter project_proposal.docx
This searches your entire Documents folder and all subfolders for a file named “project_proposal.docx“.
You can also search based on file attributes:
Get-ChildItem -Path $env:USERPROFILE -Recurse -File | Where-Object {($_.Length/1MB) -gt 500}
This finds all files in your user directory that are bigger than 500MB.
PowerShell is insanely flexible – you can filter, sort, format, export, and combine the results in countless ways.
Fair warning though – the PowerShell learning curve is not for the faint of heart!
If you’re brave enough to dive in, bookmark the official reference at https://docs.microsoft.com/powershell.
Search Directly from the Taskbar
Windows 10 and later let you search right from the taskbar.
Just click the search box (or press Win+S) and start typing.
You can search apps, files, settings, and the web from one convenient place.
It’s my go-to way to quickly launch programs and find things on my PC.
For more super cool taskbar tricks, check out our article on 18 Clever Ways to Customize Your Windows Taskbar.
Instantly Find Any Control Panel Setting
The Windows Control Panel is a labyrinth of options that seems to get more confusing with every new version.
Instead of hopelessly clicking through categories to locate a specific setting,
Use these search shortcuts to zoom right to it:
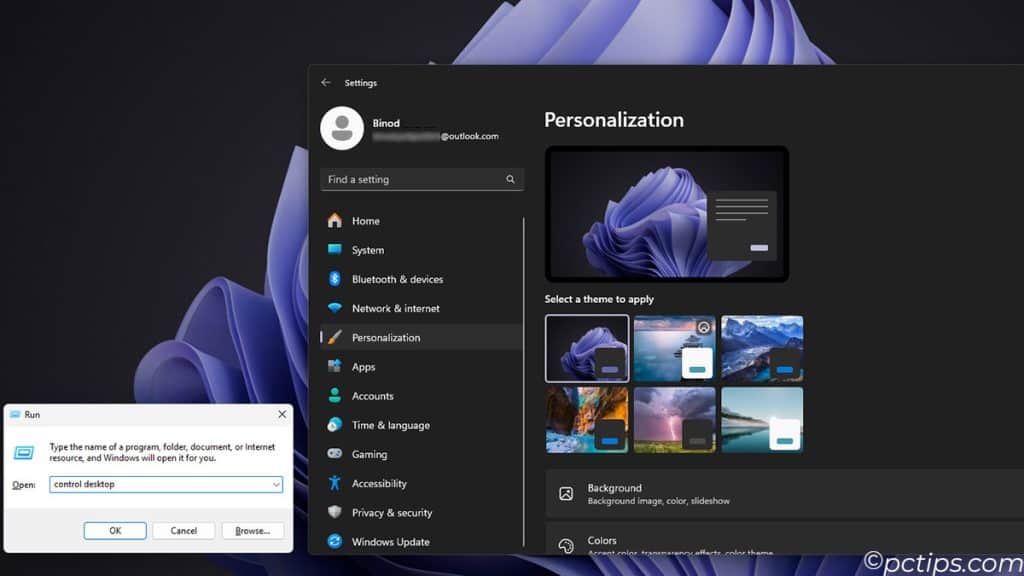
- Hit
WIN+Rto open the Run dialog - Type the name of the applet (e.g. control mouse) and press Enter
- The Mouse Properties window will open instantly
You can do this for any of the classic Control Panel items, like:
control userpasswords2for User Accountscontrol netconnectionsfor Network Connectionscontrol desktopfor Personalization settings
It even works for the modernized Windows Settings app – just use commands like ms-settings:display or ms-settings:appsfeatures. What a time saver!
If you love these Run tricks, you’ll definitely want to peep my list of 100 Run Commands Every Windows User Should Know.
It’s packed with helpful shortcuts like these.
Search the Internet
The Windows Search bar doubles as a web search box – it can search Bing for anything you need online.
Try opening the search box and typing stuff like:
- weather for an instant forecast
- define serendipity to look up word meanings
- 42*337 to do quick calculations
- Thomas Edison for a Wikipedia summary on a person
You’ll get instant answers and web results right in the search window – no need to open a separate browser. Slick, huh?
Some other crazy useful web searches to try:
- Translations – type “translate hello to french“
- Conversions – try “convert 100 lbs to kg” or “convert 25 C to F“
- Tracking numbers – paste in a USPS, Fedex, or UPS tracking number
- Flights – enter a flight number like “UA 1234” for flight status
- Stock quotes – use a ticker symbol like “MSFT” for the latest price
For lots more, take a look at 30+ Google Search Tricks You’ll Wish You Knew Sooner.
Bring Cloud Files Into Search by Syncing OneDrive
If you use OneDrive to store files in the cloud, you’ll be happy to know that Windows Search integrates with it seamlessly.
As long as you’re signed in, you can search your OneDrive files right alongside your local stuff.
This is awesome when you’re using multiple PCs.
You can start work on one machine, save to OneDrive, and then instantly find those files on another computer just by searching.
To make sure cloud content is included in searches, open the Indexing Options control panel and click the “Modify” button.
Make sure your OneDrive folder is checked.
Let AI Do the Searching with Microsoft Copilot
Buckle up, because the future of searching is here – and its name is Microsoft Copilot.
This AI-powered assistant is poised to completely change the game for finding files.
Instead of pecking in keywords or fiddling with filters, you can just ask Copilot to locate items in natural language. For example:
- “Find the Excel sheet with last quarter’s budget“
- “Show me the PNG images I used in the logos project“
- “Pull up the PDF report I was working on last Thursday“
Copilot uses cutting-edge machine learning to analyze your query, scour your files, and surface the most relevant results.
No more racking your brain trying to remember filenames or exact phrases. It’s like having a search savant living in your taskbar!
You can invoke Copilot in a few ways:
- Press
Win+Cto pop open the Copilot window - Search for “Copilot” in the Start menu
- Right-click a file or folder and pick “Ask Copilot“
It currently integrates with core Microsoft 365 apps like Word, Excel, PowerPoint, and Outlook. Support for more areas of Windows 11 is in the works.
Now, Copilot is still a bit wet behind the ears and won’t be perfect 100% of the time.
But it’s an exciting glimpse at how AI will soon be woven into the very fabric of Windows.
The days of manual searches are numbered! We’re entering the age of intelligent, conversational computing.
You might also like: 17 Amazing Things You Didn’t Know Your Computer Could Do
Privacy Considerations
With all these fancy search features, it’s important to remember that Windows is indexing and analyzing a ton of your personal files and data.
If you’re concerned about privacy, there are a few settings you can tweak.
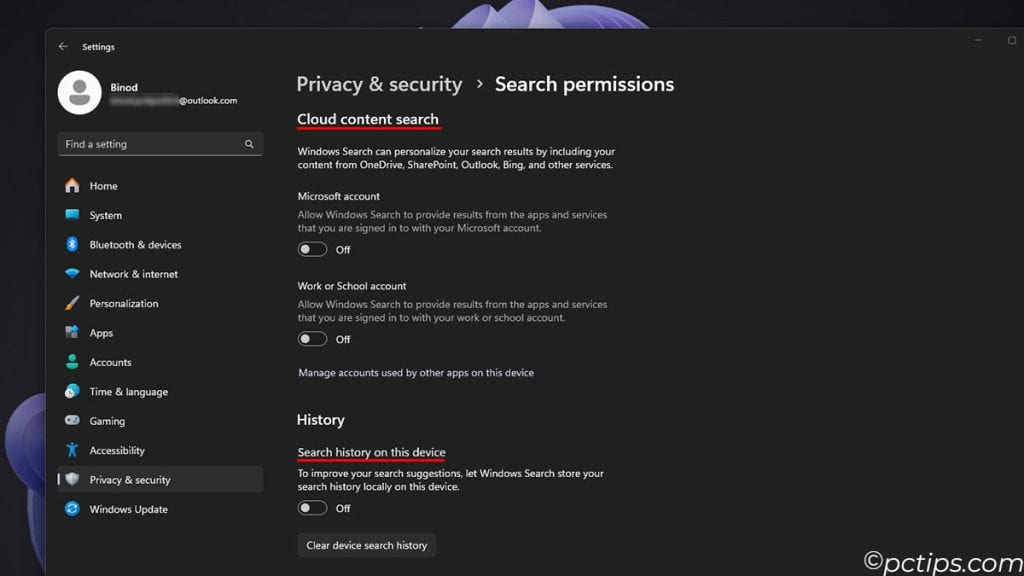
Some options to consider:
- Disable Bing integration if you don’t want web results
- Turn off “Cloud content search” to exclude online files
- Set “Search history on this device” to off
- Individually disable searching of sensitive folders like email or contacts
The trade-off is that reducing indexing can hamper your ability to quickly find things.
It’s up to you to strike the right balance between privacy and productivity.
For a deeper dive, take a peek at my article on 30 Windows Settings to Disable Right Now to max out your privacy.
Visualize Your Files in New Ways
They say a picture is worth a thousand words – well, the same goes for your files!
Seeing a visual representation of where all your disk space is going can be incredibly enlightening.
One of my favorite tools is WizTree.
It creates a treemap of your drive, showing the biggest space hogs at a glance.
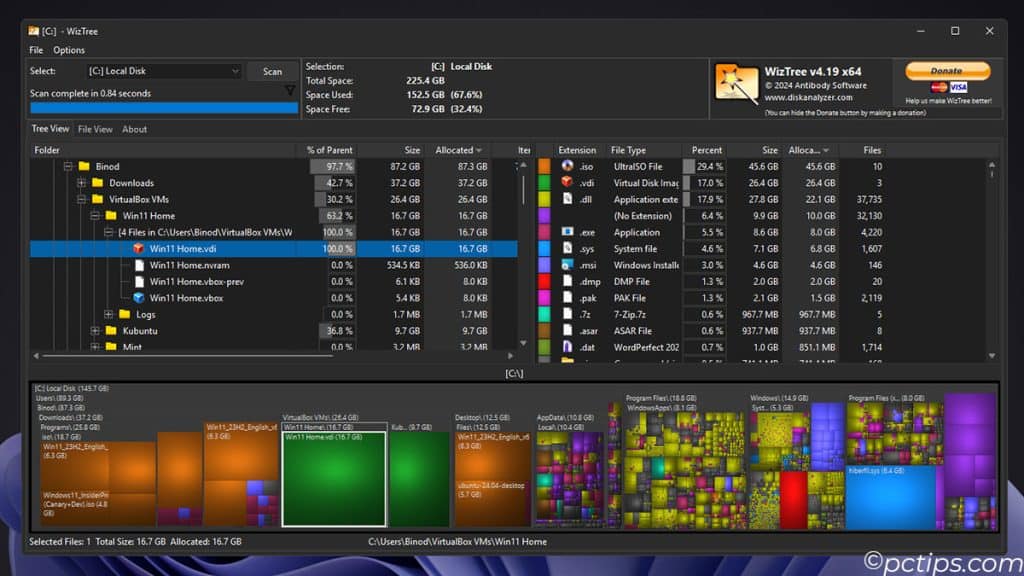
You can also use it to find the oldest and newest files, which is great for spotting obsolete data or recent work.
Fact: WizTree is 46x faster than WinDirStat!
Tip: Use these tools to inform your manual searches. For example, if WizTree shows a huge ZIP file, search for size:gigantic type:zip to find it in File Explorer.
Keyboard Shortcuts for Lightning-Fast Searches
Sometimes lifting your hands off the keyboard is just too much work.
Good thing Windows has approximately seven billion keyboard shortcuts to speed things up!
Here are a few of my faves for searching:
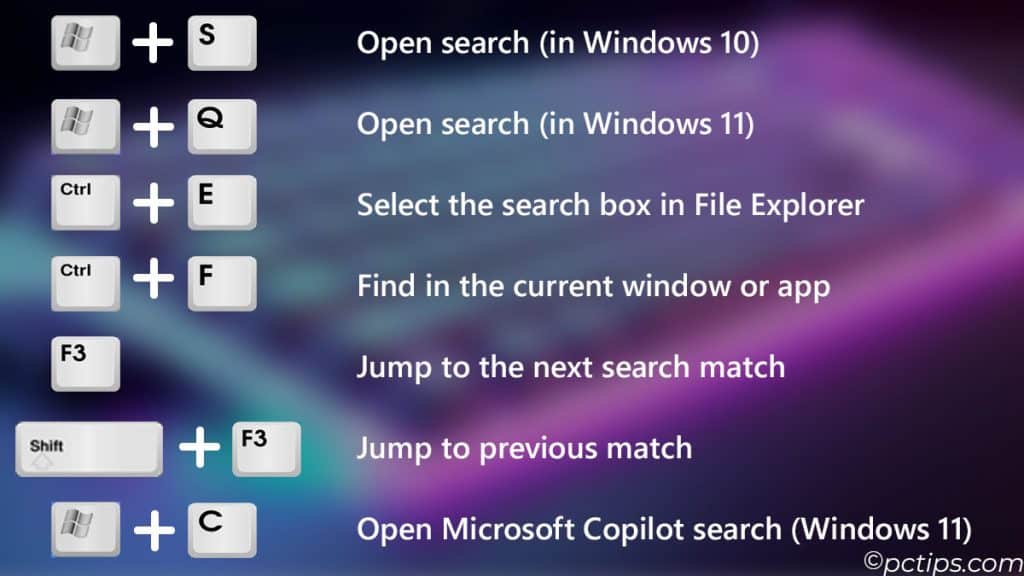
WIN + S– Open search (in Windows 10)WIN + Q– Open search (in Windows 11)CTRL + E– Select the search box in File ExplorerCTRL + F– Find in the current window or appF3– Jump to the next search matchSHIFT + F3– Jump to the previous matchWin + C– Open Microsoft Copilot search (Windows 11)
For lots more, get my cheatsheet of 100 Most Useful Keyboard Shortcuts Everyone Should Know. Your fingers will thank you!
Get Search-as-You-Type Results with Everything
For the ultimate search speed and simplicity, check out “Everything” – a free, super-fast desktop search tool from VoidTools.
True to its name, Everything searches EVERY file name and folder name on your PC (excluding system-protected areas like the Windows folder).
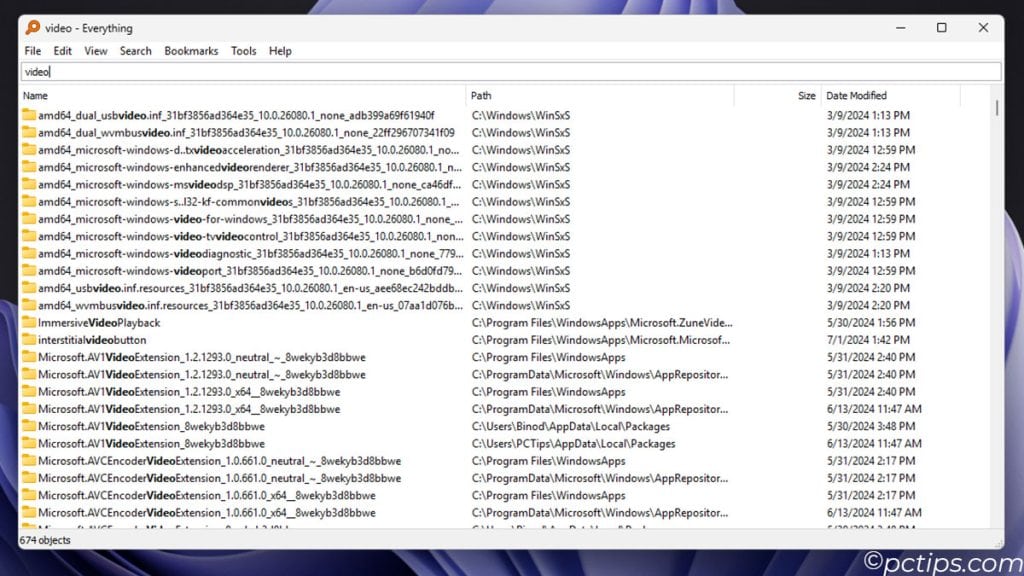
As soon as you start typing, it displays matching results – and it updates instantly with every keypress.
There’s no complex query syntax to learn or metadata to rely on.
If a file or folder name contains the text you type, Everything will find it.
Wild cards and regular expressions are supported if you need them.
To try Everything:
- Download and install from voidtools.com
- Launch the program
- Start typing in the search box
It’s a fantastic tool for quickly finding files when you know all or part of the name.
I keep it pinned to my taskbar for instant access.
If you liked this guide, please give it a share – you never know who else might need a little help in the search department.
Great article. Thank you so much, you are awesome!