Improve Your Laptop Battery Life with These Power Settings
Last Updated:
Contrary to what a lot of online guides portray, battery life optimization is actually a fairly simple task.
Enabling the Power saver plan will get you up to 70% of all possible gains in just one-click.
And if you want the battery to last even longer, make a few key changes like closing battery-burning apps and undervolting to reduce the power draw.
Let’s go over all of these in detail.
Enable Power Saver Plan
Press Win + R and enter powercfg.cpl. Select the Power saver plan here.
This plan configures desktop background slideshow, wireless adapter settings, sleep and display timers, USB selective suspend, GPU power plan, and a lot of other settings to favor battery life over performance.
As I said earlier, it provides great results with just one click.
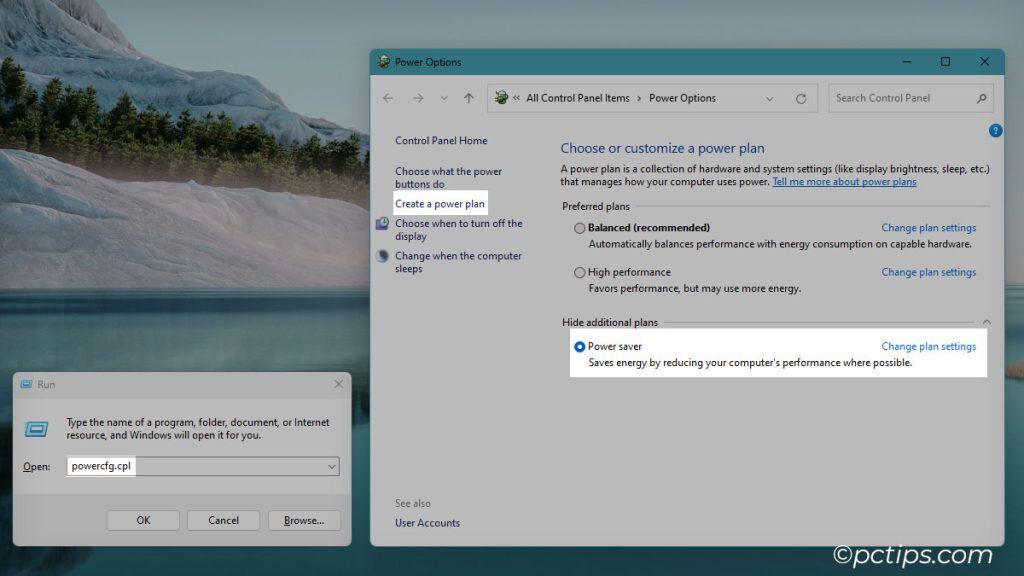
Note: Some laptops may not display this plan by default. In that case,
- Click on Create a power plan from the left.
- Select the Power saver template.
- Set the display and sleep timers on battery and press Create.
Customize your Power Plan
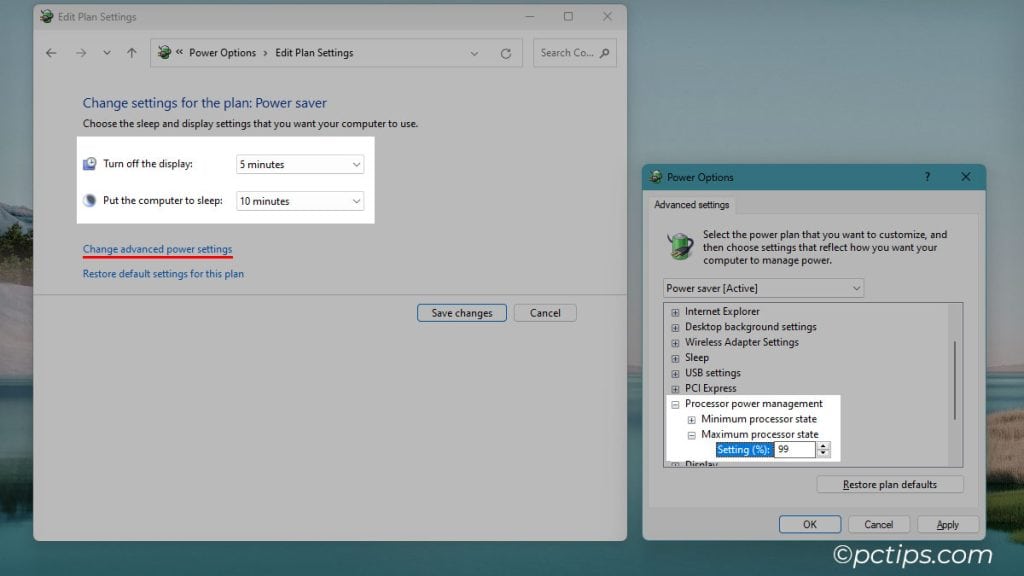
The default Power saver plan doesn’t configure the Maximum processor state, but this setting significantly affects the battery life. To customize it yourself,
- Use the powercfg.cpl run command to open the Power Options page.
- Click on Change plan settings.
- Set the display and sleep timers as low as you find reasonable. The faster your laptop turns off the display and goes to sleep, the longer the battery will last.
- Save any changes, then click on Change advanced power settings.
- Expand Processor power management > Maximum processor state.
- Set it to 99% or lower (more on this below).
- Check out the other settings too. Lower the hard drive turn off timer and hibernate timer to a low number that suits you.
- Press Ok to save the changes.
What Does Maximum Processor State Do?
This setting determines your max processor clock speed. At 100%, the CPU can boost to its max frequency as needed. 99% disables boost mode which means the CPU can’t go above its base clock speed.
Reducing this further sets lower and lower caps on the max CPU speed based on various P-states.
Basically, in tasks like web browsing or gaming where you don’t need the CPU at 100% speed, setting a cap on the max speed leads to lower power draw = less battery consumed.
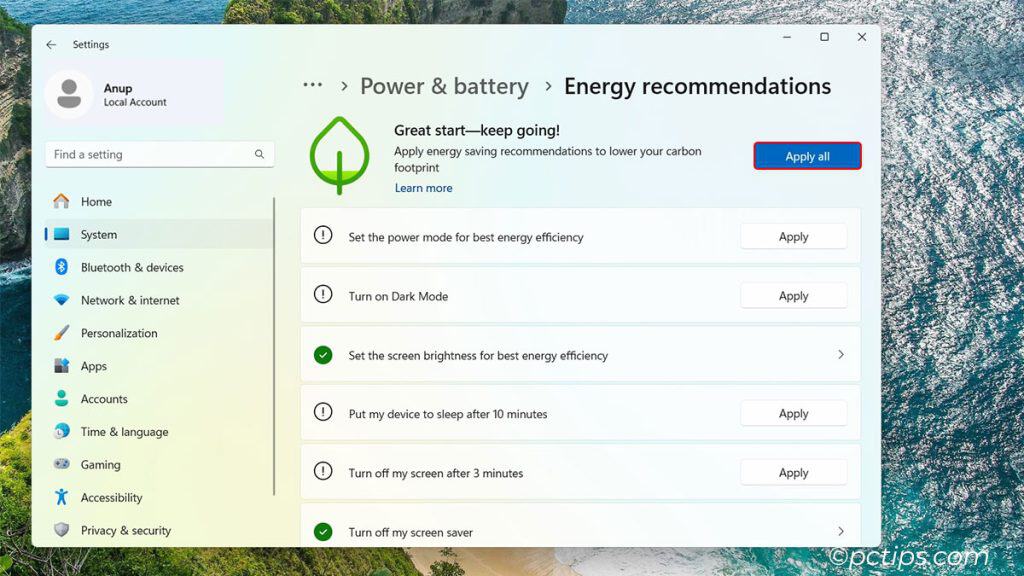
Apply Energy Saving Recommendations
Here’s another one-stop shop. Windows suggests various energy saving tweaks that you can apply with one-click (lowering the refresh rate, adjusting screen & sleep timers, etc). To try these,
- Press Win + I to launch the Settings app.
- Go to System > Power & battery > Energy recommendations.
- Click on Apply all or choose the ones to apply yourself.
Disable Heavy Battery Drainers
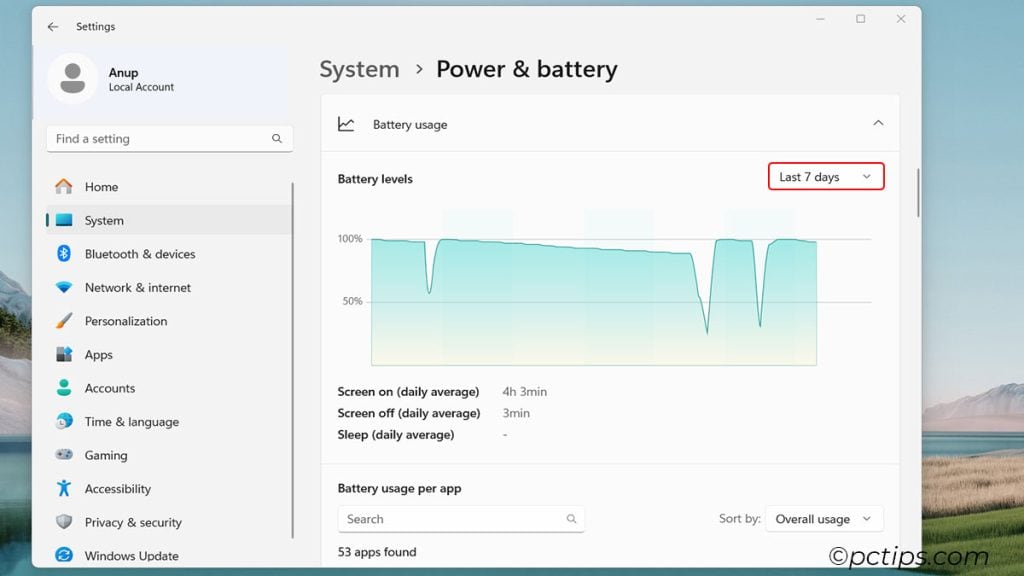
You can check battery usage data for the past 7 days from the Power & battery page.
- Open the Settings app and go to System > Power & battery.
- Scroll down and expand the Battery usage section.
- Choose to show Battery levels for the last 7 days.
- Scroll down and check the Battery usage per app.
Certain programs like antiviruses can drain a lot of battery while running in the background. If any unnecessary apps stand out to you,
- Click on More options > Manage background activity.
- Select Never to prevent the app from running in the background or at least select Power optimized mode.
- For apps that you can’t configure from here, try to disable them from the Task Manager’s Startup tab.
Optimize Display & Power Preferences
Next, we’ll optimize some display and power settings to reduce the power draw of the display and GPU.
- Keep your laptop’s brightness as low as practical.
- Press Win + I and open the Personalization tab.
- Consider using a dark background and theme here.

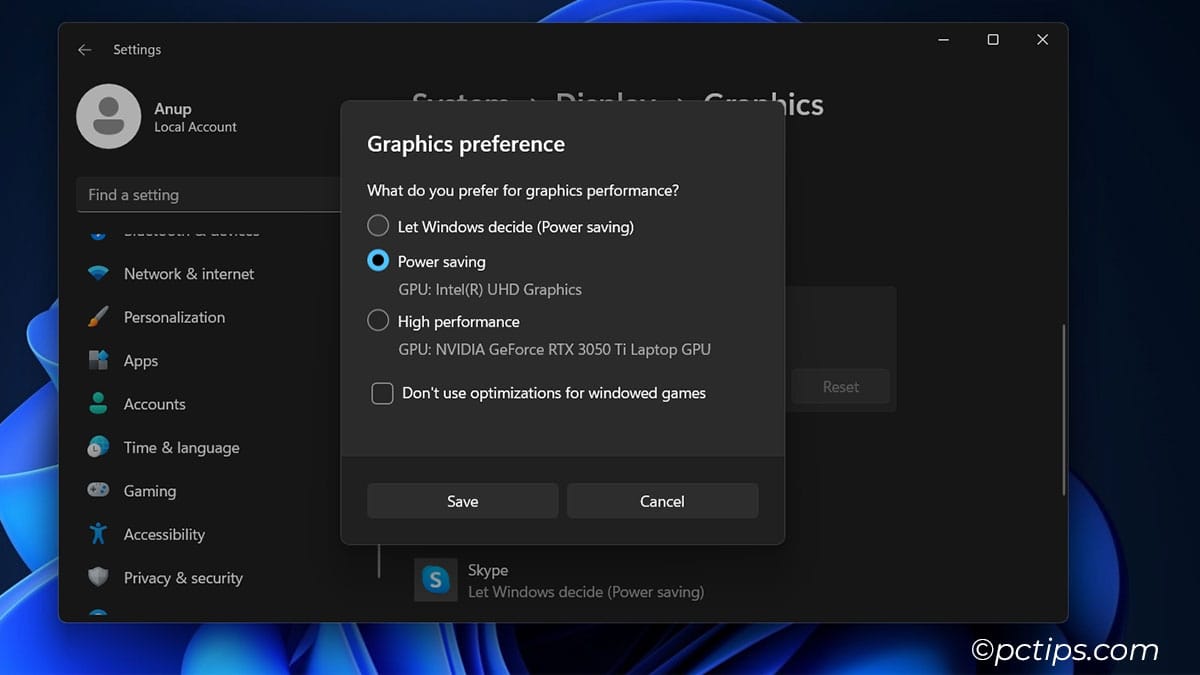
- Next, go to System > Display > Graphics.
- Review the GPU choice and check if you want to assign the iGPU for certain apps.
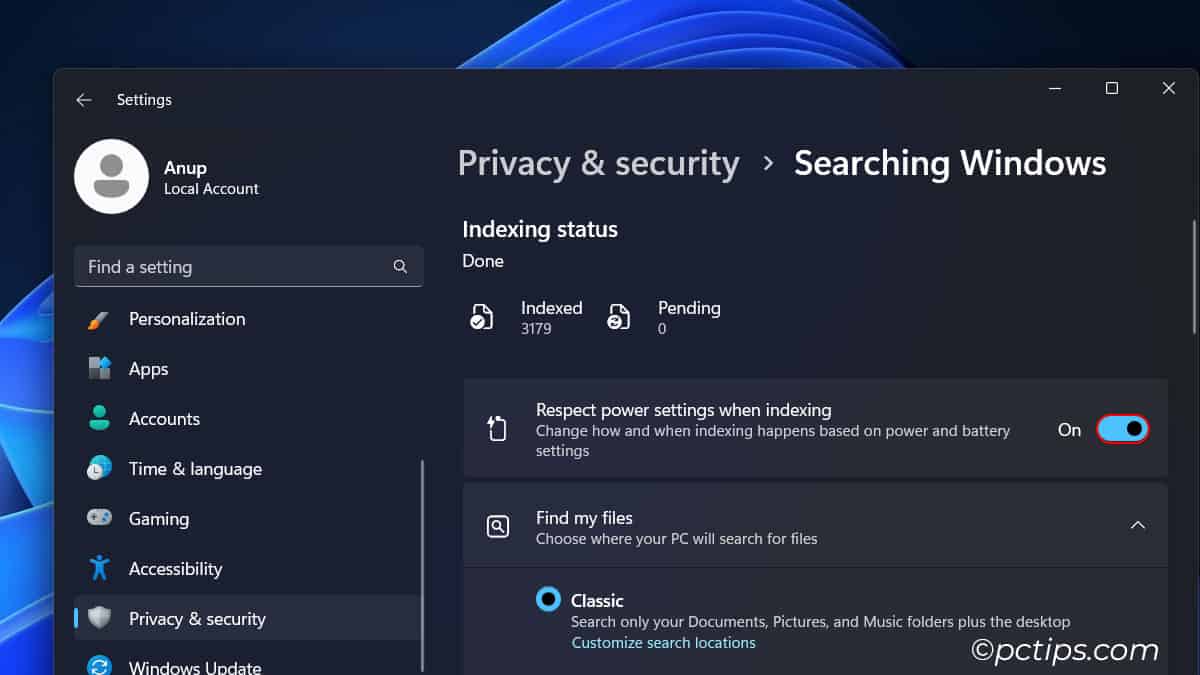
- Go to Privacy & security > Searching Windows and enable the Respect power settings when indexing option.
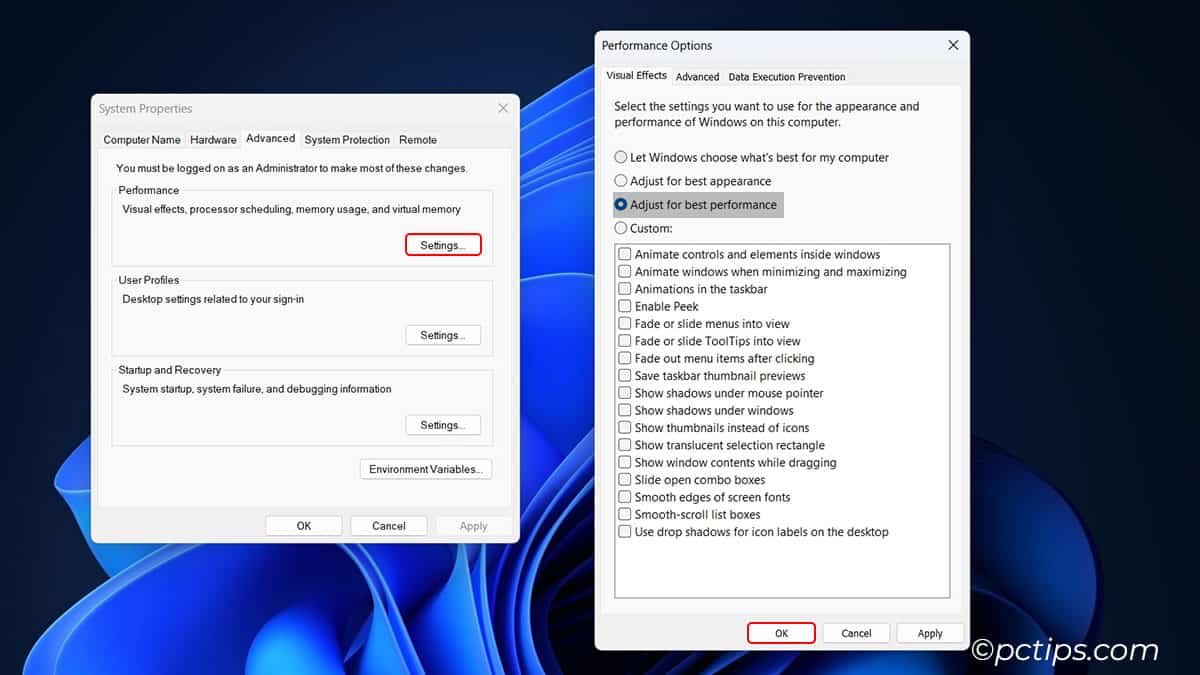
- Press Win + R and enter
systempropertiesadvanced. - In the Performance section, click on Settings.
- Select Adjust for best performance and click on Ok.
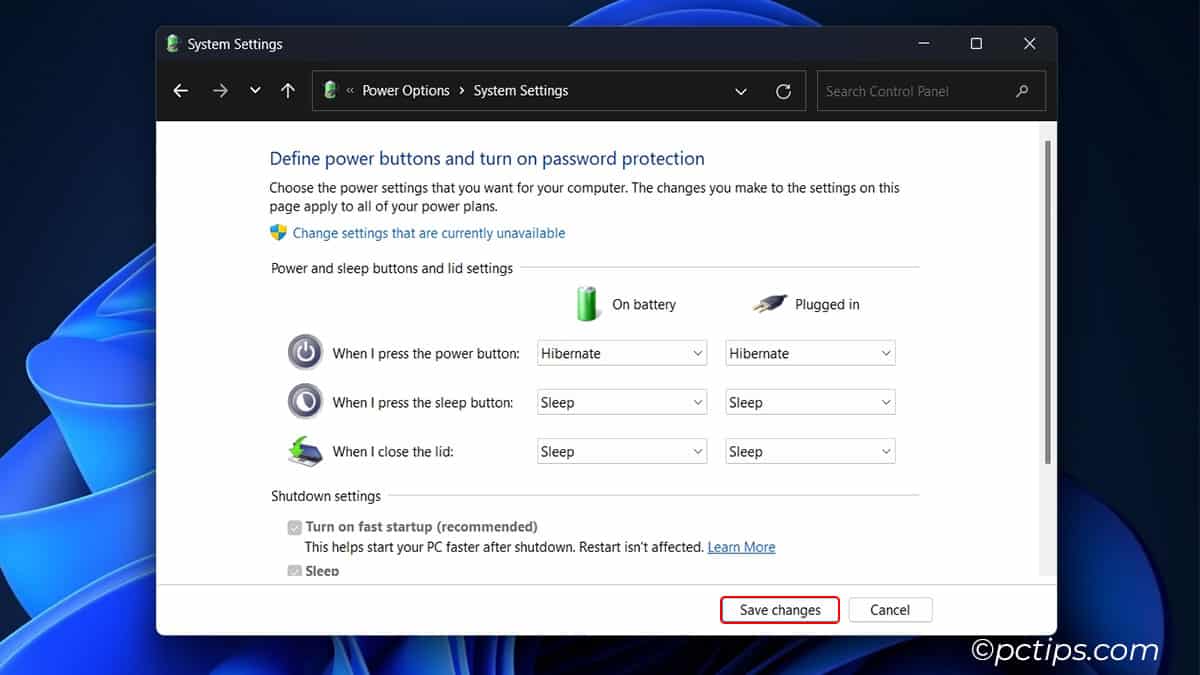
- Use the
powercfg.cplrun command and click on Choose what closing the lid does. - Set When I close the lid to Sleep or (even better) Hibernate. Save the changes.
- And finally, run the Power Troubleshooter with the
msdt.exe /idPowerDiagnostic run command. This tool will help fix any glaring issues with the power settings.
Disable Keyboard Backlight
Disabling the keyboard backlight (especially on gaming keyboards with extra-bright LEDs) can improve battery life by up to 16%.
In dimly lit rooms, it’s a useful feature for sure. But consider turning it off while in bright environments.
On my ASUS X580VD, I can do this with the Fn + F3 key combo.

Your laptop should have a similar combo visibly marked on the keyboard.
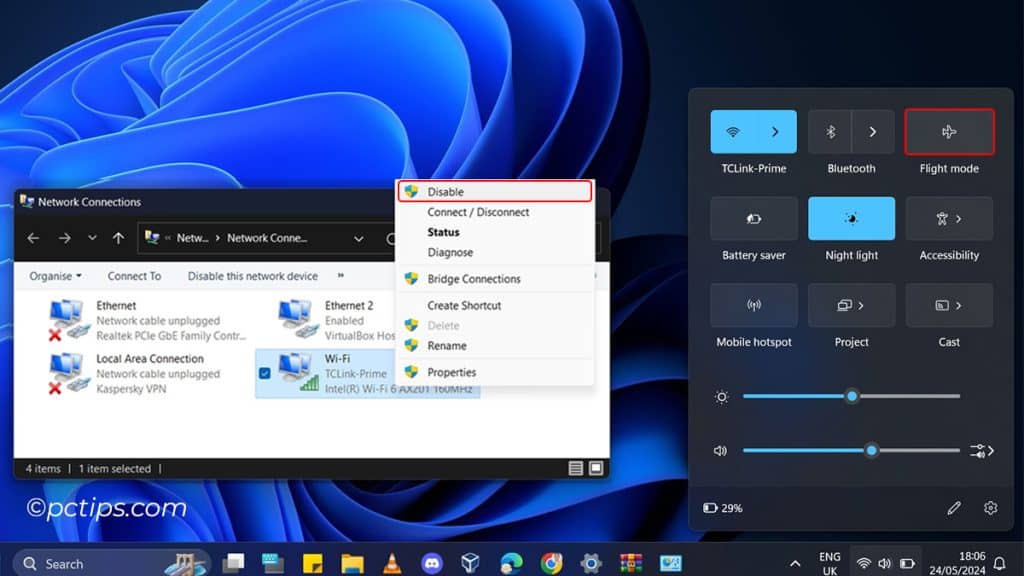
Turn Off Your Wireless Adapter
When not actively used, WiFi and Bluetooth don’t consume a lot of battery power. But overtime, the usage does add up.
Airplane mode is the easiest way to disable them temporarily. Click on the Network icon to bring up the action center and enable Airplane mode.
Alternatively, use the ncpa.cpl run command to open the Network Connections page. Disable the wireless adapter there.
When you need WiFi or Bluetooth, simply re-enable the wireless adapter or turn off Airplane mode.
Update the Drivers / Firmware
If you’ve ever read update release notes, you might’ve seen notes like improved power efficiency or high idle power fixed.
Driver and firmware updates often help reduce power consumption (via bug fixes or technological advancement).
In my experience, the GPU, wireless adapter, storage controller, and chipset drivers tend to have the most impact on battery life.
So, go to your laptop’s support page online and update these drivers at the minimum. If you update other drivers and the firmware as well, that’ll be the cherry on top.
Undervolt Your Laptop
Remember the Maximum Processor State tweak from earlier? Limiting the max CPU speed meant that less voltage was required (meaning less power draw). This approach is called underclocking.
Undervolting is where you directly limit the CPU voltage without changing the clock speed. This means your CPU draws less power but can still reach max speeds.
The default settings are designed for stability across millions of devices, not optimal power efficiency or performance.
So, by default, your CPU and GPU are likely drawing more power than they need.
Use apps like MSI Afterburner (GPU), Throttlestop (Intel CPU) or Clock Tuner (AMD CPU) to experiment with lower voltages.
Reduce the voltage in small increments and test it for some time until the voltage is so low that your laptop starts crashing.
Revert to the last working configuration and now your components are drawing less power than default without sacrificing any performance.
Use Smart Charging
Ok, this last one isn’t a battery life hack as much as it is a long-term battery health hack, but it still deserves a mention.
Your laptop battery will inevitably degrade over time. At some point, you’ve probably wondered if keeping the laptop plugged in is making this worse.
The answer to this problem is Smart Charging.
You set a battery charge limit (anywhere between 50-80%) and leave your laptop plugged in.
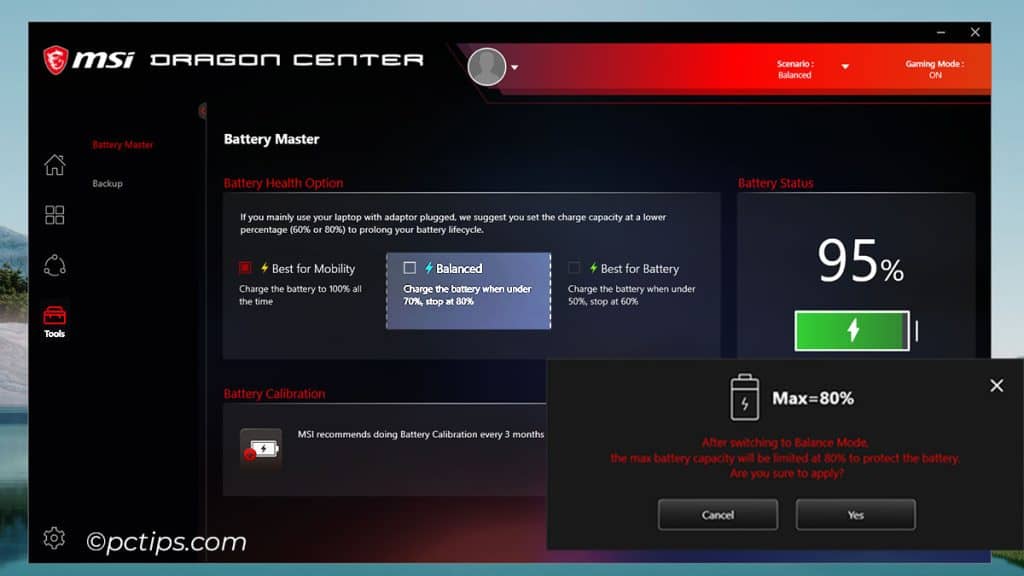
Extreme charge levels (close to 0 or 100%) are bad for your battery’s health as they accelerate chemical degradation.
But with smart charging enabled, the charge constantly remains in a healthy range. This ensures the best battery health in the long term.
So, download the battery program from your laptop manufacturer and enable Smart Charging.
Different manufacturers use different names for it (Maximum lifespan mode – ASUS, Conservation mode – Lenovo, etc). But ultimately, it’s the same tech.
What More Can You Do
These were the most practical Windows power settings to change for optimal battery life.
If you’re open to hardware-side solutions, you can improve your laptop’s battery life even further.
Ensure your laptop isn’t overheating as that’s really bad for long-term battery health. Also, disconnect unused peripherals for immediate battery life gain (RGB keyboards, mice, headsets, portable HDDs, etc).
And finally, a word of advice: I often see people complaining that their laptop only lasts 8 hours when the manufacturer claimed 12 or 16 hours of battery life.
Keep in mind that they probably achieved these figures under ideal synthetic conditions. During real-world usage, you’re extremely unlikely to hit manufacturer-claimed numbers. So, don’t fall for marketing, aim for realistic values instead.
And once you make all these changes, don’t forget to comment down below on how much your laptop’s battery life improved.
How can I stop pop up adds when I'm browsing and trying to view a website? I enjoy reading your pc help features and used some of the suggestions. Thank you,
Hi Claudia, I recommend you install uBlock Origin from the Chrome Web Store (click here). It's the best browser extension to block ads and pop-ups. I've personally used this adblocker for years. Plus, its free and open-source. Click here to open our Chrome extensions guide. It has a bit more info on how this tool works.