50 Windows File Explorer Secrets You NEED to Know
Last Updated:
You probably use Windows File Explorer all the time, but there’s a ton of tricks and secrets lurking in there that you haven’t discovered yet.
Here’s a bunch of my favorite File Explorer secrets that I bet will make you say “How did I not know that?!“
Now let’s get into the juicy stuff — the hidden settings and tricks that will supercharge your File Explorer experience.
Master Keyboard Shortcuts
First off, let’s talk shortcuts. Sure, you probably know the basics like Ctrl+C and Ctrl+V, but did you know you can use Ctrl+Shift+N to instantly create a new folder? Or that Alt+D jumps straight to the address bar?
These little shortcuts add up to save a TON of time.
I’ve created a Full File Explorer keyboard shortcuts cheat sheet you can download now.
Embrace the Address Bar
Click it and start typing a path (like C:\Users) to jump there instantly. Or click the arrows to navigate folder history — it’s a game changer.
Search from the Address Bar
In any folder, just click in the address bar and start typing — it instantly becomes a search box for that folder. When you’re done, press Esc and it reverts to a regular path display.
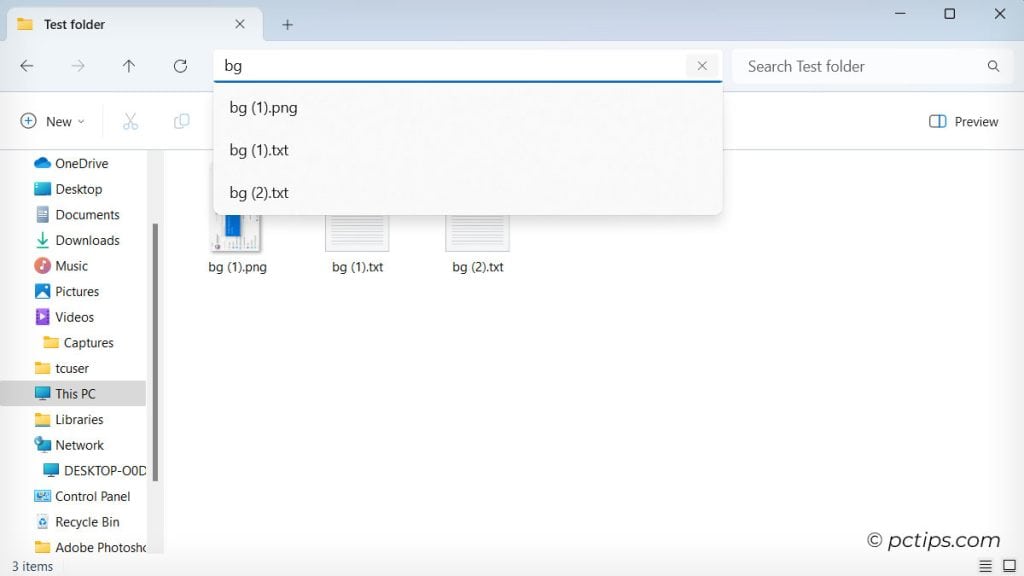
So simple, so fast.
The address bar is also a breadcrumb menu. Click the tiny arrows next to folders in the address bar and you’ll get a full folder tree to navigate with.
It’s way faster than clicking the Back button a zillion times.
Use the Address Bar for Command Line Shortcuts
The File Explorer address bar can do all kinds of command line magic.
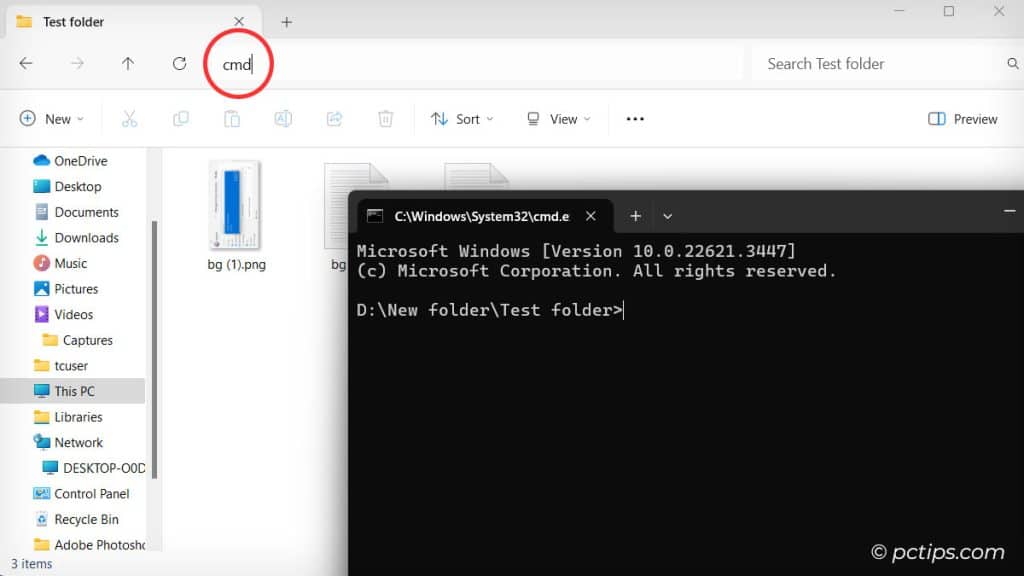
Try typing “cmd” and hitting Enter to open a command prompt in that folder. Or “powershell” for a PowerShell prompt. Or “notepad” to launch Notepad instantly. Go nuts!
The Context Menu is Clutch
Right-clicking a file or folder brings up a wealth of options, from basic stuff like Copy/Cut/Rename to app-specific actions like “Scan with Microsoft Defender“.
But here’s a pro tip: Holding ‘Shift’ while right-clicking can unlock even more possibilities!
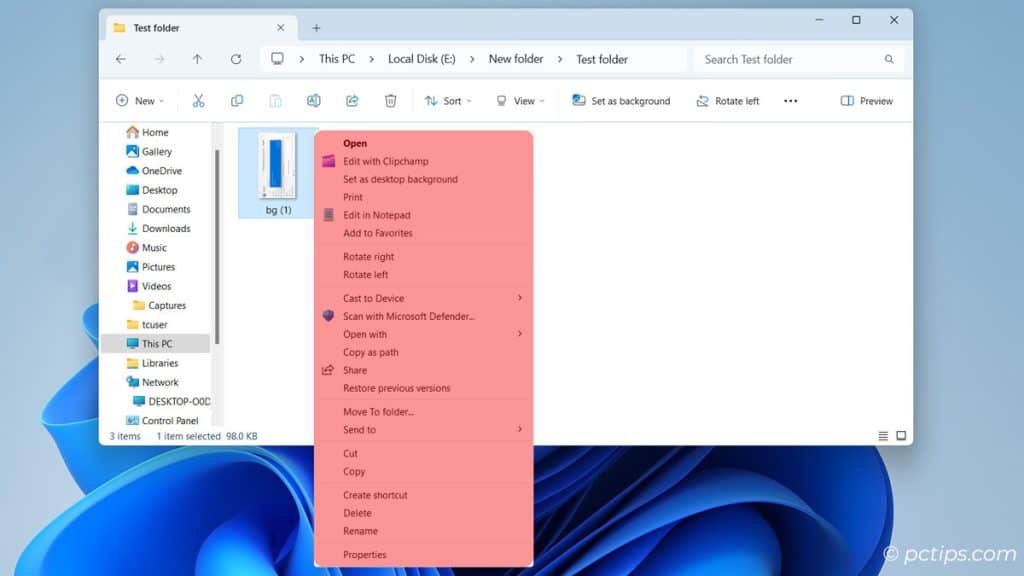
Depending on the file type and your programs, you might see options for multiple selections or extended actions. Take a minute to explore your options and you’ll be well rewarded.
Copy or Move to a Subfolder
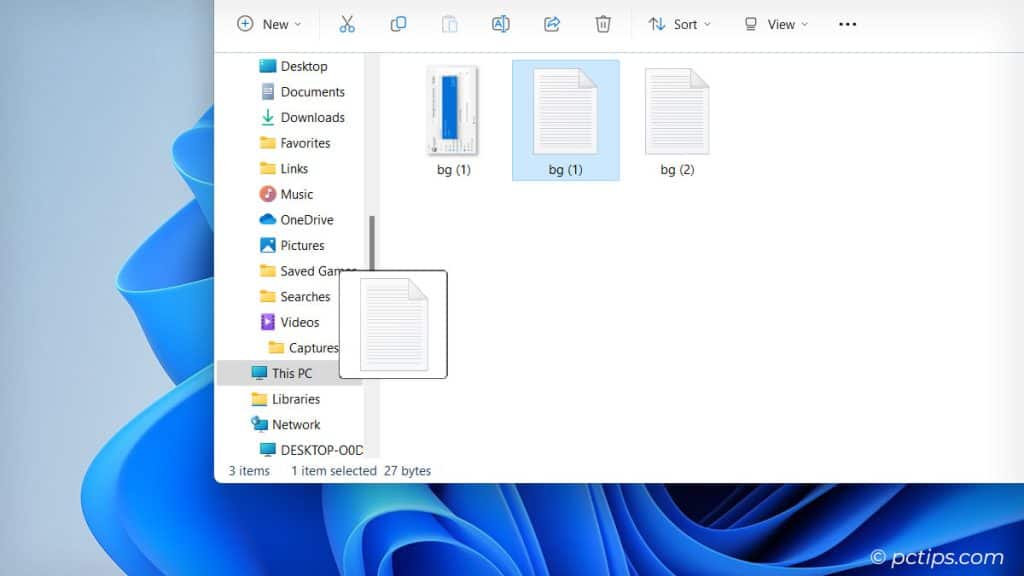
Holding Ctrl (copy), Shift (move), Alt (create shortcut) while dragging files to a folder will pop open that folder so you can drop the files into a subfolder. Keep holding and you can drill all the way down.
It sounds awkward, but it’s so fast once you get the hang of it.
Quickly Duplicate the Current Path
Need to tell someone where a file is buried? Click the address bar, press Ctrl+C, and the full path is copied for pasting. Instant directions.
Sorting is Your Secret Weapon
Click any column header in Details view to sort. Clicking Name groups by file type (folders, then files alphabetically). Clicking Date Modified sorts by date modified. Clicking Size, well, you get the idea.
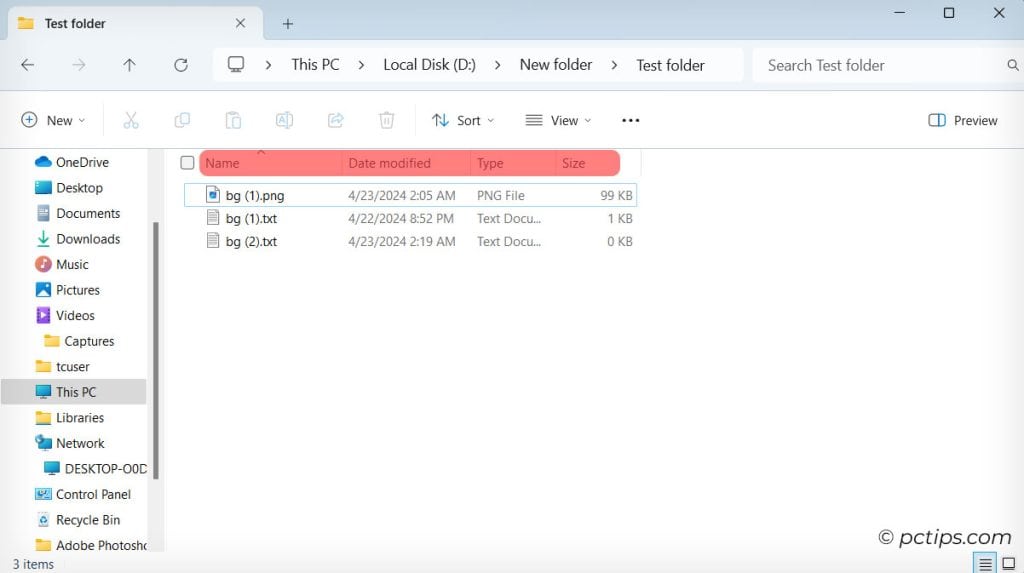
Click again to reverse sort.
But wait, Group By is even better! In Details view, right-click any column header and “Group by” whatever you want — name, date, type, tags, you name it (pun intended). Instant organization.
Zoom in and out with Ctrl + Scroll Wheel
Hold Ctrl while using the scroll wheel to change icon size on the fly tiny icons for a birdseye view, giant icons to really see those thumbnails.
Quick Select with Checkboxes
In any view, click the “View” tab and check “Item check boxes.” Now you can just click checkboxes to select files, no Ctrl or Shift needed.
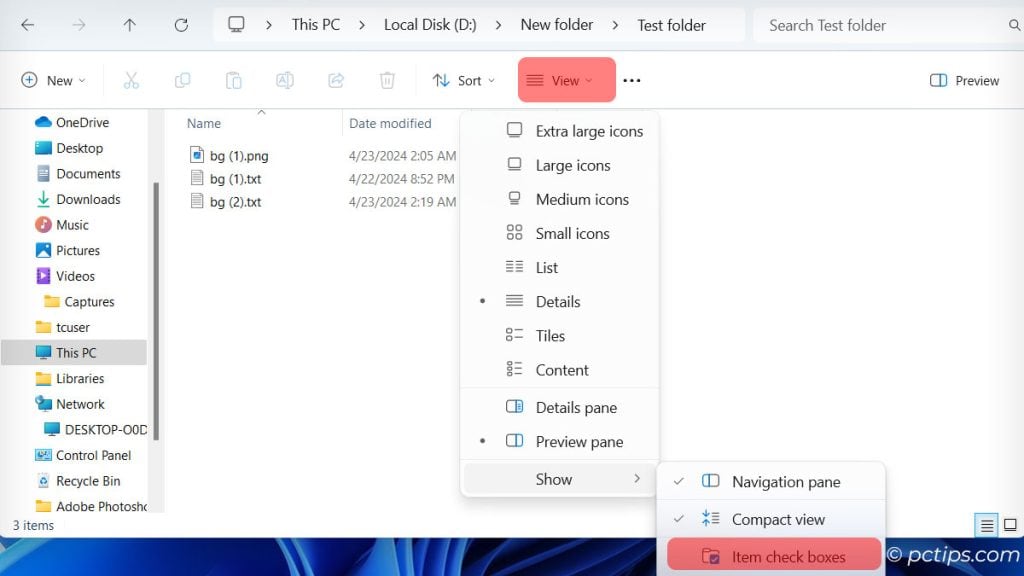
I use this all the time for selecting non-adjacent files.
Shift-click to Select a Range of Files
This is an old school trick, but I’m shocked how many people don’t know it. Click the first file, then shift-click the last file, and voila — the whole range is selected.
Combine it with Ctrl-click to select multiple ranges. Booyah.
Use the Keyboard to Select Files
Tapping the first letter of a filename will jump to it. Keep typing that letter to cycle through files that start with it.
Press the Home key to jump to the first file, End to jump to the last. Hold down Shift and use the arrow keys to select multiple files. Faster than clicking!
Copy, Don’t Just Cut
When you’re moving files between drives or to network shares, always copy (Ctrl+C), then delete the originals after you’ve confirmed the copy worked.
Cutting (Ctrl+X) leaves you with nothing if there’s a hiccup during the transfer. Don’t risk it.
The Old Right-Click Drag Move is Still the Best
Dragging and dropping to move files feels modern, but it’s error-prone. Right-click and drag instead, then you can choose Copy, Move, Create shortcuts, or Cancel if you change your mind.
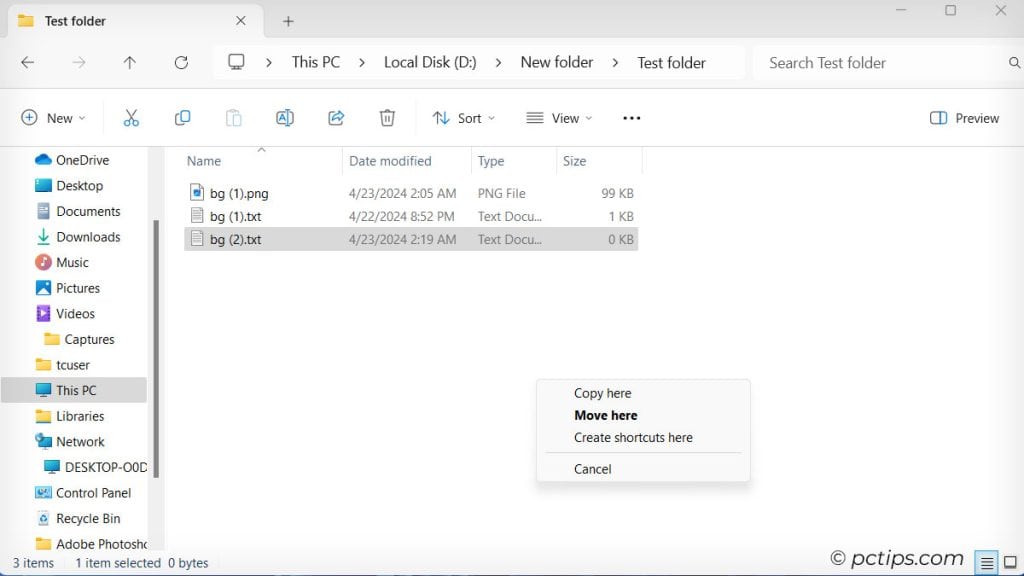
I use this constantly.
Skip the Recycle Bin
File this under “dangerous but useful“: If you hold Shift while deleting a file, it bypasses the Recycle Bin. POOF.
Only use this for stuff you’re positive you’ll never need again, but man is it cathartic.
Embrace Drag and Drop
You can drag files and folders to the navigation pane to copy or move them there. Holding Ctrl while dragging will always copy, while Shift will always move. Slick.
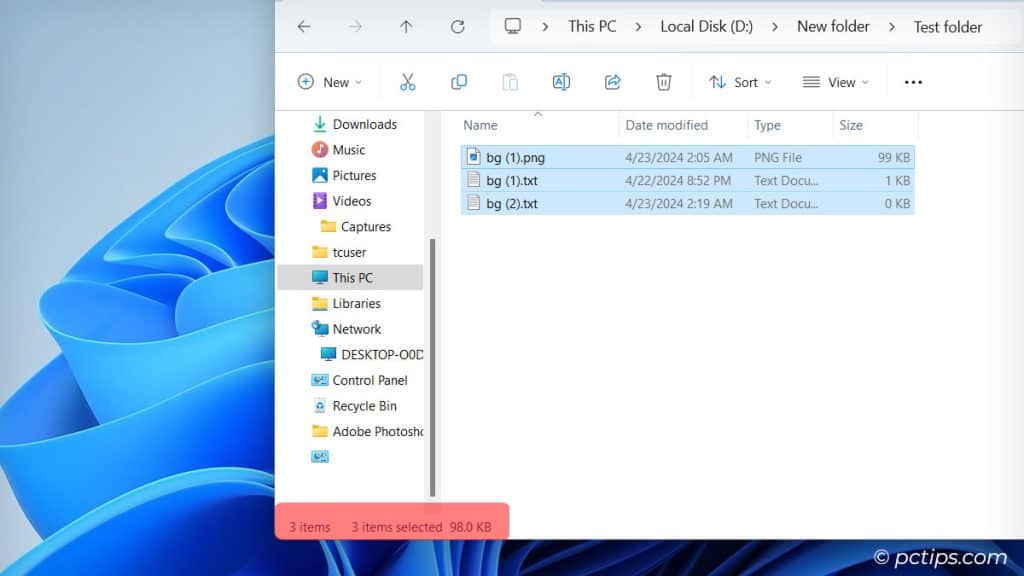
Check the Status Bar for Selection Info
When you select files, the total size and number of files appear in File Explorer’s title bar.
No need to open a properties window — it’s right there.
Pin Frequently-Used Folders to Quick Access
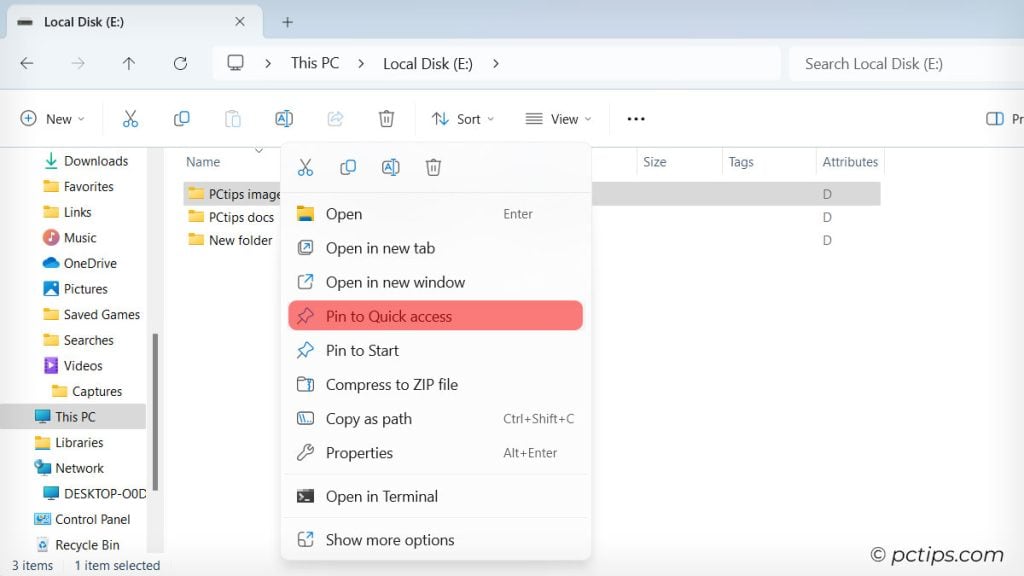
Got a few folders you open all the time? Drag them to the Quick Access section (in the navigation pane) for one-click access.
Drag any folder there (or right-click it and select “Pin to Quick Access“) for easy access. I’ve got my various dev, projects, tools, and downloads folders pinned and I use ’em constantly.
See Your True File Extensions
Some viruses like to disguise themselves as innocent-looking files like “cute-cat.jpg.exe“. To make sure you can spot these fakers, open File Explorer. Then, click on View tab > Show > File name extensions.
Now you’ll never accidentally open malware because you thought it was a photo.
Ditto for hidden files. In the View tab, select “Hidden Items.”
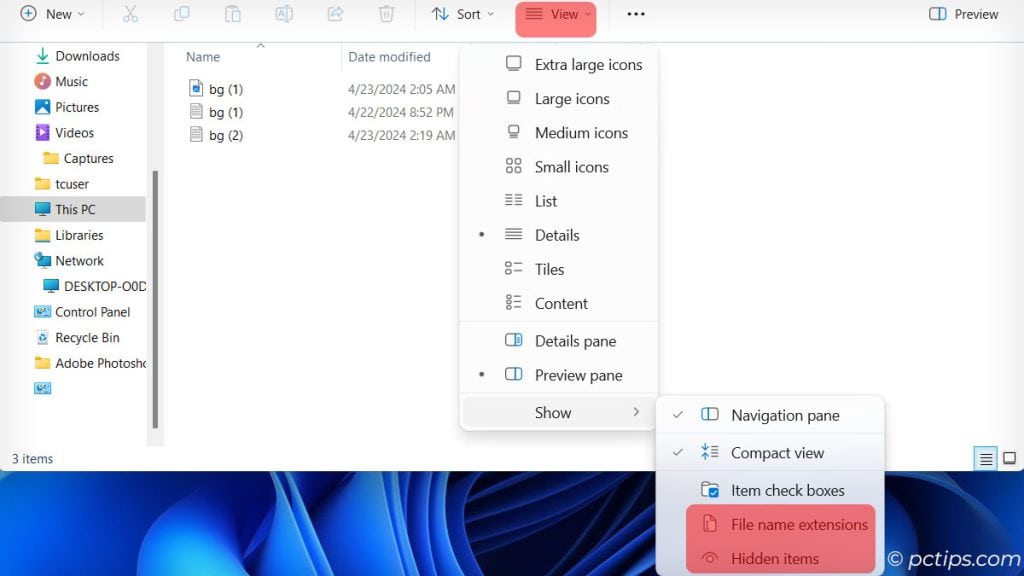
Yeah, it clutters the view a little, but you’ll always know what’s really there.
Show the Super Hidden Files
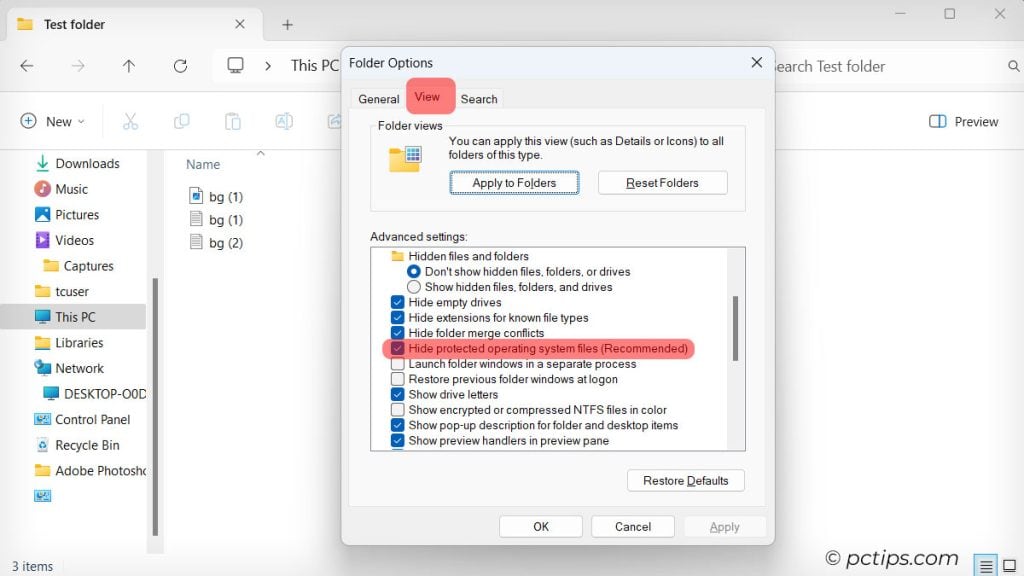
Click on the three dots icon and select Options. Then, click the View tab, and uncheck “Hide protected operating system files (Recommended)”. Hit OK and you’ll now see things like the AppData, Program Files and Windows folders. Careful in there, stud.
See All Your Drives at a Glance
Click “This PC” and bask in the glory of all your drives and their free space. Want to add network drives or cloud storage to the list?
Just right-click and “Map network drive” or “Add a network location”. Easy peasy.
Use Tabs for Multitasking
Got too many Explorer windows open? In Windows 11, just click the “+” icon on the Tabs Toolbar. Ctrl+T works too.
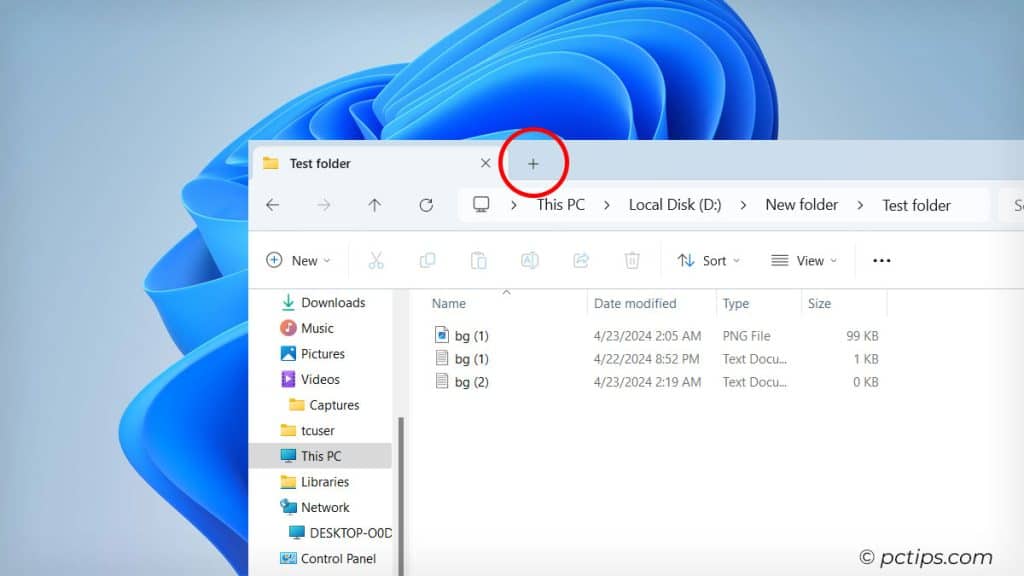
Now you can consolidate those windows into one neat tabbed interface. Amazing.
Master Middle-Click for Power Moves
Use middle-click to open folders in a new tab (not window!), or Shift+middle-click for a new instance of Explorer.
With some mice you can middle-click by clicking both buttons at once.
Snap Folders Side by Side
Drag a folder to the left or right edge of your screen and it’ll snap to fill that half. Drag another to the other side.
Bam, perfect for dragging files between locations. (This works for any apps in Windows, but it’s killer for Explorer and comparing text/code.)
Rename Files Sequentially
Select multiple files, right-click the first one, and choose Rename.
Type a name and hit Enter. All the selected files will get that same name with a (1), (2), etc. appended.
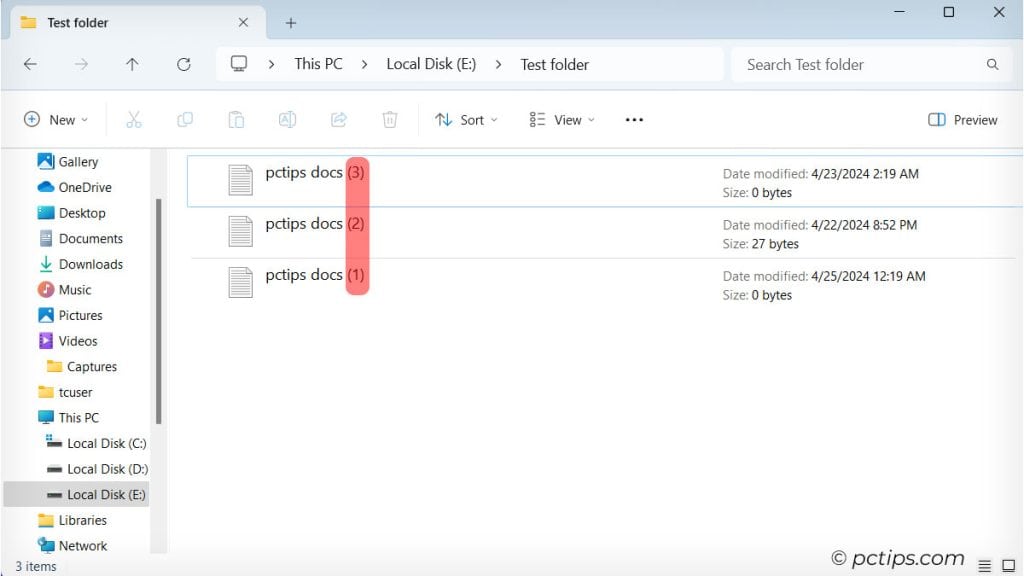
Also, Use F2 to rename files or folders. Press Enter to save changes. Press the TAB key to rename the next file. Huge time saver.
Open a File’s Location
If you have a file open in an app and need to see where it’s actually stored, right-click the file’s taskbar icon (or Shift+right-click if the app is grouped) and choose “Open file location.”
Explorer will open with that file selected.
Pin Your Network Folders
If you access folders on other PCs regularly, open them in File Explorer, then right-click them and choose “Pin to Quick Access.” Now they’ll always be one click away, even if you get disconnected.
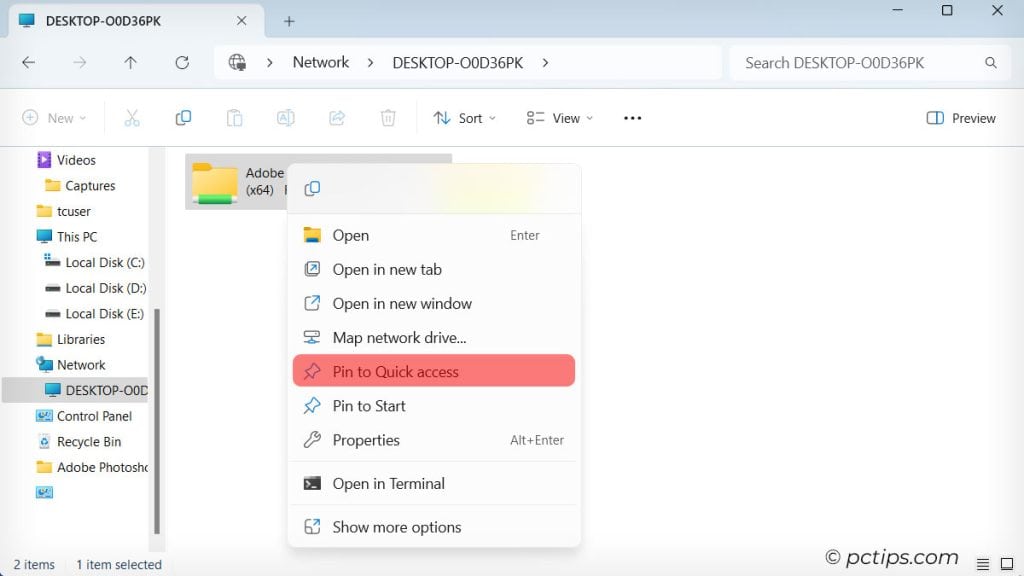
When you click them, the network connection will re-establish automatically. Slick.
Encrypt Your Sensitive Files
Got some files you really don’t want anyone snooping? Select them, right-click, and choose Properties, then click Advanced and check “Encrypt contents to secure data.”
Now those files will only be readable when you’re logged in (and not by other user accounts).
Just don’t forget your login password!
Put Your Libraries to Work
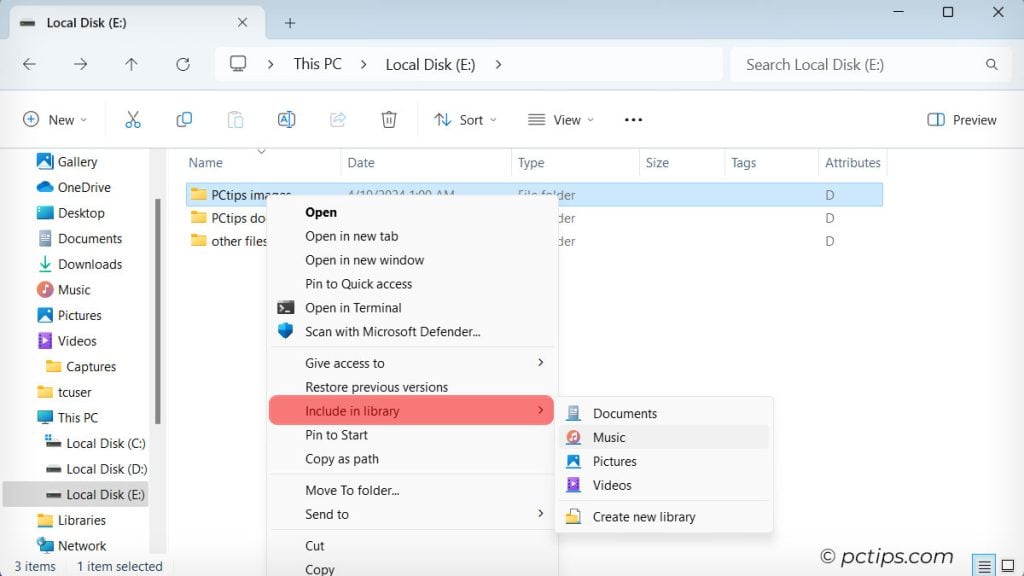
Under “This PC” you’ll see a Libraries folder. Click on it to see the default Documents, Music, Pictures and Videos libraries.
You can add any folder to a library —just Shift+Right-click the folder > select “Include in library” > select library.
Create Your Own Libraries
You’re not limited to the default libraries — right-click the Libraries header > Show more options > New for whatever you want — Work, School, Taxes, you name it.
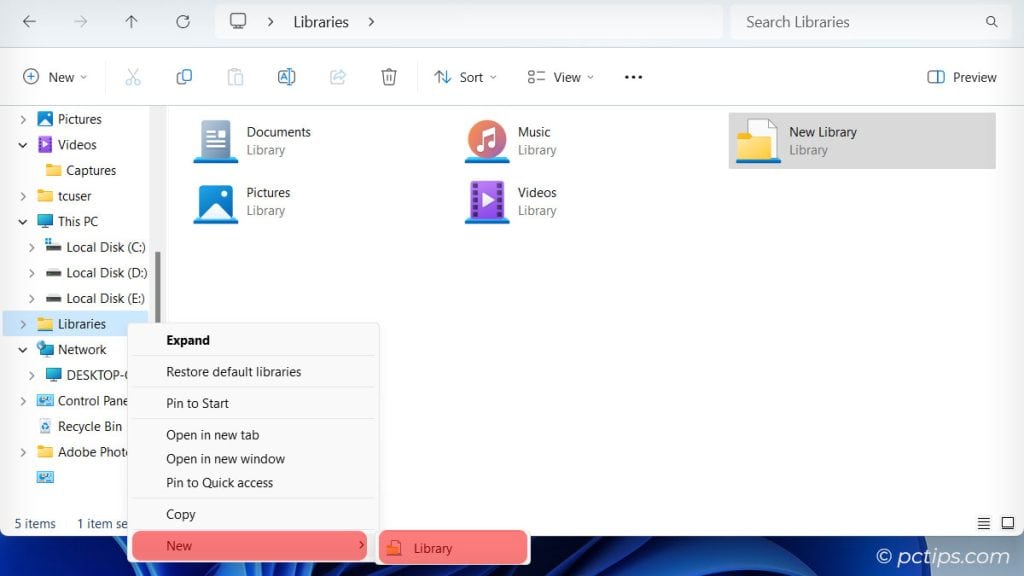
Then add folders to them for easy grouped access.
Pin Any Folder to the Start Menu
Right-click a folder and choose “Pin to Start” to add it to the tile area of your Start menu. Ridiculously handy for your most-used folders.
Access the Secret Send To Menu
Right-click a file or folder for an expanded menu and select Send To option that includes your Documents, Downloads, and Desktop folders. One-click filing!
Customize the Send To Menu
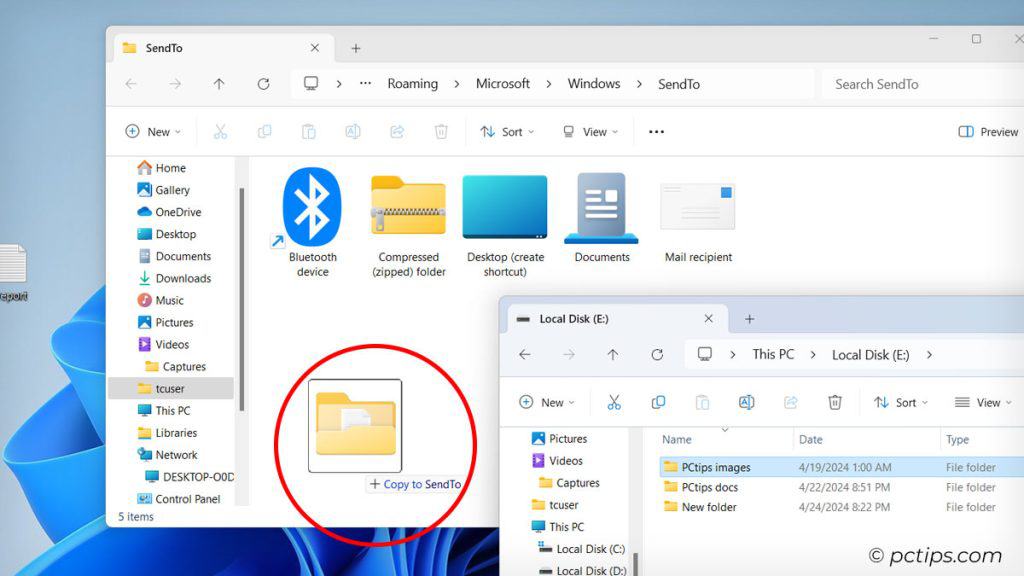
The “Send To” menu is super useful for copying/moving files to standard spots, but you can make it even better.
Open Run (Win+R), type “shell:sendto” and hit Enter.
Now just drag your favorite “copy to” folders to that window. Bam.
Customize the Send To Menu, Part 2
You know that “shell:sendto” trick from earlier. Open that folder and hold Shift while right-clicking in the blank space. Choose “New” > “Shortcut” and browse for any app you want — like Pictures or Word.
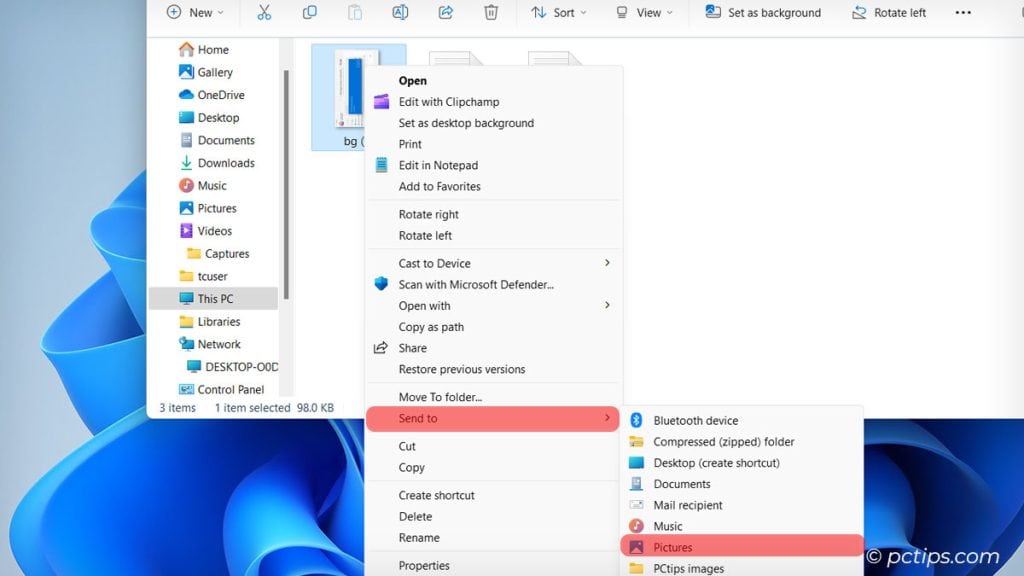
Now you can right-click files and send them to that app in a snap.
Use the Built-in ZIP Support
Right-click files, “Send to”, “Compressed (zipped) folder” and bam, you’ve got an archive. Or right-click a ZIP and “Extract All…” Done and done.
Get to Known Folders Fast
Click the address bar and type shell:downloads, shell:documents, shell:desktop (or any other known folder name) to jump directly to that folder. Ridiculously useful.
Speed up Folder Navigation
Alt + Left Arrow goes back, Alt + Right Arrow goes forward, and Alt + Up Arrow goes up one level in the folder tree. These are way faster than clicking tiny buttons or breadcrumbs!
Hit Shift+Tab to jump into the Navigation Pane, then use your arrow keys to move around. Tab gets you back to the main window.
See File Metadata
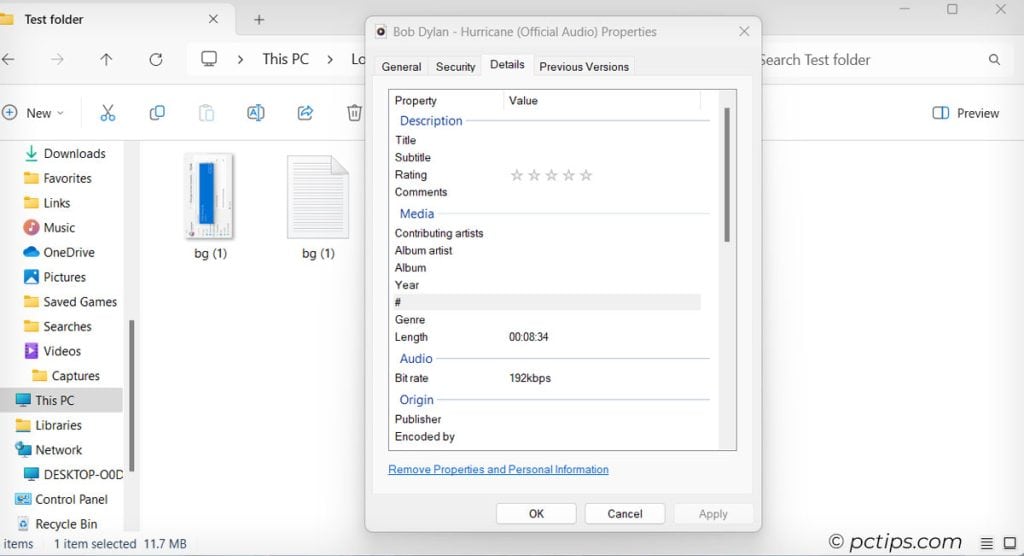
Right-click the file > Properties > Details You’ll see all kinds of useful info like the file’s author, tags, title, camera model (for photos), and more.
Expand the Details Pane
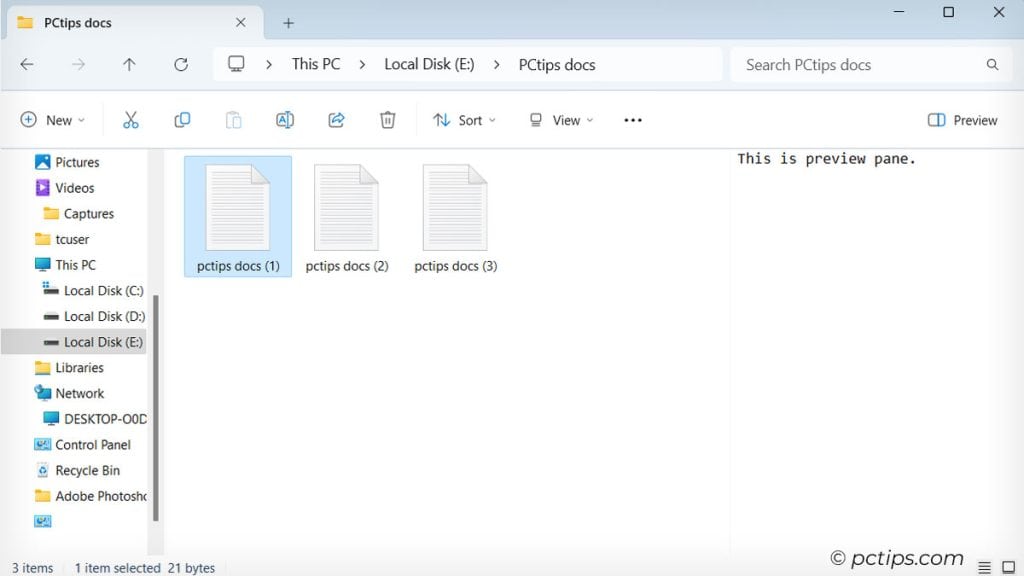
That dinky preview pane on the right is okay for reading file metadata, but to actually preview files, drag the left border of that pane way out. Now it’s like a media preview. Love it.
Want to toggle that preview pane without taking your hands off the keyboard? Just hit Alt+P to enable the preview pane.
Take Columns to the Max
In Details view, each folder remembers the column sizes you set. For folders with long filenames (like your Documents), drag that Name column way out so you can see the full names without squinting.
Quickly resize columns by double-clicking the column separator. It auto-fits the column to the longest filename – such a timesaver!
Customize Columns for More Useful Info
Right-click any column header in Details view and check the columns you want to see, like “Date created,” “Tags,” or “Dimensions” for images.
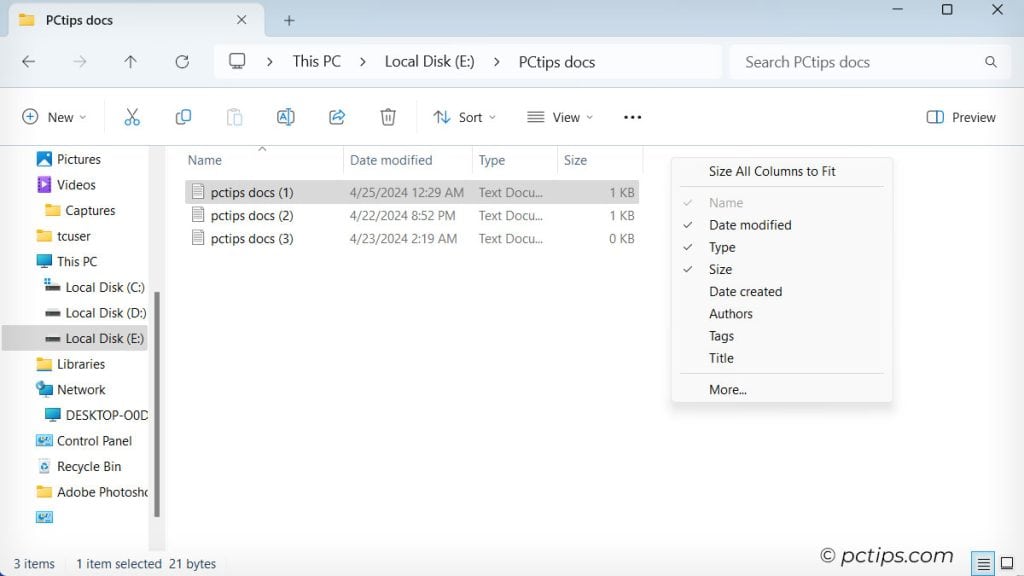
For power user points, click “More…” to access dozens of extra columns depending on the file type. It’s like seeing The Matrix.
Make Custom Views
Tweak a folder’s view just how you like it, then click “Options” (under “three dots”), go to the View tab, and click “Apply to Folders” to make your tweaks the default for that folder type. Sweet.
Use Ctrl+Shift+1 through Ctrl+Shift+8 to quickly switch between different views (Icons, List, Details, Tiles, and more).
Scan with Windows Defender
Shif+Right-click any file or folder and choose “Scan with Microsoft Defender” to run a quick malware scan on it.
I do this for every flash drive that comes my way, just to be safe.
Find Duplicates Fast
In any folder, click in the search box and type “name:” followed by whatever filename you want to check for dupes of, like “name:report.txt“.
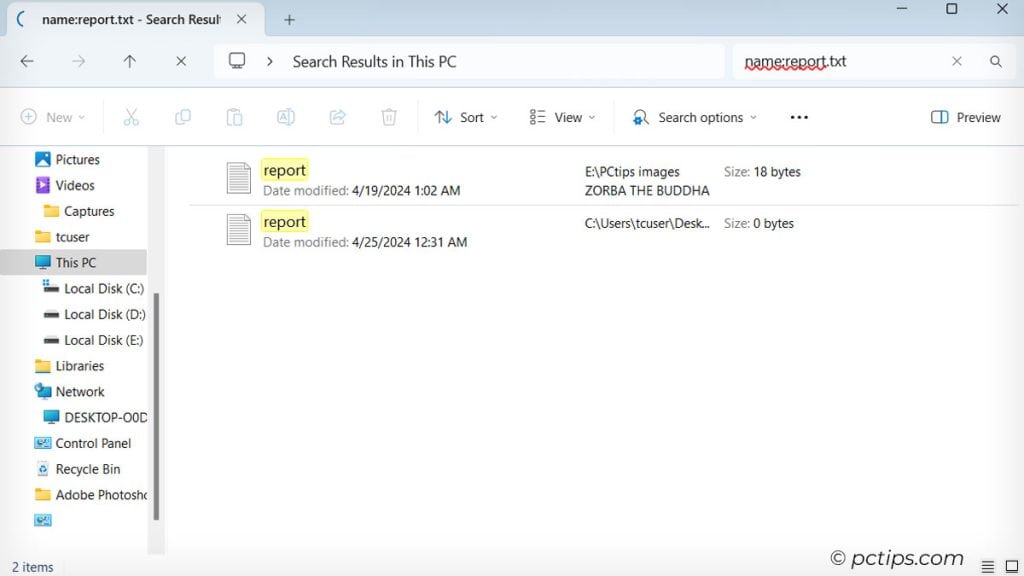
File Explorer will show you every file with that exact name, ignoring subfolders. Super handy.
Advanced Search is Crazy Powerful
Just click the search box and start typing. You can search by kind, date modified/created, file size, and all sorts of properties.
Looking for large videos? Search “kind:=video size:>1gb”.
Specific Office docs? “kind:=document datemodified:thisweek”. You’ll be a search wizard in no time.
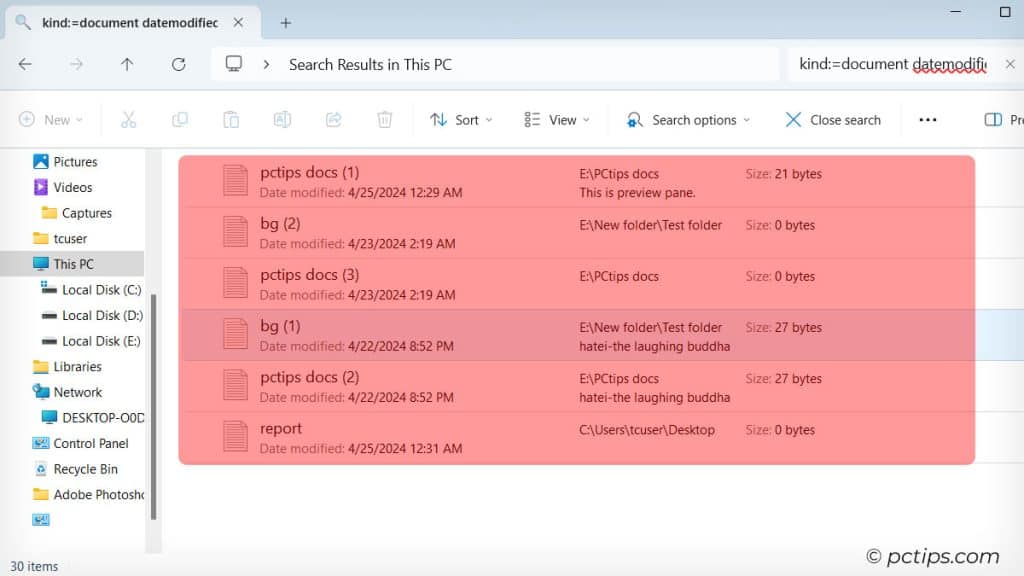
You can also use the search options menu in the search results to refine your search further.
Search Inside Files, Not Just Filenames
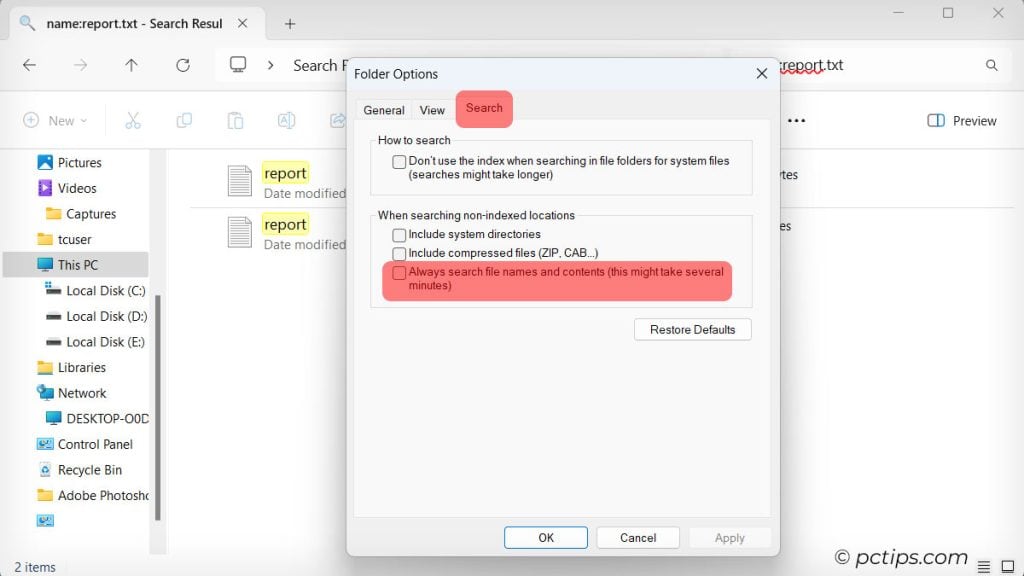
File Explorer can search within files for bits of text, but it’s not enabled by default. Click the three dots, then Options.
Click the Search tab and check “Always search file names and contents.” It’ll slow searches down a bit, but you’ll always find what you need.
Use tags, not just folders, to organize.
For files that support tags (like Office documents, images, audio, and video), you can add keywords or phrases in the Tags field of the file’s properties (right-click > Properties > Details tab).
Click “Apply” and “OK” to save. Later, search for tagged files by typing tags:yourtag in the File Explorer search box.
Note that not all file types have a Tags field.
Save Any Search as A Virtual Folder
You can turn any search into a virtual folder that updates dynamically by clicking “Save search” after doing one.
I use these for things like “all PDFs in this folder tree” or “files from 2024”.
Embrace File Explorer’s Quirks
Look, File Explorer isn’t perfect. Sometimes it crashes, sometimes it hangs, sometimes it does weird stuff like not letting you rename a file for no apparent reason.
When that stuff happens, just take a deep breath, close it down (use the Task Manager if you have to) and start again. It’s not you, it’s File Explorer.
You’ll get through this together.
There you have it, folks. 50+ stone-cold, industrial-strength, Jedi-level File Explorer tips, tricks, and secrets. If you’re not a full-on File Explorer master after this, I’ll eat my hat.
Now, I know you’re probably thinking “Wow, that’s a lot of stuff. How am I supposed to remember all these?” Well, you don’t have to memorize them all right away!
Print this list out (or save it to your meticulously organized Documents folder, of course), and keep it handy. Start with the tips that sound most useful to you, and practice them until they become second nature.
Then keep adding more to your repertoire, bit by bit.
Thank you very much, Binod Bharati. Very timely. Very useful information.