25 Hidden Windows Features You Probably Didn’t Know About
Last Updated:
Windows has been the go-to operating system for decades, but even power users miss most of its useful hidden features.
I’ve spent countless hours digging deep into Windows 10 and 11, unearthing gems that have blown my mind.
These aren’t your typical “use keyboard shortcuts” kind of tips.
We’re talking lesser-known, game-changing features that’ll have you wondering how you ever lived without them.
Trust me, you’re gonna want to try these out ASAP.
Let’s dig in.
Winget: The Windows Package Manager
If you’re sick of Googling for software, downloading sketchy .exe files, and clicking through a zillion installation prompts… have I got news for you.
Windows has a hidden package manager called “winget” that lets you install, update and manage apps with just a few quick commands.
To get started, open up PowerShell or Command Prompt and type winget.
You’ll get a quick rundown of all the commands at your disposal.
Here’s a little taste of what winget can do:
winget install <app>: Installs an appwinget upgrade <app>: Updates an app to the latest versionwinget upgrade --all: Update all your appswinget uninstall <app>: Removes an appwinget search <query>: Searches the winget catalog for an app
So instead of hunting for the VLC download page, you can just pop open a terminal and punch in…
winget search vlc
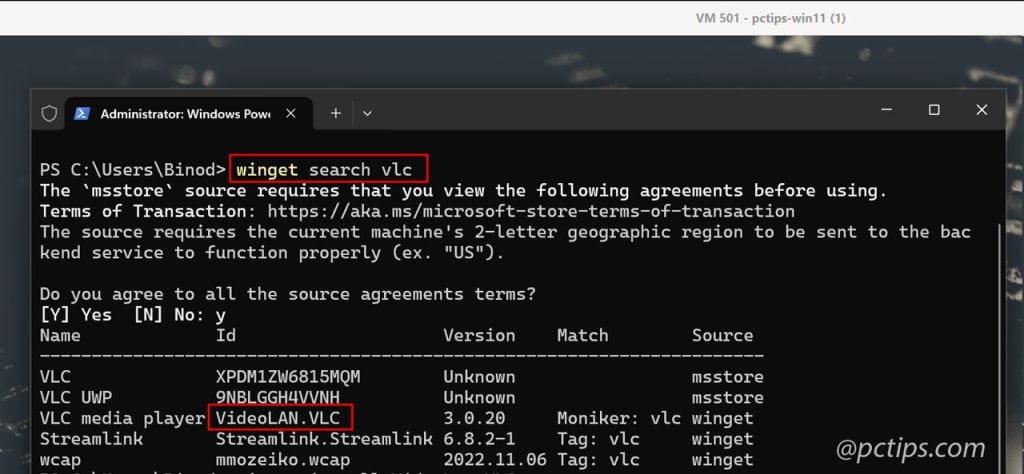
grab the app ID, then
winget install VideoLAN.VLC
…watch it install automagically. No fuss, no muss, no twenty “Next” buttons to click.
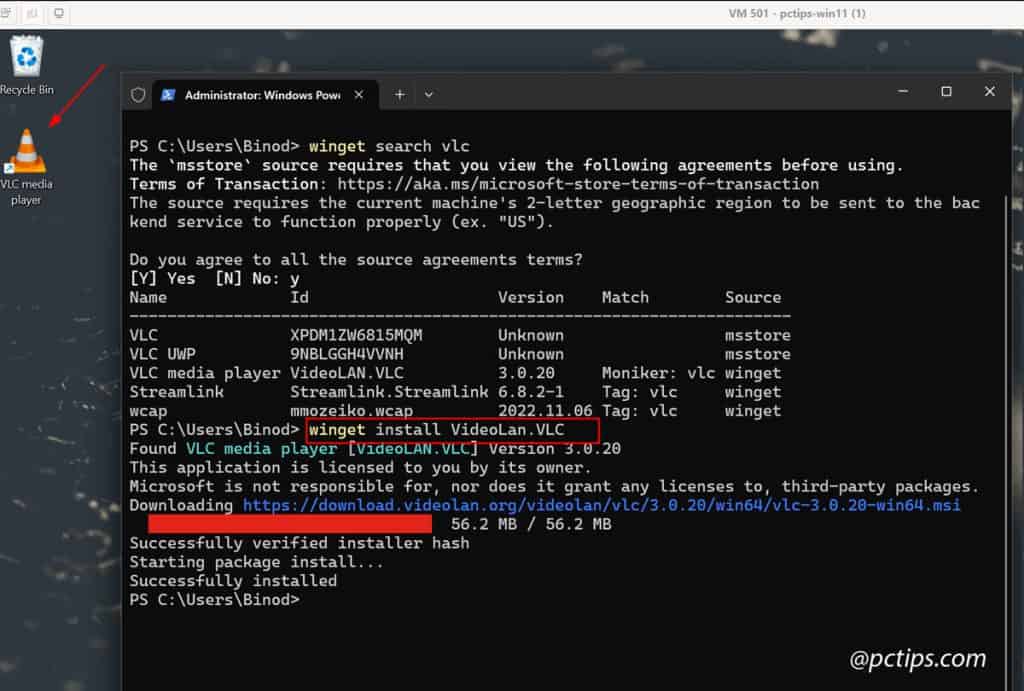
If you have ever used Linux, It’s like apt-get for Windows..
except it took Microsoft a decade longer to invent. Better late than never, I guess!
Once you get used to it, you’ll wonder how you ever lived without it.
Winget is hands-down one of the best kept secrets in Windows.
Startup App Notifications
You know how some apps sneakily configure themselves to launch at system startup?
And how that can make your boot times slug-slow?
Well, Windows now has your back with startup app notifications.
With this feature enabled, you’ll get an alert whenever an app sets itself to run at startup.
This puts you in control, letting you decide which programs are worth the auto-launch.
To access it:
- Windows 11: Settings > System > Notifications > Scroll down to “Startup App Notification”
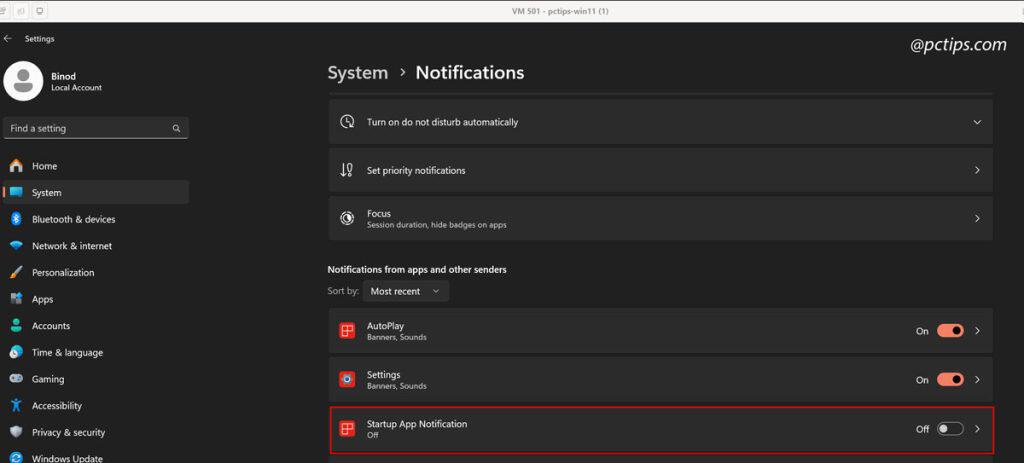
It won’t prevent the app from starting up, but at least you’ll know who the culprits are!
From there you can decide whether to let them continue or give them the boot in Task Manager’s Startup tab.
Suggested Article:
- Computer Infected With Malware? Look for These Red Flags
- 20 Power User Secrets for Mastering Windows Task Manager
- 16 Proven Tips to Make Your Slow Computer Run Faster.
Secret Start Menu
The Start menu is a faithful friend, always there to help you launch apps and find files.
But did you know it has a super-powered alter ego?
Press Windows key + X (or right-click the Start button) to summon the “Secret Start Menu“—a hidden utility belt for power users.
This covert menu is packed with quick links to all sorts of handy tools.
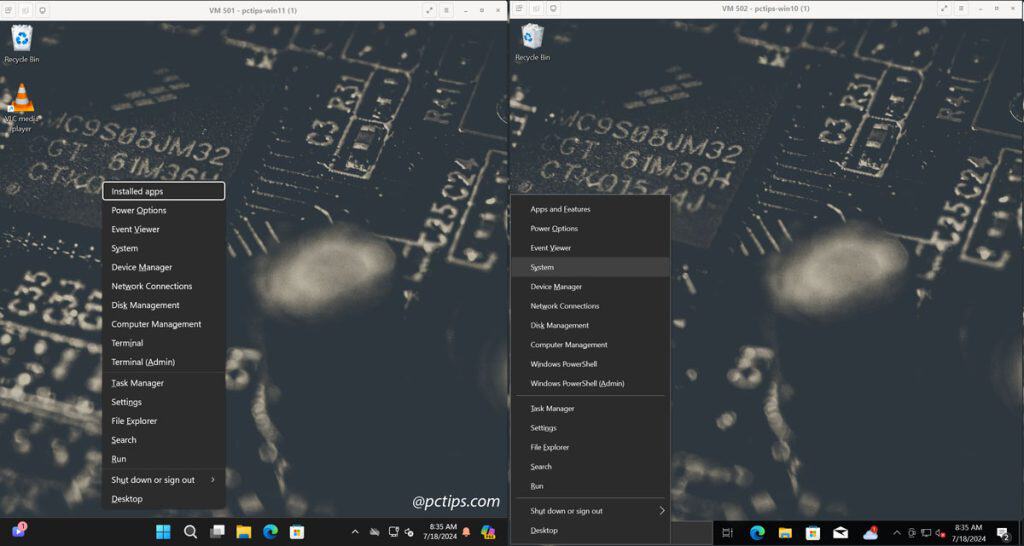
It’s got stuff like:
- Task Manager
- Control Panel
- File Explorer
- Network Connections
- Terminal (admin)
And a whole bunch more…
Think of it as a cheat code to skip digging through menus.
This is my go-to shortcut for quick access to power user tools.
Try This:
Press Win+X then hit “M“. This opens up Device Manager.
Or Win+X followed by U, then U again. Your computer instantly shuts down.
You’re just one keystroke away from your favorite Windows utilities. Pretty handy to have in your back pocket.
Also Read: 18 Clever Ways to Customize Your Windows Taskbar
God Mode
Now, I know what you’re thinking – “God Mode?
Is this some kind of cheat code?” Not quite, but it might feel like one!
God Mode is a special Windows feature that puts a TON of settings and tools into a single, convenient folder.
It basically centralizes all the stuff that’s normally scattered across the Control Panel, Settings app, and other far-flung corners of the OS.
To enable it:
- Create a new folder
- Name the folder:
GodMode.{ED7BA470-8E54-465E-825C-99712043E01C}(yep, the funky brackets and all) - Press Enter, and voila – you’ve got a turbocharged shortcut to over 200 Windows tools!
View Saved Wi-Fi Security Keys
Quick, what’s your home Wi-Fi password? Can’t remember?
No worries, You can actually view the passwords for all the Wi-Fi networks you’ve ever connected to.
Handy for when guests come over and demand internet access.
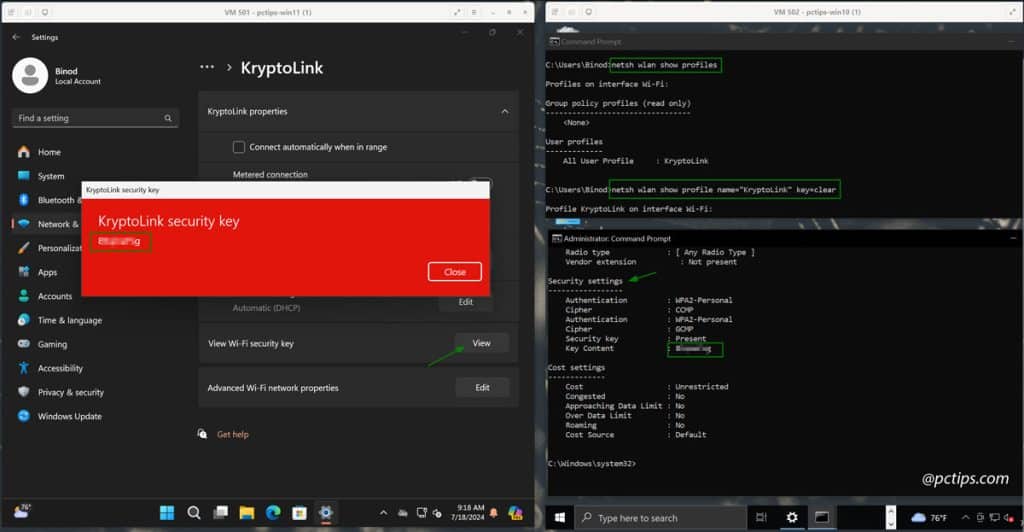
To see your Wi-Fi secrets, head to
- Windows 11: Settings > Network & Internet > Wi-Fi > Manage known networks > Select network > View Wi-Fi Security Key > View
You can also use the command line to view saved Wi-Fi passwords (works on both win10/win11).
Just open Command Prompt as an admin and type:
netsh wlan show profile name="Your_WiFi_Name" key=clear
Replace “Your_WiFi_Name” with the actual network name, and look under “Security settings” for the goods.
…there’s the password in plain text.
Of course, this is a double-edged sword.
Anyone with access to your computer can see all your network keys.
Make sure to lock your screen when you step away!
Suggest Article:
Symbolic Links (symlinks)
Symbolic links, or “symlinks” are like shortcuts on steroids.
They let you trick Windows into thinking a file or folder is stored somewhere that it’s not.
You can use them to virtually restructure your file system, sync folders across drives, or build complex backups.
One of my favorite uses for symlinks is putting application data folders on a different drive than my Windows installation.
Like so,
mklink /J "C:\Users\binod\AppData\Roaming\Mozilla\Firefox" "D:\apps\firefox"
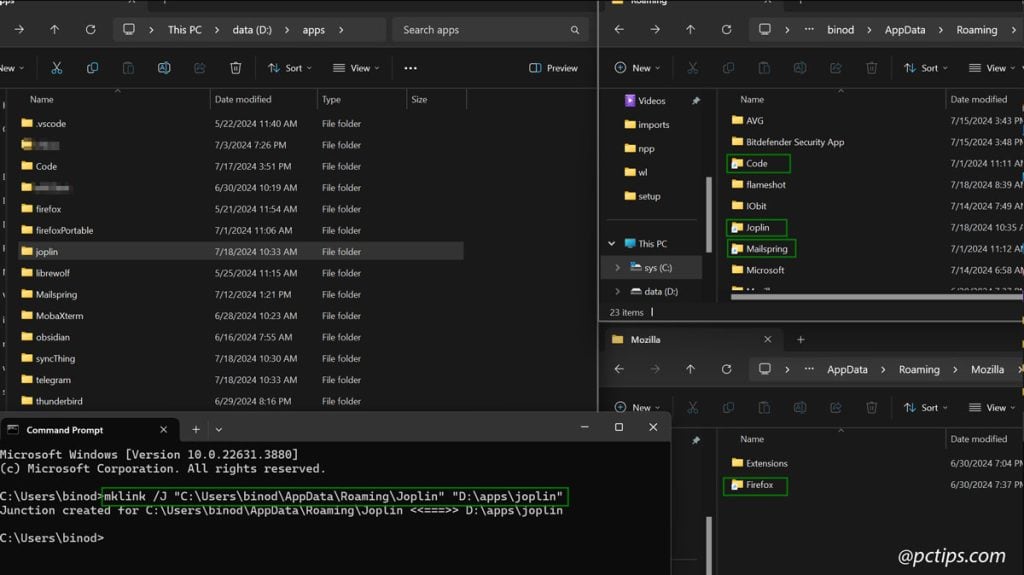
So even if Windows crashes, all my Firefox profiles, preferences and extensions are safely separate.
You can restore a symlink in seconds on a fresh installation and pick up right where you left off!
I also like keep a text file with all my common symlink commands so I can just copy-paste whenever I need to recreate them.
Here’s the basic syntax for creating symlinks:
- Directory symlink:
mklink /D Link Target - File symlink:
mklink Link Target - Directory junction:
mklink /J Link Target - Hard link:
mklink /H Link Target
Slide to Shutdown Shortcut
Shutting down your PC is a pretty common task, but reaching for the mouse and navigating menus gets old fast.
Enter the slide to shutdown shortcut—a quick, fun way to power off with a flick of your mouse.
To create this slick shortcut:
- Right-click an empty area of your desktop
- Choose New > Shortcut
- For the location, enter:
SlideToShutDown - Give it a snazzy name
- Click Finish
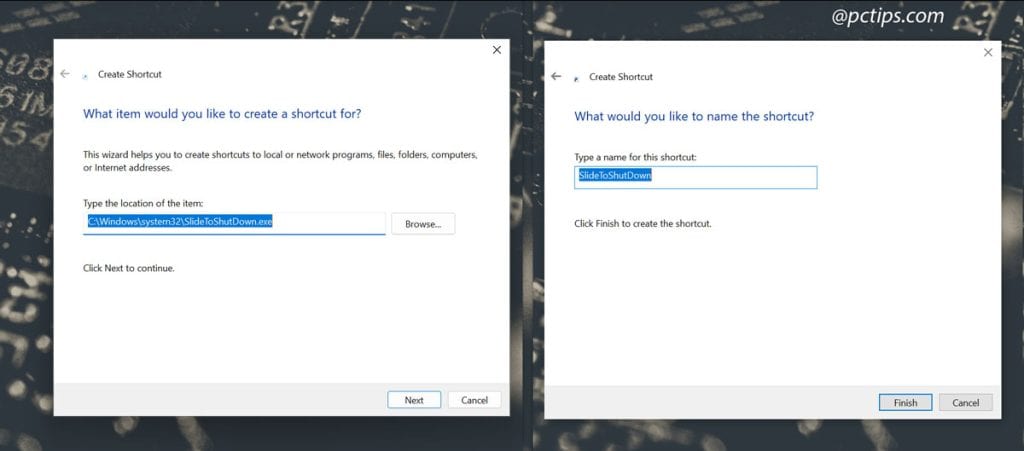
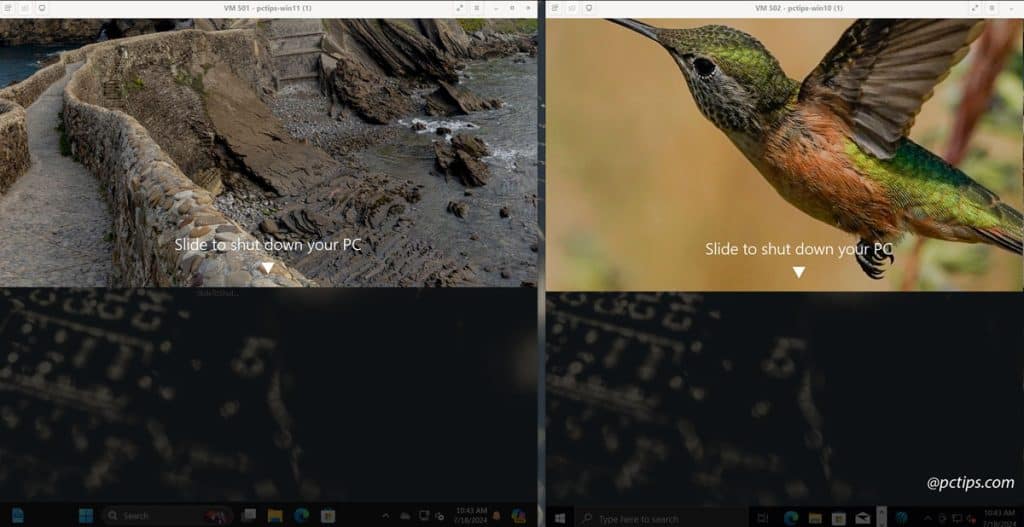
Now, double-click that shortcut and get your slide on! It’s oddly satisfying to slide down the prompt to shut down.
You can even pin the shortcut to your Start menu or taskbar for one-click access.
Pro tip: Create a folder called “pathScripts” or something similar, add it to your environment PATH variable and you can access all sorts of scripts or files just via the Win+R box. Toss your shutdown shortcut in there, and you can trigger it from the Run box (Win+R) anytime.
Hidden Administrator Account
Windows actually has a built-in admin account that’s hidden by default.
It’s mainly meant for emergency recovery scenarios, but it can be handy to activate for certain troubleshooting tasks.
To enable it:
- Open Command Prompt as administrator
- Type
net user administrator /active:yesand hit Enter - Log out and the admin account will be available on the login screen
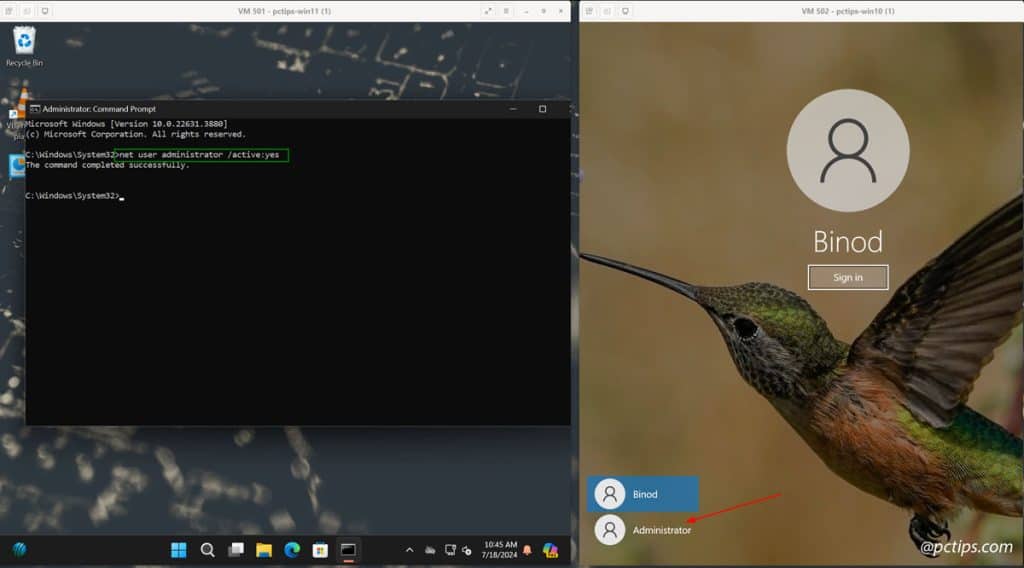
I wouldn’t use this as your main account (it bypasses a lot of security safeguards) but it’s good to know it’s there if you get locked out of your usual login.
To hide it again, just run net user administrator /active:no.
Send To Menu
The “Send To” context menu is such an underrated powerhouse.
Right-click on any file and you’ll see it – by default it has options like zipping the file, attaching it to email, and moving it to key folders.
But the real magic is that you can customize it.
All you have to do is:
- Press Win + R to open the Run dialog
- Type
shell:sendtoand hit Enter - Drag any shortcut, folder, or even program EXE into that folder
Now you’ll see them as options in your Send To menu!
I have mine set up with my most-used folders and handy tools like Notepad++, sublime, 7zip and so on
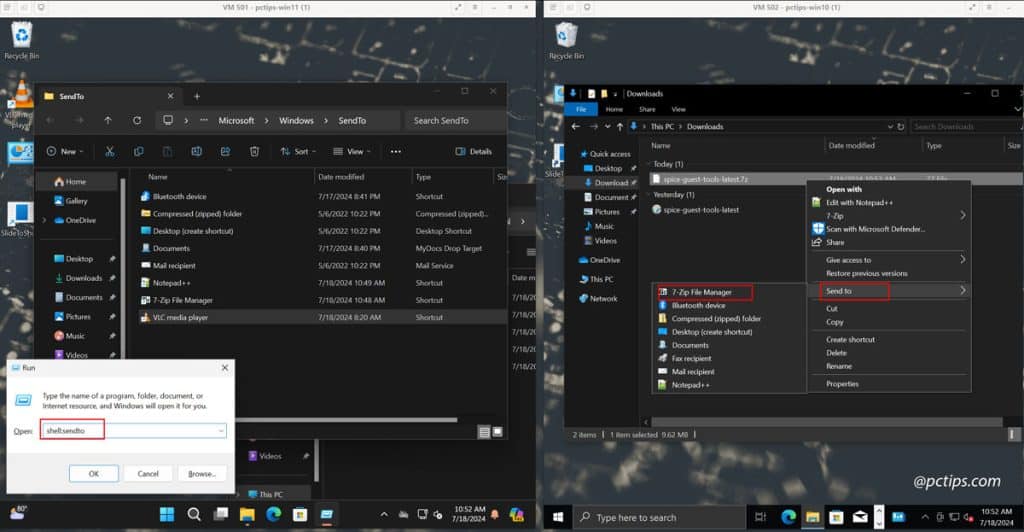
Makes quick work of repetitive file tasks.
And if you want even more right-click goodness, don’t miss my mega-list of 30 Useful Right-Click Menu Options You’re Not Using.
Dynamic Lock
If you’ve got a Bluetooth device that you always carry with you (like a phone or smartwatch), you can set Windows to auto-lock when you step away with that device.
It’s called Dynamic Lock, and it’s like a proximity-based security guard for your PC.
As soon as your paired device goes out of range, Windows locks down.
When you come back, it unlocks. Magic!
To set it up:
- Windows 10 & 11: Settings > Accounts > Sign-in options > Dynamic Lock
You can choose which devices trigger it, so you don’t get unexpectedly locked out if a peripheral disconnects.
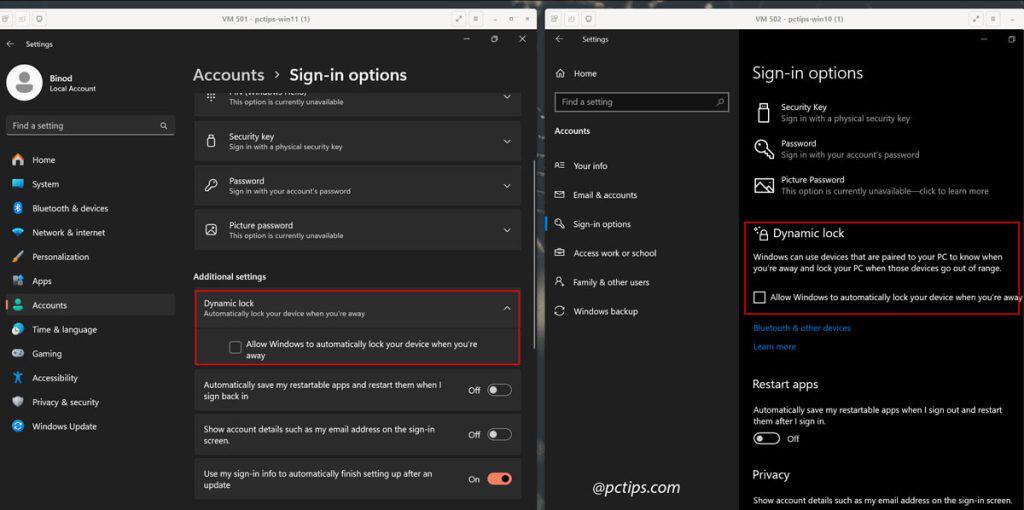
It’s a small touch, but I love how futuristic it feels.
Plus, it encourages me to actually lock my PC instead of just walking away willy-nilly.
Copy and Paste Across Devices
Ever wished you could copy something on your PC and paste it on your laptop?
With Windows’ Cloud Clipboard, you totally can.
When you enable Cloud Clipboard on Windows 10 & 11, your copied text and images will automatically sync across all your Windows devices.
You can even access a history of your recently copied items by pressing Win + V.
To set it up, go to: Settings > System > Clipboard > Toggle on “Sync across devices”
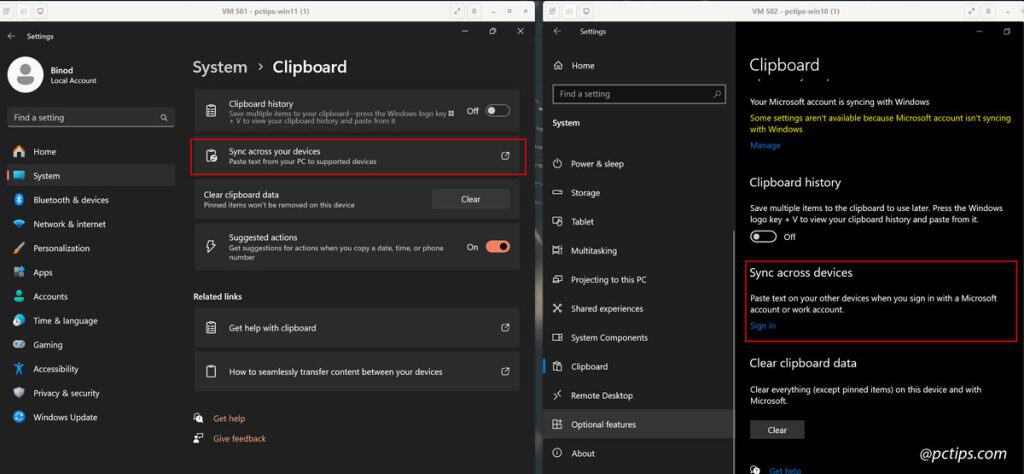
As long as you’re signed in with the same Microsoft account on each device, your clipboard contents will magically stay in sync.
It’s a real boon for productivity, but keep in mind that your clipboard data will live in Microsoft’s cloud.
So maybe don’t use it to copy and paste your darkest secrets!
Suggested Article:
Snipping Tool
Gone are the days of full-screen printscreens and clumsy cropping in Paint.
The new and improved Snipping Tool (called Snip & Sketch in Windows 10) is a screenshot powerhouse that lets you snip any part of your screen with ease.
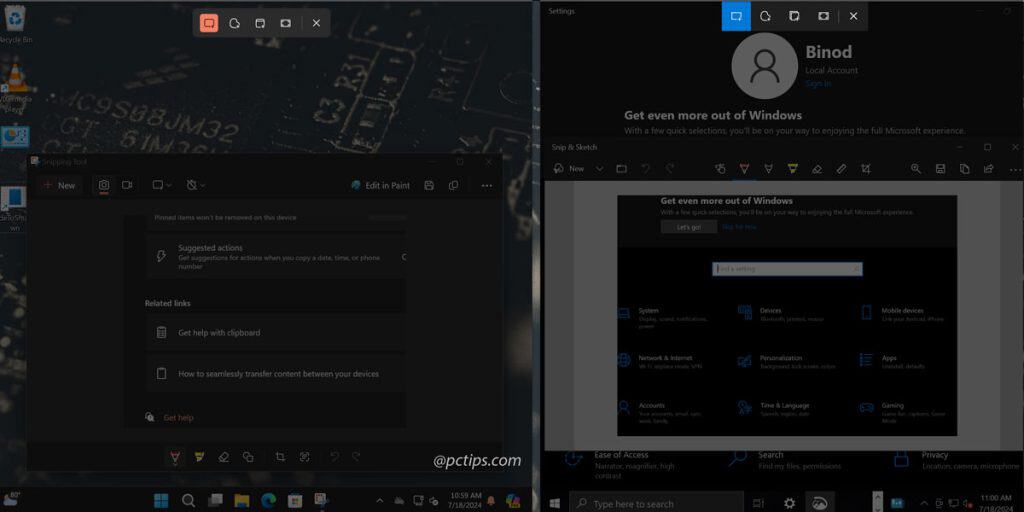
To access the Snipping Tool:
- Windows 11: Press Win + Shift + S or search for “Snipping Tool”
- Windows 10: Search for “Snip & Sketch”
Once open, you can choose from rectangular, freeform, window, or fullscreen snips.
You can also delay your screenshot by 3 or 10 seconds—perfect for capturing menus or popups.
You can also set the PrtSc key to open screen snipping directly, making it even easier to capture your screen.
Now, I’ll let you in on a little secret.
As much as I love the built-in tool, there’s a whole world of advanced screenshot techniques out there.
I’ve actually written an entire article on “How To Take Screenshots Like a Pro” that’ll take your screen-capturing game to the next level.
Windows Recovery Environment (WinRE)
Let’s not beat around the bush: sometimes, Windows just breaks.
Maybe a bad driver caused the dreaded Blue Screen of Death.
Maybe an app started misbehaving after an update.
Or maybe things just feel…off, and you don’t know why.
In those oh-crap-my-PC-is-busted moments, there’s a little-known tool that can save the day: the Windows Recovery Environment (WinRE).
Think of it like a hospital for sick PCs—a special diagnostic mode that lets you troubleshoot and repair your system, even if Windows won’t start normally.
To access the WinRE:
- Windows 11: Settings > System > Recovery > Advanced startup > Restart now
- Windows 10: Settings > Update & Security > Troubleshoot > Advanced startup > Restart now.
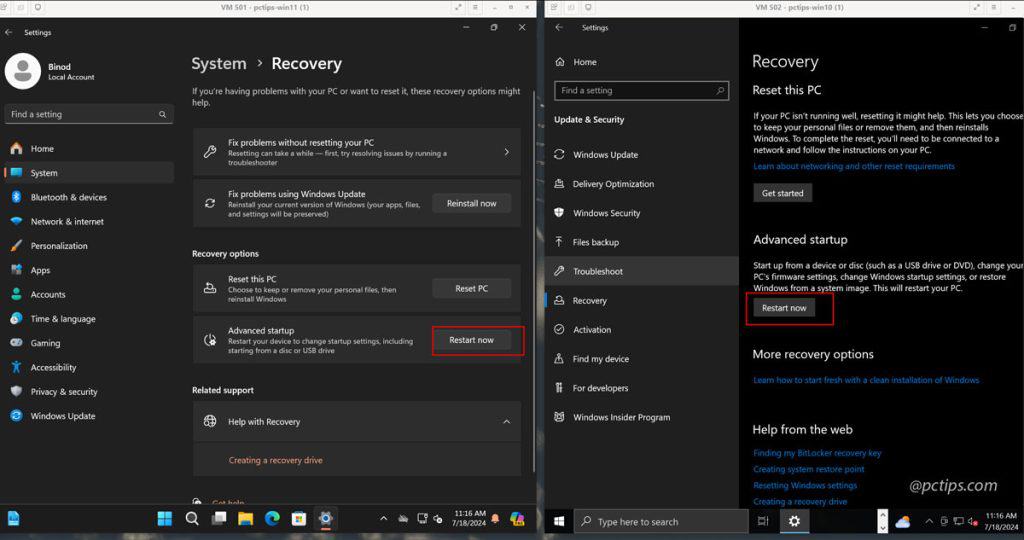
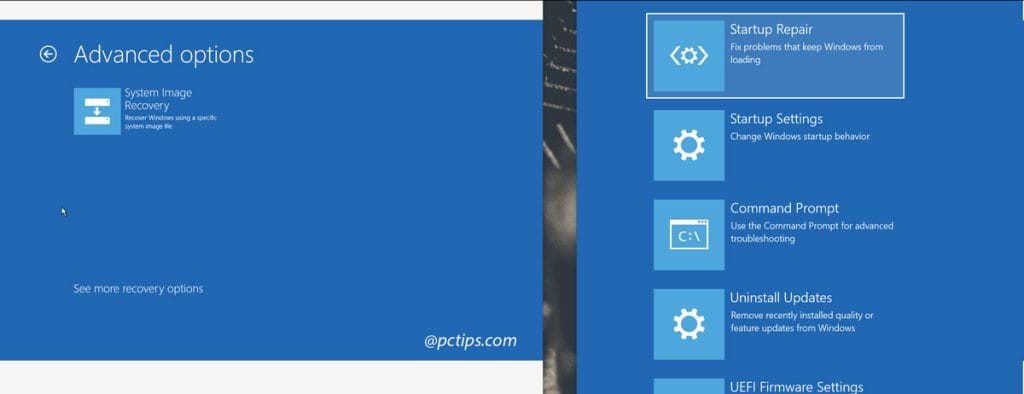
The WinRE is packed with useful tools for fixing a malfunctioning Windows install, like:
- Startup Repair: Automatically detects and fixes common boot problems
- System Restore: Rolls back recent system changes that might be causing issues
- System Image Recovery: Restores your PC from a full system backup
- Command Prompt: For running advanced repair commands
Task View
If you often find yourself drowning in a sea of open apps and windows, Task View is the life preserver you’ve been waiting for.
It’s a built-in feature that gives you a bird’s-eye view of everything running on your PC.
To access Task View on Windows 10 & 11, either:
- Click the Task View button in your taskbar (it looks like two overlapping rectangles)
- Or press Win + Tab
You’ll zoom out to an overview of all your open windows, neatly arranged in a grid.
You can click any window to jump straight to it, or use the thumbnail previews to quickly find what you need.
And the best part?
You can use Task View to create and manage virtual desktops, which brings us to…
Virtual Desktops
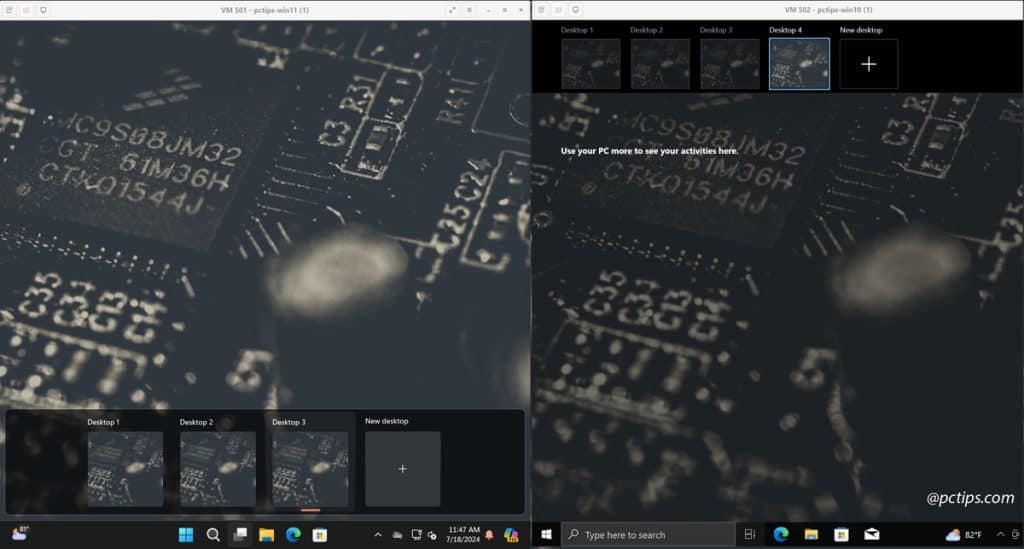
Virtual desktops are like having multiple monitors, minus the extra hardware.
They let you create separate “workspaces” to organize your open windows by project, task, or app.
For example, you could put all your work apps on one desktop, your social media and chat apps on another, and your music and video players on a third.
That way, you can focus on one thing at a time without closing everything else.
To create a new virtual desktop on Windows 10 & 11:
- Open Task View with Win + Tab
- Click “New desktop” in the top-left corner
- Open the apps and windows you want on that desktop
- Switch between desktops using Task View or Win + Ctrl + Left/Right Arrow
They’re a simple but powerful way to stay organized and focused, no matter how many things you’re working on.
File History and Revisions
File History is Windows’ built-in tool for automatically backing up your files to an external drive or network location.
And it lets you easily “go back in time” to previous versions of your files.
To enable File History
- Windows 10: Settings > Update & Security > Backup > Add a drive
- Windows 10/11: Win + R >
control /name Microsoft.FileHistory
Once it’s set up, File History will quietly back up your Desktop, Documents, Music, Pictures, and Videos folders in the background.
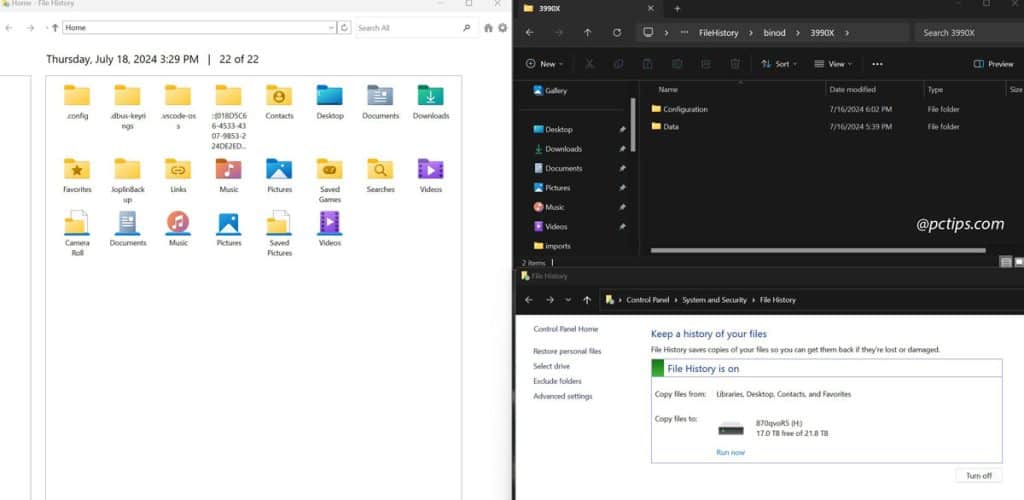
And if you ever need to retrieve an old version of a file, just open the File History interface and browse through the timeline of changes.
PowerToys
If you really want to supercharge your Windows experience, you need to get acquainted with Microsoft PowerToys.
It’s a free, open-source toolkit that adds a bunch of powerful utilities to Windows 10 and 11.
Some of the greatest hits include:
- FancyZones: Create custom window layouts and snap your apps into place
- PowerRename: Batch rename files with advanced search and replace
- Shortcut Guide: See an interactive map of all your keyboard shortcuts
- Color Picker: Identify colors anywhere on your screen and copy their hex codes
- Image Resizer: Quickly resize images with a right-click
To get started with PowerToys on Windows 10 & 11:
- Download the latest PowerToys release from GitHub
- Run the installer and follow the prompts
- Open the PowerToys app to configure and enable the individual utilities
There’s a bit of a learning curve, but if you take the time to explore PowerToys, I promise you’ll find at least a few tools that’ll make your day-to-day Windows use faster and more productive.
Suggested Article:
- The Ultimate Guide to PowerToys: Everything You Need to Know
- 65 FREE NirSoft Tools That Put Windows to Shame
Storage Sense
If you’re always running out of disk space, Storage Sense is here to help.
It’s a nifty feature that automatically frees up space by cleaning up junk files and moving old files to the cloud.
To configure Storage Sense
on Windows 10: Settings > System > Storage > Toggle on “Storage Sense”
And on Windows 11: Settings > System > Storage > Storage Sense
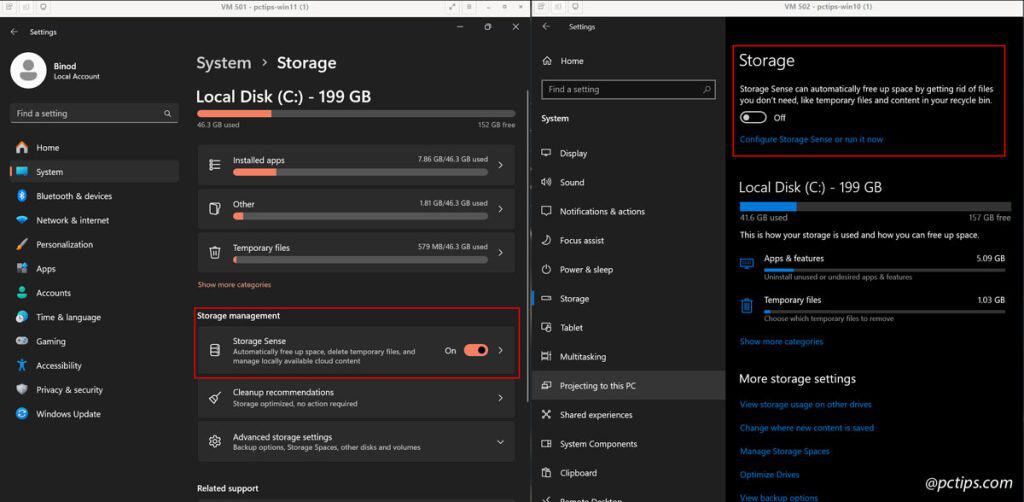
You can customize Storage Sense to:
- Delete temporary files, downloads, and Recycle Bin items older than a certain age
- Run automatically in the background or only when you’re low on disk space
It’s a great set-it-and-forget-it solution for keeping your hard drive lean and mean.
Just be careful not to set the “clean up” options too aggressively, or you might accidentally delete files you still need!
For even more ways to reclaim your precious gigabytes, check out my guide on How to FREE Up More than 100GB+ Of Disk Space.
Windows Sandbox
Do you ever download sketchy-looking apps or email attachments and think “I really shouldn’t open this“?
With Windows Sandbox, you can!
It lets you spin up an isolated, temporary virtual machine where you can run untrusted software without putting your real PC at risk.
To enable Windows Sandbox on Windows 10 & 11 (Pro, Enterprise, and Education editions only):
- Hit Win+R >
optionalfeatures - Check the box next to “Windows Sandbox” and click “ok“
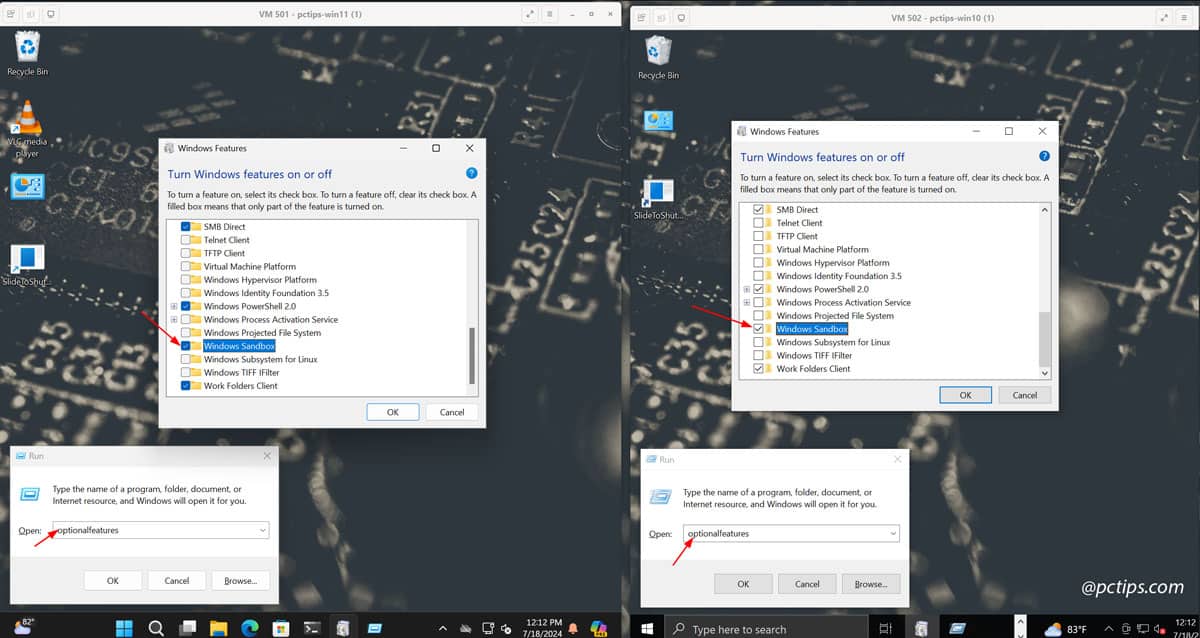
- Reboot, then look for Windows Sandbox in your Start menu
When you open Windows Sandbox, it’ll create a brand-new Windows environment that’s completely isolated from your main installation.
You can download and run whatever software you want in there, and any changes will be totally erased when you close the Sandbox.
It’s an incredibly handy tool for safely testing apps, websites, and attachments without having to set up a whole separate virtual machine.
Just keep in mind that the Sandbox starts fresh every time, so don’t expect to save any data in there!
Resource Monitor
For power users who want to keep a close eye on their system’s performance, Resource Monitor is a goldmine of information.
To open Resource Monitor on Windows 10 & 11: Start menu > search “Resource Monitor”
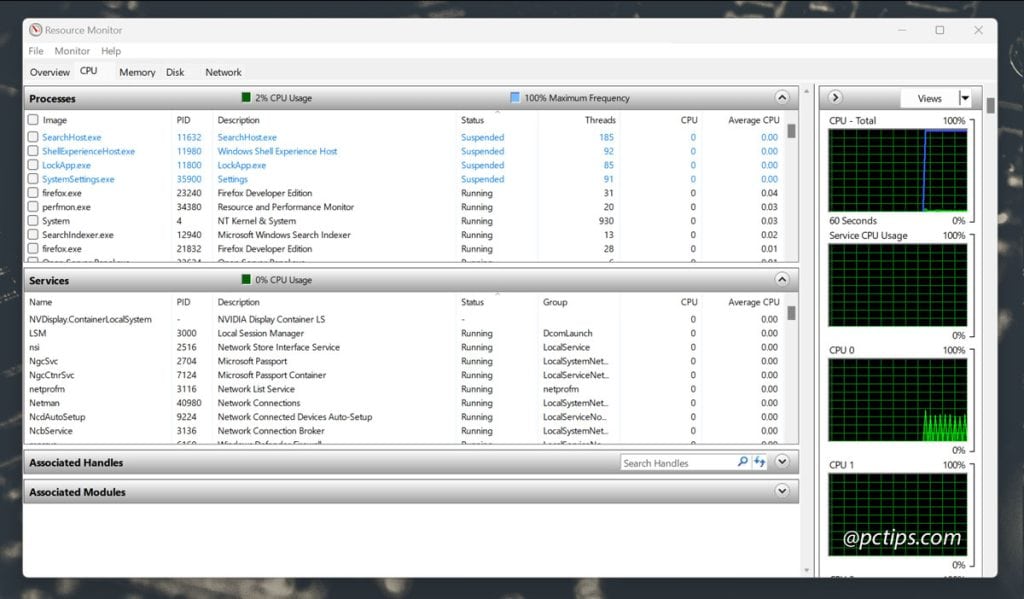
You’ll see real-time graphs of your CPU, memory, disk, and network usage, along with a detailed breakdown of which processes are using the most resources.
If you see a process that’s going haywire, you can right-click it and end it directly from Resource Monitor.
It’s also a great way to identify sneaky malware or crypto miners that might be bogging down your system in the background.
If you see a bunch of unfamiliar processes chewing through your CPU or disk, that’s a big red flag.
Also Read: 20 Power User Secrets for Mastering Windows Task Manager.
Reliability Monitor
If you’ve been fighting with a Windows problem that seems to come and go, Reliability Monitor is your secret weapon.
It keeps a detailed log of system and application crashes, Windows updates, and other important events, going back weeks or even months.
To open Reliability Monitor on Windows 10 & 11: Start menu > search “View reliability history”
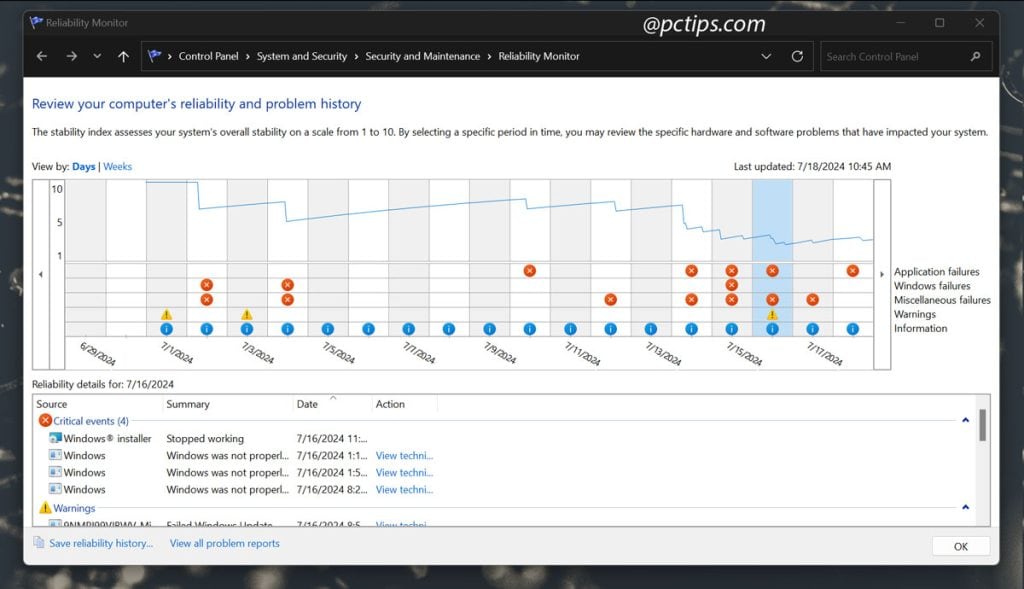
You’ll see a timeline graph showing your system’s “stability index” over time.
The more crashes and failures, the lower the stability score.
And you can click any day to see a detailed breakdown of what went wrong.
It’s a great way to spot patterns and correlations that you might otherwise miss.
For example, if you see a bunch of app crashes that all started right after a Windows update, that’s a good clue that the update might be to blame.
Of course, Reliability Monitor won’t fix your problems for you.
But it gives you a treasure trove of clues and context to help you figure out what’s really going on.
Steps Recorder
Need to show someone how to do something on their PC?
Don’t write out a long set of instructions—use Steps Recorder to create an automatic slideshow of what you did!
When you start a recording in Steps Recorder (called PSR.exe), it tracks your clicks, keystrokes, and other actions.
When you’re done, it spits out a handy MHTML file with screenshots and annotations showing exactly what you did.
To use Steps Recorder on Windows 10 & 11:
- Open the Start menu and search for “Steps Recorder” or “
psr.exe“ - Click “Start Record” and go through the steps you want to demonstrate
- Click “Stop Record” when you’re done
- Save the MHTML file and share it with whoever needs to see your process
It’s a lifesaver when you’re trying to help your mom figure out why her printer isn’t working, or show your coworker how to use a new piece of software.
Built-in Screen Recording
Speaking of recording, did you know Windows has a hidden screen recorder built right in?
It’s part of the Xbox Game Bar, but it works with any app—not just games.
To start recording your screen on Windows 10 & 11:
- Open the app or window you want to record
- Press Win+G to open the Xbox Game Bar
- Click the “Record” button (or press Win+Alt+R) to start recording
- Click the “Stop” button (or press Win+Alt+R again) to finish your recording
Your video will be saved in your Videos > Captures folder as an MP4 file.
Not bad for a built-in tool most people don’t even know exists!
Hidden Calculator Secrets
The humble Windows Calculator app is hiding some serious scientific chops under that simple exterior.
And I’m not just talking about the scientific mode (though that’s pretty cool too).
Did you know the Calculator can:
- Convert units, from Celsius to Fahrenheit or miles to kilometers?
- Calculate the difference between two dates or add/subtract time spans?
- Solve complex equations with variables and parentheses?
- Switch between programmer (binary/octal/hex) and scientific number formats?
- Draw graphs of equations and functions?
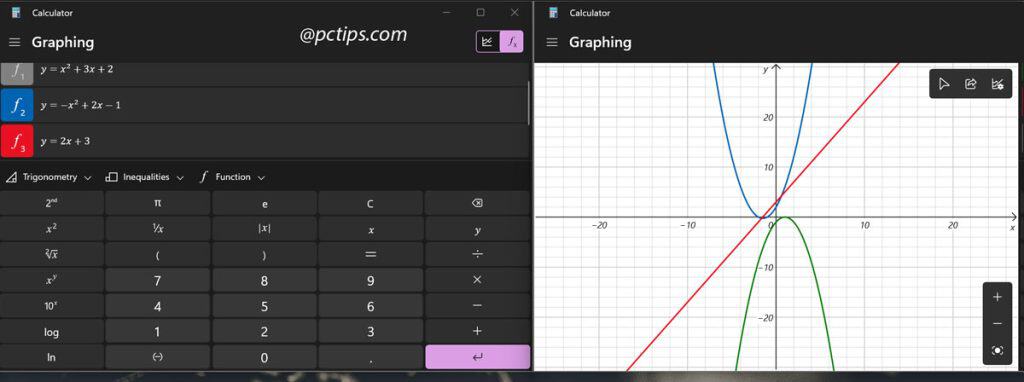
To unlock the Calculator’s hidden powers on Windows 10 & 11:
- Open the Calculator app
- Click the “hamburger” menu icon in the top-left corner
- Choose the mode you want from the drop-down menu
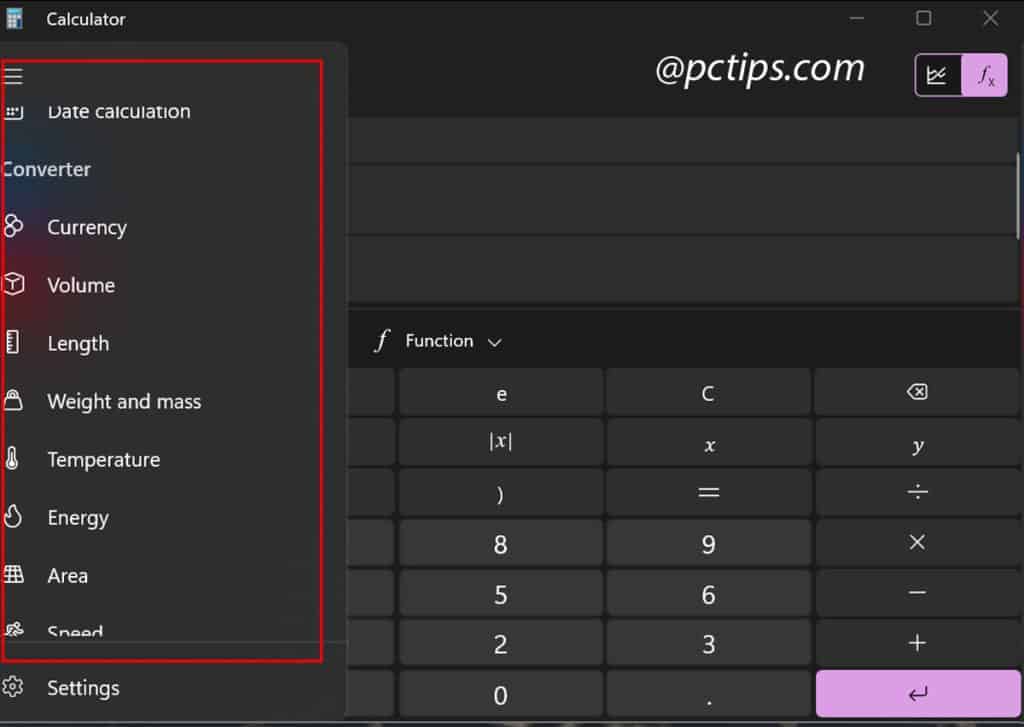
Spend some time exploring all the different modes and options—you’ll feel like a calculus wizard in no time.
And the next time you need to do a quick unit conversion or date calculation, you’ll know right where to turn.
Advanced Touchpad Gestures
If you’ve got a precision touchpad (most newer laptops do), you might be surprised at how many cool gestures it can handle.
Beyond the basic tap, scroll, and zoom, you can use multi-finger gestures to quickly switch apps, show the desktop, or open Task View.
To see and customize your touchpad gestures: Settings > Devices > Touchpad
Some of the most useful advanced gestures include:
- Swipe three fingers up to open Task View
- Swipe three fingers down to show the desktop
- Swipe three fingers left or right to switch between open apps
- Tap four fingers to open Action Center/Notification Panel
Play around with the different gestures and see which ones feel natural to you.
And if you find yourself accidentally triggering gestures you don’t want, you can always disable individual ones in the touchpad settings.
Mastering touchpad gestures will make you feel like a Windows ninja—zipping between apps and desktops without ever lifting your fingers from the pad.
Give ’em a try!
Windows Subsystem for Linux (WSL)
Last but certainly not least, we’ve got the Windows Subsystem for Linux (WSL).
It’s a way to run real Linux distributions like Ubuntu, Debian, or Kali directly on Windows, without needing a virtual machine or dual boot.
With WSL,you can use Bash scripts, access the Linux filesystem, install Linux packages with apt-get, and basically treat Windows like a Linux machine.
It’s a huge boon for developers, sysadmins, and anyone else who needs Linux tools but doesn’t want to give up their Windows comforts.
To install WSL on Windows 10 & 11:
- Hit Win+R > optionalfeatures
- Click “More Windows features”
- Scroll down and check the box next to “Windows Subsystem for Linux”
- Click OK and restart when prompted
- Open the Microsoft Store and search for “Linux”
- Choose your favorite distribution (like Ubuntu) and click “Install”
Once it’s set up, you’ll be able to launch your Linux distro from the Start menu like any other app.
From there, you can use the Linux terminal, install packages, and access the Linux filesystem from within File Explorer.
There’s a bit of a learning curve (especially if you’re new to Linux), but WSL is a game-changer for anyone who needs the power of Linux but can’t or won’t abandon the creature comforts of Windows.
There you have it, folks – 25 hidden Windows features that’ll make you feel like the Gandalf of your PC.
Found this useful? Pass it on to your friends and coworkers. The more we share, the more we all learn.
i have been working on a laptop since 2000. I keep my hands on the keyboard and normally my thumbs on the tap plate direct under the space may. I have notice my thrub will drift across the tap bar, chaging my display view from 24% to 500% I normally work with my display at 100%. Is there a way to lock down the tap plate to remain at 100% all the time? I lose valuable time of resetting my display back to 100%. Thank you very much Rick
Thanks for the info!
Hi, so your laptop's touchpad is acting up and messing with your screen zoom while you're trying to work? If that's so, I've got a few ideas that might help you out. First, try disabling pinch-to-zoom: go to Settings > Devices > Touchpad, and toggle off "Pinch Zoom" or "Zoom Gestures." If that doesn't do the trick, updating the touchpad's drivers might solve the problem. And if all else fails, try using an external mouse instead of the touchpad, and see if the problem persists. Let me know if any of these suggestions work for you, and if you need more help, just holler!