Beginner’s Guide to Using Windows Disk Management
Last Updated:
There’s a powerful built-in tool in Windows you should know about: Disk Management.
It’s a one-stop-shop for managing all your hard drives, SSDs, and other storage devices.
With Disk Management Tool, you can:
- Initialize new disks and prepare them for use
- Create, delete, and resize partitions to organize your storage
- Format drives with different file systems like NTFS, FAT32, or exFAT
- Assign, change, or remove drive letters to easily access your drives
- Convert between basic and dynamic disks for advanced features
- Create spanned, striped, or mirrored volumes for massive storage or performance
- Create and attach virtual hard disks (VHDs)
- …and so much more!
In this guide, I’ll walk you through everything you need to know to become a Disk Management pro.
How to Access Disk Management
There are several ways to launch Disk Management, but my personal favorite is the trusty Run dialog.
Hit Win+R, type diskmgmt.msc, and hit Enter. You’re in.
Master More Run Commands: 100 Run Commands Every Windows User Should Know.
Alternatively, you can right-click the Start button (or press Win+X) and select “Disk Management” from the power user menu.
If you’re more of a visual person, simply search for “Create and format hard disk partitions” in the Start menu search bar, and click the top result.

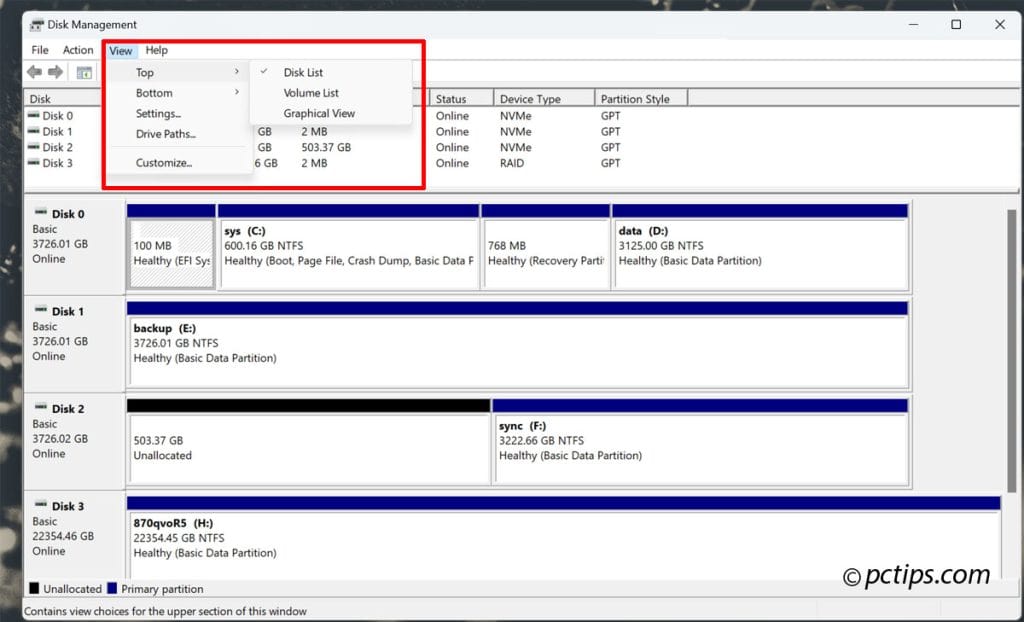
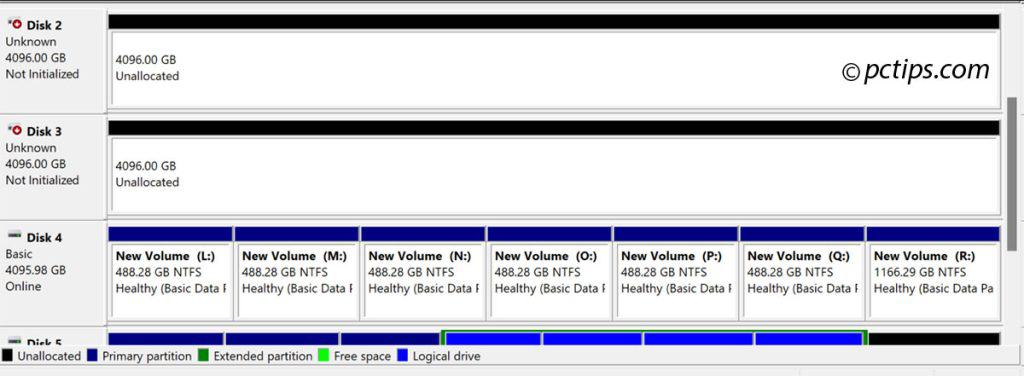
Start with a Bird’s Eye View
When you first fire up Disk Management, don’t just jump in and start clicking around willy-nilly.
Take a step back and really look at what you’re seeing.
At the top, you’ve got a list of all your drives and partitions, with key info like drive letter, label, file system, status, capacity, and free space.
Below that is a graphical representation of your physical disks, showing how each disk is carved up into partitions and logical volumes.
Spend a minute orienting yourself.
Note which disks are holding your operating system, which ones are for data storage, and which (if any) are currently unallocated.
I like to show the “Disk List” at the top and “Graphical view” at the bottom to get a quick overview of my drives.
To customize the layout, head to the View menu and play around with the options.
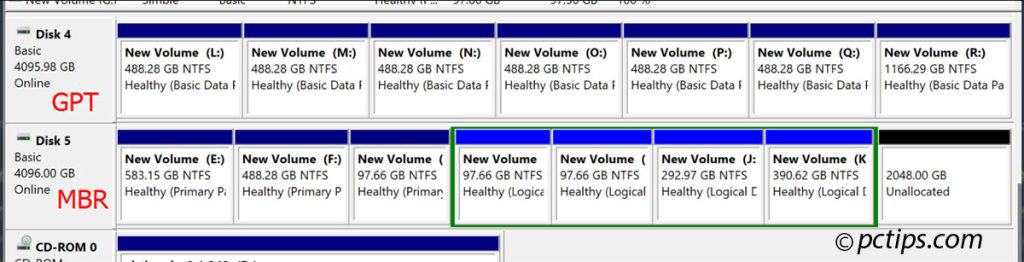
Know Your Partition Types
Not all partitions are created equal.
In the Disk Management visual layout, you’ll see a few different colors and styles used for partitions.
In fact, there are three main types you need to know about:
- Primary Partitions (dark blue): These are the “main” partitions on a disk. On an MBR disk, you’re limited to 4 primary partitions max..
- Extended Partitions (green): Extended partitions are like containers that can hold multiple logical drives. They’re a way to get around the 4 partition limit on MBR disks.
- Logical Drives (light blue): These are the partitions inside an extended partition. You can have as many logical drives as you want (well, up to the max supported by the file system).
You might also see special partitions like:
- EFI System Partition (ESP): A small partition used by UEFI systems to store boot files.
- Recovery partitions: Created by your computer manufacturer to restore your PC to its factory state
- Boot Partition: Contains the files needed to start Windows, like the Windows Boot Manager
- BitLocker Encrypted Partition: Locked down with BitLocker drive encryption for extra security
These are usually best left alone unless you really know what you’re doing.
Embrace GPT (But Know When to MBR)
In addition to partition types, you also need to be aware of the two main disk partition styles: GPT (GUID Partition Table) and MBR.
GPT is the more modern standard and offers several advantages over MBR, such as support for larger disk sizes (over 2 TB) and more partitions per disk (128 instead of just 4 primary partitions).
It also includes redundancy features that make it more resistant to corruption.
However, there are still some situations where MBR might be necessary, such as when dual-booting with an older operating system that doesn’t support GPT or when using certain types of BIOS firmware.
In general, I recommend using GPT whenever possible, especially on newer systems.
But it’s good to know the differences and when you might need to stick with MBR.
Quickly Spot Unformatted Drives
When you plug in a brand-new disk fresh out of the box, it will usually show up as “Not Initialized” and “Unallocated” in Disk Management.
This is one of the first things I always check for when troubleshooting disk issues.
Unallocated space will show up as black bars in Disk Management’s visual layout, making it super easy to spot which disks need some attention.
Once you’ve identified an unformatted drive, you’ll need to initialize it before you can start partitioning and formatting.
Get Initialized
Right-click an uninitialized disk and choose “Initialize Disk” from the context menu.
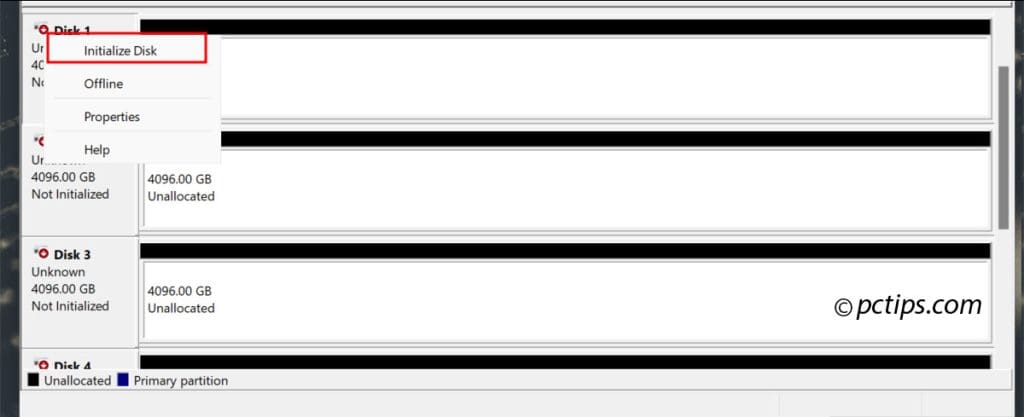
You’ll be asked to select either MBR or GPT partition style – 99% of the time you want GPT (refer back to the previous tip to make the right choice for your needs)
Once initialized, the disk will be ready for you to create partitions and start using it to store data.
Creating New Partitions
Once you’ve initialized a disk, you’ll likely see a big chunk of unallocated space.
It’s time to slice and dice it into partitions that you can actually use.
Right-click the unallocated space on your disk (the black bar) and select “New Simple Volume” from the menu.
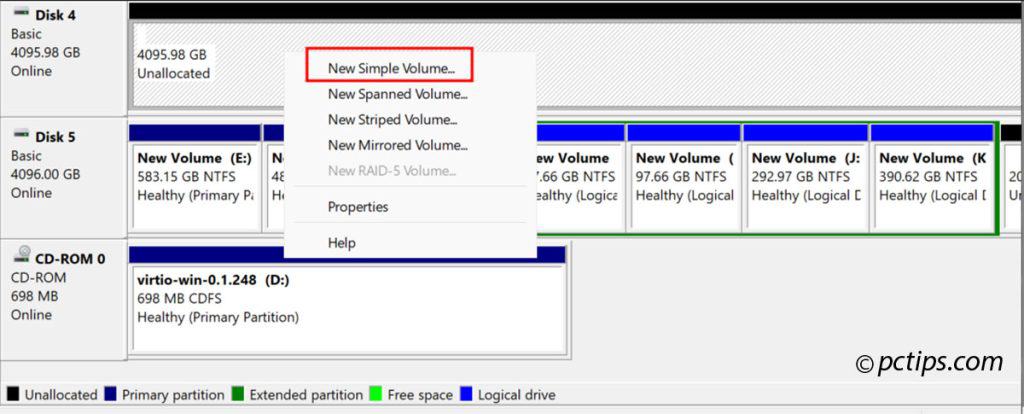
The New Simple Volume Wizard will guide you through the process of:
- Specifying the size of the new partition
- Assigning a drive letter
- Choosing a file system (NTFS is usually the way to go)
- Optionally labeling the new volume
Consider unchecking the “Quick Format” box and enabling file and folder compression – this will take longer but gives you a clean, compact volume.
Warning: Be careful not to choose the wrong disk – formatting the wrong drive can wipe out important data! Double-check the disk number and size to make sure you’ve got the right one.
Formatting Drives and Volumes
Formatting will erase all data on the drive, so make sure you’ve got everything backed up before proceeding!
To format a partition, just right-click it and choose “Format…” from the menu.
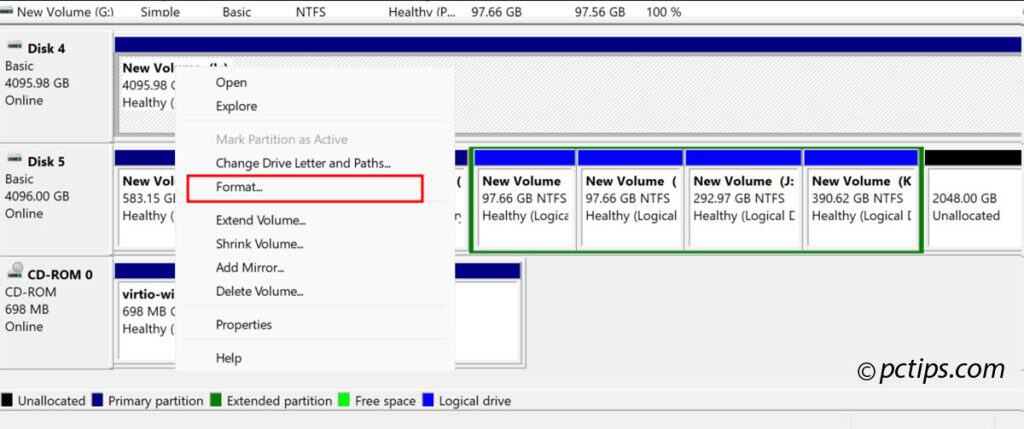
Formatting can take a while for larger drives, so be patient.
I once lost an entire drive by interrupting a format in progress. Never again!
Pro Tip: Check the “Perform a quick format” box to skip the bad sector scan and save time, but only if you’re confident the drive is in good shape.
Assigning, Changing, or Removing Drive Letters
Drive letters are how Windows identifies and accesses your partitions.
By default, Windows assigns letters starting with C: (for the system drive) and going up from there.
But what if you want to change the letter assigned to a partition?
Or maybe you have a partition you don’t want to be accessible at all?
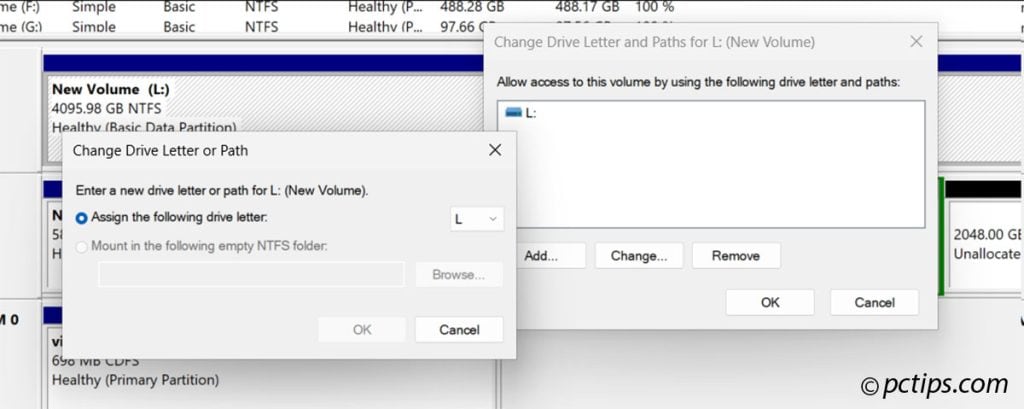
- To assign a new drive letter, right-click a volume and choose “Change Drive Letter and Paths“, then click Add
- To change an existing drive letter, right-click the volume, select “Change Drive Letter and Paths“, click Change, and pick a new letter from the dropdown
- To remove a drive letter entirely, right-click, “Change Drive Letter and Paths“, then click Remove
Personally, I like to leave C: as the default for my system partition, use D: for my active data partition, E: for backups, and F: for syncing my D: .
It’s a system that works well for me, but feel free to come up with your own scheme!
If you want to learn more about organizing your files and folders, check out some of my other articles:
- Best Way to Organize Files on Your Computer
- 20 File Naming Tricks to Find ANYTHING in Seconds
- 10 Clever Ways to Organize Your Desktop Icons
Resizing Partitions
Sometimes you’ll create a partition and later realize you made it too small or too big.
No worries – resizing a partition is a piece of cake with Disk Management!
Just right-click the partition you want to resize and select “Extend Volume…” or “Shrink Volume“, depending on your needs.
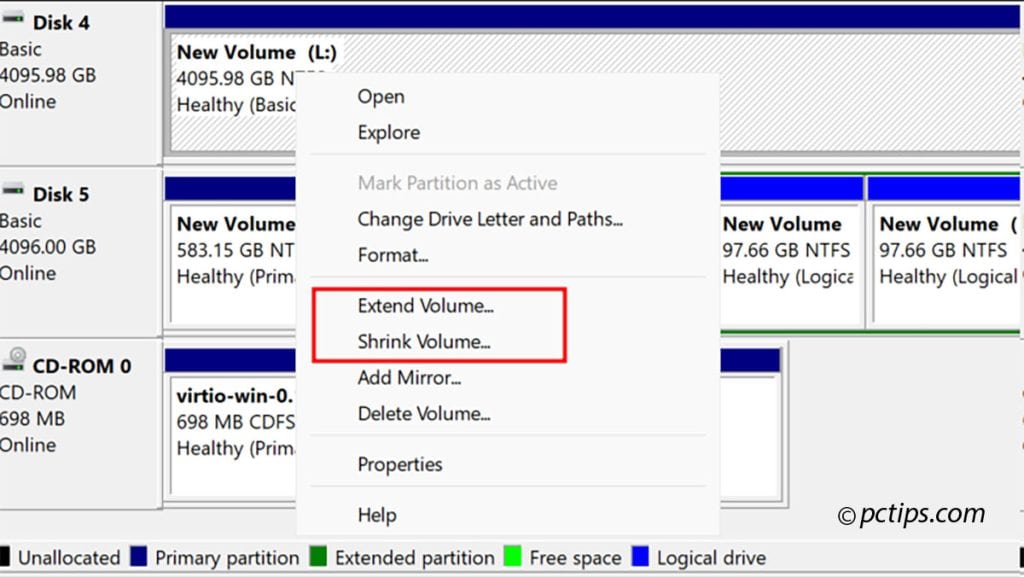
Keep in mind:
- You can only extend a partition if there’s adjacent unallocated space to expand into
- Shrinking a partition will leave unallocated space that can be used to create new partitions or extend other existing ones
Deleting Partitions and Volumes
Disk Management makes it easy to delete partitions, but be careful – there’s no going back once you click that Delete button!
To delete a partition or volume:
- Right-click the partition and choose “Delete Volume“.
- Click Yes to confirm.
- The partition will be deleted and the space will show up as unallocated.
WARNING: Deleting a partition will erase all data on the drive. Make sure you have backups of anything important before proceeding!
If you want to securely erase a drive so the data can’t be recovered, you’ll need to use a third-party tool like DBAN or Eraser.
For more info, check out my guide on How to Permanently Delete Files.
Unleash the Power of DiskPart
For advanced Disk Management tasks, you can’t beat the DiskPart command-line utility.
This is where the real power users play.
Launch DiskPart by opening a Command Prompt (or better yet, PowerShell) as an administrator and typing “diskpart“.
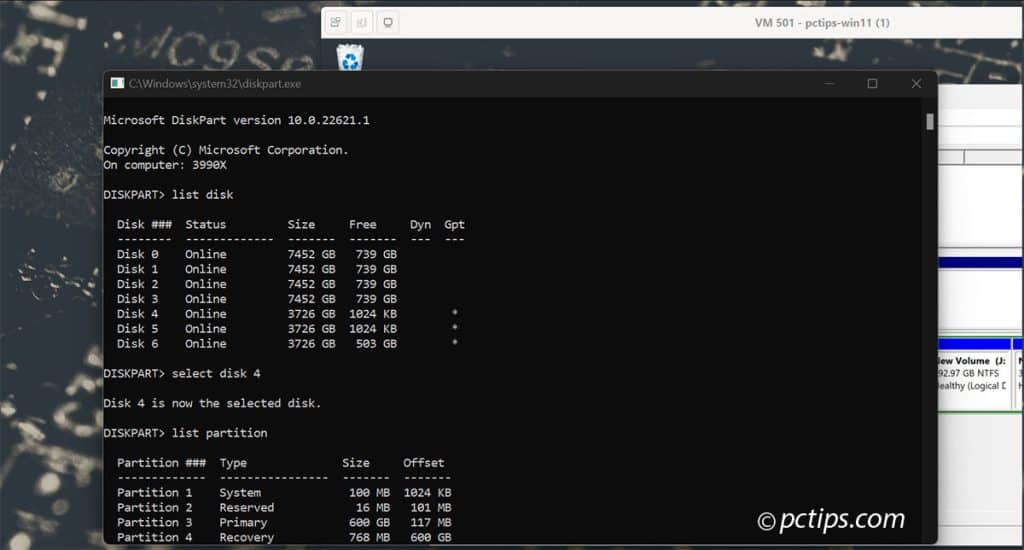
Some of my favorite DiskPart commands:
list disk– shows all available disksselect disk X– selects a disk (replace X with the disk number)list partition– shows partitions on the selected diskcreate partition primary size=X– creates a new primary partition of size X MBassign letter=X– assigns drive letter X to the selected partition
DiskPart is insanely powerful, so be sure to read the documentation and use it with caution.
Wipe a Disk Clean with DiskPart
Need to completely erase a disk, partitions and all?
DiskPart can do it with a single command.
- Launch DiskPart as an administrator
- Use list disk to identify the disk you want to nuke
- Select the disk with select disk X (replace X with the disk number)
- Type clean to wipe the disk clean of all partitions and data
- You can then use create partition primary to create a new partition on the fresh disk
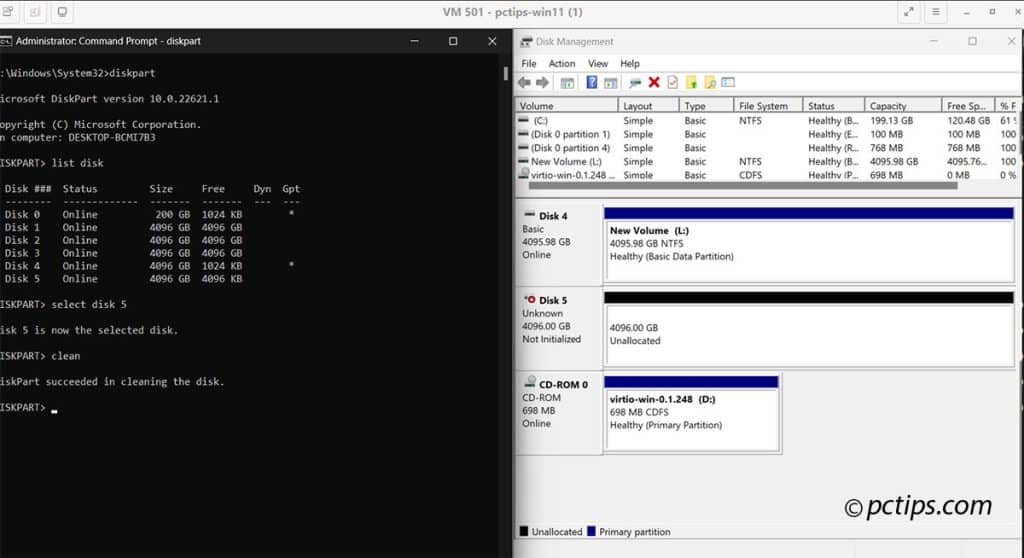
Seriously, triple-check that disk number before running clean – there’s no going back!
The Power of PowerShell
If you really want to take your Disk Management skills to the next level, you need to learn PowerShell.
PowerShell is a powerful scripting language that lets you automate just about anything in Windows.
Here are a few handy PowerShell commands for managing disks:
Get-Disk– Lists all disks on the systemInitialize-Disk– Initializes a RAW diskNew-Partition– Creates a new partitionFormat-Volume– Formats a volumeGet-Volume– Lists all volumes on the systemOptimize-Volume– Defragments or trims a volume
For example, to create a new partition and format it as NTFS, you could run:
$disk = Get-Disk 1
$partition = New-Partition -DiskNumber $disk.Number -Size 100GB -AssignDriveLetter
Format-Volume -Partition $partition -FileSystem NTFS -NewFileSystemLabel "Data"
There’s a bit of a learning curve with PowerShell, but it’s so worth it.
Convert a Drive from Basic to Dynamic (or Back Again)
Windows has two main drive types: Basic and Dynamic.
Basic drives are what most folks are used to – one or more partitions on a physical disk, what you see is what you get.
Dynamic drives support fancier features like:
- Spanning a volume across multiple physical disks for MASSIVE storage pools
- Striping data across disks for increased performance (RAID 0-style)
- Mirroring volumes for fault tolerance (RAID 1)
To upgrade a Basic drive to Dynamic, just right-click the disk, select “Convert to Dynamic Disk“, and let the wizard do its thing.
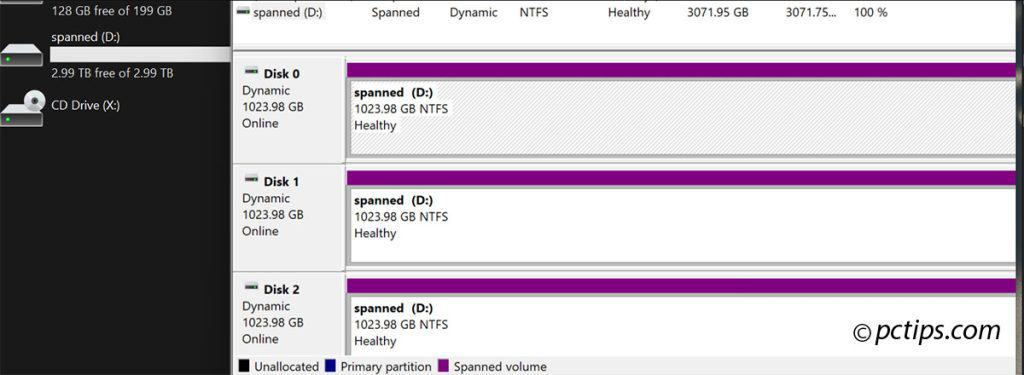
Create a Spanned Volume for MASSIVE Storage Pools
Now we’re getting into the really fun stuff.
A “Spanned Volume” is a special type of dynamic volume that lets you combine multiple disks into one giant mega-volume.
For example, let’s say you have three 1TB disks.
Normally you’d have to manage them as three separate 1TB partitions (D, E, and F).
But with a spanned volume, you can lump them all together into a single 3TB volume (let’s call it D).
To create a spanned volume, you need to convert all the participating disks to dynamic.
Then right-click any unallocated space and choose “New Spanned Volume“.
Select all the disks you want to include, and poof – you’ve got a massive storage pool!
Spanned volumes are super handy for things like big media collections, backups, or anything else where you need a ton of space and don’t want to manage multiple drives.
However, there are a couple of downsides:
- If any disk in the set fails, you lose access to the ENTIRE spanned volume. It’s like a chain – one broken link and the whole thing falls apart.
- You can extend a spanned volume (by adding more disks), but you can never shrink it.
Stripe Data for SPEED (RAID 0)
Another nifty Dynamic disk trick is striping – AKA RAID 0.
Striping spreads data evenly across multiple physical disks, allowing them to be accessed in parallel for much faster read/write speeds.
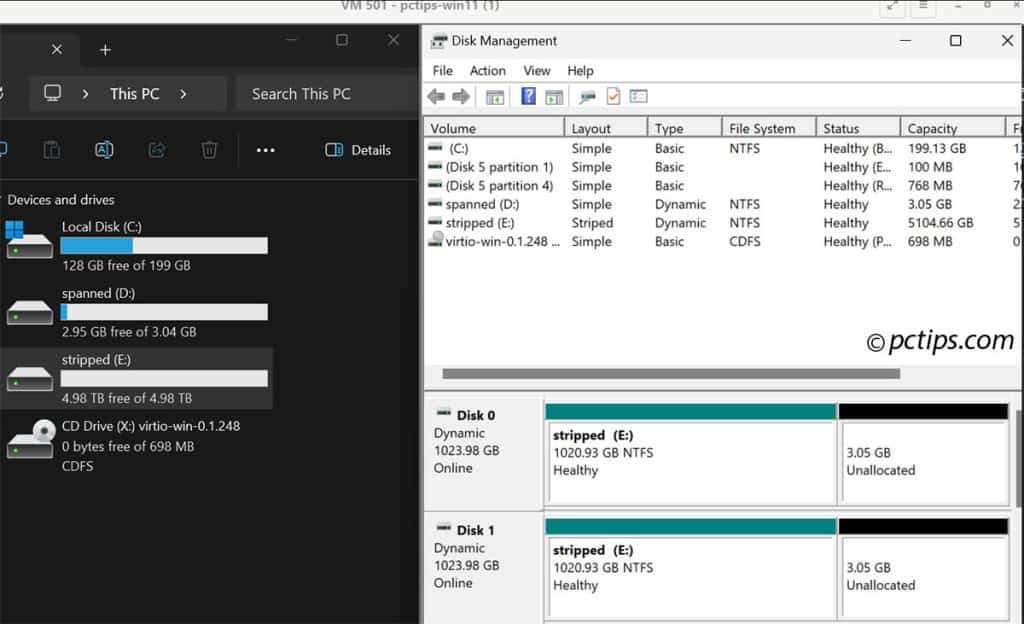
Setting up a striped volume is dead simple:
- Convert the disks to Dynamic
- Right-click a Dynamic disk and select “New Striped Volume“
- Use the wizard to select which disks to include and configure the stripe
Striping is fantastic for speeding up stuff like video editing, database work, or anything else that’s I/O-bound.
I’ve seen multi-disk RAID 0 arrays absolutely smoke single drives in benchmarks.
Like spanning though, striping doesn’t provide fault tolerance.
In fact, it increases your risk of data loss, since a single drive failure will tank the whole array.
Add a Mirror for Fault Tolerance (RAID 1)
If safety is more your speed, Dynamic disks also support mirroring – AKA RAID 1.
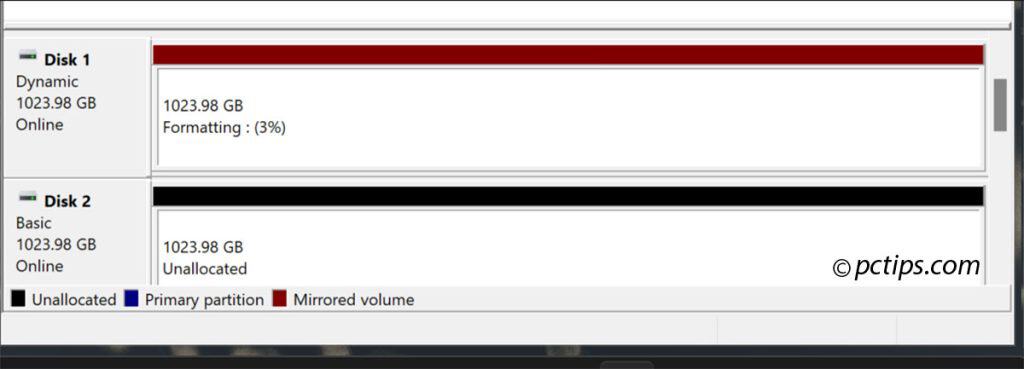
Mirroring simply keeps an identical copy of all data on two (or more) physical drives.
If one drive fails, you’ve got a perfect backup ready to go on the other(s).
To create a mirrored volume:
- You guessed it – convert to Dynamic first
- Right-click and choose “New Mirrored Volume”
- Cruise through the wizard to select which disks to include and set up the mirror
Mirroring is awesome for stuff that absolutely, positively has to stay safe – think business documents, family photos, backups etc…
The tradeoff is that you lose half your raw capacity, since every byte has to be stored twice.
But for irreplaceable data, the peace of mind is well worth it.
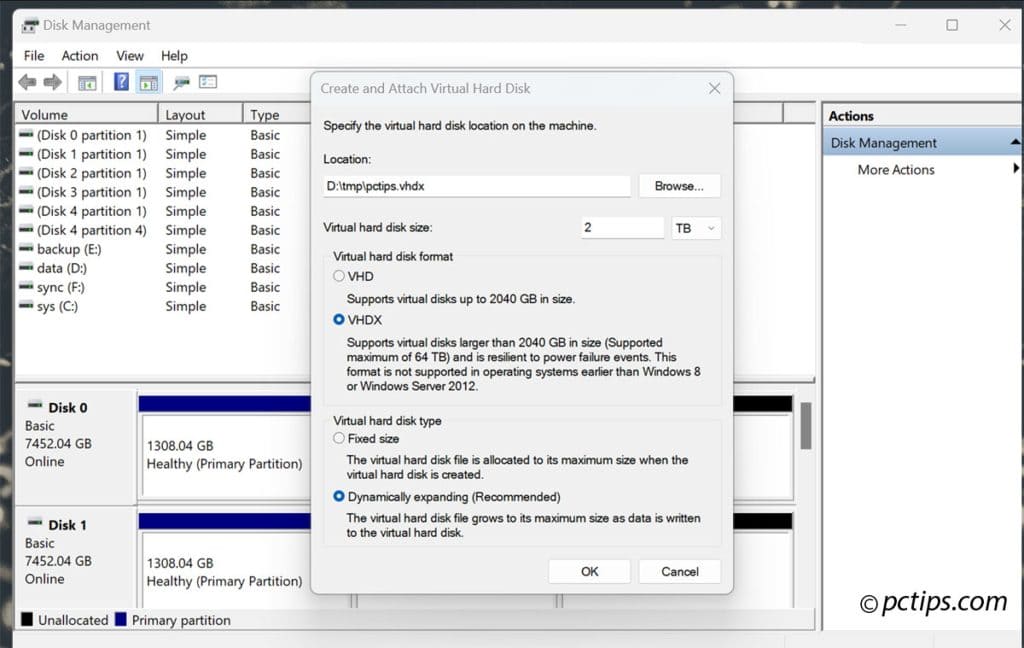
Create a Virtual Hard Disk (VHD)
VHDs are like having a hard drive inside your hard drive (very Inception, I know).
I use VHDs all the time for stuff like:
- Trying out new versions of Windows without borking my main install
- Sandboxing sketchy software to keep my main OS clean
- Packaging up entire drives for faster backups
To create a VHD:
- Open Disk Management and select “Action > Create VHD” from the top menu bar
- Give your VHD a home (path), a size, and choose between fixed or dynamic sizing
- Fixed VHDs take a while to create but are faster to use day-to-day
- Dynamic VHDs are quick to spin up but may be a touch slower since they grow/shrink on the fly
- Initialize and format the VHD like any other new disk
Mounting VHDs
You can easily “mount” an existing VHD file so it shows up as a new disk in Disk Management.
Just click Action > Attach VHD and browse to the file.
You can then partition, format, and use the VHD like any other drive.
When you’re done, right-click the mounted VHD and choose “Detach VHD“.
The beauty is that the whole virtual disk is encapsulated in a single portable file!
Troubleshooting Common Disk Issues
Even with all these awesome Disk Management tricks up your sleeve, you’re bound to run into issues from time to time.
Here are a few common disk problems and how to fix them:
- Disk shows as “Not Initialized” – Right-click the disk and choose “Initialize Disk”
- Disk shows as “Offline” – Right-click the disk and choose “Online”
- Disk shows as “Missing” – Check cables and power, rescan disks in Disk Management
- Can’t delete a partition: Make sure the partition is not in use by any programs or services. You may need to boot into Safe Mode to delete stubborn partitions.
- Disk is full – Free up space, Delete unnecessary files, move files to another drive, extend volume if possible
- Disk is slow – Check for errors (
chkdsk), defragment disk, consider upgrading to SSD
If all else fails, Google is your friend.
Chances are someone else has encountered the same problem and found a solution.
If you’re ever unsure about how to proceed with a disk issue, the best thing you can do is back up your data before attempting any fixes. Better safe than sorry!
I hope this guide has given you a new appreciation for just how powerful and flexible Disk Management really is.
If you found this guide helpful, please share it with your friends and colleagues.
It is a shame that Microsoft don't bring Disk Management into the 21st Century with the addition of a few drop down menus where users can make choices with one or two clicks instead of have to use a quasi form of dos.
I can not see my Seagate personal cloud or external drive in my window 10 professional what should I do