How to Make Windows Defender Work Even Better
Last Updated:
Windows Defender has come a long way.
It’s now a robust, full-featured antivirus and anti-malware solution built right into Windows 10 and 11.
And the best part? It’s totally free. No subscriptions, no nags, no nonsense.
But hey, just because it’s good out of the box doesn’t mean there aren’t a few tweaks you can make to really kick it into high gear.
I’ll help you configure Windows Defender’s advanced security features and provide tips for maximum protection in this guide.
What Is Microsoft Defender Antivirus?
Let me start by clearing up the nomenclature.
Windows doesn’t actually have ANY component named ‘Windows Defender’. Not since the 20H1 update in May 2020 anyway.
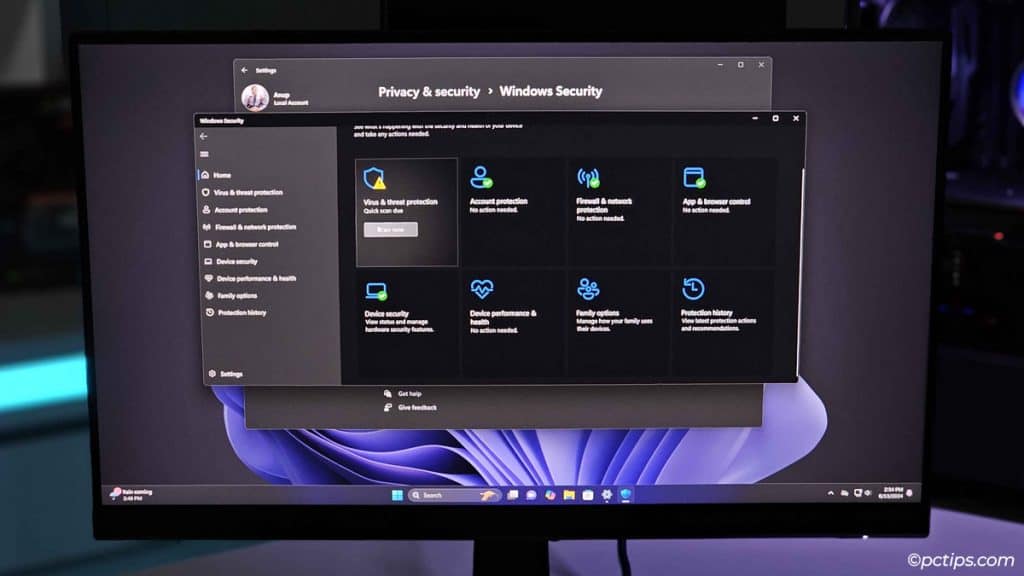
What it now has is the Windows Security suite.
The antivirus (AV) component of this suite is ‘Microsoft Defender Antivirus’.
It constantly keeps an eye out for malware with Real-Time Protection. It also runs automated Quick Scans daily and protects you 99.94% of the time (on average).
If you suspect your PC is infected, you can always run a Full Scan or Offline Scan instead of the scheduled Quick Scans.
Reduce Your Attack Surface
Microsoft Defender Antivirus keeps malware out – that’s great! But there are a lot of common threats antiviruses can’t protect you from.
That’s where the other protection mechanisms in Windows Security come in.
Besides the AV, the suite includes features like phishing protection, ransomware protection, exploit protection, etc.
The more of them you utilize, the more you reduce your attack surface.
At the very least, think about your PC usage habits and protect yourself against the threats you’re most prone to.
You might be at the highest risk of email fraud, phishing scams, data breaches, identity theft, ransomware, or something else.
Enable the appropriate protection feature in Windows Security and keep yourself safe.
That’s the idea anyway! Now, let’s put that into practice.
Configure Windows Security Properly
Only Microsoft Defender Antivirus and Firewall are enabled by default.
I’ll explain all the other features and provide steps to configure them in this section.
Once that’s done, we’ll talk about how secure your PC is now and how the protection compares to other antivirus security suites.
Microsoft Defender Scans
Press Win + I to open Settings. Go to:
- Windows 11: Privacy & security > Windows Security > Virus & threat protection > Scan options
- Windows 10: Update & Security > Windows Security >Virus & threat protection > Scan options
You’ll find four types of scans here.
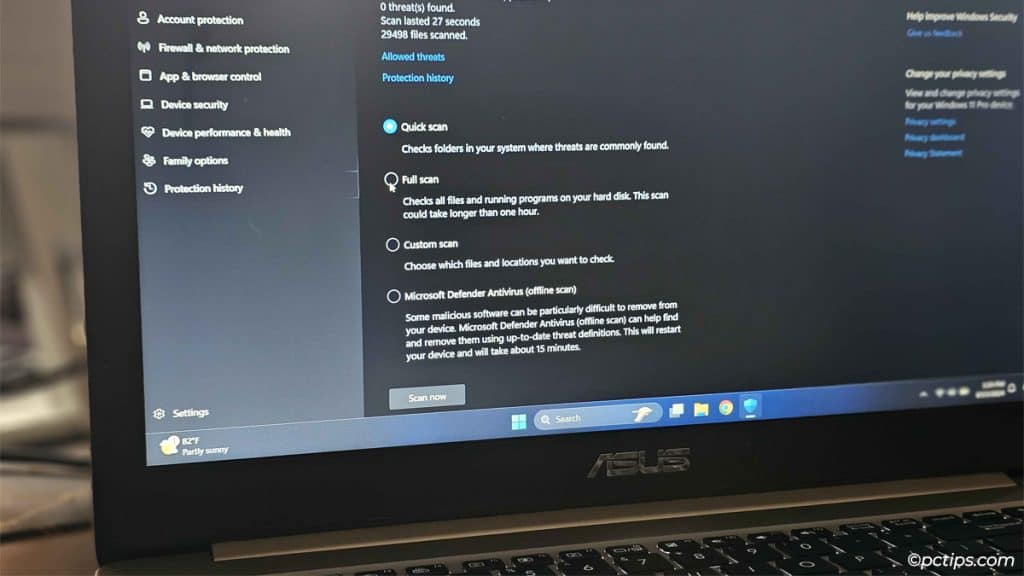
Quick Scans
Quick Scans check common malware locations like registry keys, Windows startup folders, and USB drives.
Microsoft Defender has real-time protection and cloud protection enabled by default.
It uses the latest virus definitions and behavior-based detection methods to constantly monitor your PC for signs of suspicious activity (e.g., it scans every file and location opened).
Due to this, a Quick Scan is enough in almost all cases.
Full Scan
But what if you suspect some malware has snuck past Defender? In that case, a Full Scan isn’t a bad idea.
This one scans every drive on your system.
Depending on the amount and type of files on your system, it usually takes between 20 minutes to a few hours. In extreme cases, it can take shorter or longer than that too.
Offline Scan
For rootkits or other persistent types of malware that affect the MBR, it’s best if you can scan without even loading the OS.
An offline scan does exactly this – it runs from outside the normal Windows kernel.
If you suspect that even a Full Scan failed to find malware, run an Offline Scan.
Your PC will load the Windows Recovery Environment (WinRE) instead of the OS and perform an Offline Quick Scan there.
Custom Scan
Sometimes, you’ll suspect specific locations that a Quick Scan might miss.
This could be a removable USB stick, a network drive, or some folder on your SSD.
In such cases, run a Custom Scan for a fast, pinpointed scan.
You can also right-click the folder in File Explorer and select Show more options > Scan with Microsoft Defender.
MSRT and Safety Scanner
In the Virus & Threat Protection Updates section, click on Protection updates.
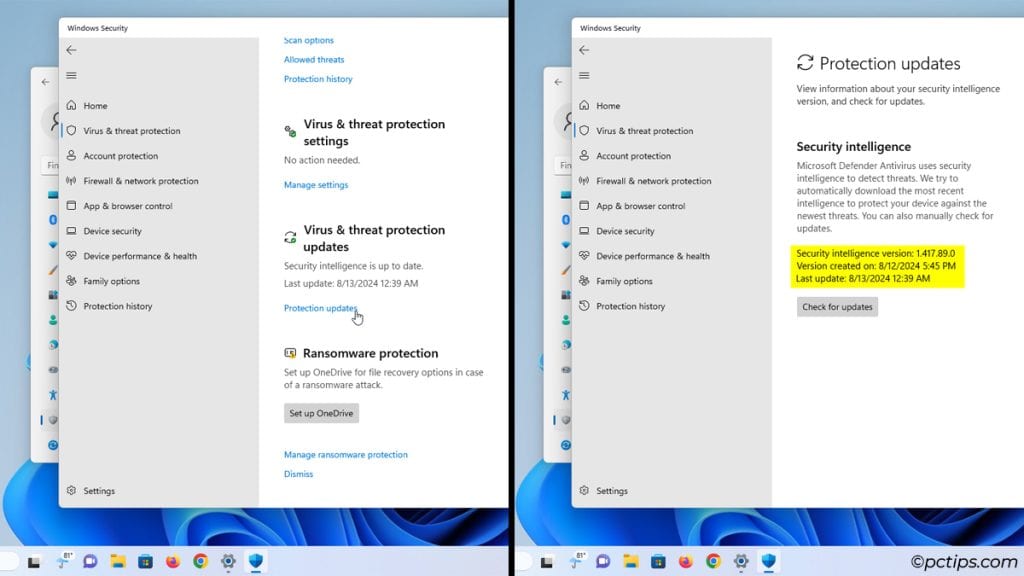
You’ll find that Windows has recently updated its security intelligence.
Windows Defender only has a malware protection rate of 99.94% when it’s equipped with the latest virus definitions.
On offline PCs with outdated security intelligence, the protection rate is much lower.
If you have any such computers that are NOT up-to-date, don’t rely on the built-in scanner.
Instead, scan them with the Malicious Software Removal Tool (MSRT).
It’s very easy to use – simply download and run it. Or, carry it around on a USB stick.
Microsoft’s Safety Scanner is another excellent portable tool for second-opinion scans.
Dealing with Threats
You might get notified that ‘Microsoft Defender Antivirus found threats’.
Click on the notification. Or, open the Protection history tab.
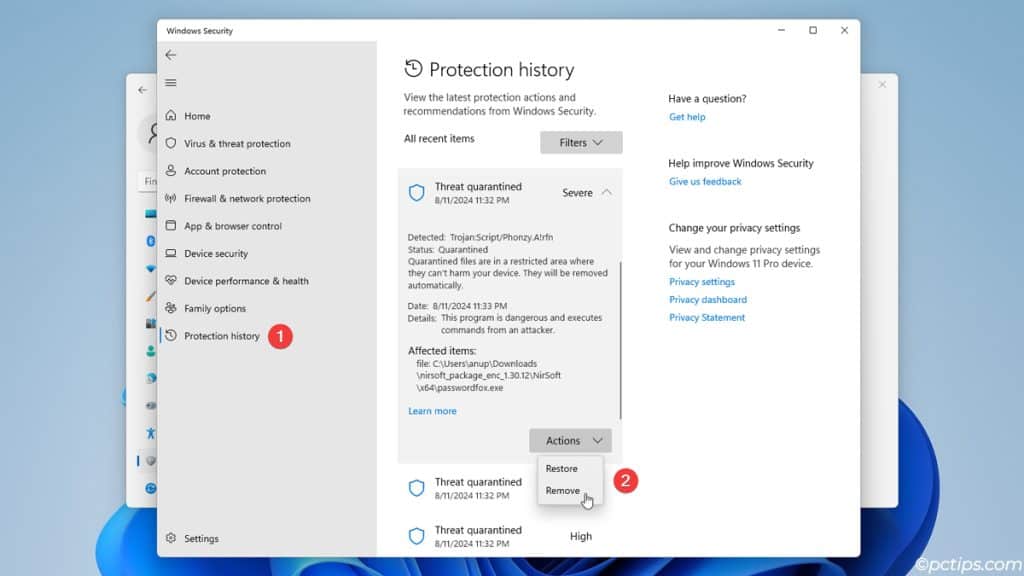
Here, you’ll find the threats that Defender recently quarantined (i.e. the threat has been isolated and won’t harm your PC).
Defender will automatically remove quarantined items after a while. Or, you can immediately remove them yourself.
If some files were incorrectly quarantined, you can click on them and restore them from here.
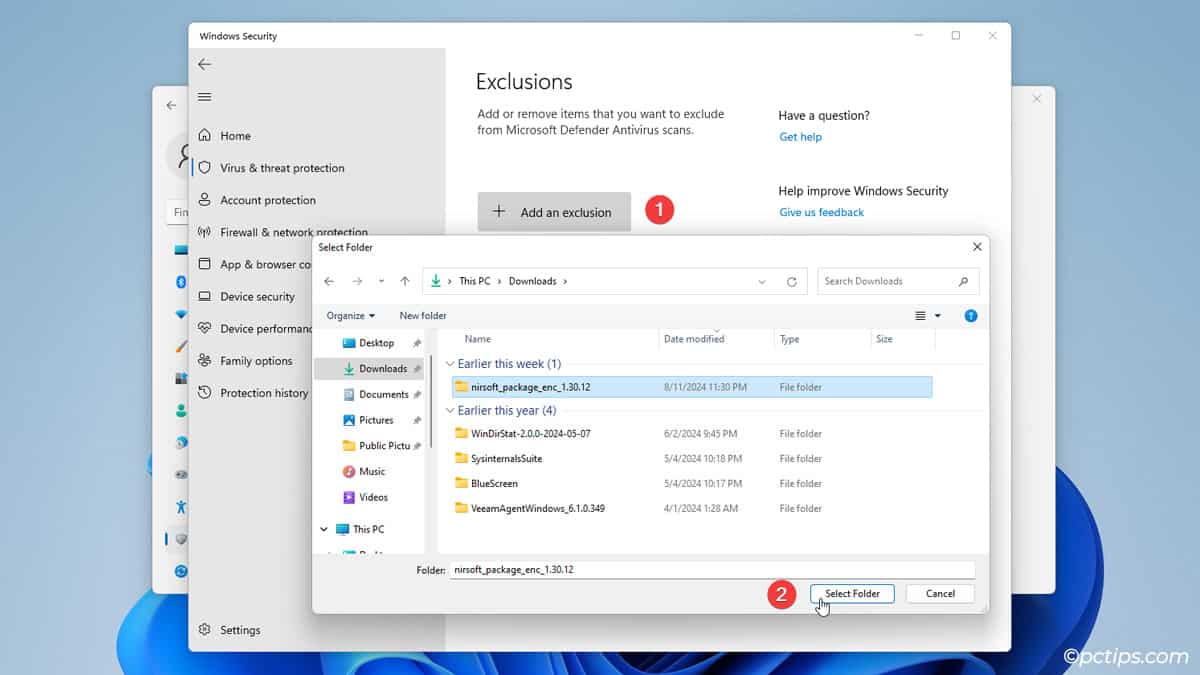
Exclude Files from Scans
Microsoft Defender has one of the lowest false positive rates, but it does occasionally mess up.
For instance, it incorrectly identified Nirsoft programs as a threat and quarantined them on my PC.
To prevent such issues,
- Click on Manage virus and threat protection settings > Add or remove exclusions.
- Click on + Add an exclusion and select the file or folder you want to exclude from scans.
Temporarily Disable Defender
Sometimes, you’ll want to pause real-time protection. This could be to add trusted files to the exclusion list, to test another antivirus, or for any other reason.
- Click on Manage virus and threat protection settings.
- Toggle off Real-time protection.
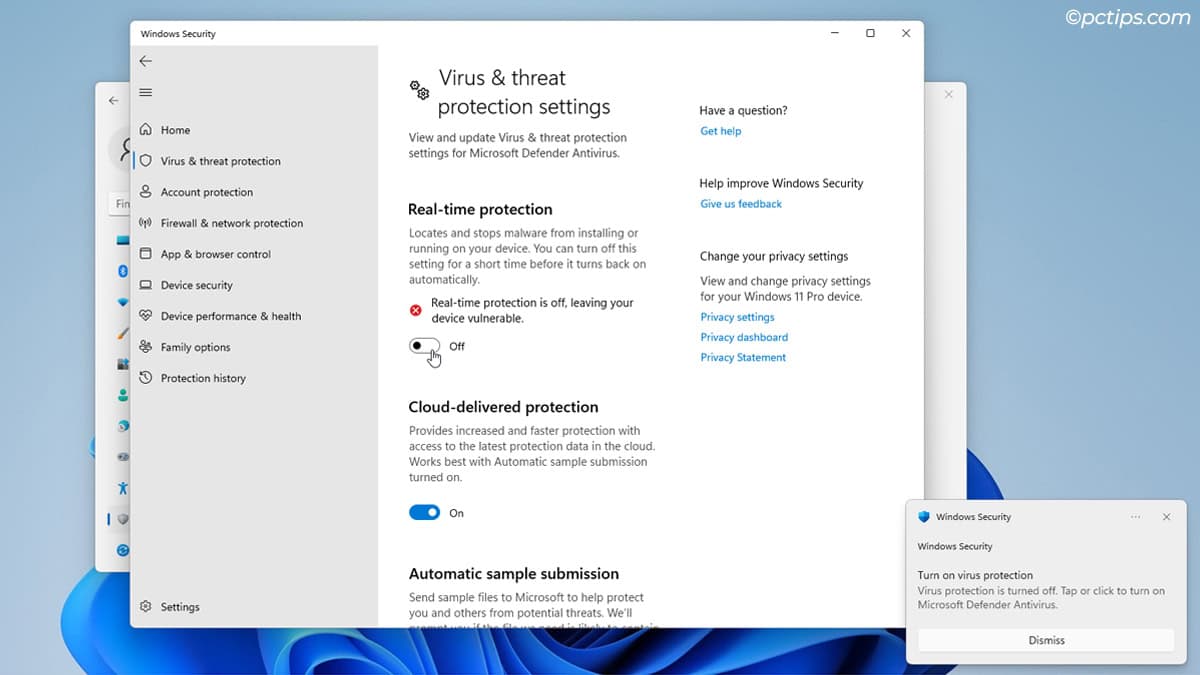
- It will automatically turn back on shortly after. Or, you can re-enable it yourself from the same location.
Set up Ransomware Protection
On the Virus & threat protection page, click on Manage ransomware protection.
Toggle on Controlled folder access.
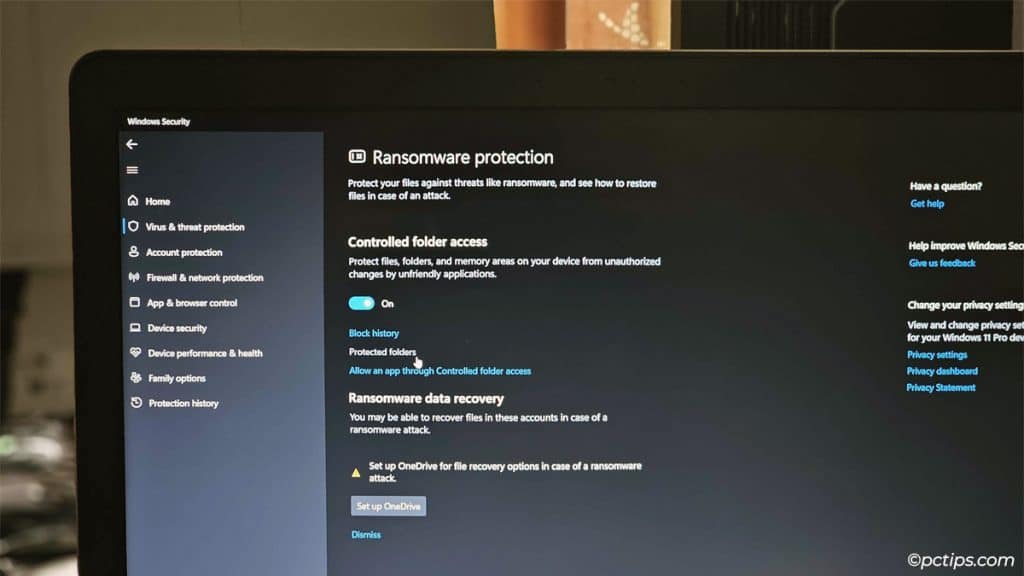
This feature lets you select specific folders to protect. Only authorized programs can access and change those folders and their contents.
So, if ransomware ever tries to encrypt your valuable data, it will remain untouched.
A word of caution: on paper, it’s great. In practice, this feature often blocks valid programs and causes file access errors.
Allowing apps manually usually helps. But if it’s too much of a hassle, ditch this feature and set up OneDrive data recovery instead.
All you need to do is sign in to your Microsoft account and back up important files to OneDrive.
OneDrive uses record versioning to save different versions of those files at different points in time.
So, even if ransomware encrypts the latest version, OneDrive will let you restore a recent older version.
Manage App Protection & Online Security
Open the App & browser control tab. The features here will protect you from dangerous websites and files online.
First, turn on Reputation-based protection.
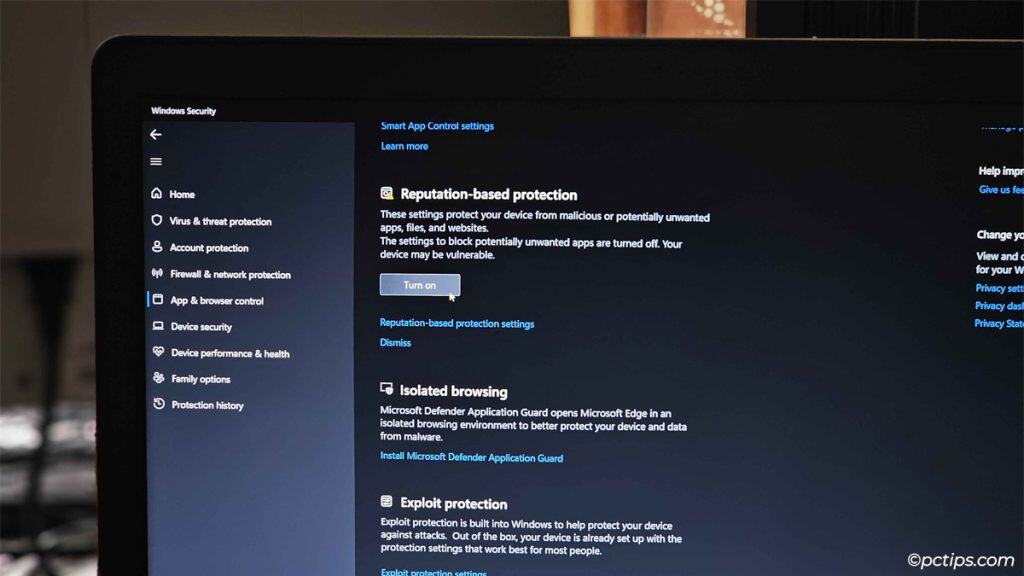
If you click on Reputation-based protection settings, you’ll find the exact forms of protection this provides:
- Microsoft Defender SmartScreen for Edge and the MS Store
- Protection against phishing, deceptive ads, drive-by attacks, etc
- Reputation-based URL and app protection
- Checks downloaded files on third-party browsers too
Next, check out Isolated browsing.
This feature augments Edge and Office with an isolated container with which you can open suspicious websites and files.
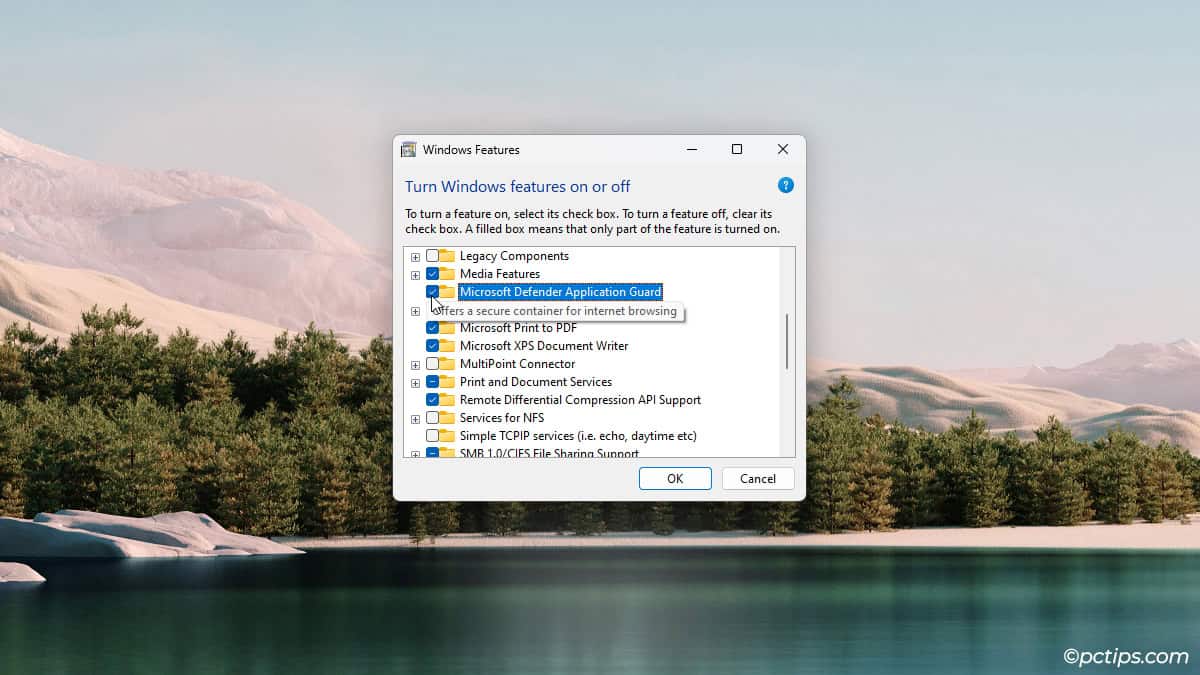
- Click on Install Microsoft Defender Application Guard.
- Enable the Microsoft Defender Application Guard checkbox and press Ok. Restart the PC when prompted.
- Now, you can press Ctrl + Shift + Q to launch an app-guard-protected window in Edge. Use this if you need to open a webpage you don’t trust.
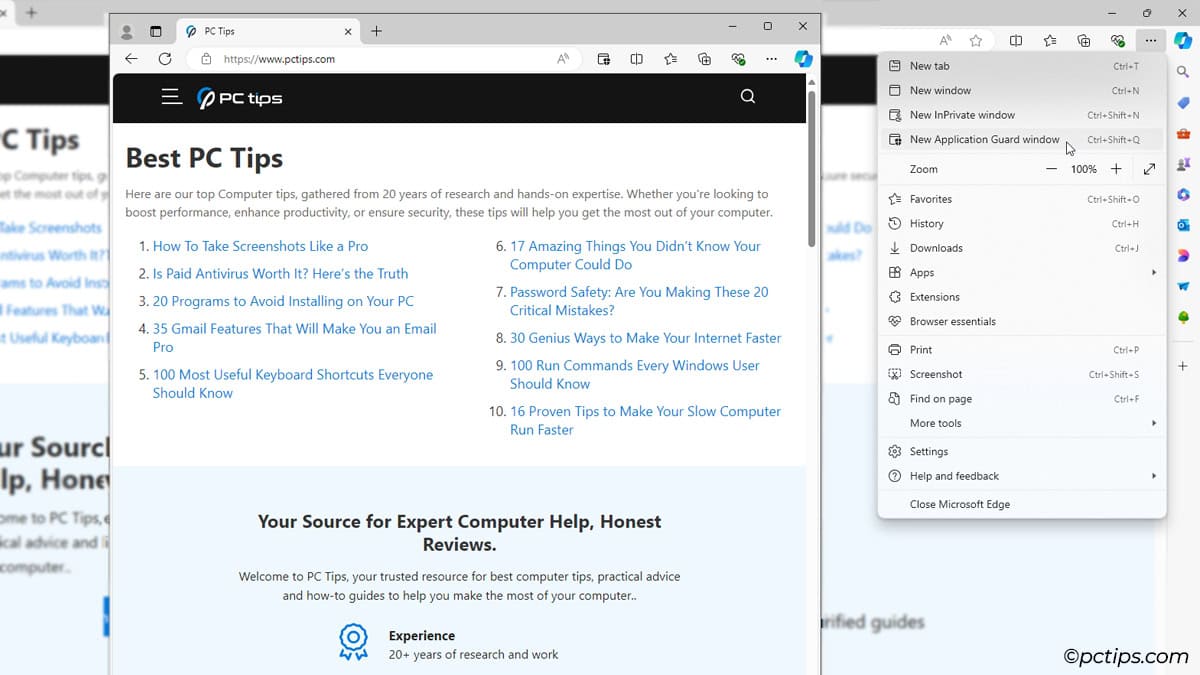
- The same goes for MS Office documents. Files that come from unknown sources are classified as untrusted and automatically open in an app-guard window.
Configure Driver Security
Go to Device Security > Core isolation details.
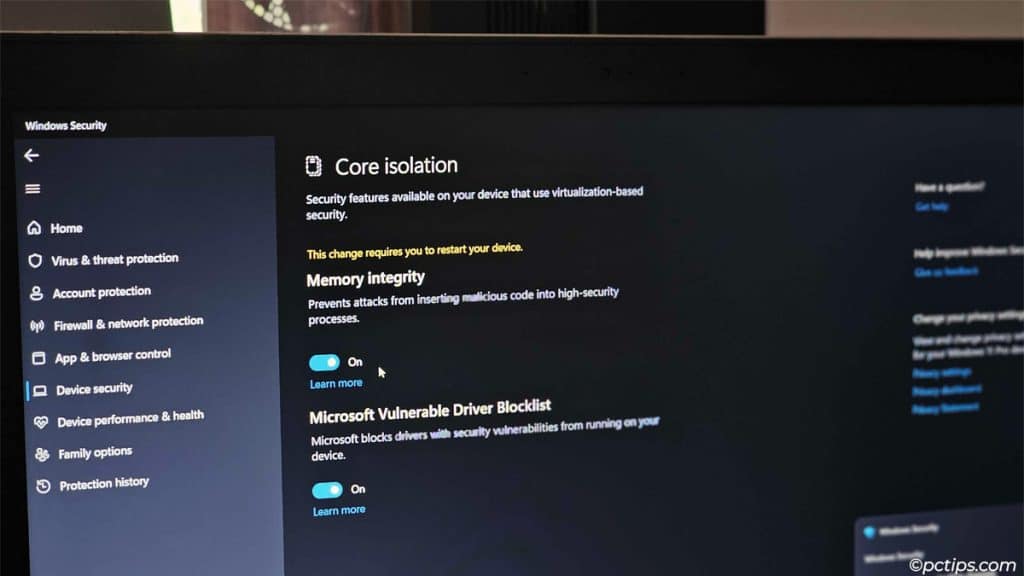
Turn on Memory integrity. This should automatically enable Microsoft Vulnerable Driver Blocklist too.
These features will prevent malware from using low-level drivers to hijack your PC.
Depending on your hardware and Windows version, your device might support other features too like:
- Kernel-mode Hardware-enforced Stack Protection
- Memory access protection (Kernel DMA Protection)
- Local Security Authority protection
- Microsoft Defender Credential Guard
Enable those as well.
Use BitLocker for Encryption
On the Device Security page, you’ll also find an option called Manage BitLocker drive encryption.

Anyone with a bit of know-how can bypass the Windows password very easily.
But if you encrypt your drives, it’ll be impossible for unauthorized people to access your private data.
Even if your device gets stolen, your data at least will remain untouched.
Set up Parental Controls
Windows Security also includes parental controls for those who want to ensure a safe digital environment for their kids.
Once you add an account for your kid, you’ll be able to manage things like:
- Pick which websites your kids can visit
- Set an age limit for content including apps and games (content unfit for children is automatically blocked)
- Review their online activity
- Control the screen time
- Manage all of this on your phone with the Microsoft Family Safety app
What About Other Features?
Things like the Firewall, Tamper Protection, Smart App Control, Exploit protection, etc work well by default. So, don’t worry about those.
Depending on your hardware, Windows version, and Microsoft license, your PC might also have more or less security features.
For instance, Microsoft 365 subscribers have access to Defender for Individuals. This version includes extra features like Identity Theft Protection.
I also tested multiple devices and found that older devices didn’t support certain features like hardware security.
The takeaway here is: just explore all the features available to you and make the best of what you’ve got.
Upgrade Defender with Group Policies
Even with the free version, you can configure group policies to further strengthen and customize Windows Security.
These are settings that you won’t find in the normal Windows Security app.
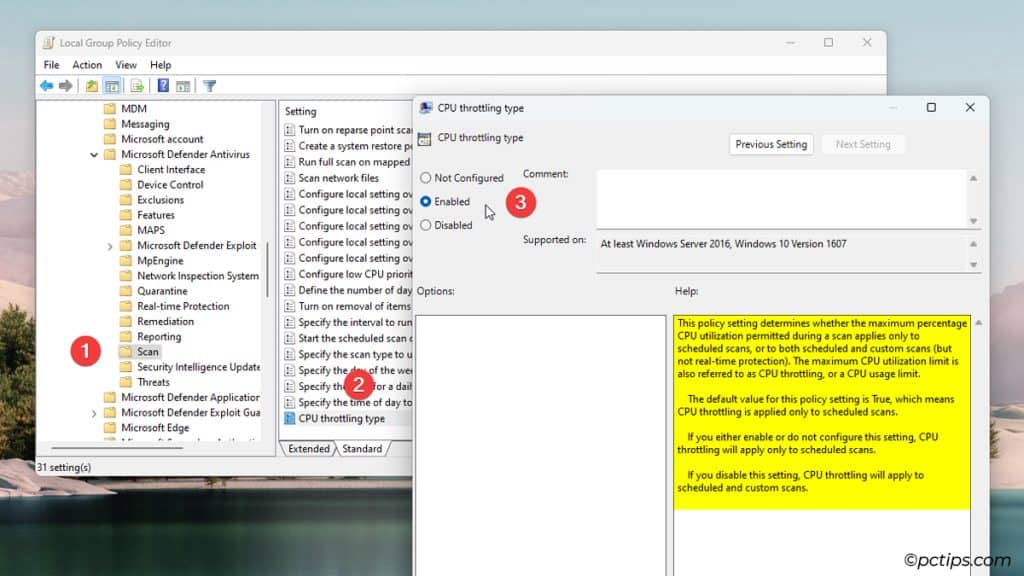
Press Win + R and enter gpedit.msc. Check out some of these examples:
- Set Defender to compute hash values to verify files it scans.
Computer Configuration\Administrative Templates\Windows Components\Microsoft Defender Antivirus\MpEngine\Enable file hash computation feature - Pick how aggressively Defender should scan and block suspicious files.
Computer Configuration\Administrative Templates\Windows Components\Microsoft Defender Antivirus\MpEngine\Select cloud protection level - Set max CPU % Defender can use for a scan.
Computer Configuration\Administrative Templates\Windows Components\Microsoft Defender Antivirus\Scan\CPU Throttling type - Create a system restore point before every scan.
Computer Configuration\Administrative Templates\Windows Components\Microsoft Defender Antivirus\Scan\Create a system restore point - Update security intelligence on startup.
Computer Configuration\Administrative Templates\Windows Components\Microsoft Defender Antivirus\Security Intelligence Updates\Check for the latest virus and spyware security intelligence on startup - Turn Windows Defender SmartScreen on or off.
Computer Configuration\Administrative Templates\Windows Components\Windows Defender SmartScreen\Explorer\Configure Windows Defender SmartScreen
Deploy ASR Rules [Advanced]
Every protection feature you’ve configured so far has made your attack surface smaller and smaller.
If you’re serious about security, there’s one more crucial practice enterprise admins follow that you could implement on your system – Attack Surface Reduction (ASR) Rules.
- Open the Group Policy Editor with
gpedit.msc. - Go to:
Computer Configuration\Administrative Templates\Windows Components\Microsoft Defender Antivirus\Microsoft Defender Exploit Guard\Attack Surface Reduction - Double-click the Configure Attack Surface Reduction rules policy.
- Set it to Enabled and click on Show.
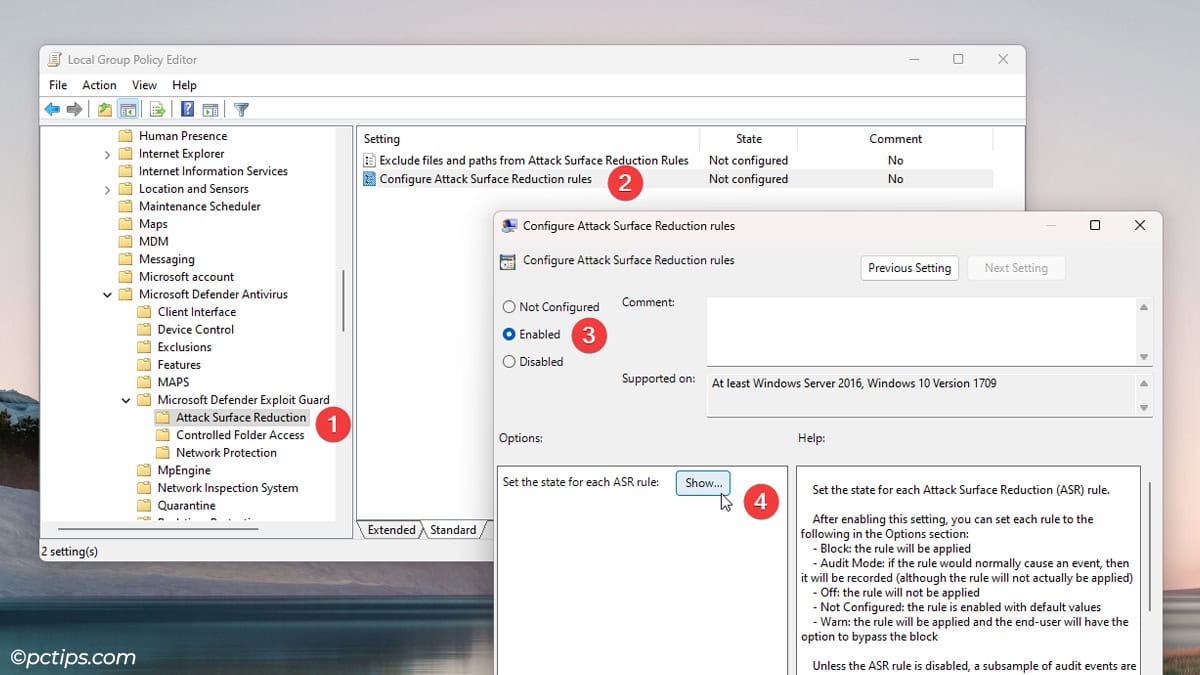
- Open Microsoft’s ASR rule to GUID matrix table.
- Copy any Rule GUID from here. For instance, I’ll copy the one to ‘Block executable content from email client and webmail’.
- Paste it in the Value name section.
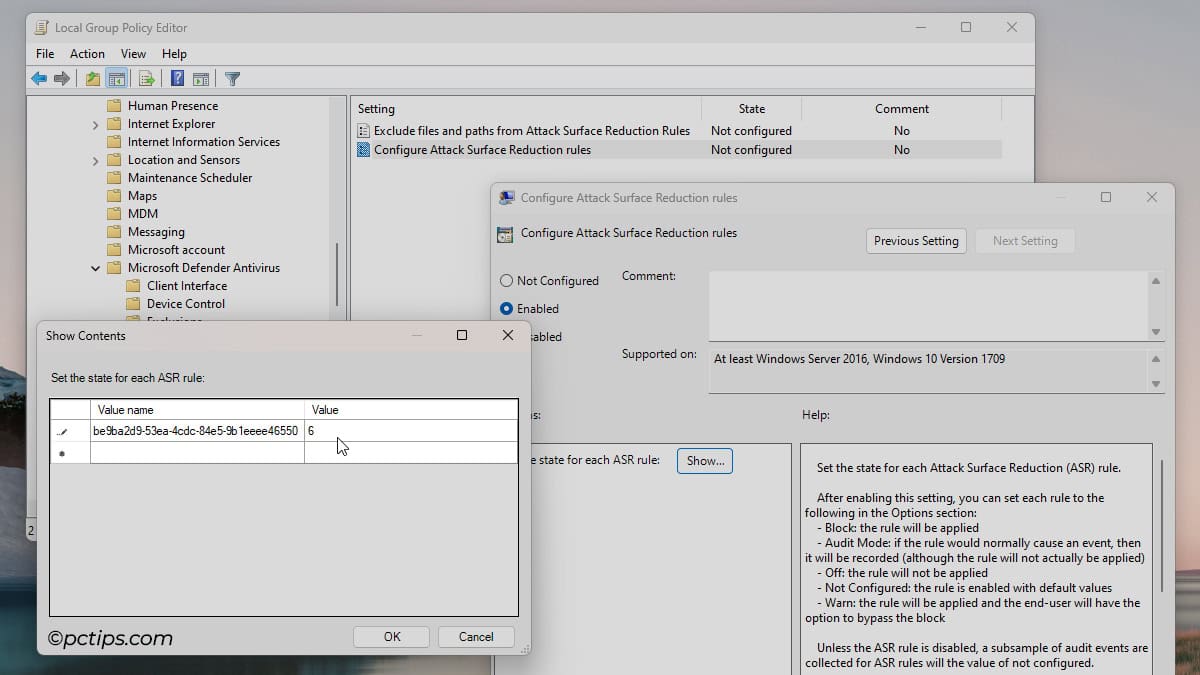
- Enter 6 in the Value field and press Ok. 6 sets the rule status to Warn (i.e., Windows will warn you when any executable content from email tries to run; you can block it or let it run).
- Press Apply to implement this rule.
- Repeat steps 6-8 and implement any other ASR rule you want. You can add all of them for maximum security, but take care that your device usability isn’t impacted.
So, Are You Secure Now?
Compared to a while ago, you’re definitely a lot better equipped to deal with threats, both knowledge and tool-wise.
If you followed along with the steps so far, Windows is as secure as it will be with any third-party security system.
However, even the most robust security system doesn’t stand a chance against human error.
Social engineering attacks and large-scale scams have proven this time and again (case in point: the 2016 US Presidential Election email leaks).
You’ve already configured Windows to be as safe as possible. Make sure to follow the same theme in general:
- Practice good browsing habits. Don’t open shady links and suspicious files. Or at least use sandbox modes for them.
- Watch out for scams and frauds. As people readily share private info online, these are increasing every year.
- Read up on password safety. Ditch any common or leaked passwords.
- Protect yourself with a VPN on public networks, and with 2FA in general.
- Regularly backup files to external drives. Ideally, follow the 3-2-1 method.
These simple tips, combined with Defender, will reliably protect you from most threats.
Can I Use Defender with Another Antivirus?
Kind of, but not fully.
Two antiviruses simultaneously running on a system massively strain resources. Often, they will even detect each other as threats and interfere with protection.
Due to this, Defender automatically disables it’s real-time protection when you install a third-party antivirus.
You can enable Defender’s Periodic scanning if you want protection from both antiviruses. Other Defender features will remain active and unaffected.
I prefer to solely stick with Defender. My main issue with third-party antiviruses is that they tend to be intrusive (bombard you with promotions) and hog system resources.
If you have a third-party antivirus that works well for you, feel free to stick with that!
In either case, the important takeaway is that you should utilize the entire security suite, not just the antivirus.
Times have changed, and this is what’s necessary to stay safe now.
Implement sandbox modes, second-opinion scans, phishing protection, ransomware protection, and every other feature available to you. And always follow safety best practices!
Let me know if you have any questions regarding Windows Defender or security in general.
And please consider sharing this guide with your friends and family; help them stay safe!
I have windows 11 but when I go into settings/privacy and security. there is no > Virus & threat protection > Scan options. Advise please. Thank you.
Hi Michelle, looks like I made a typo. The correct steps are: Privacy & security > Windows Security > Virus & threat protection > Scan options. Thank you for pointing that out!