25 Admin Tools That Will Make You a Windows GENIUS
Last Updated:
As a Windows power user, there are certain administrative tools you absolutely must know inside and out.
These tools give you the ability to diagnose issues, optimize performance, automate tasks, and truly take control of your system.
In this article, I’ll be sharing 25 of the most essential Windows admin tools based on my own extensive testing and experience.
For each one, I’ll explain what it does, how to use it, and why it’s so darn useful.
You’ll come away with a powerful toolkit for tackling any Windows challenge.
Let’s jump right in with one of my all-time favorites…
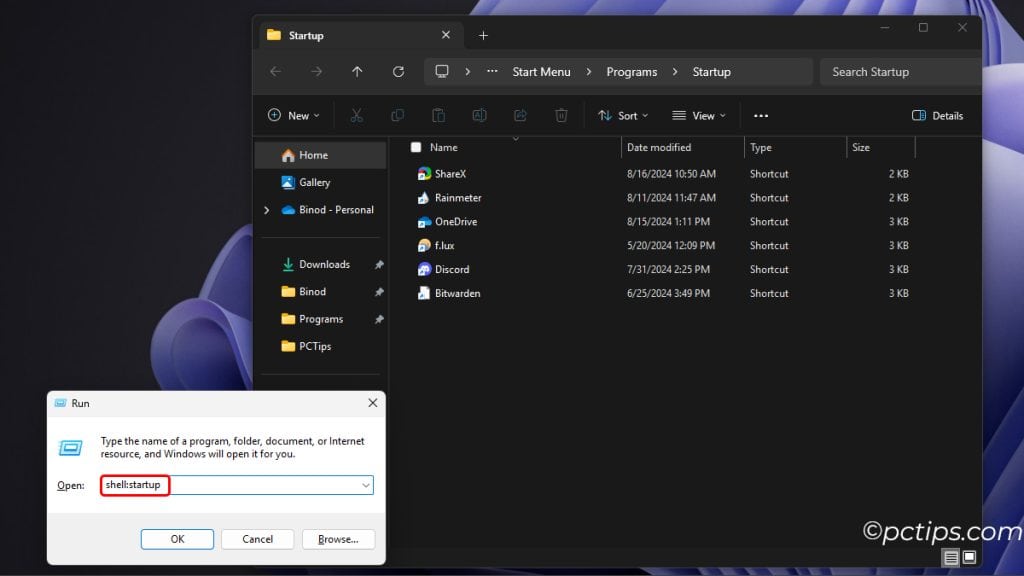
The Run Dialog
Memorize this keyboard combo: Win+R.
This launches the Run dialog, a magical portal that lets you zip straight to any Windows tool, setting, or even website with a few keystrokes.
Forget hunting through menus!
Want a quick list of 100 most useful keyboard shortcuts?
Some of my favorite Run commands:
cmd: Opens the classic Command Promptpowershell: Launches Windows PowerShellmsinfo32: Get all the juicy details about your systemdxdiag: DirectX Diagnostic Tool. Essential for troubleshooting video and sound issues.ncpa.cpl: Manage network connectionsappwiz.cpl: Launches Programs and Features to uninstall appsmrt: Malicious Software Removal Tool. Scan for and remove common malware.
The Run dialog also supports standard shell commands.
Try shell:startup to instantly open your Startup folder. How cool is that?
If you want to really dive into the power of Run, check out our article on 100 Run Commands Every Windows User Should Know.
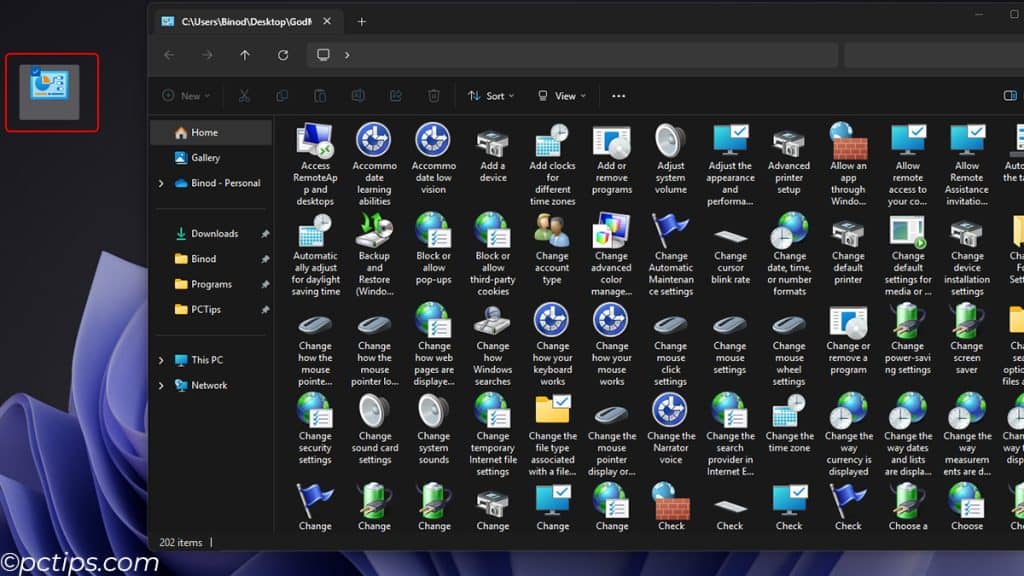
GodMode
No, this isn’t some cheat code from a video game.
GodMode is a special folder that gives you instant access to over 200 Windows tools and settings.
It’s like having a control panel on steroids.
To activate GodMode, just create a new folder and name it: GodMode.{ED7BA470-8E54-465E-825C-99712043E01C} (copy-paste for accuracy)
That’s it!
Double-click the GodMode folder anytime to reveal a treasure trove of Windows settings and tools.
For more hidden gems like this, check out my article on 25 Hidden Windows Features You Probably Didn’t Know About.
Winget
Windows finally has its own built-in package manager.
And let me tell you, it’s a thing of beauty.
With Winget, you can install, upgrade, and remove programs with just a few keystrokes.
No more Googling for download links!
To use Winget:
- Open PowerShell or Terminal
- Type a Winget command like:
winget install <packagename>to install a programwinget upgrade <packagename>to update an installed programwinget uninstall <packagename>to remove an installed programwinget search <packagename>to find available packages
For example, to install Mozilla Firefox, you’d run: winget install Mozilla.Firefox
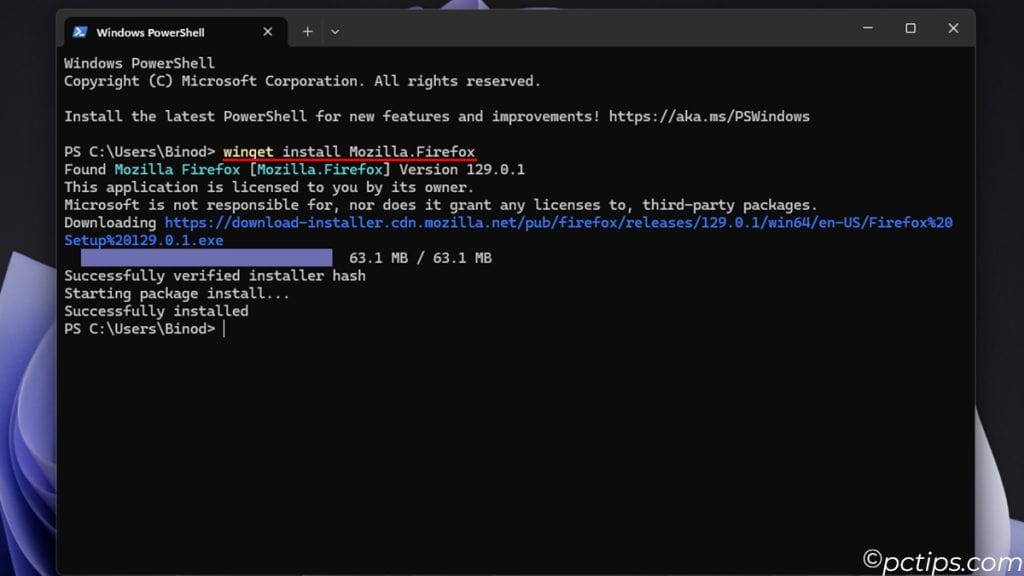
It’s that easy. Winget takes care of the rest, downloading and installing the app for you.
Winget makes it a breeze to automate software installs and updates across multiple PCs.
For a full guide on using winget, check out my article on How to Install Any Windows Program in Seconds with Winget.
Command Line
Whether you prefer the classic Command Prompt, the shiny new Terminal, or the powerhouse PowerShell, command line skills are a must for any Windows user.
Some essential commands everyone should know:
ipconfig– For all your IP needsping– Is it up? Is it down? ping will tell youtracert– For when you need to follow the network trailnetstat– What’s connecting to what? netstat knowstasklist / taskkill– For when a process needs to be put in its placesfc / DISM– For those times when Windows needs a little self-carechkdsk– Checks the disk for errors
Of course, that’s just scratching the surface.
PowerShell in particular offers amazingly powerful system administration and automation capabilities.
It’s well worth investing time to learn.
To rapidly expand your command line skills, I highly recommend bookmarking sites like SS64 that provide quick command references and examples for all the major operating systems. Infinitely useful!
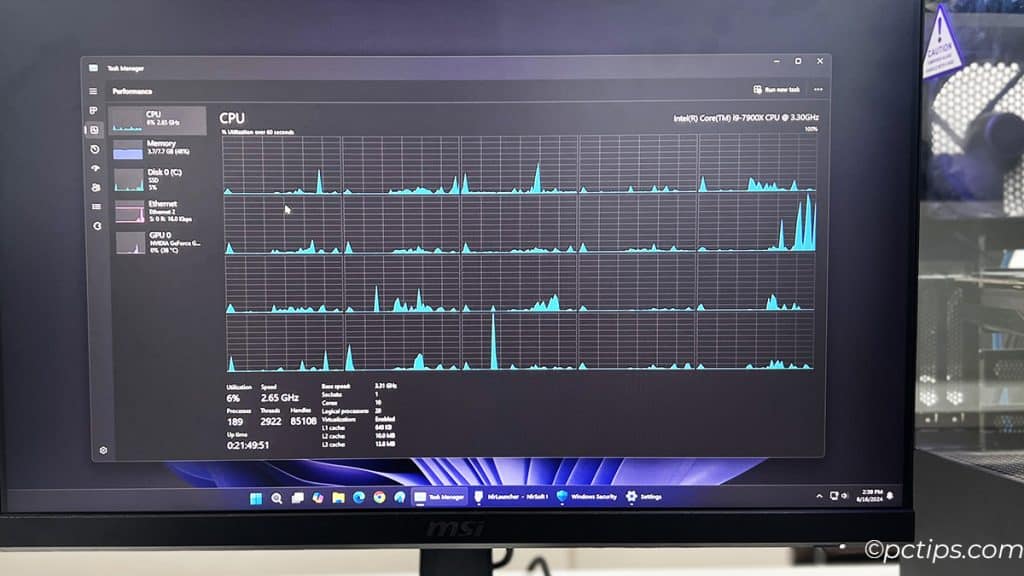
Task Manager
Task Manager – your one-stop shop for monitoring and managing running applications and processes.
But if you’re only using it to force quit frozen apps, you’re barely scratching the surface.
For the full scoop, check out this deep dive: 20 Power User Secrets for Mastering Windows Task Manager
But here’s a quick taste of what Task Manager can do:
- Track resource usage across CPU, memory, disk, network, GPU
- Analyze app performance over time on graphs
- Set processor priority and affinity for specific processes
- Monitor startup programs and disable/open location
- Enable/disable Windows features and services
Understanding Task Manager’s full capabilities will allow you to troubleshoot issues and optimize your system like never before.
Trust me, it’s a tool you’ll use Every. Single. Day.
Resource Monitor
While Task Manager is great for a quick overview, Resource Monitor (resmon) is where you go for deep, nitty-gritty details about your PC’s performance.
This tool gives you incredibly detailed insights into how your system is using CPU, memory, disk, and network resources.
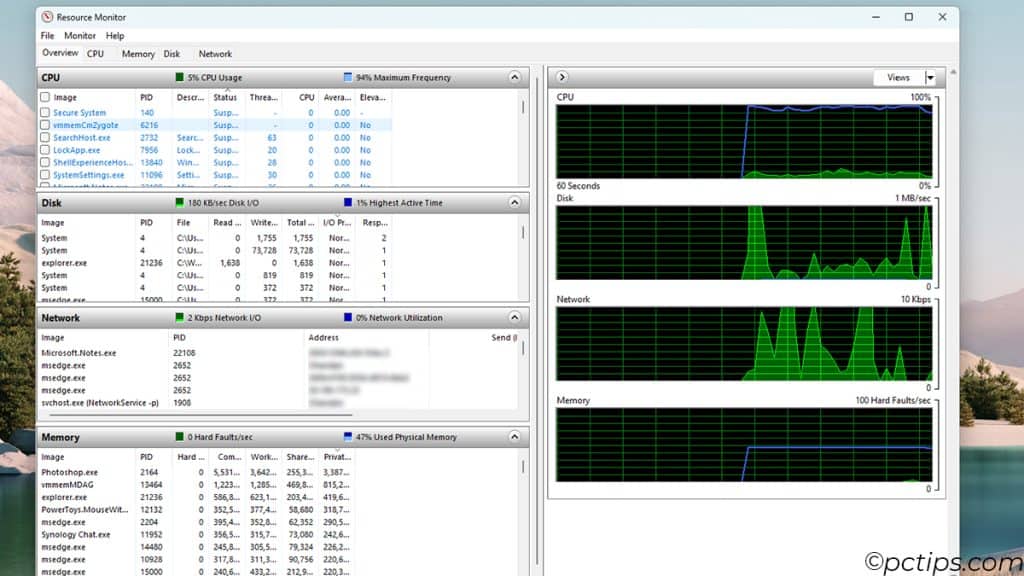
You can see exactly which processes are reading/writing files, which TCP/IP addresses they’re connecting to, which files are memory mapped, and more.
Some of my favorite Resource Monitor features:
- Disk tab: Shows real-time disk activity, I/O speeds, and file paths for all processes. Useful for spotting disk bottlenecks.
- Network tab: Graphs TCP connections, network activity, and which processes are making connections to which addresses and ports. Great for security analysis.
- Memory tab: Visualizes physical memory usage, commit charge, and which files are memory mapped. Go here to diagnose low-memory issues.
To launch Resource Monitor, just type resmon into the Run dialog (Win+R).
For a guided tour, check out The Beginner’s Guide to Using Resource Monitor on Your PC.
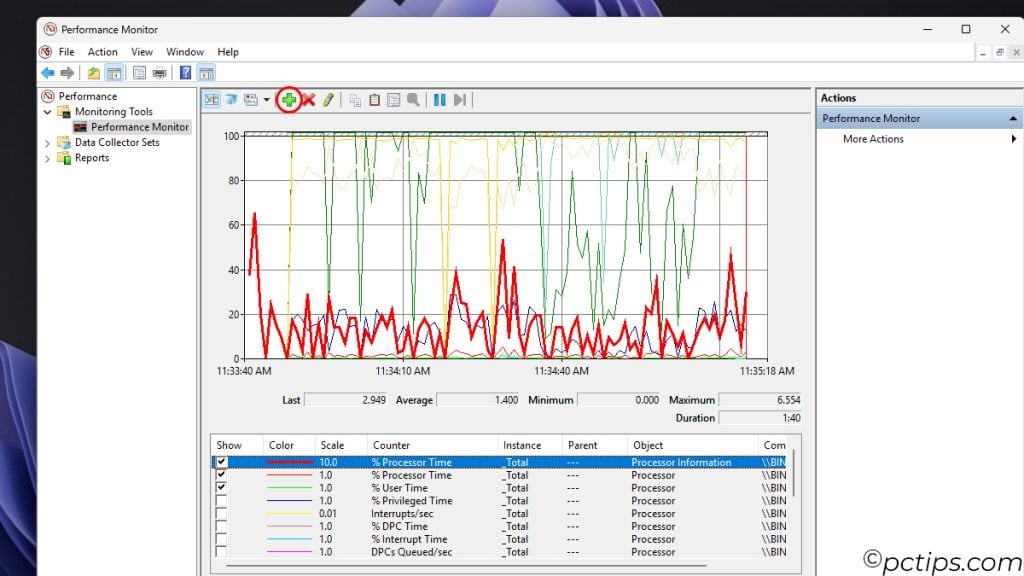
Performance Monitor
Performance Monitor (perfmon) is the granddaddy of Windows performance tools.
It’s a powerful framework for collecting, analyzing, and graphing all kinds of detailed performance data over time.
With Performance Monitor, you can:
- Track metrics for just about any performance counter on your PC – processor time, disk queue length, you name it
- Log performance data to files for later analysis or export to other tools like Excel
- Generate reports on system performance, reliability, and more
- Set up alerts to proactively notify you when key metrics exceed limits
To launch Performance Monitor, just type perfmon into the Run dialog (Win+R).
The first thing you’ll see is the intimidating graph view.
Don’t worry, you can easily configure the metrics it shows from the green plus button.
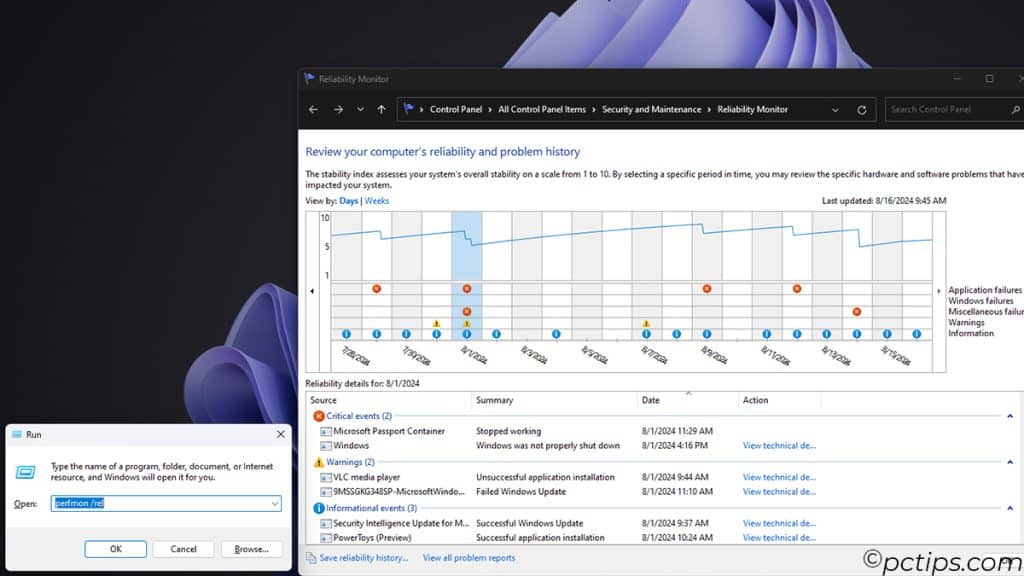
Reliability Monitor
Reliability Monitor is like a report card for your PC’s stability.
It provides a timeline of events that impact stability – application failures, Windows failures, warnings, and information events.
The graph shows a stability index that ranges from 1 (very unstable) to 10 (very stable).
From this timeline view, you can easily correlate crashes, errors, and failures with things like system updates, software installs, or configuration changes to help identify the root cause.
Clicking on a particular day shows more details on the events.
You can launch Reliability Monitor from the Run dialog with perfmon /rel.
It’s actually part of the wider Performance Monitor tool suite.
While it’s not the most sophisticated diagnostics tool out there, I find Reliability Monitor to be a quick and useful way to get a high-level pulse on system stability over time.
Give it a look the next time you’re chasing down a series of mysterious crashes!
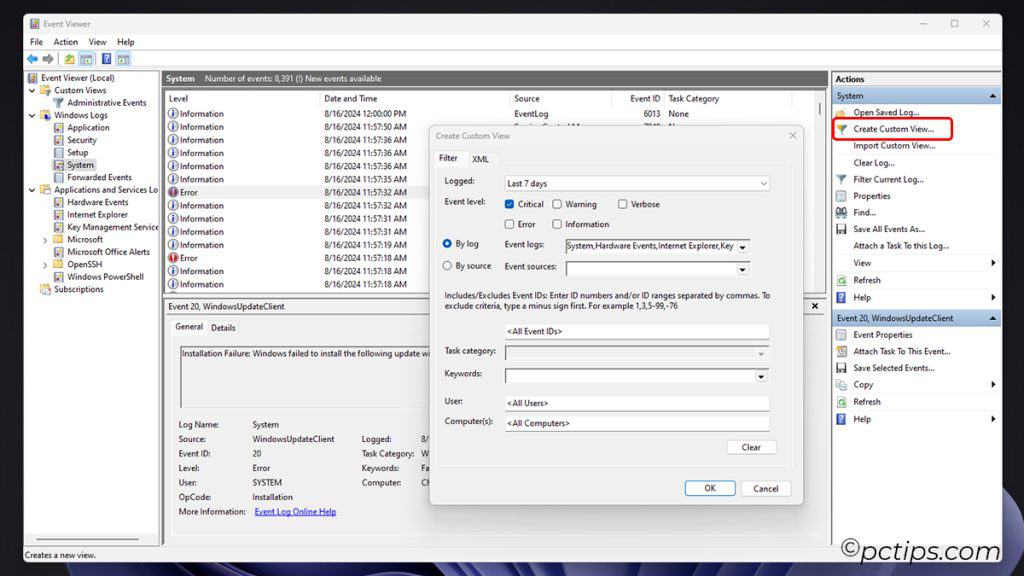
Event Viewer
When bad stuff happens on a Windows PC, Event Viewer is the first place I turn to investigate.
It’s a centralized hub for viewing event logs from the operating system, applications, and hardware.
Some common issues you can diagnose with Event Viewer:
- Unexplained application crashes or hangs
- Windows startup/shutdown problems
- Device driver errors
- Security events like failed login attempts
- Hard disk issues and file system corruption
To get started, launch Event Viewer from the Run dialog with eventvwr.msc.
One of my favorite Event Viewer tricks is creating a Custom View to find and filter events from multiple logs.
Click “Create Custom View” in the right pane and you can set up complex queries that span logs, time periods, etc. Very handy!
The hardest part of Event Viewer is often deciphering the cryptic, technical event descriptions.
When in doubt, copy/paste the text into a web search to get more context.
Microsoft’s own documentation is a good place to start.
For more troubleshooting tips, see this article on 20 Common Windows Problems (And Their Easy Fixes).
Task Scheduler
Task Scheduler is my not-so-secret weapon for automating repetitive maintenance jobs on Windows PCs.
It lets you schedule scripts, programs, and commands to run automatically based on all sorts of flexible triggers – at a set time, at startup/shutdown, when a user logs on, when the PC is idle and more.
Here are some of my favorite ways to use Task Scheduler:
- Run nightly backups and file syncs
- Schedule disk cleanup and defrag during off-hours
- Auto-reboot the PC weekly to clear out memory leaks
- Run malware and virus scans on a set schedule
- Rotate and archive log files to prevent them from filling the disk
- Launch programs or services after the system starts
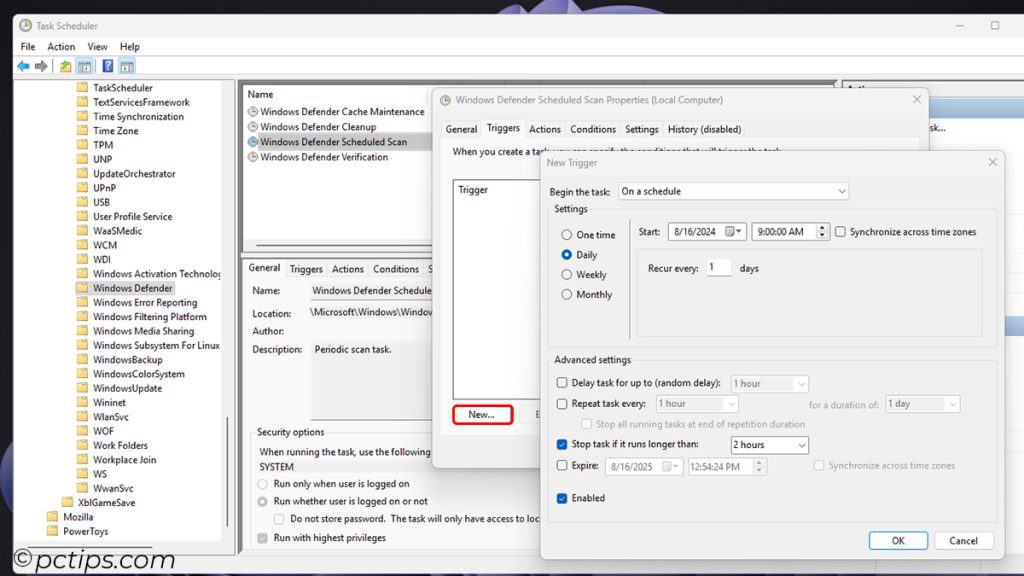
To get started, launch Task Scheduler from the Run dialog with taskschd.msc.
Task Scheduler is an amazingly versatile tool for automating system maintenance and administration.
If you find yourself doing something more than once, there’s probably a way to automate it with Task Scheduler.
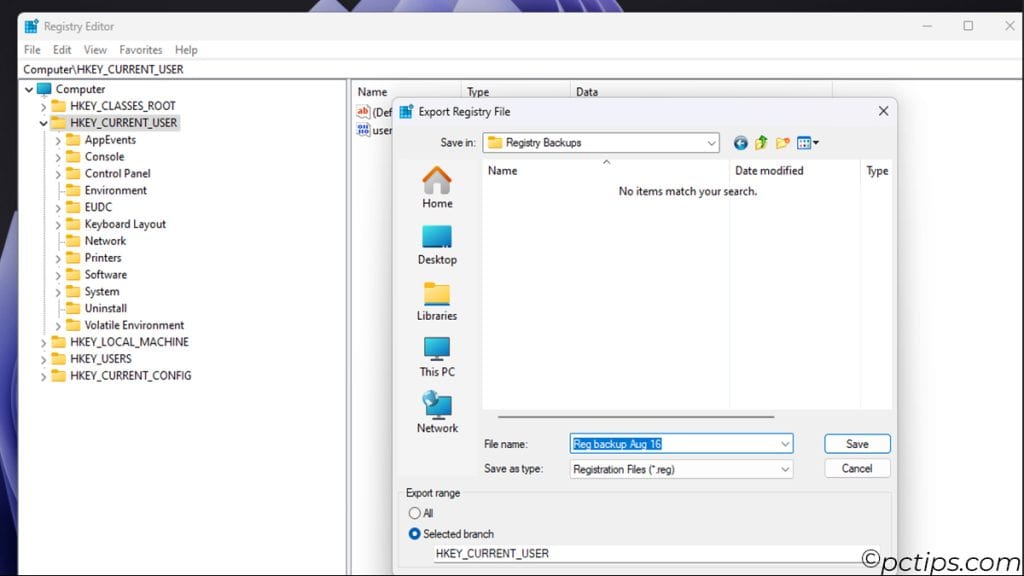
Registry Editor
The Windows Registry – the mysterious, labyrinthine database that controls virtually every aspect of the OS.
Editing it directly with the Registry Editor (regedit) can unleash immense power…or completely wreck your Windows installation if you’re not careful!
I’ll be frank: I avoid using regedit for all but the most specific, well-documented tweaks.
Mucking about in the Registry willy-nilly is a great way to hose your system.
Always back it up first and triple-check any changes!
To stay out of trouble, I recommend using regedit only in these cases:
- When following a specific, reputable guide to enable some well-defined functionality
- To change a setting that Windows doesn’t expose a GUI option for
- When troubleshooting or repairing a specific, identified Registry key/value
- To back up the Registry before big system changes or updates (always back up!)
Personally, I rely on pre-tested .reg files from reputable sites whenever possible rather than editing directly in regedit.
But it’s still essential to understand the Registry’s structure and inner workings.
That said, there are some handy regedit tricks worth knowing.
For some of my favorites, check out 17 Must-Know Registry Tweaks for Windows.
Group Policy
Group Policy is a beast of tools that lets sysadmins manage the Windows environment for groups of users and PCs from a central location.
It’s most often used to:
- Enforce security policies like password complexity, lockout, etc.
- Control user permissions and access rights
- Configure and lockdown Windows and application settings
- Deploy software installs and updates
- Set up folder redirection and offline file access
- Manage power settings, desktop configs, and much more
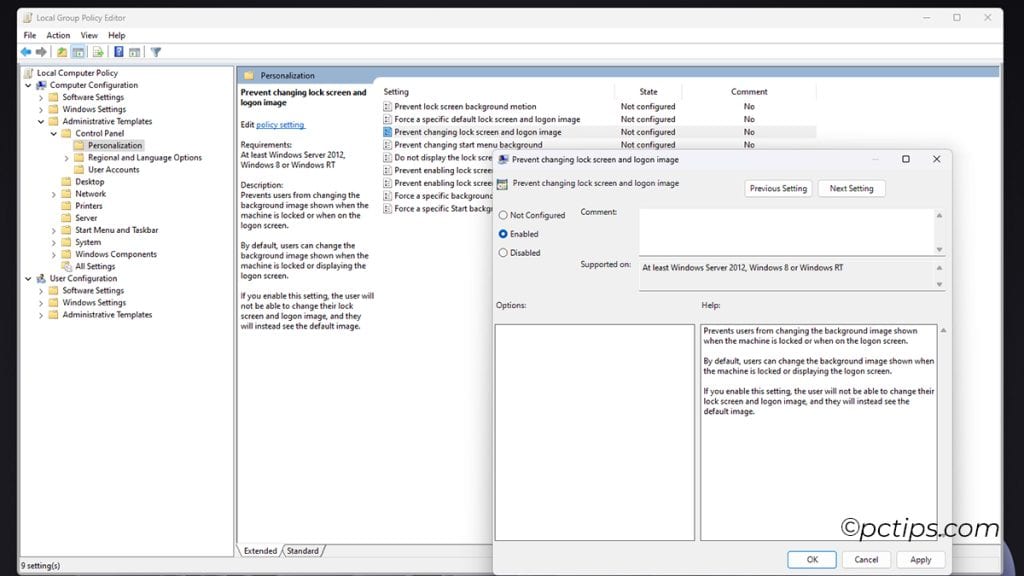
If you have Windows Pro or higher, you can use the Local Group Policy Editor (gpedit.msc) to view and apply a subset of Group Policy settings locally.
But the real power comes from managing Group Policy centrally on a Windows domain controller via Active Directory.
Here are 30 Critical Group Policy Settings to Secure & Optimize Windows
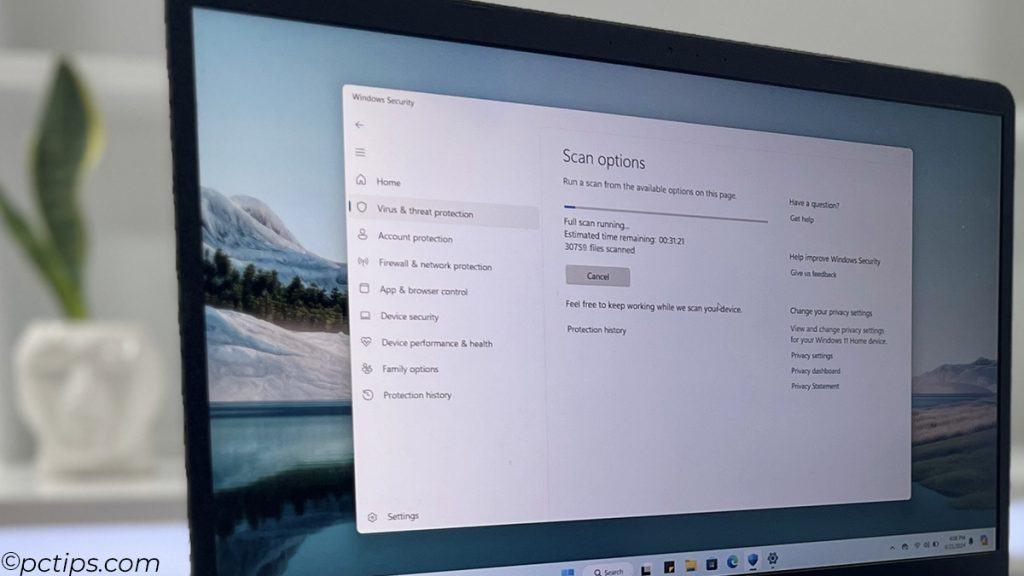
Windows Security
Windows Security (formerly Windows Defender) is your built-in suite of security tools.
It includes an antivirus, firewall, app & browser control, and more.
To launch Windows Security, just type “Windows Security” into the search box.
You can also find it in the Settings app under Privacy & Security > Windows Security.
In Windows Security, you can:
- Scan for viruses and other malware
- Check your security report and act on recommendations
- Manage firewall settings and rules
- Control which apps can access your location, camera, microphone, etc.
- Enable and configure features like ransomware protection and exploit protection
While third-party security tools have their place, Windows Security has come a long way in recent years.
It’s now what I recommend for most users.
To get the most out of Windows security, see our guide on How to Make Windows Security Work Even Better.
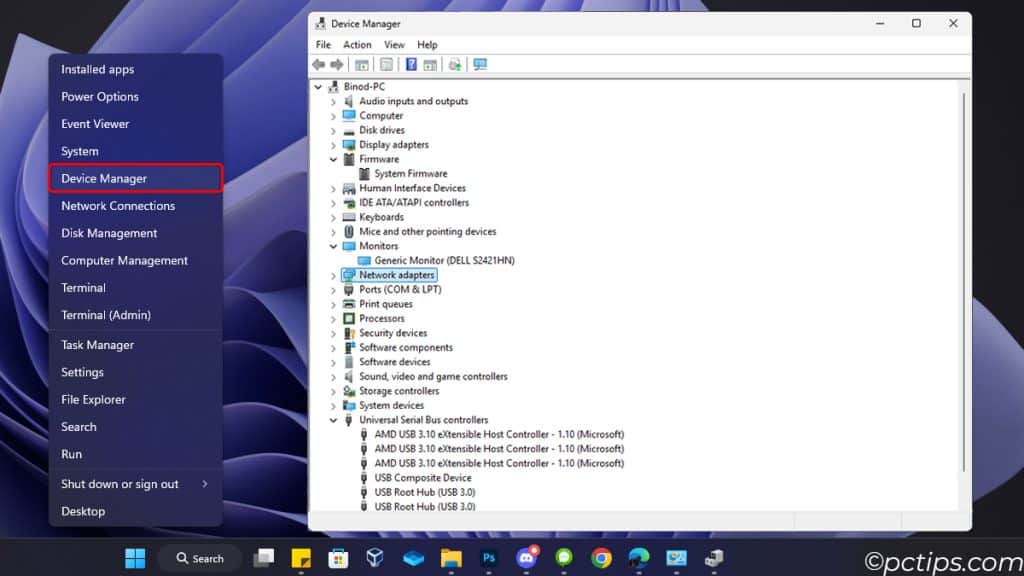
Device Manager
Device Manager is your go-to tool for managing the hardware devices installed on your PC.
It shows you a tree view of every device, from the processor to each connected USB gizmo, along with their drivers and current status.
Some key Device Manager use cases:
- Identifying unknown devices that show up as a yellow question mark
- Updating, rolling back, disabling, or uninstalling buggy device drivers
- Troubleshooting error codes by looking up the specific code online
- Enabling/disabling devices for diagnostic purposes
- Setting power management options to control when devices can wake the PC
To launch Device Manager, press Win+X and select Device Manager. Or type devmgmt.msc into the Run dialog.
DiskPart
DiskPart is a nifty command-line tool that lets you manage disks, partitions, and volumes right from a terminal window – no GUI needed!
It’s especially useful for automating disk admin tasks via batch script.
To use DiskPart:
- Open an admin Terminal by right-clicking the Start button and selecting Terminal (Admin)
- Type
diskpartand pressEnter - Type
list diskto see a list of available disks - Type
select disk <number>to select a disk to work with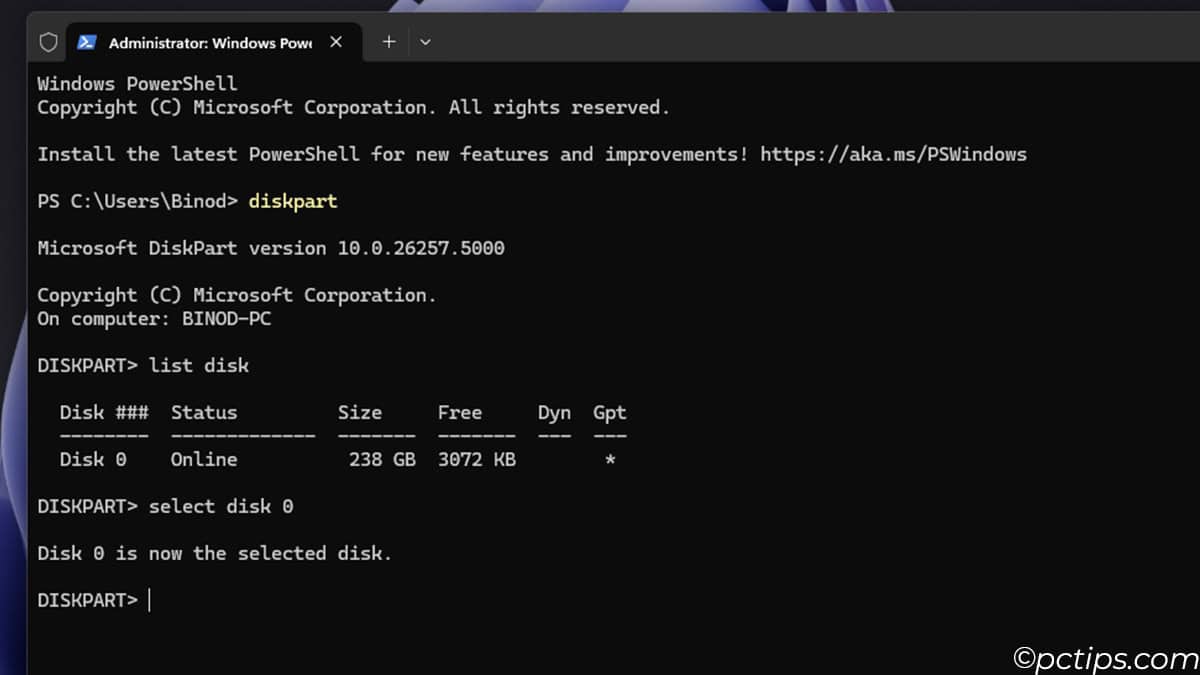
- Type commands like
create,delete,format,assign, etc. to manage partitions and volumes
Some common DiskPart commands worth knowing:
list disk: Lists all available disks with their size, status, and other infolist volume: Shows all volumes across all diskscreate partition primary size=X: Creates a new primary partition of X MBformat fs=ntfs quick: Formats the selected volume with the NTFS file systemassign letter=Z: Assigns drive letter Z to the selected volumeclean: Wipes clean all partition info from the selected disk (use with care!)convert gpt: Converts an MBR disk to a GPT disk (useful for 4TB+ disks)
DiskPart is one of those tools you may not use every day but it’s indispensable when you need it.
Be careful! Diskpart is a low-level utility that can wipe data if used incorrectly. Always double-check your commands!
Robocopy
Robocopy (Robust File Copy) is a powerful command-line utility for copying files and directories.
It’s faster and more resilient than traditional copy methods, making it ideal for bulk file transfers and backup tasks.
Some key Robocopy features:
- Multi-threaded copying for faster performance
- Ability to resume interrupted file transfers
- Mirroring directories (one-way sync)
- Granular include/exclude rules for files and folders
- Detailed logging and job scheduling
To use Robocopy:
- Open Command Prompt
- Type
robocopyfollowed by your source and destination directories and desired options
For example, to mirror a directory tree from C:\Source to D:\Backup, you would use:
robocopy C:\Source D:\Backup /MIR /Z /MT:8
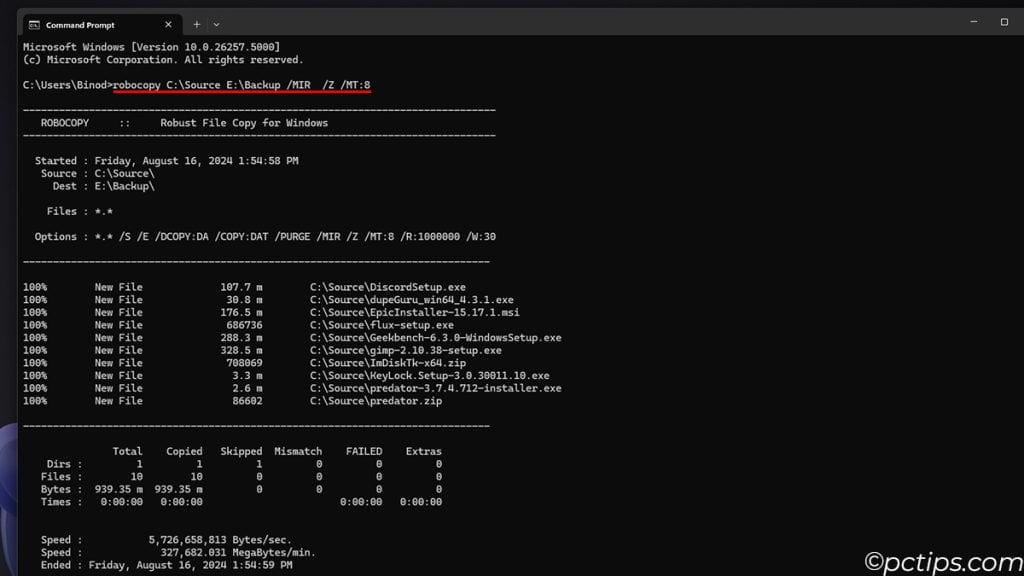
This command will copy all new and changed files, remove any files that no longer exist in the source, use restartable mode, and use 8 threads for faster copying.
Spend some time reading through the Robocopy documentation and testing it out.
You’ll be surprised at how often it comes in handy!
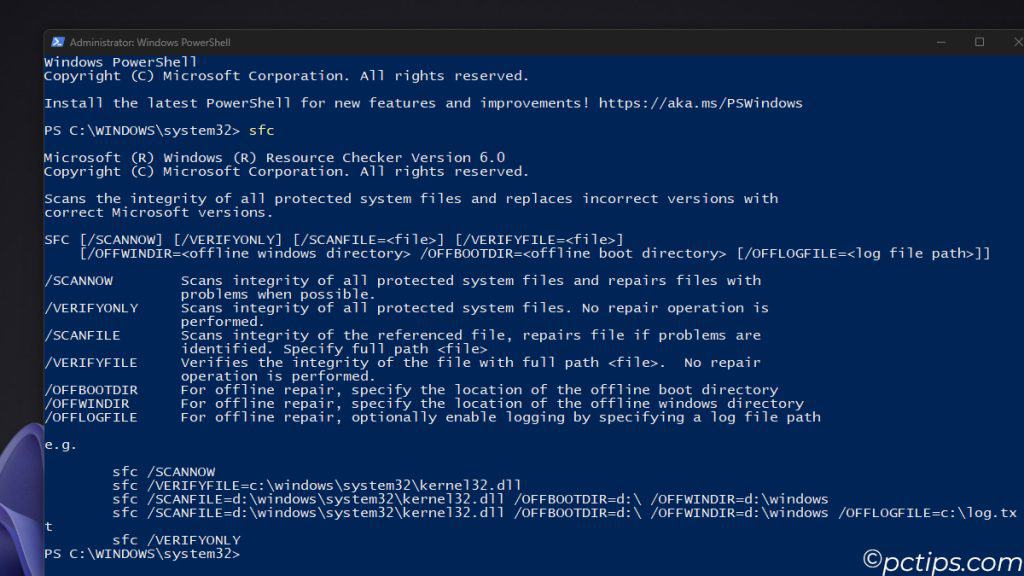
System File Checker and DISM – Repair Your Installation
System File Checker (sfc) is a command-line tool that scans for and repairs corrupted Windows system files.
It’s an essential tool for troubleshooting weird system behavior and stability issues.
To run System File Checker:
- Open Command Prompt as Administrator
- Type
sfc /scannowand hitEnter
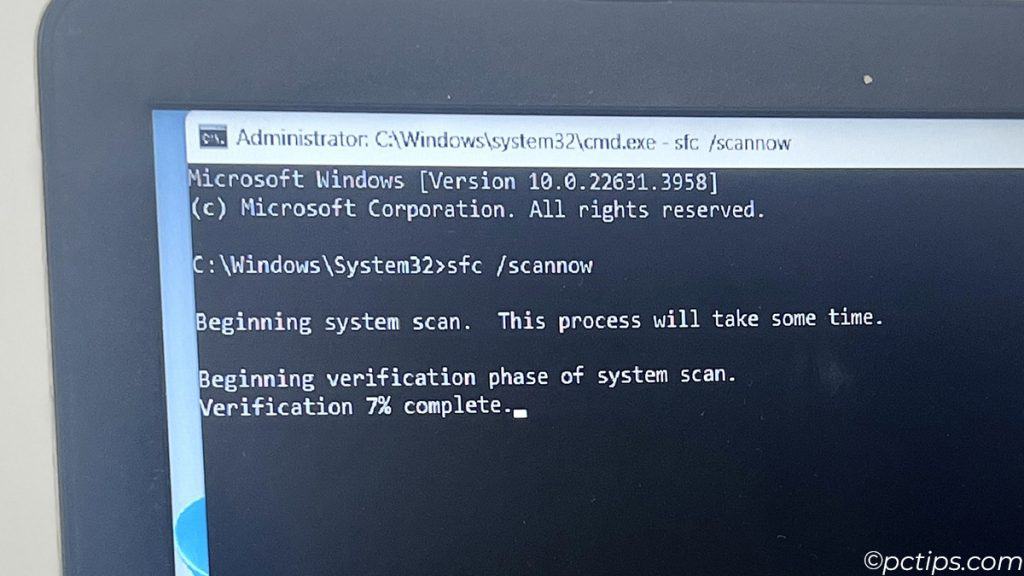
System File Checker will now scan all protected system files and replace any corrupted ones with cached copies.
This can take some time, so be patient.
If sfc finds corrupted files but can’t fix them, you may need to use the Deployment Image Servicing and Management (DISM) tool to repair your Windows image.
To do this:
- Open Command Prompt as Administrator
- Type
DISM /Online /Cleanup-Image /RestoreHealthand hitEnter
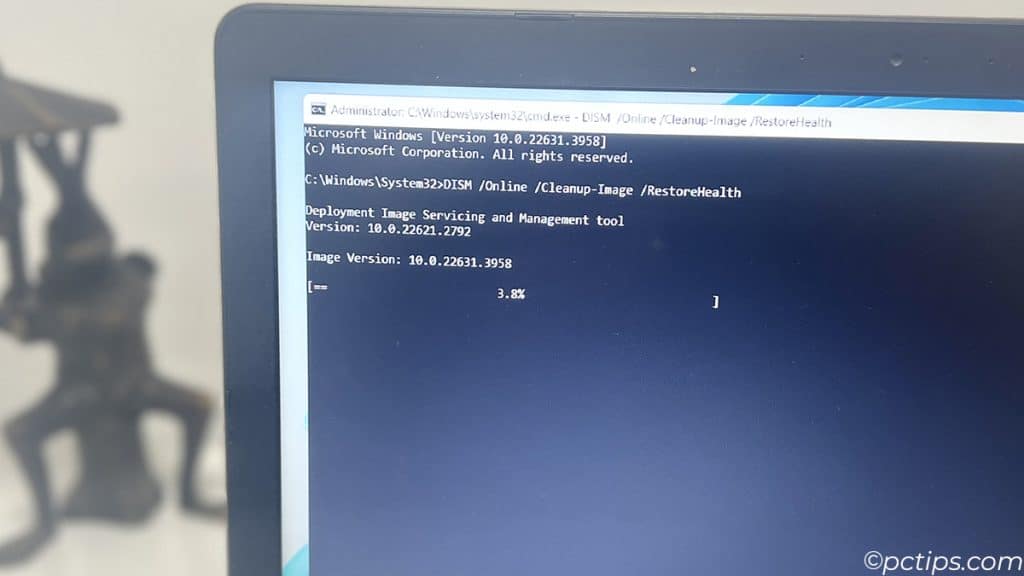
DISM will now download clean copies of any corrupted files from Windows Update and repair your image.
Together, sfc and DISM are powerful tools for repairing Windows system issues.
I recommend running SFC first, and if that doesn’t fix your issue, then try DISM.
Watch For: 15 Signs Your Windows Installation Might Be Corrupted
Network Connections
Windows offers oodles of GUI and command-line tools for managing and repairing network connections but my go-to is still good old ncpa.cpl.
It is your one-stop shop for managing network adapters and connections on your Windows system.
It’s essential for configuring IP settings, troubleshooting connectivity issues, and more.
To launch it, just type ncpa.cpl into the Run dialog (Win+R). From here you can:
- View a list of all network adapters (Ethernet, Wi-Fi, VPN, etc.)
- Enable or disable specific adapters
- Change adapter settings like IP address, DNS servers, etc.
- Diagnose and repair connection issues
- Set up VPN connections and configure proxy settings
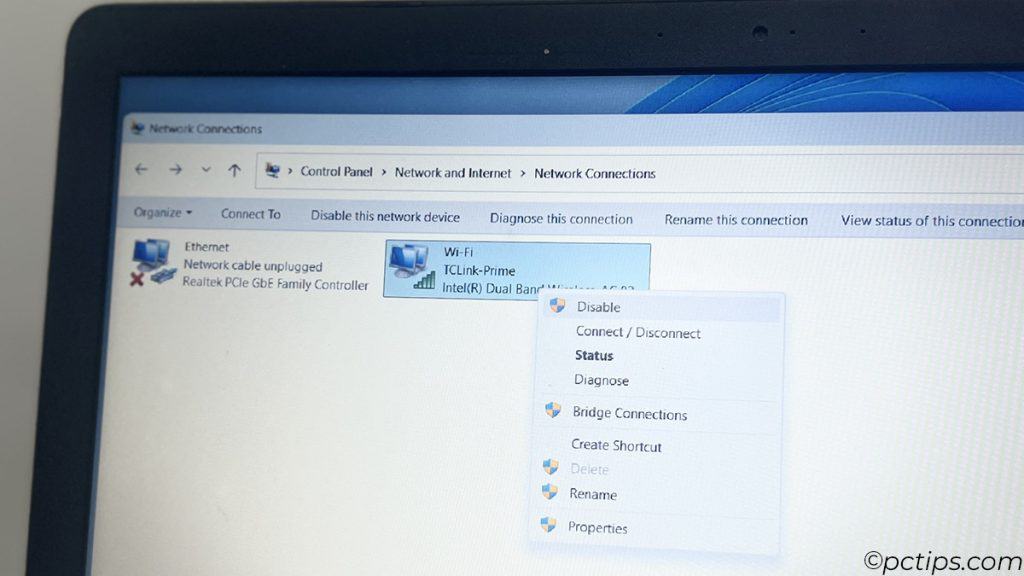
One of my favorite ncpa.cpl tricks is using it to quickly release and renew my IP address when debugging connection issues.
Right-click the adapter again and disable it, wait a few seconds, right-click and re-enable.
Speed Up: 30 Genius Ways to Make Your Internet Faster
Memory Diagnostics Tool
Windows Memory Diagnostic is a built-in tool for testing your system’s RAM for errors.
To use the Memory Diagnostics Tool:
- Type
mdsched.exeinto the Run dialog (Win+R) - Click “Restart now and check for problems” (be sure to save your work first!)
- Let the test run through all its passes (usually 2-3 on a modern system). This can take a while so feel free to grab some coffee.
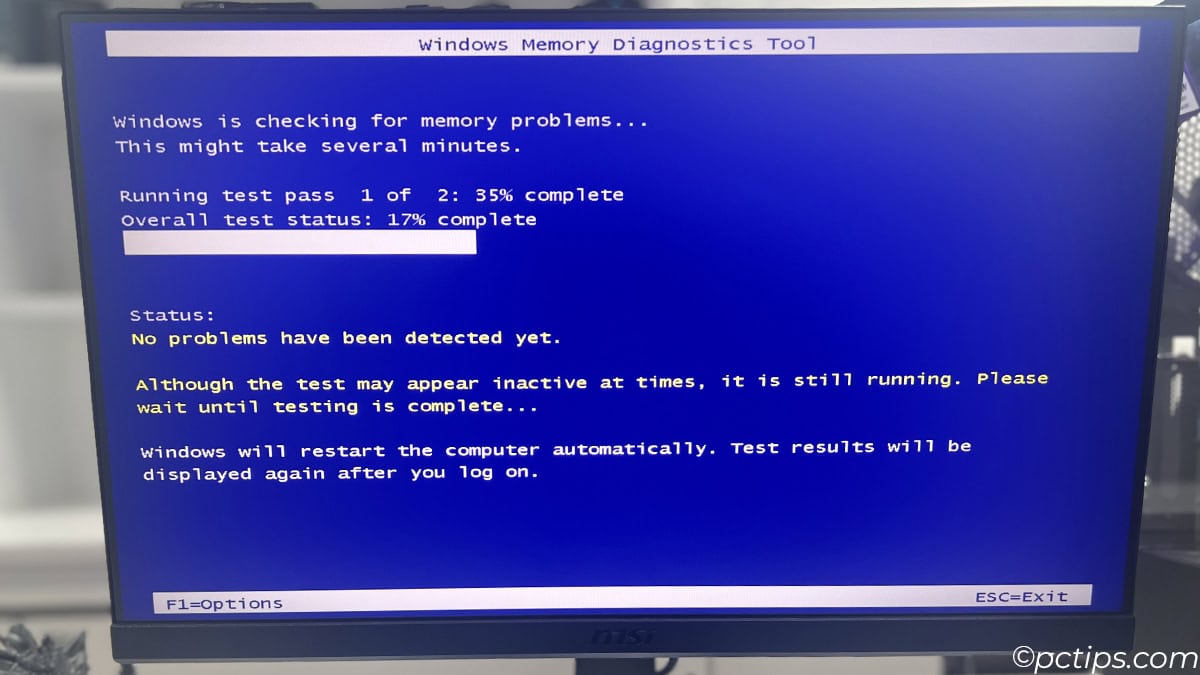
- When the test is done, your PC will automatically reboot and you’ll see the results on the Windows boot screen
If you see any errors listed, it’s a pretty strong indicator you have a bad RAM stick.
You’ll need to replace it or run further tests to pinpoint which exact stick is faulty.
Even if you get a clean bill of health from the Memory Diagnostics Tool, I always recommend following up with a more thorough memory test using a dedicated RAM testing tool like MemTest86.
The Windows tool is great for a quick spot check but it can miss more subtle issues.
In fact, if system stability is critical (like on a server or production machine), I’ll often run MemTest86 for 24-48 hours straight to really hammer on the RAM.
It’s not uncommon for errors to only pop up after several hours of testing, especially with cheaper or overclocked RAM.
So next time you’re chasing the dreaded Blue Screen of Death or other random crashes, be sure to give the ol’ Memory Diagnostics Tool a run.
It just might save you hours of fruitless troubleshooting!
Watch For: How to Tell If Your RAM Is Going Bad (Before It’s Too Late)
Free Up RAM: 15 Programs That Are Eating Your RAM (And Their Alternatives)
System Restore
Ever wished you could just wind back the clock on your PC to a time before that borked driver install or janky software update?
With System Restore, you can!
System Restore periodically takes “snapshots” of your system state (including the registry, installed apps, drivers, etc.) and tucks them away for safekeeping.
If you run into trouble down the road, you can return your system to one of these restore points to undo recent changes and get things humming again.
Some common scenarios where System Restore can be a lifesaver:
- An app or driver install gone wrong that breaks your system
- A sketchy piece of software that infects you with malware
- System instability or crashes caused by a recent change
- Accidental deletion of an important system file or registry key
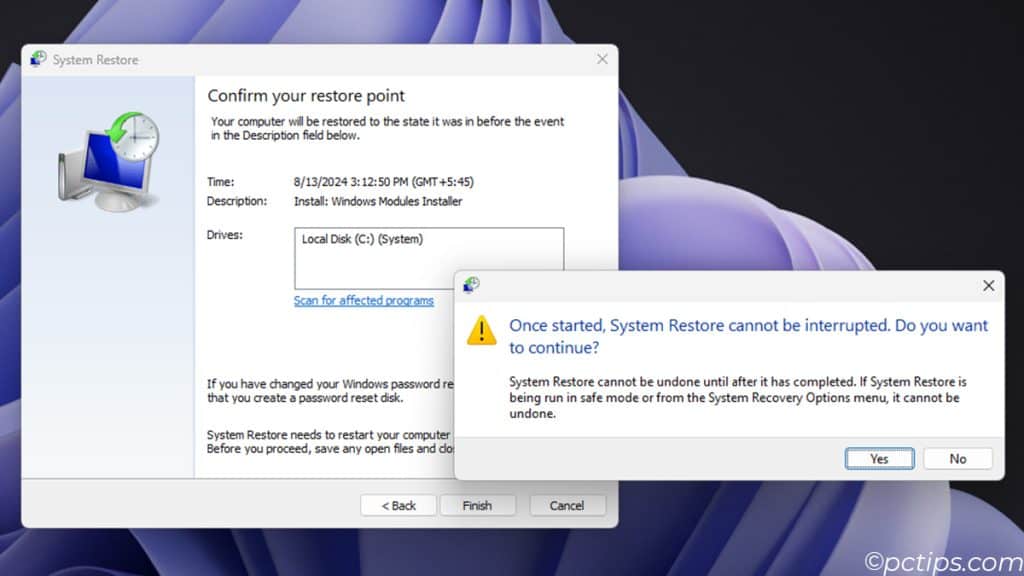
To use System Restore:
- Search for
rstrui.exein the Start menu - Choose the Recommended restore or a different restore point
- Click Next, cross your fingers, and let ‘er rip!
You can also create manual restore points before making big system changes (always a smart move).
From the System Restore UI, just click “Create” to make a new snapshot.
It’s important to note that System Restore only affects system files and settings – not your personal files like documents, music, or photos.
So while it can be a godsend for undoing system wonkiness, it’s not a substitute for proper backups of your data!
Bonus Tools!
There are a few more notable ones worth mentioning:
- Computer Management – A central console for managing system components, storage, users and groups, services, and more
- MMC (Microsoft Management Console) – A customizable toolkit for creating bespoke admin consoles with just the tools you need
- Hyper-V – Windows’ built-in hypervisor for creating and managing virtual machines
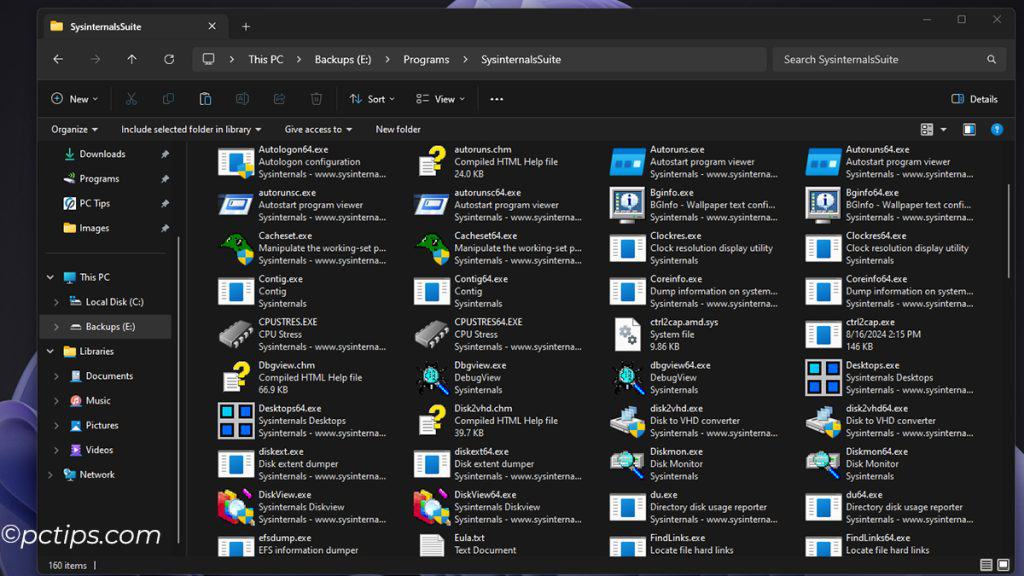
- Sysinternals Suite – A set of advanced utilities from Microsoft for digging deep into Windows internals
Pick one of the tools covered and dive deeper.
Read the documentation, watch some tutorials, and try to use it to solve a real problem.
Come back and let me know how it went in the comments!
If you found this guide helpful, please consider sharing it with your fellow Windows users.
I tried installing Godmode on my system. I copied the special pathname but could not insert it as a file or as a directory in GodMode. How about a hint.
My desk top is running window 10. It does not have TMP 2.0. How can I get it installed? HP Pavilion. It's about 5 years old or older, but it works fine. Am 77 and cannot afford to buy a new one.
Hey Thomas, TPM 2.0 is a security chip that's required for Windows 11, but it's totally optional for Windows 10. No worries if your HP Pavilion doesn't have it - it won't affect how Windows 10 runs at all. In general, TPM chips are soldered onto the motherboard when the laptop is made. But again, you don't need one for Windows 10, so it's no biggie! Now, if you're looking to upgrade to Windows 11, there's a way! Microsoft doesn't officially support it, but you can use a tool called Rufus to create a bootable USB installer that bypasses the TPM 2.0 requirement. I've got an article here "Fastest Way to Create a Bootable USB" that walks you through the process step-by-step.
Edward, When you rename the folder, make sure to remove any spaces. The name should be exactly: GodMode.{ED7BA470-8E54-465E-825C-99712043E01C}