Windows 10 Is Dying! Here’s What You MUST Do Now
Last Updated:
The clock is ticking.
Windows 10, the operating system we’ve relied on for years, is on its deathbed.
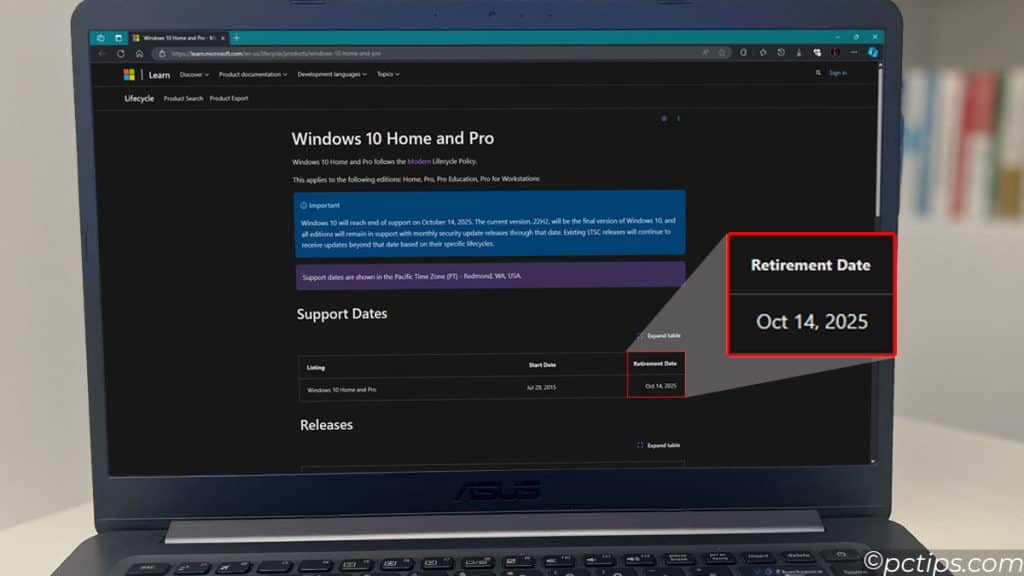
Microsoft will end support for Windows 10 on October 14, 2025.
That’s just around the corner.
The last feature update, version 22H2, was released way back on October 18, 2022.
Since then, it’s been crickets.
Let me walk you through what you need to know and how to prepare for this big change.
By the end of this guide, you’ll have a clear action plan.
Why Windows 10 Is “Dying”?
When I say “dying,” I don’t mean Windows 10 will just disappear in 2025.
But Microsoft’s shift towards Windows 11 as the primary OS is undeniable.
Under their Modern Lifecycle Policy, mainstream support for Windows 10 ends on October 14, 2025.
What does that mean for you?
- No more software updates.
- No more patches.
- No more bug fixes.
Any new vulnerabilities discovered by hackers after that date will remain unpatched, leaving your system exposed.
Microsoft has done this before with Windows 7 and earlier versions.
It’s all part of the transition to the next big thing.
The Security Risk Is Real
Now, your third-party antivirus will keep catching the usual suspects like malware and phishing attempts.
But there’s a big difference between antivirus and Microsoft’s security updates.
These updates are designed to patch holes and vulnerabilities in Windows itself.
Once support ends, it leaves the floor open for all sorts of nasty stuff – from zero-day exploits to kernel-level security flaws.
Your system will be a sitting duck!
We saw the consequences of this with Windows 7 post-support:
- In 2020, a critical SMBv3 vulnerability (CVE-2020-0796) affected unsupported Windows 7 systems.
- Windows 7 systems were no longer receiving regular security updates, leaving them exposed.
- Millions of Windows 7 systems were still in use at the time, despite the end of support in January 2020.
- The vulnerability allowed for worm-like spreading, potentially enabling large-scale attacks on unsupported machines.
Imagine what could happen with Windows 10…
You might also like: Computer Infected With Malware? Look for These Red Flags
Can I Keep Using Windows 10 After Support Ends?
Technically, you can keep using Windows 10 after support ends. But should you?
That’s a different question entirely.
For businesses, Microsoft does offer an Extended Security Updates (ESU) program.
However, the costs can be substantial, and the protection is limited.
For the average user, the risks of running an unsupported OS are numerous:
- Software incompatibility: Major applications will eventually drop Windows 10 support.
- Hardware driver issues: New devices may lack Windows 10 drivers altogether.
- Compliance problems: Depending on your industry, using an unsupported OS could violate data protection regulations.
Just last week I tried to install Windows 7 on one of my laptops to test a feature for a content I was working on.
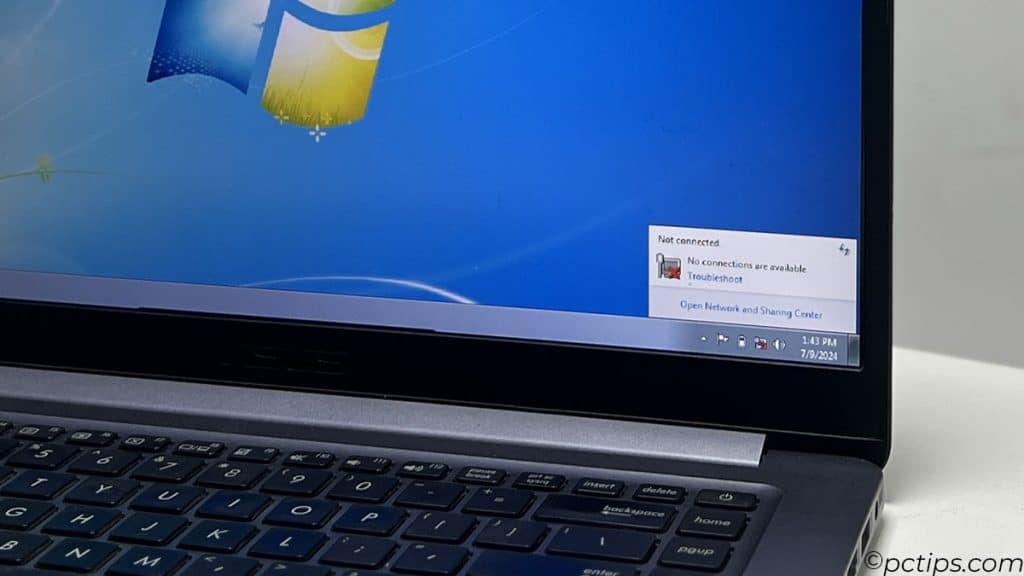
I had major driver problems – no network connection, USB keyboard and mouse didn’t work.
Even after troubleshooting, I couldn’t fix all the driver issues.
As vendors stop making/updating drivers, you’ll face similar problems with Windows 10.
If you absolutely must keep using Windows 10 after support ends, here’s what I recommend:
- Disconnect it from the internet
- Don’t use it for anything sensitive
- Keep regular backups of important data
- Plan to upgrade/replace it ASAP
Should You Really Upgrade to Windows 11
Windows 11 got a lot of hate when it first launched – the centered Start menu and new hardware requirements.
But it’s come a long way since then.
I’ve been using it on my main PC for a while now with no major issues.
I like the seriously beefed-up security features and the UI improvements, especially the snap layouts and improved support for virtual desktops.
However, not everyone is a fan of the hardware requirements or the user interface changes.
If you hate change or have privacy concerns about telemetry and data collection, I get it.
Let’s look at some stats:
- As of June 2024, Windows 10 holds 66.04% of the Windows OS market share, down from 71.09% in June 2023.
- Windows 11 has climbed from 23.93% in June 2023 to 29.75% in June 2024. (Source)
Will It Run on Your Machine?
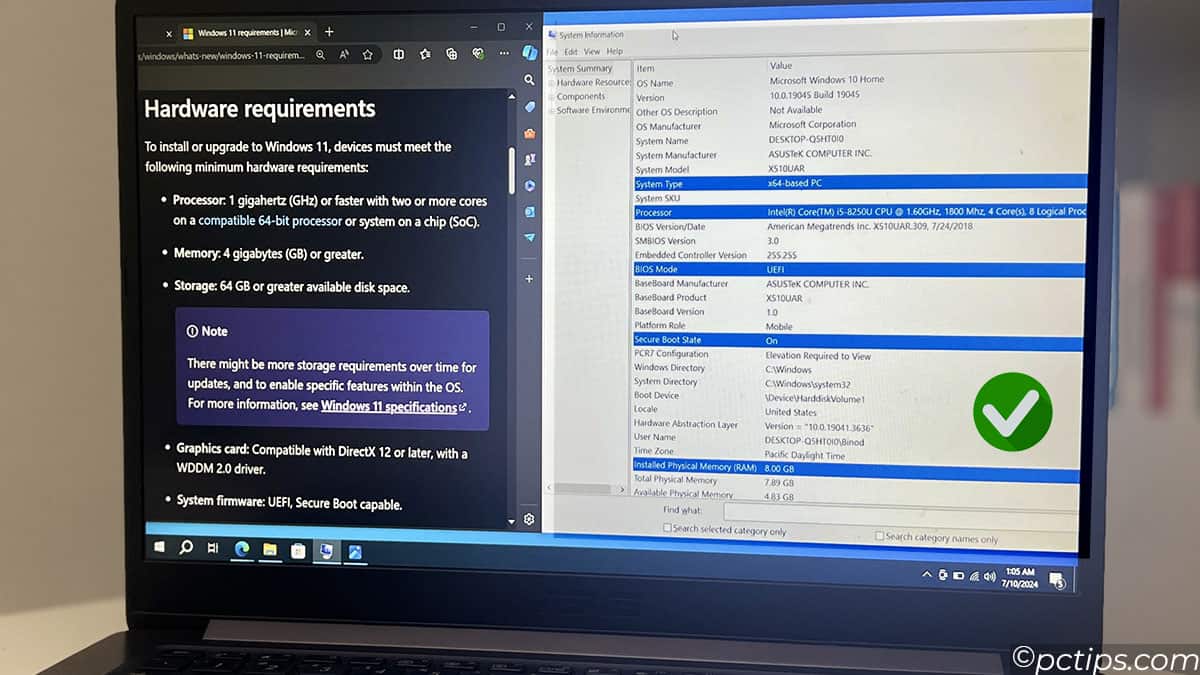
Before you even consider upgrading to Windows 11, you need to check if your hardware makes the cut.
The updated hardware requirements for Windows 11 as of 2024 are:
- CPU: 1 gigahertz (GHz) or faster with 2 or more cores
- RAM: 4 GB or greater
- Storage: 64 GB or larger storage device
- System firmware: UEFI, Secure Boot capable
- TPM: Trusted Platform Module (TPM) version 2.0
- Graphics card: DirectX 12 compatible graphics / WDDM 2.0
Many perfectly functional computers are getting left behind.
To check if your current PC is compatible, look for the “This PC can run Windows 11” message in Windows Update.
Or download and run Microsoft’s PC Health Check app.
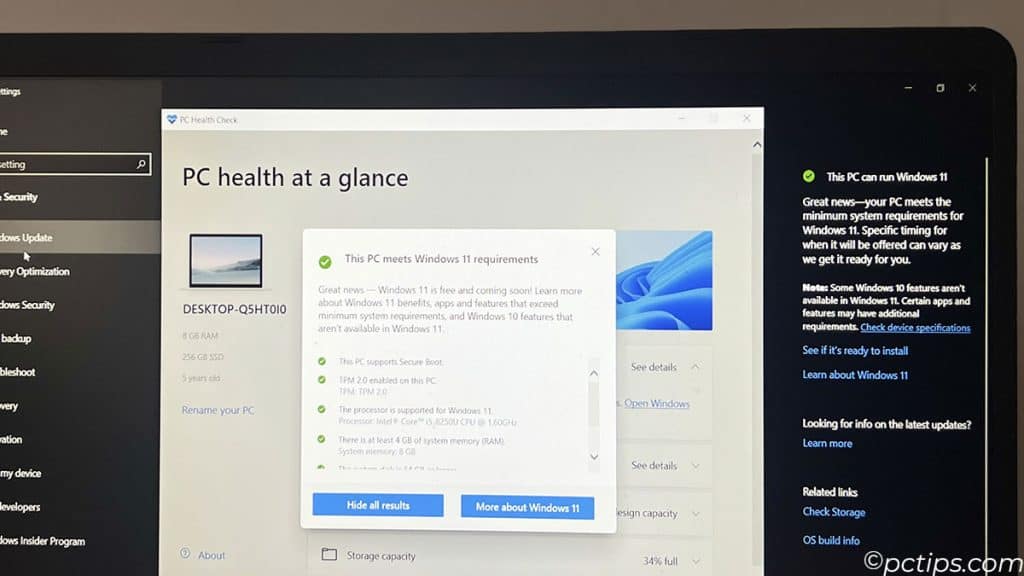
It will scan your system and give you a simple yes/no answer on Windows 11 compatibility.
Even if the scan fails, there are some hacky workarounds to bypass the hardware checks and force Windows 11 onto “unsupported” machines.
I’ll show you how to do that.
Just keep in mind that Microsoft doesn’t officially condone this, and it may lead to some instability.
That said, I’ve upgraded many old laptops for friends and family and haven’t had any major issues.
Before making any decisions, assess your hardware situation.
If your machine is too old or you’re considering an upgrade anyway, this might be the perfect time.
If Not Windows 11, Consider These Options
If Windows 11 isn’t a good fit, you have a few other options to consider:
- Keep Using Windows 10 – If you’re happy with Windows 10 and not connected to sensitive networks, you could cautiously keep using it for a while. Just back up regularly and ideally disconnect it from the internet. I don’t recommend this unless you have no other choice – be aware of the increasing security risks.
- Wait For Windows 12 – This is a bit silly and hypothetical, but just like many of us skipped Windows 8 to wait for 10, you could potentially ride out Windows 10 for a few more years and see what Windows 12 brings. But you’d be living on the edge security-wise.
- Switch to Mac – If you’re ready to open your wallet, an Apple Mac is a compelling Windows alternative. Macs are pricey, but you get best-in-class hardware, an intuitive and polished interface, and a huge library of apps. Most popular Windows software has Mac versions. And Macs can even run Windows in a virtual machine when needed. I have several friends who were lifelong Windows users until they got a MacBook. Now they’d never go back.
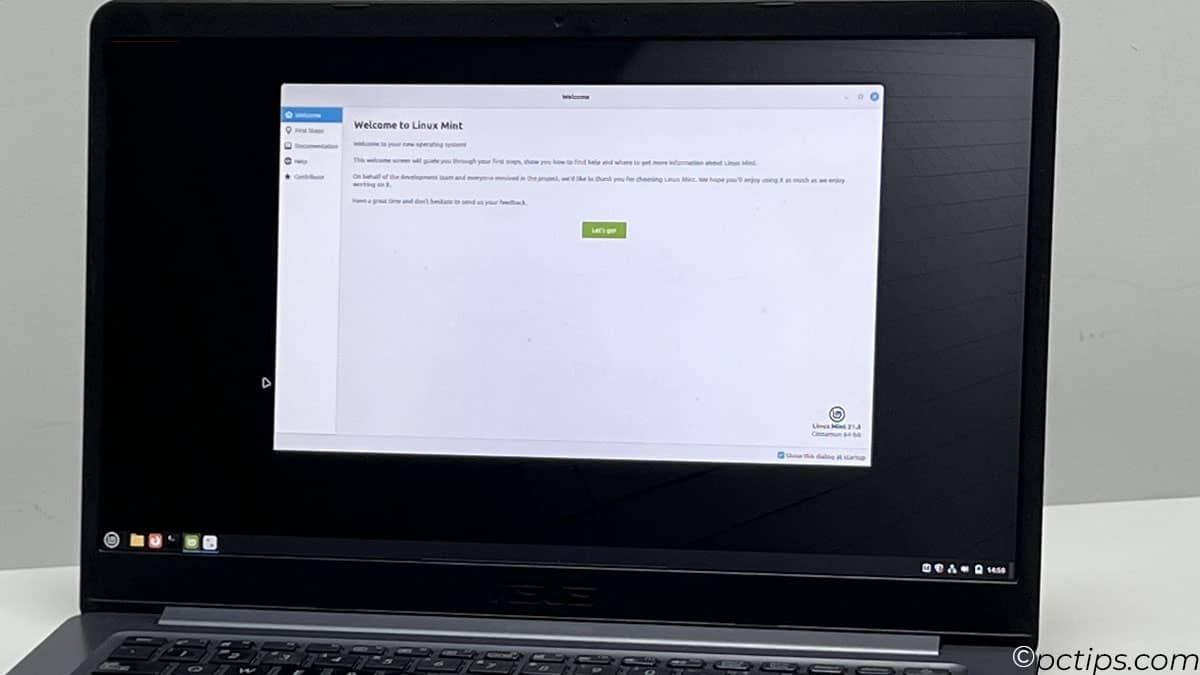
- Switch to Linux – If you’re willing to learn a new OS, and mainly use your PC for web browsing, email, and basic productivity, Linux is a great free alternative. Distros like Ubuntu and Linux Mint are very Windows-like these days. Most of your hardware should just work. And you’ll be safe from Windows malware.
- Go Mobile-Only – Depending on your needs, a modern tablet or smartphone might suffice as your primary computing device. If you mostly use your computer for web browsing, email, and light document editing, an iPad or Android tablet could do the trick.
Of course, these options won’t be right for everyone.
Heavy Windows users with specific software needs will likely need to stick with Microsoft’s ecosystem.
But it’s worth considering all your options before committing to an upgrade path.
How to Prepare Your PC for an Upgrade
If you’ve decided to take the plunge into Windows 11, there are a few key steps to take before hitting that “Update” button:
- Confirm your hardware meets the Windows 11 system requirements. If it doesn’t, research workarounds or consider a hardware upgrade.
- Back up all your important files and data to an external drive or cloud storage. Don’t skip this step! Upgrades can go wrong.
- Make a list of all the software and drivers you absolutely need. Check that each one has a Windows 11-compatible version or a suitable alternative.
- If you use any peripherals like printers, scanners, drawing tablets, etc. – verify they have Windows 11 drivers available.
- Jot down any software license keys or login credentials you’ll need to reinstall apps. I like to make a text file with everything in one place.
- Optionally, uninstall any software you no longer use. No sense in carrying digital baggage to your fresh OS!
That may seem like a lot of preparatory work.
But trust me – you do not want to discover a mission-critical app or peripheral isn’t compatible after you pull the trigger on an upgrade!
An ounce of preparation saves a pound of frustration.
Backing Up Your Data Before the Big Move
Regardless of which path you choose, there’s one absolutely crucial step you MUST take before upgrading or switching systems: backing up your data.
Trust me, you don’t want to lose your precious photos, documents, and memes in the transition.
There are plenty of backup options out there, from cloud storage services like OneDrive and Google Drive to external hard drives and NAS devices.
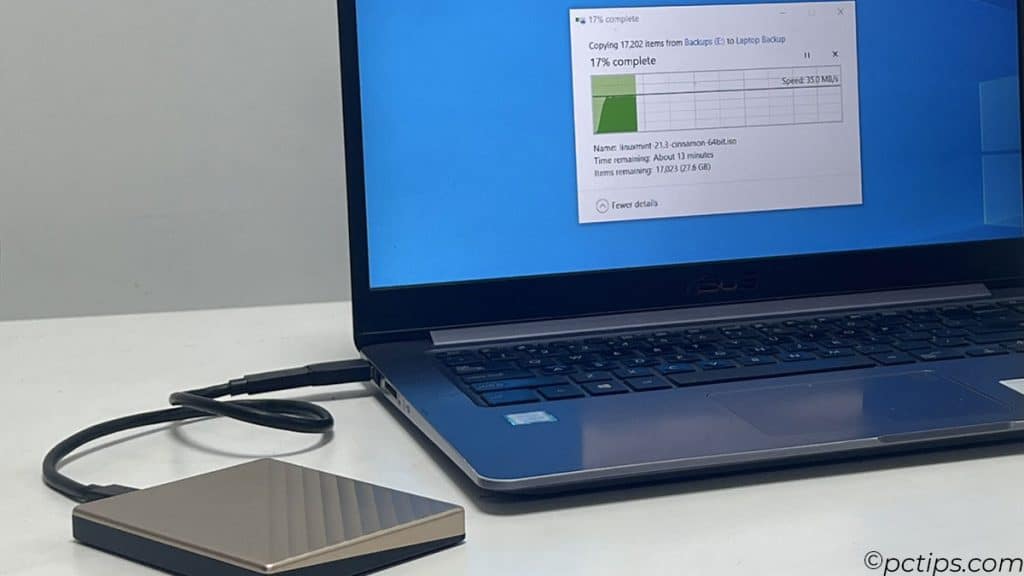
I prefer a combination of network, local, and external backups.
I use my Synology NAS for archives, sync local and external drives using Robocopy, and keep multiple backup copies in different locations.
You never know when disaster might strike, so don’t put all your eggs in one basket.
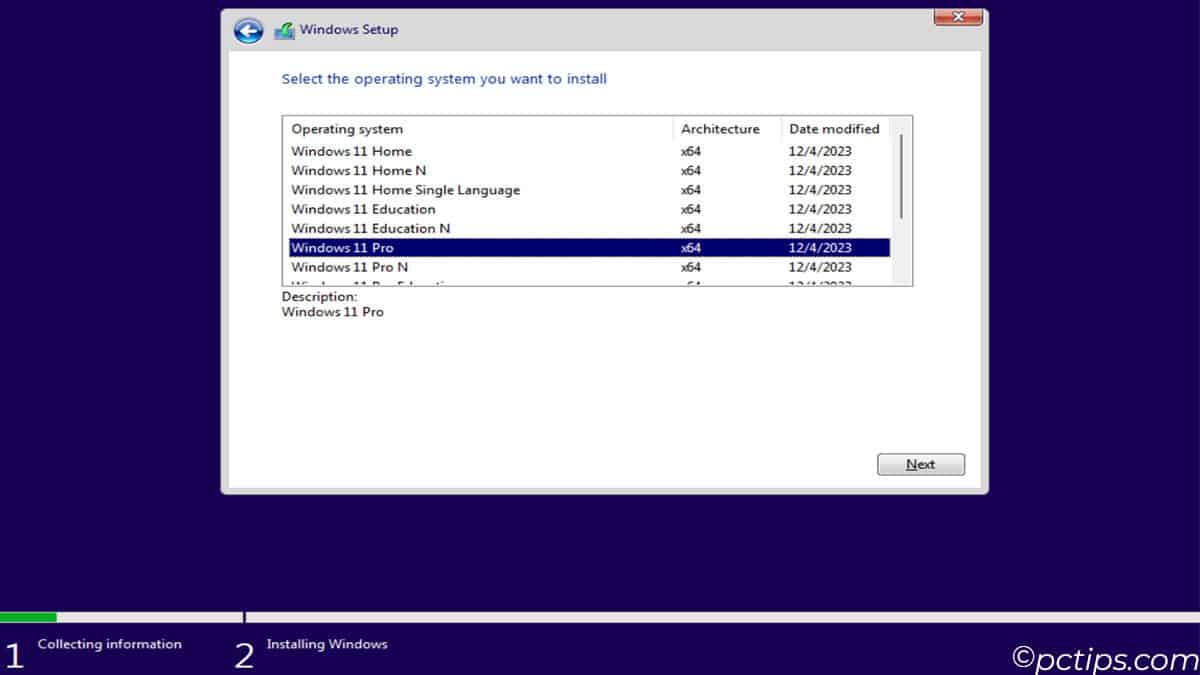
How to Upgrade to Windows 11
OK, you’ve checked your hardware, backed up your files, and steeled your resolve.
You’re ready to upgrade to Windows 11!
If your PC is supported, the process is actually pretty straightforward:
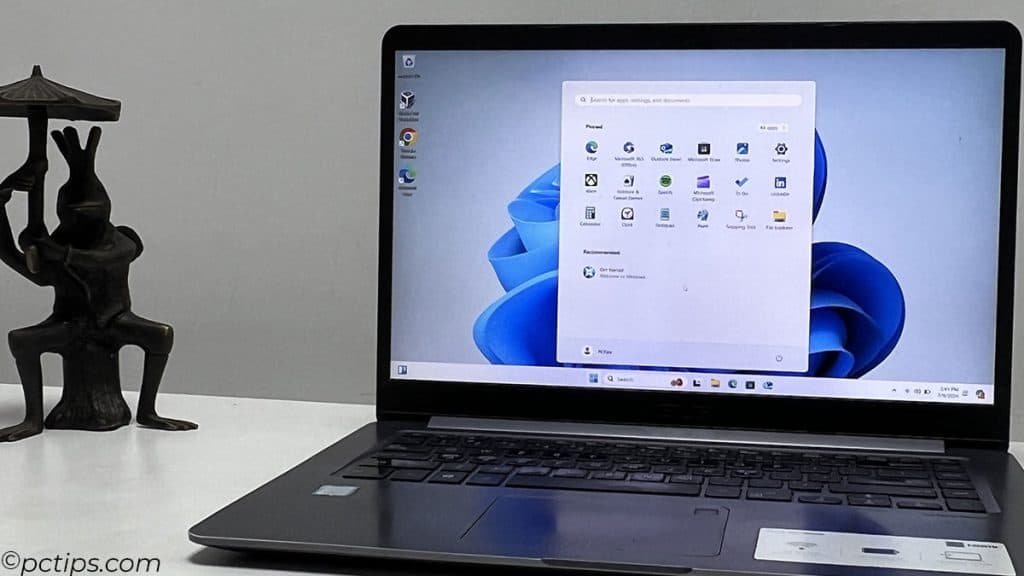
- Open Windows Update in your Windows 10 Settings app. You should see a message like “Windows 11 is available”.
- Click Download and Install.
- The installer will run a compatibility check and download the necessary files. This could take a while on slower internet.
- When it’s done, you’ll see a prompt to restart your PC. Save any open work first!
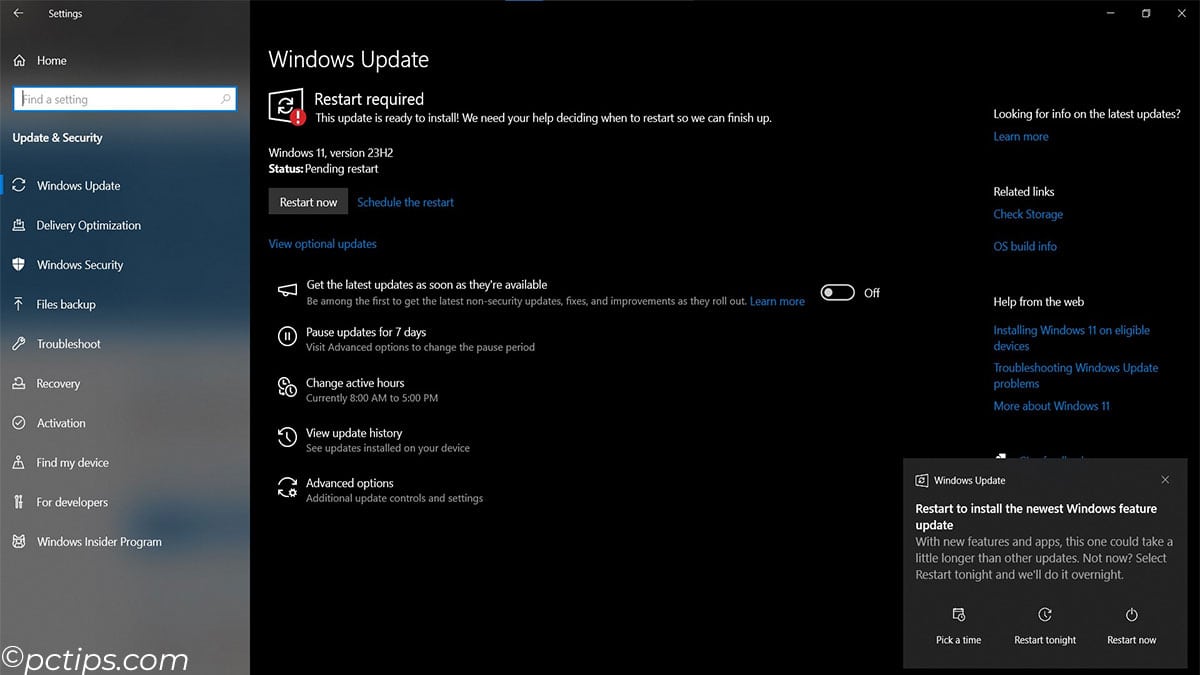
- Upon restarting, setup will begin and your PC will reboot several times. You’ll see a progress percentage.
- Eventually, you’ll reach the Windows 11 Out-of-Box-Experience (OOBE) setup screens. You can configure settings or skip them for now.
- After a final restart, Windows 11 will load and display a welcome message. That’s it, you’re upgraded!
My advice: Plan for the upgrade to take about an hour, so do it when you won’t need your PC for a bit. While it’s usually a smooth process, there is always some risk of failure, so make doubly sure you’ve got backups. If something does go sideways, try again – the second attempt often succeeds.
How to Do a Clean Install of Windows 11
Maybe you want a truly pristine Windows 11 experience, without carrying over any cruft from your Windows 10 days.
Or maybe you tried upgrading but ran into problems.
In either case, you can do a clean install of Windows 11. It’s a bit more involved, but gives you a guaranteed fresh start:
- You’ll need an 8GB or larger USB drive that you can erase.
- On your Windows 10 PC, download the Windows 11 Media Creation Tool from Microsoft.
- Launch the Assistant and proceed to select your USB flash drive to start creating the bootable USB.
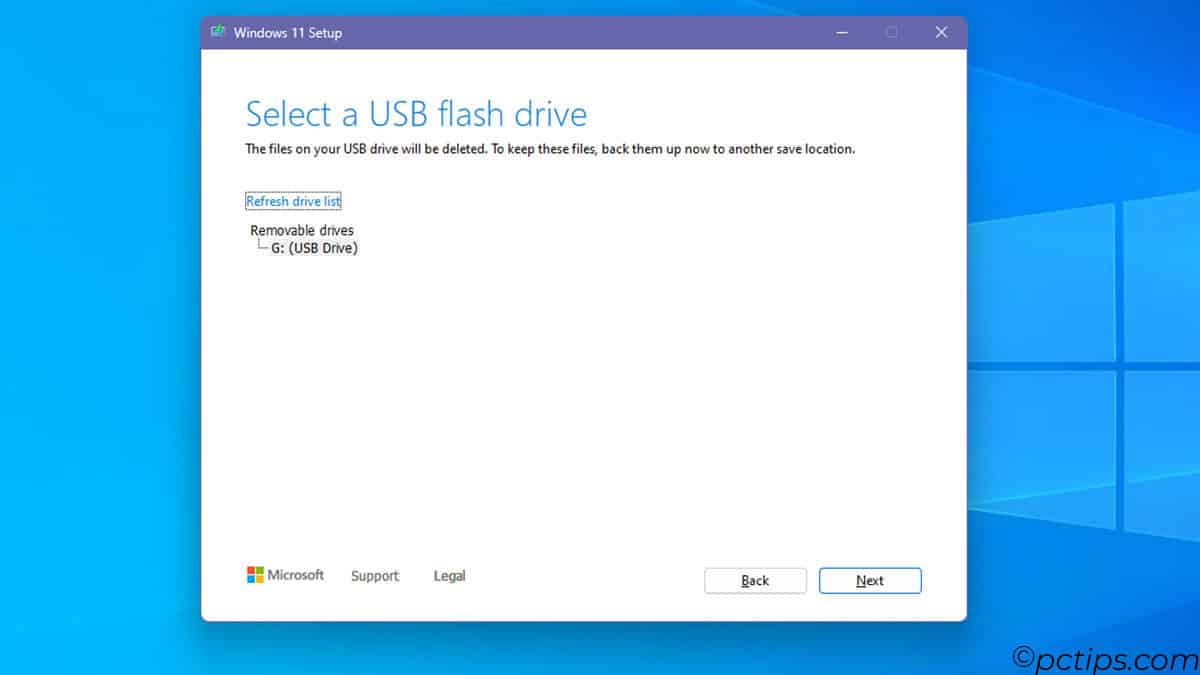
- Boot your PC from the USB drive. You may need to change a BIOS or UEFI setting to allow this.
- The Windows 11 installer will appear. Choose your language and keyboard layout.
- On the Install Windows screen, click Install Now, then I don’t have a product key. Windows will automatically activate after installation.
- Choose the Custom install type. Delete all the existing partitions on your disk and create a new one. (This wipes your drive!)
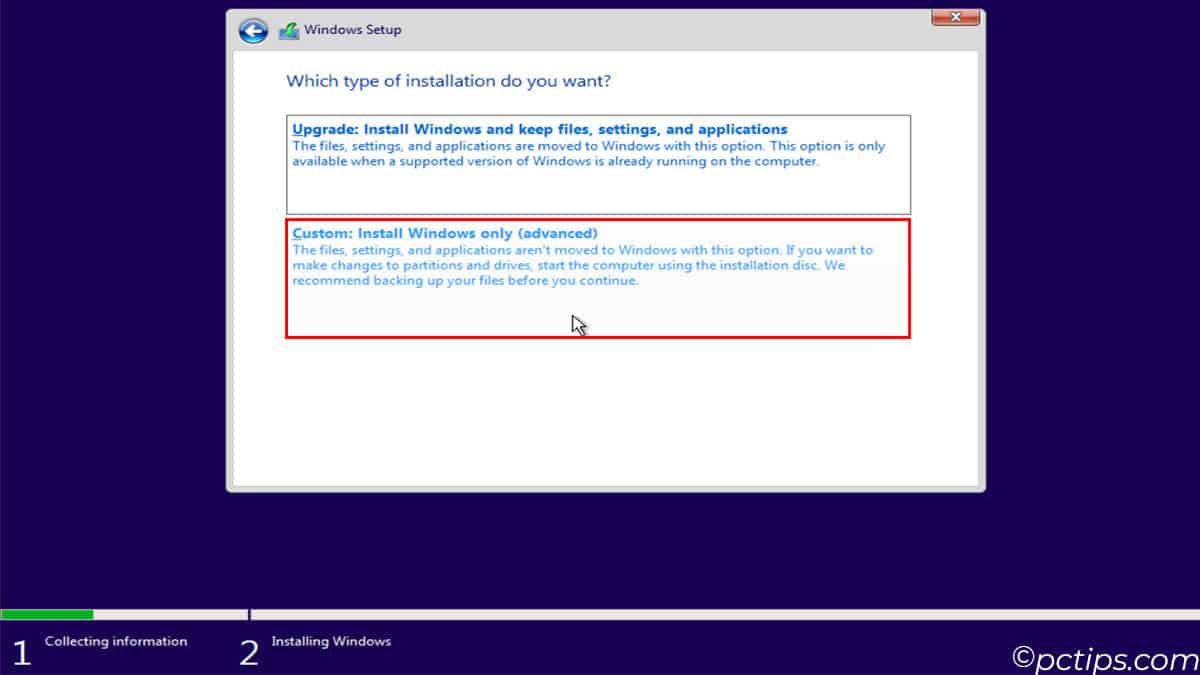
- Setup will copy files and restart several times. Eventually, you’ll reach the OOBE screens, as with an upgrade.
- When setup is complete, reinstall all your essential apps and drivers. Restore your backed-up files.
A clean install is more work than an in-place upgrade.
But it guarantees you’re starting with a pristine operating system, with no fossilized settings, software, or drivers from a past OS version.
If you’ve got the time, and sufficient backups, I recommend a clean install over an upgrade.
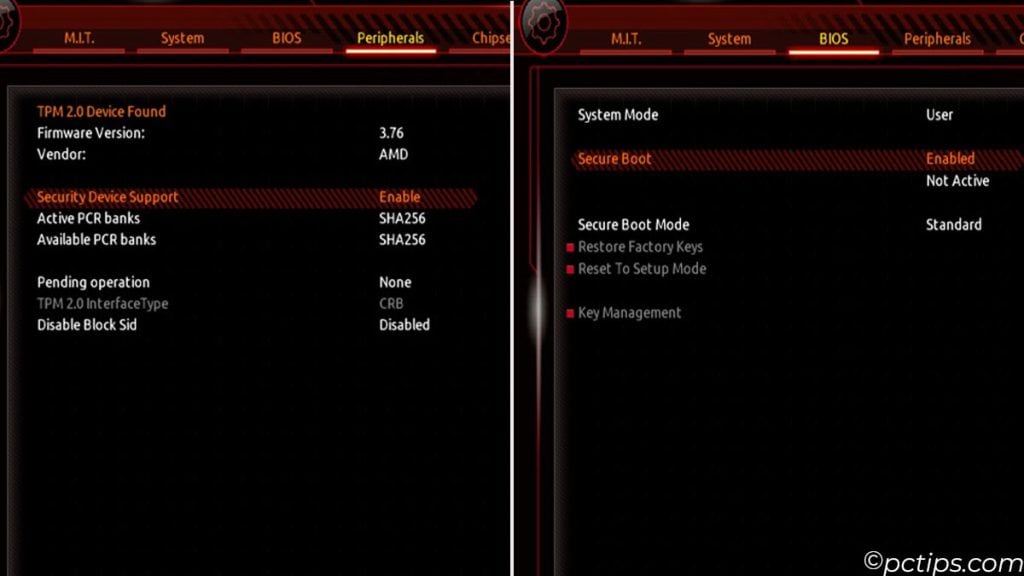
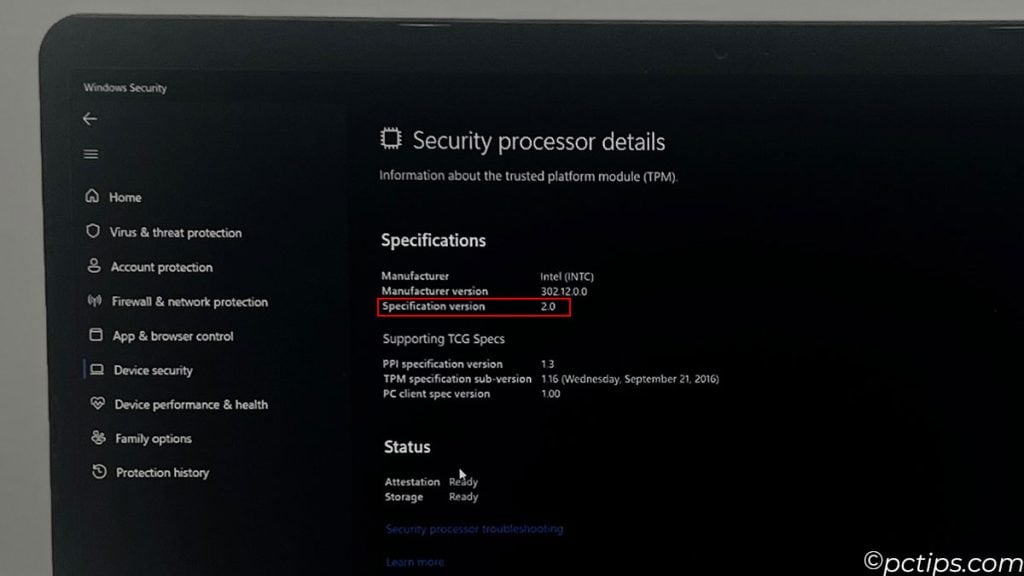
TPM 2.0 and Secure Boot
Let’s take a quick detour into some of Windows 11’s more controversial requirements.
Two that tend to trip people up are TPM 2.0 and Secure Boot.
TPM (Trusted Platform Module) is a cryptoprocessor chip that enables advanced security features.
Secure Boot is a feature that prevents malware from hijacking your PC during startup.
Both were optional in Windows 10, but mandatory in Windows 11.
The good news is that most computers manufactured in the last few years already have TPM 2.0 and Secure Boot.
But they may be disabled by default.
If the PC Health Check app says that your otherwise-supported PC fails these requirements, try these steps:
- Reboot your PC and enter the BIOS/UEFI firmware settings. The exact key varies, but try F1, F2, F10, F12 or Del.
- Using the keyboard, navigate to the Security or Trusted Computing section.
- Look for an option to enable the TPM or PTT (Intel Platform Trust Technology). It may be hidden in an Advanced submenu.
- While you’re there, look for Secure Boot and enable that too.
- Save and exit, rebooting the PC.
Now try the PC Health Check app again.
With any luck, you should pass the TPM and Secure Boot checks.
This can be a frustrating process, but it’s worth attempting if it helps you avoid a new hardware purchase.
Upgrading Unsupported Devices
I mentioned earlier there are some ways to bypass the Windows 11 hardware requirements and install it on unsupported PCs. Microsoft even has a support article on it now!
I’m not going to outline the full process here, as it’s a bit tedious.
The easiest approach is to use a third-party installer like Rufus.

I’ve used this method to successfully upgrade several older PCs to Windows 11.
But keep in mind this is very much at your own risk.
Microsoft says your PC will be in an unsupported state and might not be eligible for updates. Proceed with caution.
What to Expect After Upgrading to Windows 11
Congratulations, you’ve arrived in Windows 11!
So, er, now what?
The first thing you’ll probably notice is that things look different.
But not that much different. It still feels very much like Windows 10 with a fresh coat of paint.
Some key changes you’ll encounter:
- The taskbar is centered by default and has a shiny new Start menu
- File Explorer has a streamlined look with new icons
- There’s some great snap layout and virtual desktop enhancements for multitasking
- Many system apps like Task Manager and Paint have been redesigned
- You have new options to personalize your themes and touchscreen gestures
But under the hood, it’s still very much the Windows we know.
Most of your existing software and hardware should work as before.
Just be prepared to spend some time re-learning where things are.
Microsoft seems to delight in shuffling menus and settings around with each update!
I’d recommend spending an hour exploring and customizing the interface to your liking.
But in general, if you were comfortable with Windows 10, you’ll pick up Windows 11 without much trouble.
Better For Security
While it doesn’t get the splashy headlines, one of Windows 11’s most important improvements is its security posture.
Under the hood, Microsoft has hardened the OS against an alarming rise in sophisticated malware and supply-chain attacks.
This may actually be the best reason to upgrade.
Some highlights:
- Secure Boot and TPM 2.0 (Trusted Platform Module) are now required. These protect your hardware and firmware from tampering.
- Virtualization-Based Security (VBS) is enabled by default. This isolates critical system processes from malware.
- Hypervisor-Protected Code Integrity (HVCI) ensures that only trusted code can run in the kernel. No more pesky rootkits.
- The new Smart App Control feature blocks untrusted or improperly signed applications from running.
Now, the downside of all this security is potential performance and compatibility issues, especially on older hardware.
Hence the strict system requirements.
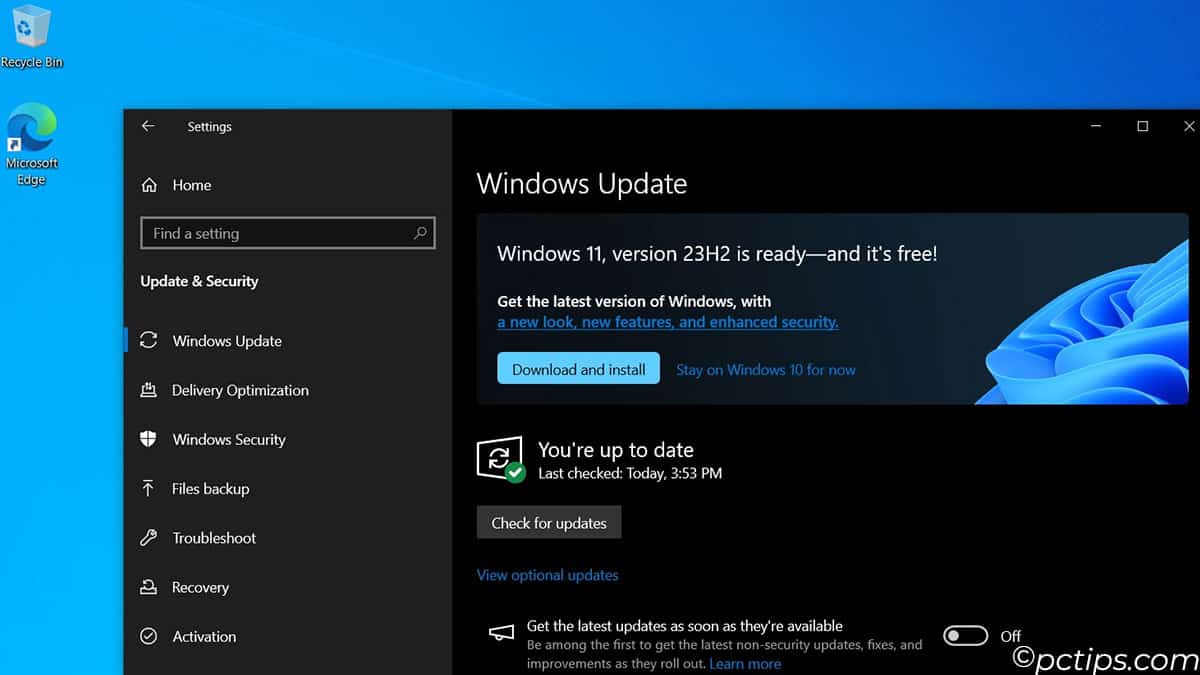
The Upgrade is Free
Here’s the best part about upgrading to Windows 11 – it’s completely free!
If you’re currently running a licensed copy of Windows 10, you can upgrade to Windows 11 at no additional cost.
That’s right, you get all these new features and performance improvements without spending a dime.
Microsoft has made the upgrade process incredibly simple, too.
As long as your PC meets the minimum requirements, you can initiate the upgrade right from within Windows 10.
Just head to the Windows Update settings, click “Check for updates,” and follow the prompts.
The whole process is automated and usually takes less than an hour.
Don’t Want to Upgrade or Switch? How to Safely Stay on Windows 10
If you absolutely can’t or don’t want to upgrade from Windows 10, there are some steps you can take to mitigate the risks:
- Keep Your PC Updated: Install all available Windows 10 updates, including optional updates, to ensure you have the latest security patches.
- Use a Modern Browser: Outdated browsers are more vulnerable to online threats. Use a modern, regularly updated browser like Microsoft Edge, Google Chrome, or Mozilla Firefox for safer browsing.
- Enable Windows Defender: Windows 10 includes a built-in antivirus called Windows Defender. Make sure it’s enabled and up to date to protect against malware (go to Settings > Update & Security > Windows Security and select “Open Windows Security”).
- Be Cautious Online: Avoid clicking on suspicious links or downloading unknown files. Most malware infections occur due to user error.
- Use Strong, Unique Passwords: Don’t reuse passwords across multiple accounts, and make sure to use strong, complex passwords. Consider using a password manager like Bitwarden or KeePass to generate and store secure passwords.
- Enable Two-Factor Authentication: For an extra layer of security, enable two-factor authentication (2FA) on accounts that offer it. This requires a second form of verification (like a code sent to your phone) in addition to your password to log in.
- Disconnect from the Internet: If your Windows 10 machine doesn’t need Internet access, consider disconnecting it from the network entirely. An offline PC is much less vulnerable.
Remember, these are temporary measures. The longer Windows 10 goes without security updates, the riskier it becomes to continue using it, especially if connected to the internet.
Should You Switch to Linux?
If you’re not happy with Windows 11 and you’re feeling adventurous, you might consider switching to Linux.
Linux is a free and open-source operating system that comes in many different flavors (“distributions”).
Popular user-friendly distributions like Ubuntu, Mint, and Manjaro have made great strides in ease of use.
They offer familiar desktop interfaces and support a wide range of hardware.
Many common applications like Firefox, Chrome, and LibreOffice work natively on Linux.
However, Linux still requires a bit more technical know-how compared to Windows.
Some specific applications (particularly professional software) may not have Linux versions.
And while Linux is generally considered secure, it’s not immune to all threats.
If you’re curious about Linux, I recommend trying it out in a virtual machine or on a spare PC before making a full switch.
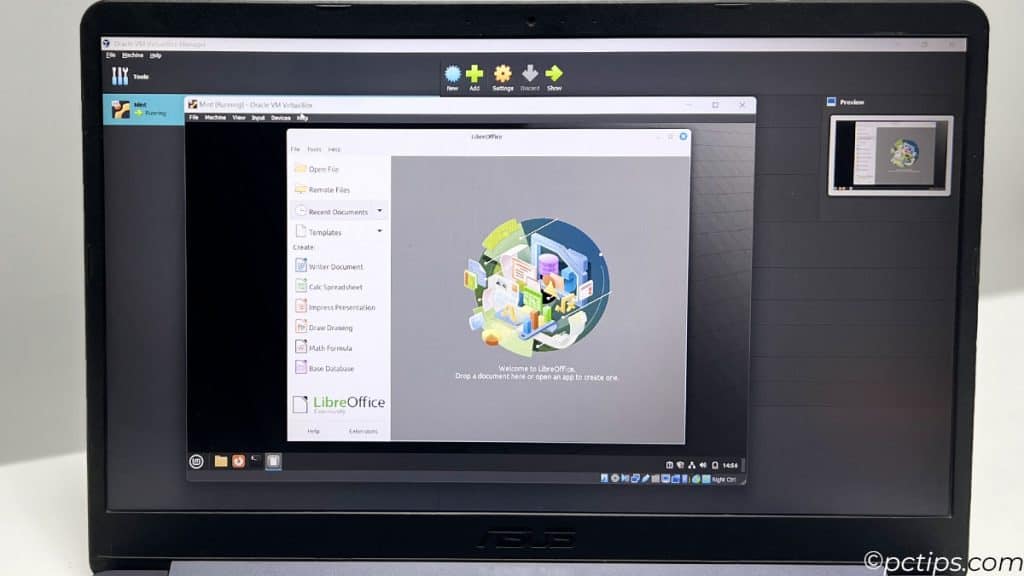
It’s a viable alternative for some users but not a direct replacement for Windows.
Help Others Upgrade from Windows 10
If you’ve made the jump to Windows 11 or another OS, consider helping others do the same.
Share this article with your friends and family.
Offer to assist with backups and the upgrade process.
Many users are unaware of the looming end of support for Windows 10 and the risks it entails.
I am almost done dealing with Microsoft. We were lied to so many times and this one is the latest and greatest lie. When we were forced to update from windows 7, 8, 8.1, we were told by Microsoft that the new Windows 10 will be the last one, and it will be constantly updated and fixed forever. Now we are getting a "free" upgrade to Windows 11 which is basically the same as Windows 10, but the new version is not compatible with our very expensive original PC. Now we are told to buy a new computer in order to give some new power to Microsoft. I can see no improvements in Windows 11 that are not already in Windows 10. I can imagine that when Windows 11 becomes "obsolete" the new Windows 12 will again force us to buy more hardware. When Windows 10 came out, I bought a new PC... I will not fall for that one again.