The Beginner’s Guide to Mastering Virtual Desktops
Last Updated:
Here’s a dirty little secret about productivity: using only one desktop is holding you back, BIG TIME.
You’re probably thinking, “What’s wrong with my single desktop?
It’s worked fine for me so far!”
Sure, one desktop can work.
You can cram everything onto that single screen.
But let me ask you this:
Have you ever felt overwhelmed by the sheer number of windows and apps scattered across your desktop?
Felt that nagging urge to compulsively Alt+Tab again and again (and again) just to find that one website or document you need?
If you nodded your head to any of those, then buckle up, my friend.
I’m about to blow your mind with the magic of virtual desktops.
What Are Virtual Desktops?
Simply put, multiple desktops (a.k.a. virtual desktops) allow you to organize your open windows and apps across several distinct “screens.”
It’s like having multiple physical monitors, except it’s all virtual.
Here’s a quick breakdown:
- Each desktop acts as its own separate workspace
- You can switch between desktops with a quick keystroke or click
- Open windows stay on their assigned desktop until moved
- Desktops can be added, removed, and rearranged on the fly
Think of it like having a neat stack of desks, each set up for a specific task or project.
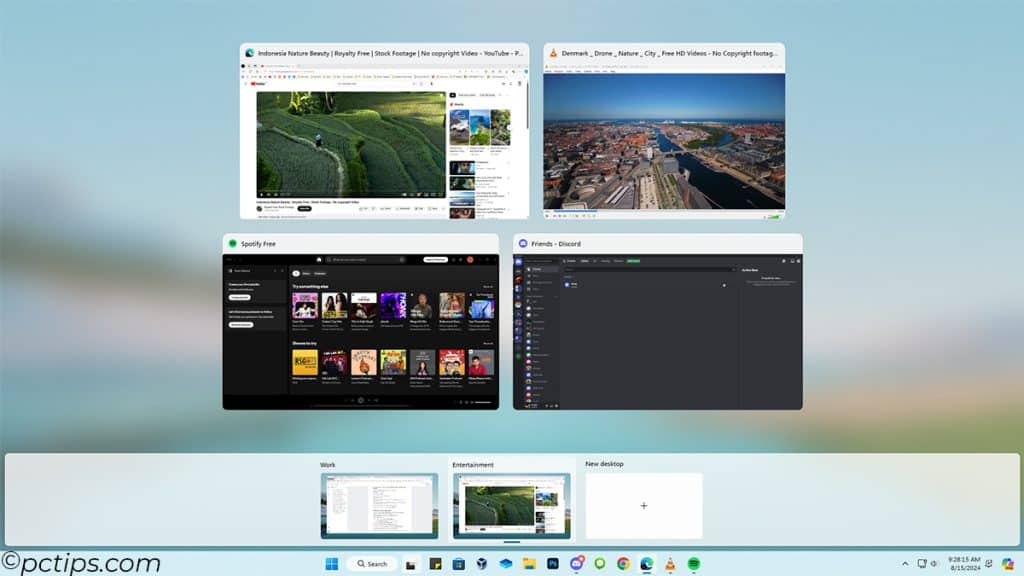
Need to focus on writing that report? Switch to your “Work” desktop.
Ready to take a break? Hop over to your “Entertainment” desktop with YouTube and Spotify.
Why You Need Virtual Desktops?
I’ve been using virtual desktops for years now, on both Linux and Windows, and I can’t imagine going back to a single desktop.
The benefits are just too good to ignore.
Here are just a few reasons why:
- Cleaner Workspace: Keep your desktop tidy and organized by separating apps and windows into different virtual desktops.
- Enhanced Focus: Dedicate each desktop to a specific task or project, reducing distractions and helping you stay focused.
- Improved Organization: Group related apps and files together on separate desktops for easy access and better workflow.
- Better Multi-tasking: Quickly switch between desktops to handle different tasks without losing your place or cluttering your screen.
- Fast Context Switching: Instantly jump between projects or tasks by switching to the corresponding desktop.
- Enhanced Privacy: Keep sensitive information on a separate desktop, away from prying eyes when sharing your screen.
- Customized Environments: Tailor each desktop to your needs with different wallpapers, window layouts, and color schemes.
How to Set Up Multiple Desktops
Sold on the idea but not sure where to start? No worries!
Setting up multiple desktops is a cinch.
The exact steps vary between operating systems, but the basic flow is the same:
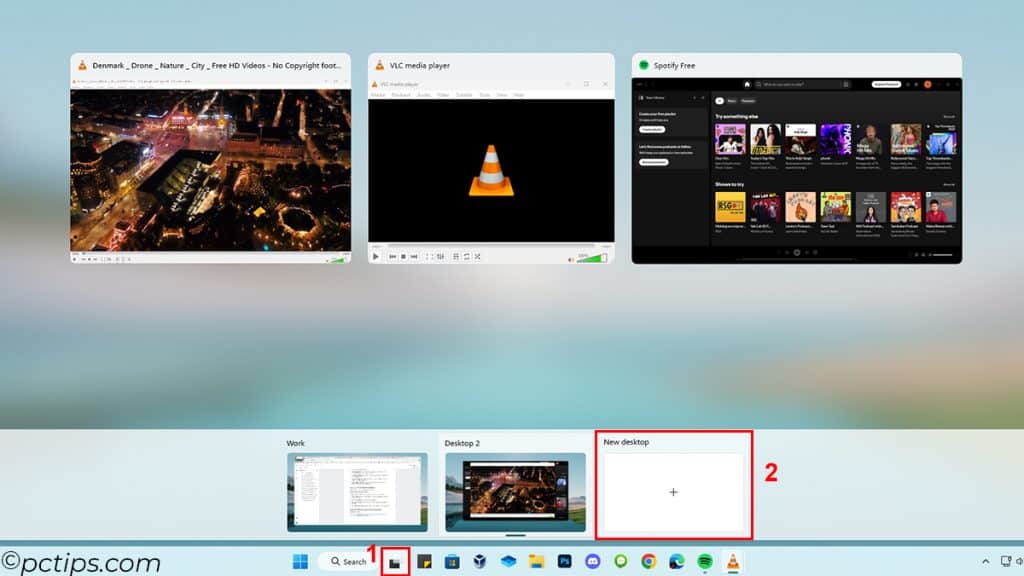
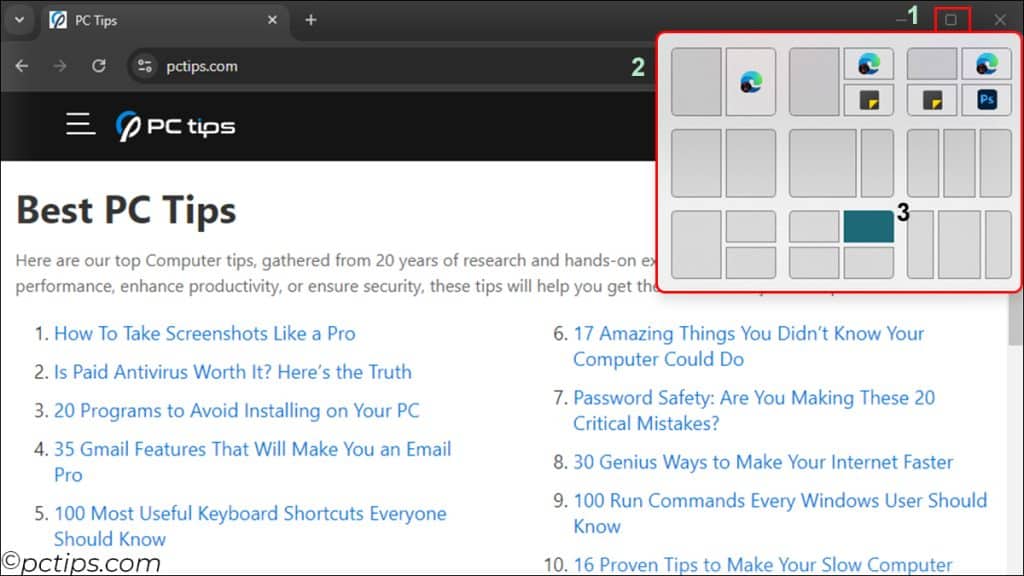
- Click the Task View button on the taskbar (it looks like two overlapping squares) or by pressing Win+Tab
- Click the New desktop button (it looks like a “
+” symbol) - Open some windows and apps on it, then rinse and repeat for as many desktops as you need.
- To switch between desktops, just open Task View and click on the desktop you want.
Keyboard Shortcuts for Virtual Desktops
I love keyboard shortcuts.
In fact, I’ve written a full article on the 100 Most Useful Keyboard Shortcuts Everyone Should Know, complete with a cheat sheet.
Using keyboard shortcuts for virtual desktops will have you zipping around around your workspaces in no time.
Here are the key combos to know:
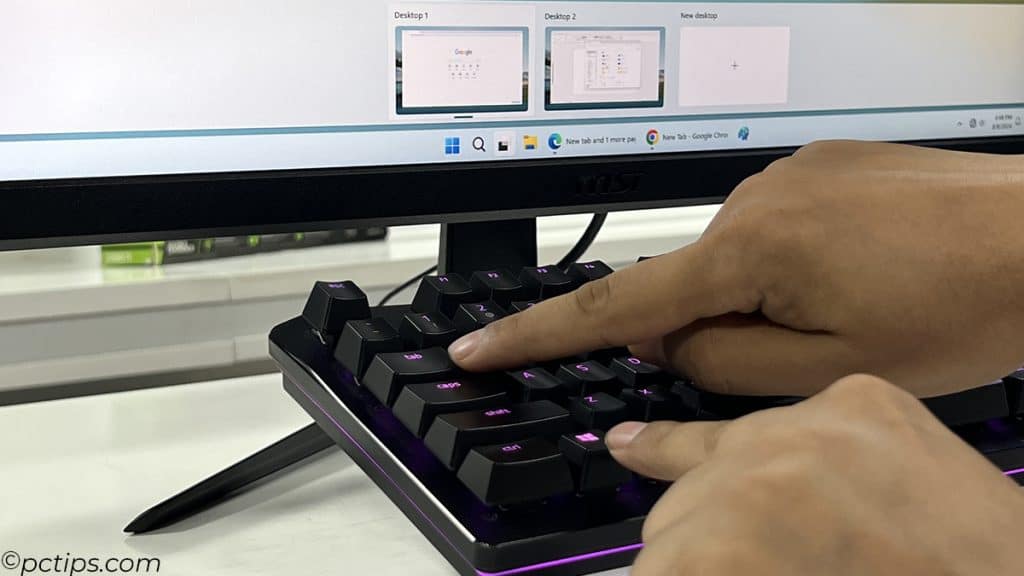
- Win+Tab: Open the Task View pane
- Win+Ctrl+D: Create a new virtual desktop
- Win+Ctrl+Left/Right Arrow: Switch to the virtual desktop on the left or right
- Win+Ctrl+F4: Close the current virtual desktop
- Win+Shift+Left/Right Arrow: Move the current window to the monitor on the left or right
Practice these shortcuts and you’ll navigate your desktops without even thinking about it.
Laptop Trackpad Gestures
If you’re using a laptop with a precision touchpad (like most modern Windows machines), you’re in for a real treat.
Windows 10 and 11 both support a variety of multi-touch trackpad gestures that make managing virtual desktops a breeze.
To customize your trackpad gestures, go to Settings > Bluetooth & Devices > Touchpad > Advanced gestures.
Here’s a setup that I’ve found to be particularly effective:
- Three-finger swipe Down: Show the current desktop (same as
WIN+D) - Four-finger swipe Down: Create a new desktop (same as
WIN+CTRL+D) - Four-finger swipe Left/Right: Switch to virtual desktops (same as
WIN+CTRL+RIGHT/LEFT arrow) - Three-finger swipe Left/Right: : Switch apps on current desktop (same as
ALT+Tab)
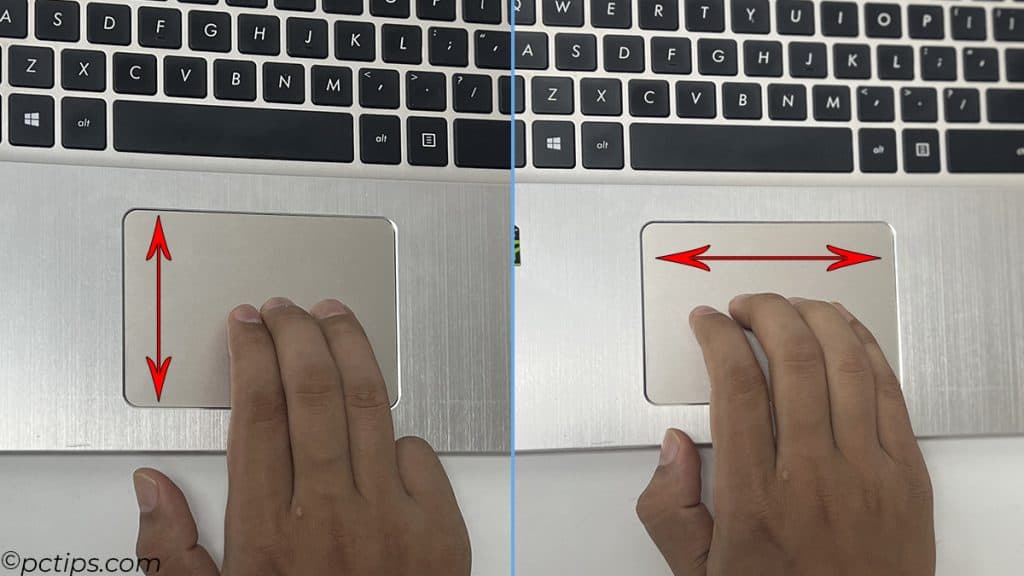
These gestures make it incredibly easy to navigate your desktops without ever lifting your hands from the trackpad.
Read these too:
- 20 Powerful Laptop Features You’re Not Using
- 15 Brilliant Ways to Repurpose an Old Laptop
- 25 Things You Should NEVER Do With Your Laptop
Manage Desktops with the Right-Click Menu
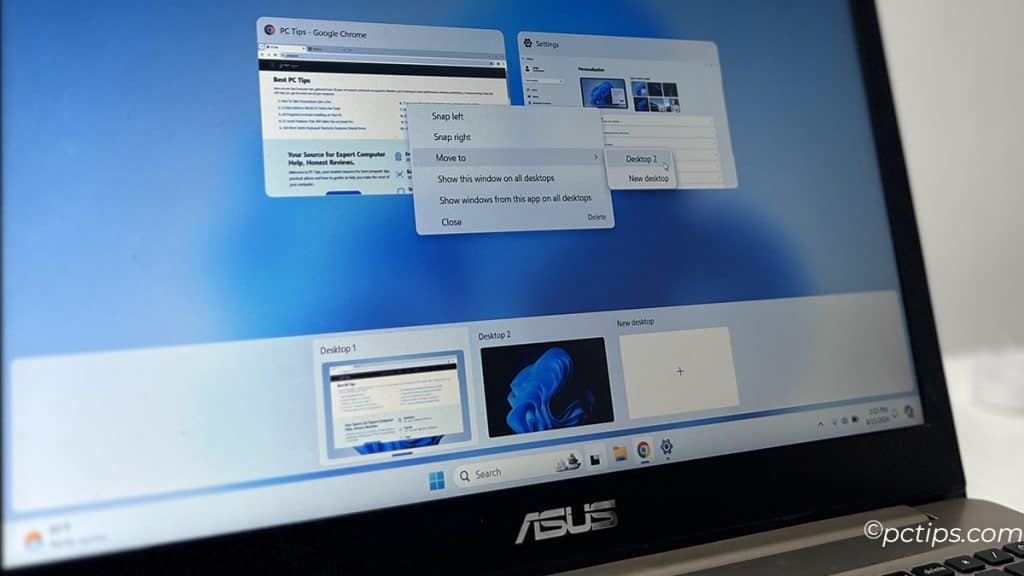
In the Task View pane, if you right-click on a desktop, you’ll see a menu with several useful options:
- Snap Left: Snaps the app/window to the left side of the screen
- Snap Right: Snaps the app/window to the right side of the screen
- Move to: Send the current window to another desktop
- Show this window on all desktops: Make the window always visible, no matter which desktop you’re on
- Show windows from this app on all desktops: Make all windows from the app visible on all desktops
- Close: Close the selected desktop
Drag and Drop Between Desktops
While the “Move to” option in the right-click menu does the job, it’s often quicker to use drag and drop.
Here’s how:
- Go to the desktop containing the window you want to move
- Open Task View
- Click and drag the window slightly to “pick it up“
- Hover over the desktop you want to move the window to
- Release the mouse button to drop the window on the new desktop
This is a fantastic way to redistribute windows as your needs change throughout the day.
Just grab, drag, and you’re good to go!
For more drag-and-drop tricks, check out our article on 15 Windows Drag-and-Drop Secrets Nobody Told You.
Rearrange Desktops to Fit Your Workflow
One of my favorite virtual desktop features is the ability to rearrange your desktops on the fly.
This lets you put your most-used desktops front and center while tucking less important ones off to the side.
There are two ways to do this:
- In Task View, click and drag the desktop thumbnails at the bottom of the screen in the order you want
- Right-click a desktop thumbnail and use the “Move left” and “Move right” options to shuffle it around
I find myself doing this constantly as I work, always tweaking and optimizing my desktop arrangement to match my current flow.
Set Different Wallpapers for Each Desktop
You might have noticed the “Choose Background” option in the rearrange menu.
It’s a great visual cue that helps you quickly identify which desktop you’re on.
To do this:
- Open Task View and right-click the desktop you want to customize
- Select “Choose background” from the menu
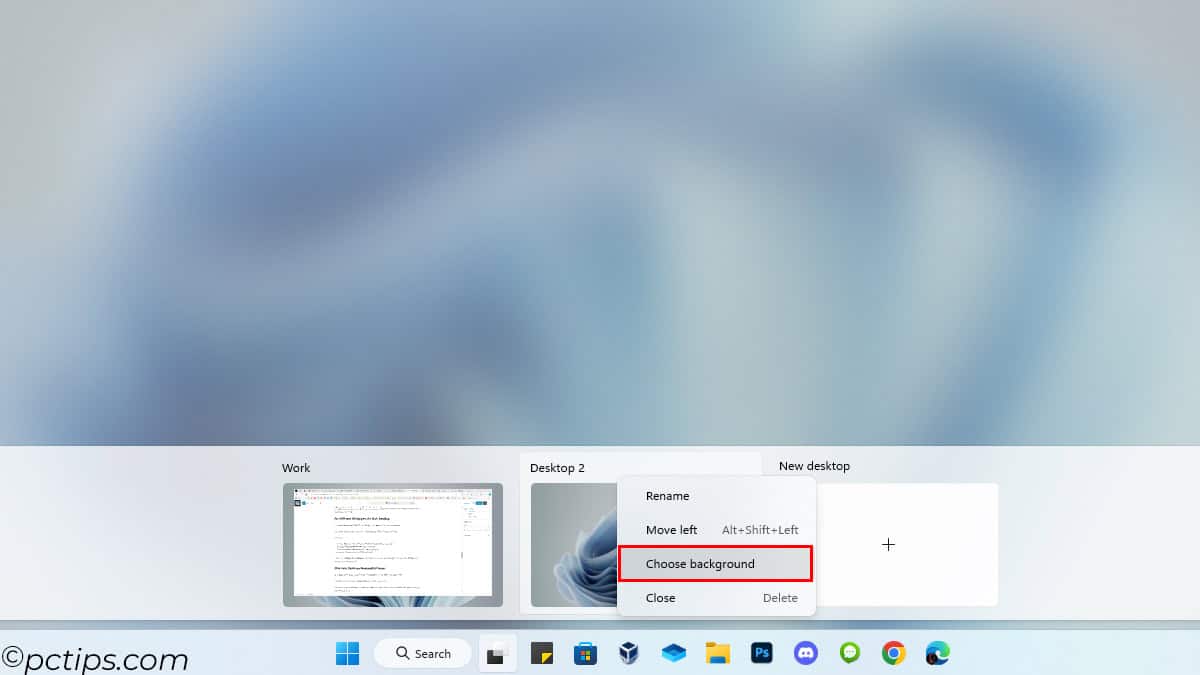
- Pick a wallpaper that fits the vibe you’re going for
- Repeat for your other desktops as desired
You can also change the wallpaper by going to the specific desktop, right-clicking on the background, and selecting “Personalize.”
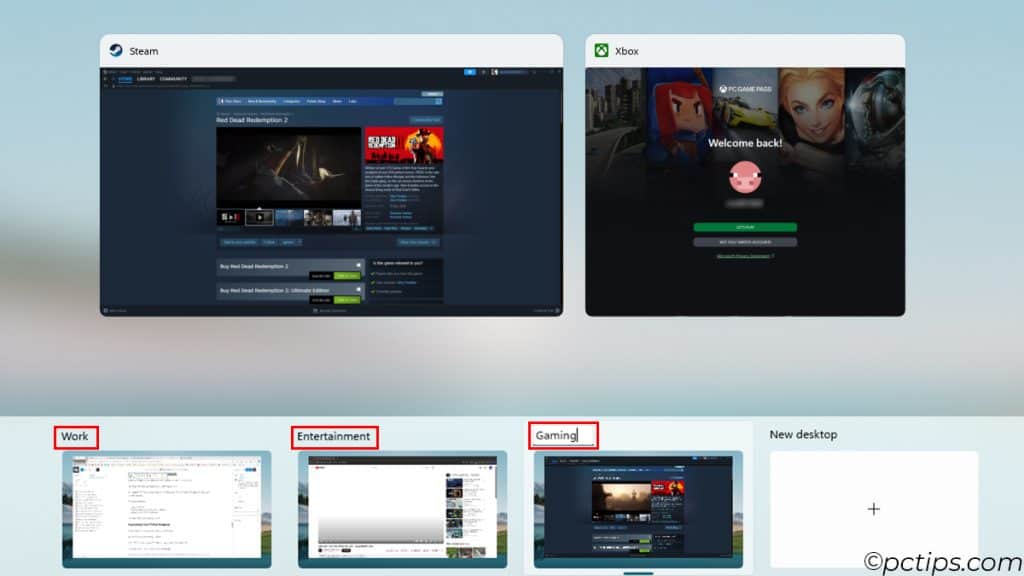
Give Your Desktops Meaningful Names
By default, Windows just numbers your virtual desktops (Desktop 1, Desktop 2, etc.)
But did you know you can rename them to anything you want.
It’s a small thing, but giving your desktops clear, descriptive names can make a big difference in keeping yourself organized.
To rename a desktop:
- Open Task View
- Click the desktop’s current name to select it
- Type in a new name and hit
Enter
This way, I always know what goes where.
Organizing Your Virtual Desktops
So you’ve got your virtual desktops all set up and named.
But how do you decide what goes where?
When I first started using multiple desktops, I have to admit…I was a bit lost.
It felt like I had too many options, if that makes sense?
I’d create a bunch of desktops with no real rhyme or reason, toss windows onto them willy-nilly, and end up more disorganized than when I started.
But then I had an epiphany: I needed a system.
So I sat down and really thought about how I tend to use my computer.
What tasks do I do most often? Which apps do I use together? Slowly but surely, a logical setup began to take shape:
- Desktop 1: Miscellaneous – For anything extra that doesn’t fit into the other categories.
- Desktop 2: Coding – IDE, terminals, dev tools, and anything else related to programming.
- Desktop 3: Creative – Photo editing, graphic design, video editing, and other creative pursuits.
- Desktop 4: Communication – Email, chat apps, video conferencing, and social media.
- Desktop 5: Research – Web browsers, note-taking apps, and other tools for gathering information.
- Desktop 6: Entertainment – Music players, YouTube, streaming services, and casual games.
- Desktop 7: Gaming – For serious gaming sessions, separate from the lighter entertainment on Desktop 6.

I also like to create temporary desktops for specific tasks or projects when I really need to focus without distractions.
But in general, I’ve found that organizing by purpose works much better for me.
No matter what I was working on, I always knew exactly where to find the tools I needed.
And with a clear separation between work and play, it became so much easier to stay focused and avoid distractions.
Of course, this is just what works for me.
Your ideal setup might look completely different—and that’s okay!
The key is to keep experimenting until you find a system that clicks.
For more tips on file organization, check out my other articles::
- Best Way to Organize Files on Your Computer
- 20 File Naming Tricks to Find ANYTHING in Seconds
- 10 Clever Ways to Organize Your Desktop Icons
Using Snap Layouts with Virtual Desktops
Windows 11 introduced a killer new feature called Snap Layouts that takes window management to a whole new level.
With a single click, you can divide your desktop into neatly arranged window zones and snap apps into them effortlessly.
It’s a multitasker’s dream come true.
To use Snap Layouts:
- Hover over the Maximize button on any window
- Click the Snap Layout you want from the menu that appears
- Click the zone you want the window to snap into
- Repeat steps 1-3 for your other windows
I’ve found Snap Layouts to be an incredible complement to virtual desktops.
Set up a “Research” desktop with a browser snapped to the left and a note-taking app on the right.
Rock a “Command Center” desktop with your email, calendar, and task list in a perfectly tiled grid. The possibilities are endless!
For a deeper dive, read our guide on How to Snap Windows Like a Pro.
Virtual Desktops and Multiple Monitors
If you’re using virtual desktops with multiple monitors, there are a few things to keep in mind:
- All your monitors switch together when you change virtual desktops
- You can’t have different virtual desktops on each monitor (sorry!)
- Snap Layouts work independently on each monitor, even if they’re showing the same virtual desktop
- You can move windows between monitors within a virtual desktop using
Win+Shift+Left/Right Arrow
While it would be nice to have separate desktops per monitor, virtual desktops are still a big productivity win on multi-monitor setups.
Taskbar Settings for Virtual Desktops
The taskbar can behave differently with virtual desktops depending on your multitasking settings.
Here’s how to control it:
In Windows 11:
- Go to System > Multitasking
- Under “Desktops“, you’ll see two options:
- “On the taskbar, show all the open windows”
- “Show all open windows when I press Alt + Tab”
If you want the taskbar and Alt+Tab to show only the windows open on the current desktop:
- Set “On the taskbar, show all the open windows” to “Only on the desktop I’m using“
- Set “Show all open windows when I press Alt + Tab” to “Only on the desktop I’m using“
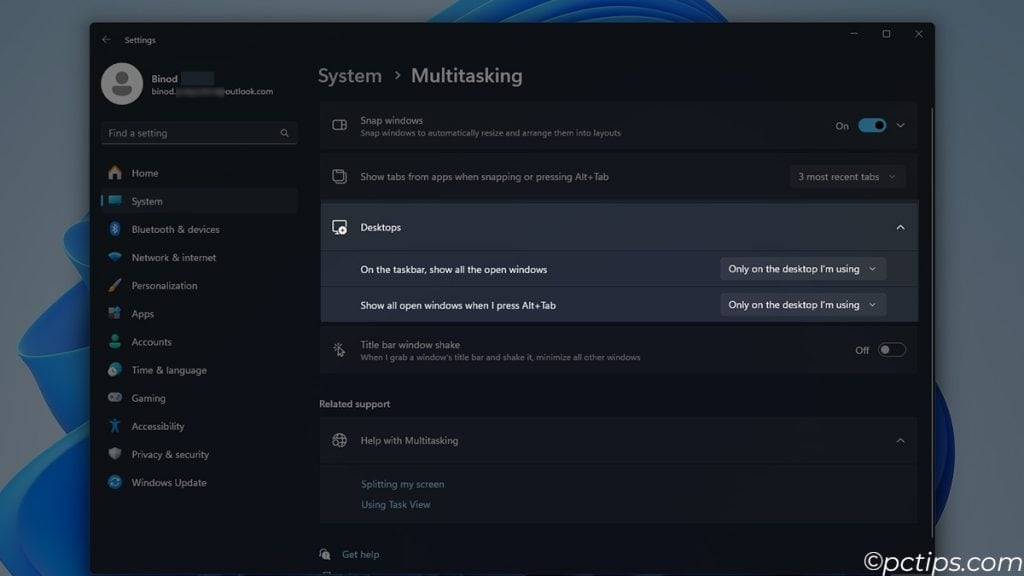
This setup provides a focused view, showing only the windows relevant to your current workspace.
However, if you prefer seeing all windows across all desktops:
- Set both options to “On all desktops“
With this setup, the taskbar will show all open windows, regardless of which desktop they’re on.
Pressing Alt+Tab will also cycle through all windows across all desktops.
I prefer to show open windows only on the desktop I’m using to keep the taskbar clutter-free, but you might want to show all open windows if you frequently move between desktops.
Advanced Virtual Desktop Tips
By now, you’re well on your way to being a virtual desktop power user.
Here are a few advanced tips to take your desktop game to the next level:
- Use a separate browser profile for each desktop. This keeps your cookies, history, and settings separate for different tasks.
- Assign a shortcut key to your mouse: Map the
Win+Tabshortcut to a button on your mouse for even faster desktop switching (I have it set to the thumb button on my Logitech G502). - Create a dedicated desktop for personal stuff: Keep your personal apps and files on a separate desktop to maintain work-life balance and prevent distractions.
- Use virtual desktops with PowerToys FancyZones: Combine virtual desktops with PowerToys FancyZones for the ultimate window management setup. Create custom layouts for each desktop and snap windows into place with ease.
- Go keyboard-only: Challenge yourself to navigate your desktops using only keyboard shortcuts for a week. You might be surprised at how much faster and more efficient you become.
- Use a macro tool: Use a macro tool like AutoHotkey to create custom shortcuts for common virtual desktop tasks, like moving windows to specific desktops or opening app groups with a single key press.
These are just a few ideas to get your gears turning.
The possibilities with virtual desktops are endless.
Don’t be afraid to get creative with your virtual desktop setup.
I’ve been using virtual desktops for years, and they’ve completely transformed the way I work.
Share your thoughts in the comments below – I’d love to hear how other folks are using this powerful feature.
And if you found this guide helpful, please give it a share!
This is the perfect solution for me as day trader!! Thank you so much for helping people as I also do on my trading. And at no cost to them as you do here. Makes ya feel good at the end of the day!!