Screenshot Like a Pro with ShareX
Last Updated:
ShareX is the Swiss army knife of screen capture tools. Here are a few reasons why it’s my favorite:
- Annotation and in-app editing
- Region-detects to auto-select areas of your screen
- Scrolling captures
- Record the screen as a video or GIF
- Auto-captures at certain intervals
- Delayed screenshots
- Upload captures to Imgur or any site of your choice
- Get shortened shareable links
- Useful tools like OCR, QR code generator, image beautifier, etc are built-in
- Can automate all these tasks with custom workflows
Essentially, it’s a powerful screen capture tool that can do it all. And the best part is that despite being loaded with so many features, it’s still easy to use.
Getting Started with ShareX
Download ShareX from GetShareX.com or the Microsoft Store as you prefer. Install and launch it, then follow along with me.
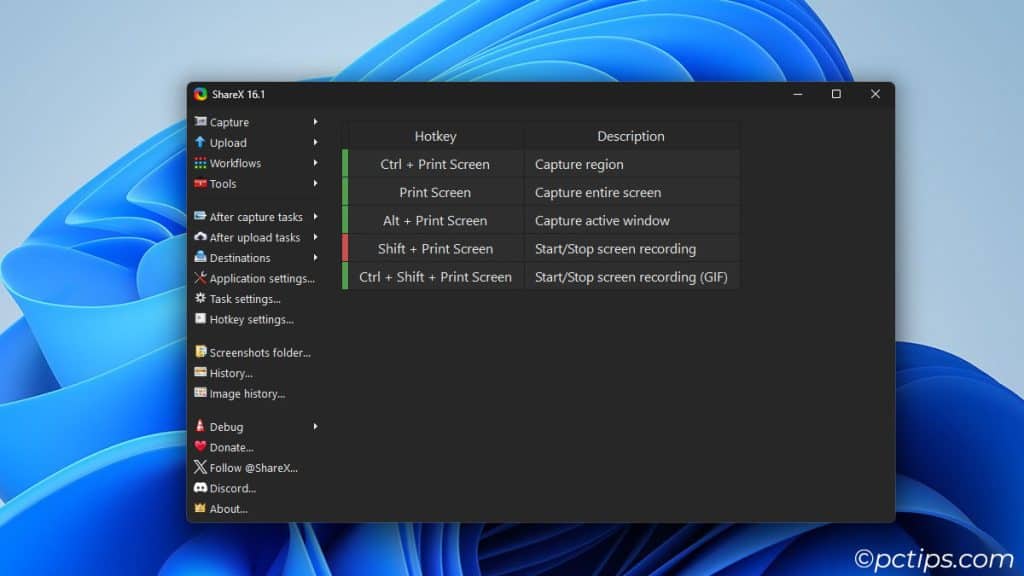
At launch, you should see the default hotkeys.
PrintScreen captures the entire screen by default. But I prefer using it to capture selected regions instead.
If you want to make any similar personalizations, double-click on the hotkeys to change them.
Then, press the hotkeys to try out the different capture modes.
- Capture Region – Capture the selected region.
- Capture Full Screen – Capture your entire screen.
- Capture Active Window – Capture the active window.
- Screen Record – Capture the selected region as a video.
- Screen Record GIF – Capture the selected region as a GIF.
Master the Capture Region Mode
Capturing the selected region is the bread-and-butter of any screen capture app. This feature is particularly polished in ShareX.
ShareX auto-detects and selects regions based on where you hover the cursor.
For custom selections, you can use the rectangle, ellipse, or freehand tool as needed.
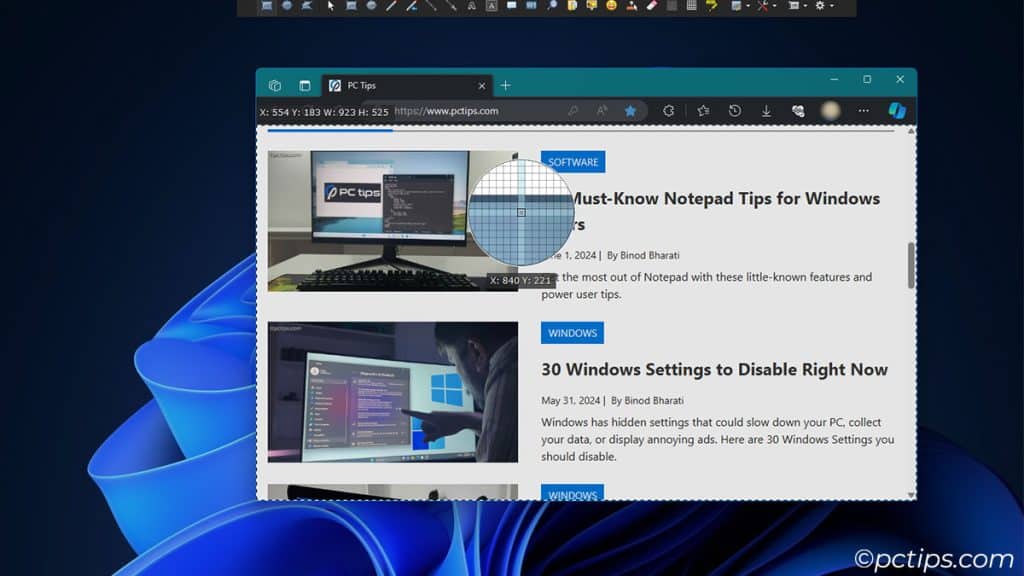
And I can’t sing enough praises of the annotation lineup (the tools at the top).
In addition to standard tools like rectangle, ellipse, line, arrow, and freehand draw, ShareX also supports useful tools like freehand arrow, step counter, speech bubble, and magnifier.
You can insert text, images, and stickers, or pixelate, blur, and highlight sections.
The Select and Move tool lets you move annotations.
And most of these tools support keyboard hotkeys for easy usage.
TLDR; ShareX is packed with features that will elevate even the most basic screenshots to the next level.
Record Screen as Video or GIF
If you use ShareX, you won’t need a separate app just to record the screen as a GIF.
Simply press Ctrl + Shift + PrintScreen or whatever custom hotkey you’ve set to try it out.
Take a Scrolling Screenshot
Have you ever wanted to capture an entire webpage or document but couldn’t because it’s too big and you’d have to scroll down to get the whole thing?
ShareX’s scrolling capture is built for situations like this. Try it out in your browser right now!
Open ShareX and select Capture > Scrolling Capture. Then, click on the page you want to capture.
ShareX will scroll and take multiple screenshots of the page, combine them, and provide you with the final product. No editing needed on your part!
Set Up Auto Capture
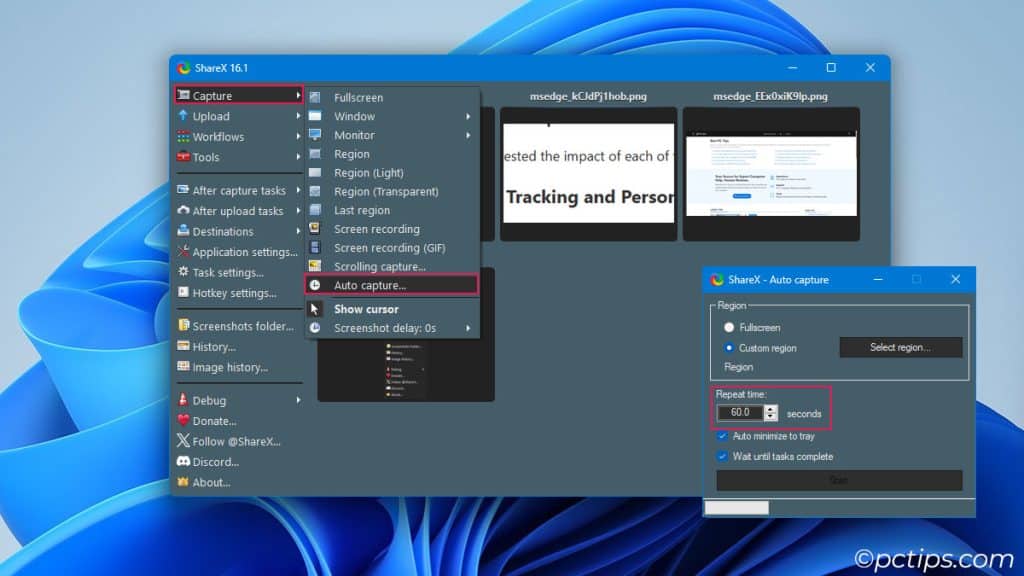
Say you want to log what users did on a PC throughout the day.
One of many ways to do this is by automatically capturing the screen at certain intervals (say, every 60 seconds).
Windows Recall does a similar thing, and it recently made headlines due to privacy concerns.
But if you’re voluntarily doing it on your PC, there’s not much to worry about.
Select Capture > Auto capture and set the repeat time to try it out.
Set A Screenshot Delay
Pressing any key (even PrintScreen) can make certain pop-ups, menus, and selections disappear. Delayed screenshots are extremely useful for capturing such items.
Go to Capture > Screenshot delay and set a delay between 0-5 seconds.
Now, the capture tools will only show up after a few seconds. You can set up the screen any way you like beforehand.
Edit Screenshots on the Go
Open ShareX, right-click an image and click on Edit image.
Or even better, access the editor after every capture from After capture tasks > Open in image editor.
This allows you to crop, rotate, and resize screenshots on the go.
Make sure to check out the Image effects feature too.
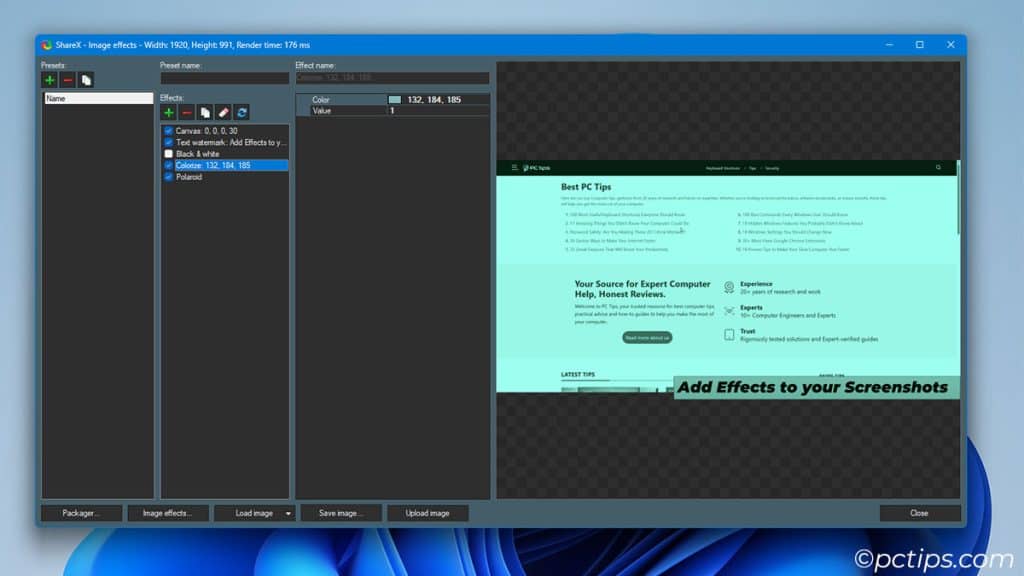
Color adjustments, spoiler overlays, borders/outlines, watermarks; a ton of effects are available by default and more can be downloaded from the ShareX image effects page.
You can create presets of multiple effects. And, you can go to After capture tasks > Add image effects > Presetname to auto-apply these presets to each capture.
That’s right, you set up the effects once, and every screenshot will automatically come out with the effects applied.
If you’re a content creator who takes a lot of screenshots, this will save HOURS of post-processing in the long run.
Make Your Screenshots Look Professional
Shadows, gradients, and padding are what give screenshots the ‘pro’ look. ShareX can give this look to all your screenshots with the Beautify image feature.
Right-click a screenshot and select Beautify image. You’ll instantly understand how useful this screenshot hack is.
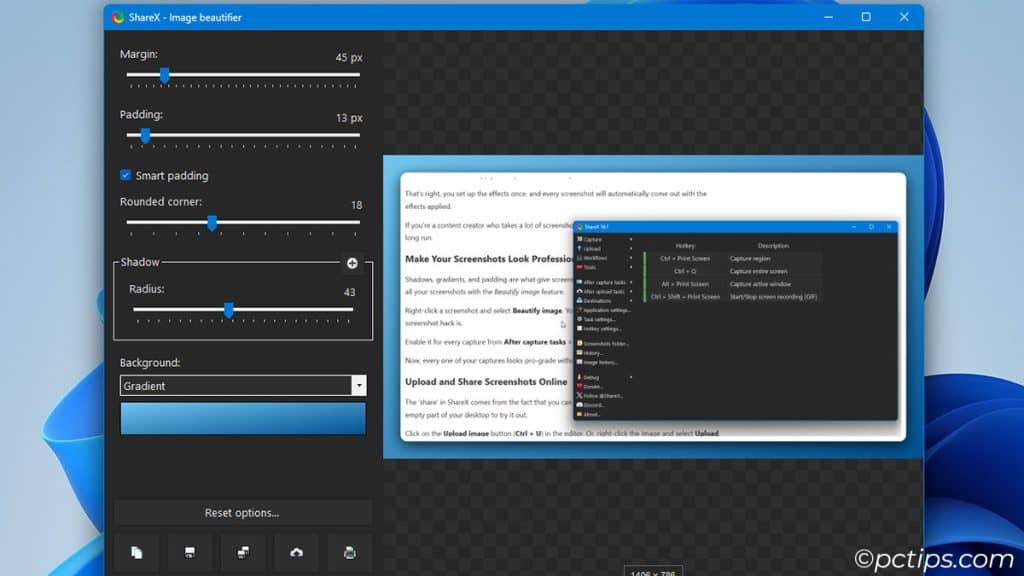
Enable it for every capture from After capture tasks > Beautify image.
Now, every one of your captures will look pro-grade without even a second of extra work on your part.
Upload and Share Screenshots Online
The ‘share’ in ShareX comes from the fact that you can upload and share screenshots online. Capture an empty part of your desktop to try it out.
Click on the Upload image button (Ctrl + U) in the editor. Or, right-click the image and select Upload.
ShareX will upload the image to Imgur and copy the URL to your clipboard. Provide this URL to whoever you want to share the image with.
You’re not limited to just screenshots either. It can upload text to sites like Pastebin, files to sites like Dropbox, upload files from a URL, and so on.
This is just ShareX being ShareX; incredibly versatile!
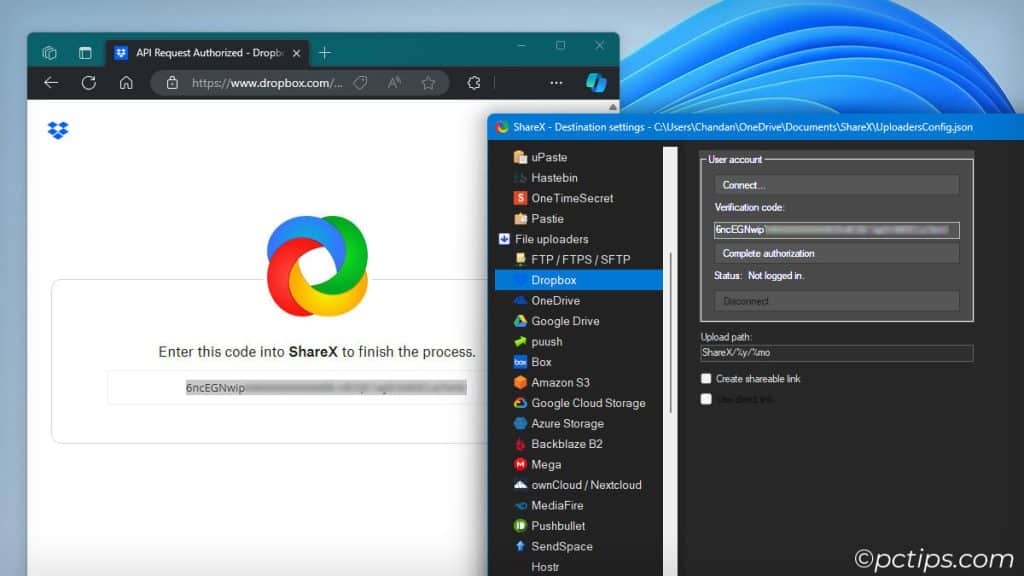
Manage Upload Destinations
ShareX supports uploading images and files to over 40 destinations.
You can upload screenshots to Imgur, Flickr, X, Google Photos, and so on.
If you go to Destinations > Destination settings, you can even customize advanced settings for the site you chose (account type, login, album to upload to, etc).
It’s the same story for text and files; tons of sites with tons of options to customize.
If you host your own server, you can even upload files there via Custom uploader settings.
Set Up After Capture Tasks
Despite being packed with so many features, ShareX is still extremely easy to use. The reason it’s so smooth is automation.
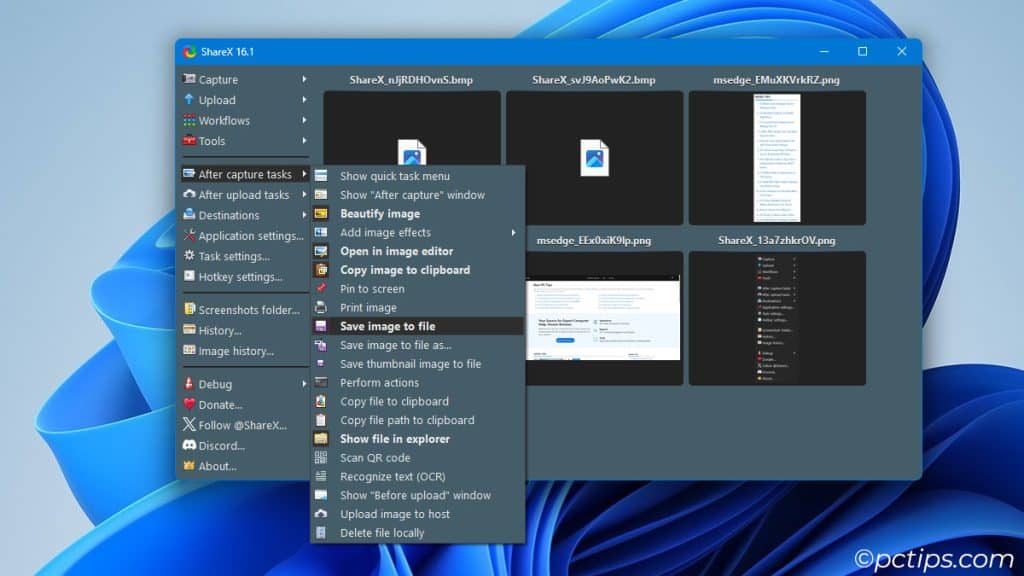
You can open the image in the editor and add effects, beautify it, save it as a file, open it in File Explorer, print the image, upload and share it online, and so on.
And, you can set all these to be done automatically.
Customize the tasks according to your needs and you’ll quickly notice how much extra work this saves for you.
Automate After Upload Tasks
Sharing screenshots online is easy with ShareX, but you can automate things even more.
You can enable URL shortening via bit.ly, tiny.url, or any other service of your choice.
You can automatically share the shortened URL via email, or to social media sites like X, Facebook, and Reddit.
You can also open the URL in a browser after the upload completes.
All simple but useful little tweaks.
Create Custom Workflows
If ShareX hasn’t impressed you yet, this will do the job.
You can assign entire workflows to hotkeys!!
Everything we’ve explored so far, from taking a screenshot to editing it and sharing it online, all of this makes up a workflow.
So, you could press PrintScreen and save a raw screenshot of the selected region to your desktop.
You could press Alt + 1 and ShareX could capture the active window, apply a watermark, and upload it to Flickr.
You could press Ctrl + Q to capture the screen, apply various effects (color grading, borders), and share the image via email.
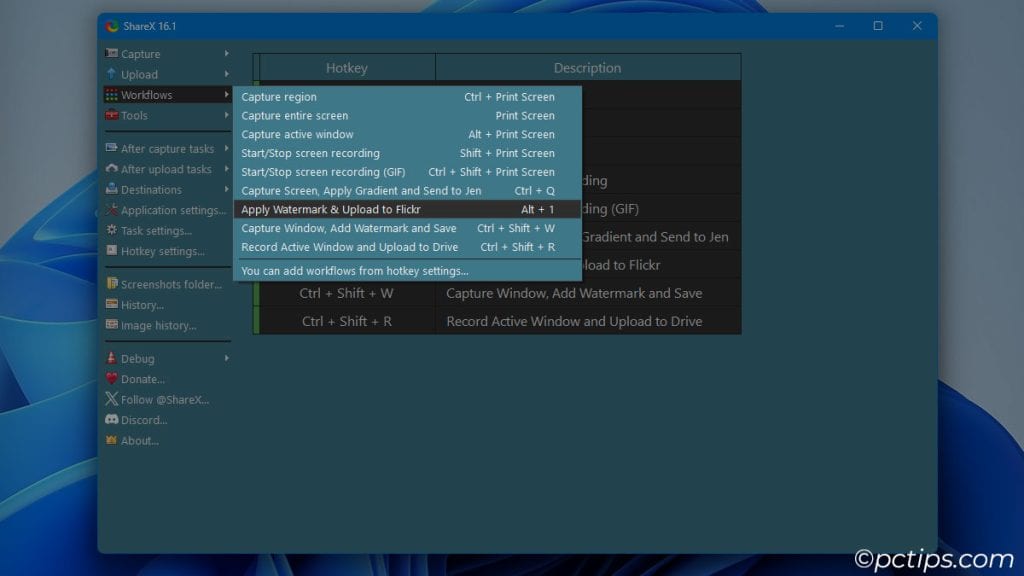
You get the idea. You can create custom workflows with different tasks based on what you need them for. Name them and assign hotkeys.
Then, with one click, ShareX can execute the entire list of tasks for you.
OCR, QR Codes, and Much More

This is just the cherry on top; ShareX even has built-in productivity tools like
- OCR to extract text from images and various parts of the screen
- QR to create QR codes, scan them from an image, or the screen
- Screen color picker to identify colors
- Ruler, image combiner, splitter, DNS changer, and 20+ useful tool
Not Sure If ShareX Is Right For You?
The main ‘problem’ with powerful programs like ShareX is that they can be intimidating to get started with.
I’ve faced this myself. A few years back, I was using Lightshot and Flameshot, and they worked well for me. So, I felt the learning curve of ShareX was an unnecessary hassle. I put off installing it for quite some time.
I know a lot of you are having this same thought right now, which is why I’d like to remind you – there is NO learning curve!
ShareX is not any more difficult than your current screenshot app. PrintScreen takes basic screenshots all the same. They get saved to a folder all the same. You won’t have any problems getting started with it.
The only difference is that ShareX has a higher skill ceiling, meaning pros can get more out of it. Over a few months, you’ll naturally try out and get used to the optional advanced features of ShareX.
And when you come out the other end, your screenshot game will be at a completely different level.
That’s all I have to say about that. I hope you found a useful tool to add to your repertoire today. Drop a comment if you found the guide helpful!