The Router Security Checklist Every Home Needs
Last Updated:
Think about all the devices connected to your home WiFi – your laptop, phone, smart TV, baby monitor, security cameras.
Now imagine a hacker getting access to ALL of that. Scary, right?
It’s not just a hypothetical.
In January 2024, the U.S. Justice Department revealed that Chinese state hackers had hijacked hundreds of home routers to cover their tracks while attacking critical infrastructure.
Cyber criminals are always on the lookout for unsecured routers to exploit.
Once they’re in, they can:
- Spy on your online activity
- Steal sensitive data like passwords & credit card numbers
- Hijack your devices for botnets
- Even access your connected cameras & mics!
But don’t panic!
With a few simple tweaks, you can drastically improve your router’s security and keep the bad guys out.
Let’s get started.
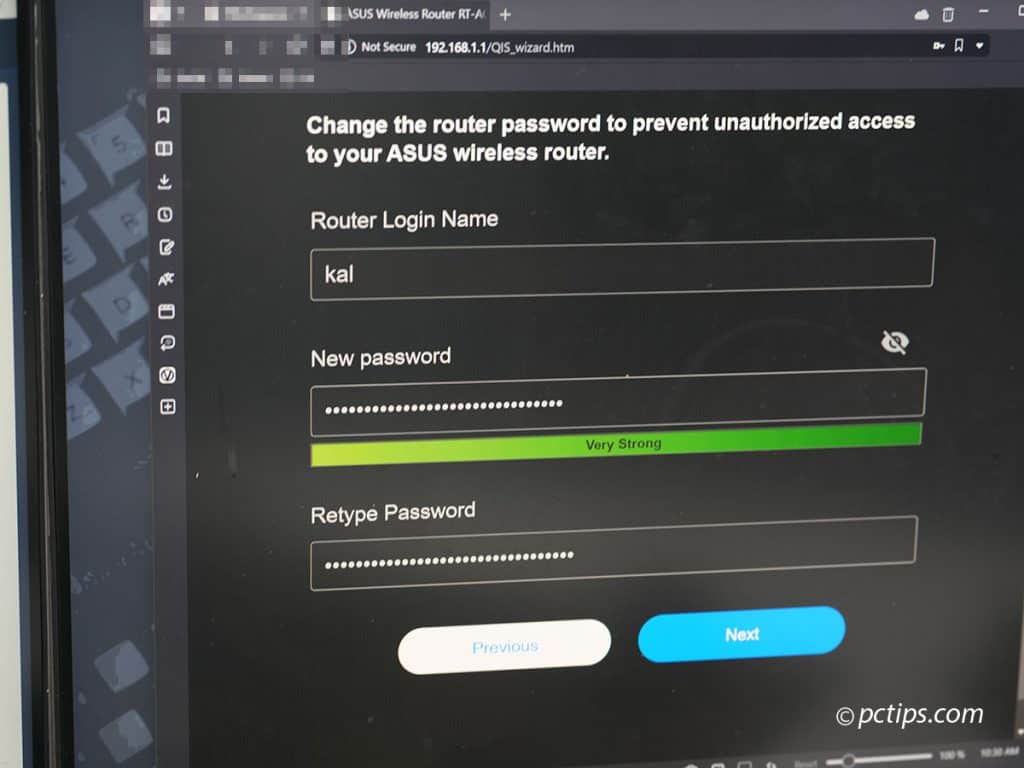
Change the Default Admin Credentials
When you first unbox your new router, it comes with a default username and password for the admin panel.
These credentials are usually something super easy to guess, like “admin” and “password”.
But you’d be amazed how many people never change the default login on their router.
Manufacturers set these up to make initial configuration easy, but they’re a massive security risk.
Cyber criminals maintain extensive lists of default router credentials.
They can use automated tools to scan for vulnerable routers and break in with just a few clicks.
In fact, a 2018 study found that 81% of data breaches are due to poor passwords.
So when you set up a new router, make changing the admin password your top priority.
It’s one of the first things I do with any new router.
Here’s how:
- Access your router’s admin panel by entering its IP address in your browser. This is usually something like
192.168.1.1or10.0.0.1.Check your router’s manual or the label on the device for the exact address. - Enter the default username and password. Again, these are often printed on the router or in the manual. Common combos include:
- admin/admin
- admin/password
- admin/<blank>
- Navigate to the password settings (exact location varies by model) and enter a new, strong password.
If your router supports enabling login CAPTCHA like my ASUS RT-AX89X, do that too. It prevents automated brute-force attacks.
And don’t just use a common password like “password123” or your dog’s name.
That’s asking for trouble.
Come up with something strong and unique.
I like to use a passphrase mixed with uppercase, lowercase, numbers and symbols.
And I always store them in a password manager for safekeeping.
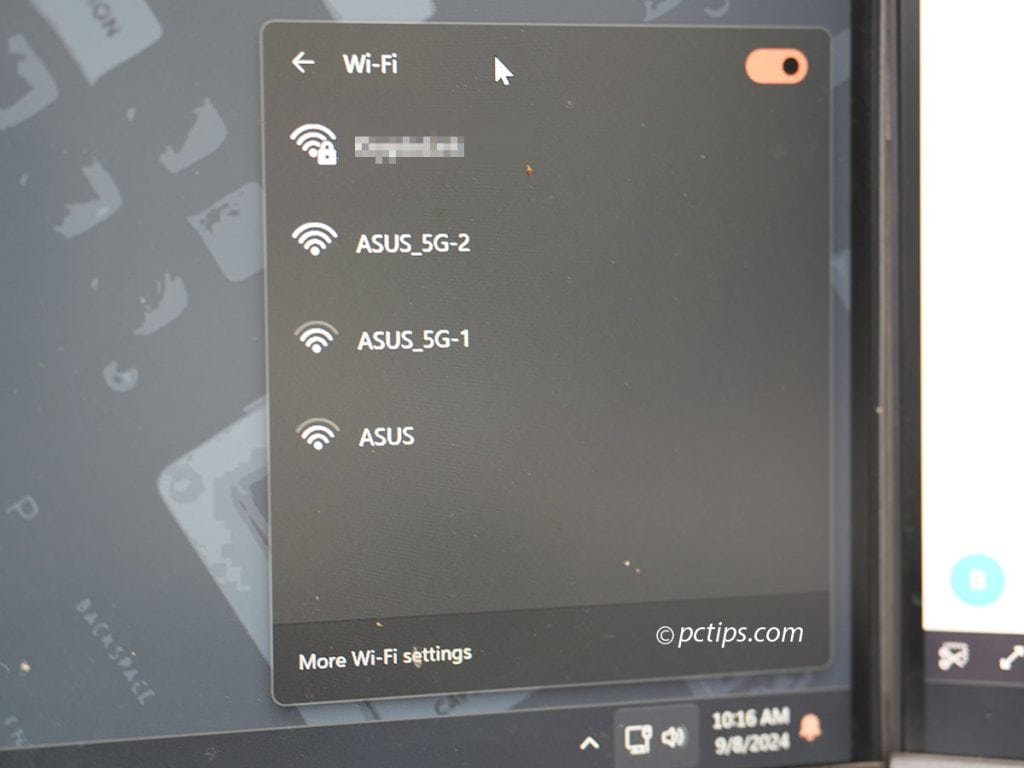
Change Your Network Name (SSID)
Your router broadcasts its network name, or SSID, for devices to connect to.
By default, this is often set to the router’s brand name, like “ASUS_5G-2” or “NETGEAR” followed by a string of numbers.
Why is this a problem?
It gives potential attackers information about your router model, making it easier for them to look up known vulnerabilities.
Changing your SSID is simple:
- Log into your router’s admin panel.
- Look for “Wireless Settings” or something similar.
- Find the SSID field and change it to something unique.
- Avoid using personal information like your name or address.
- Save the changes and reconnect your devices.
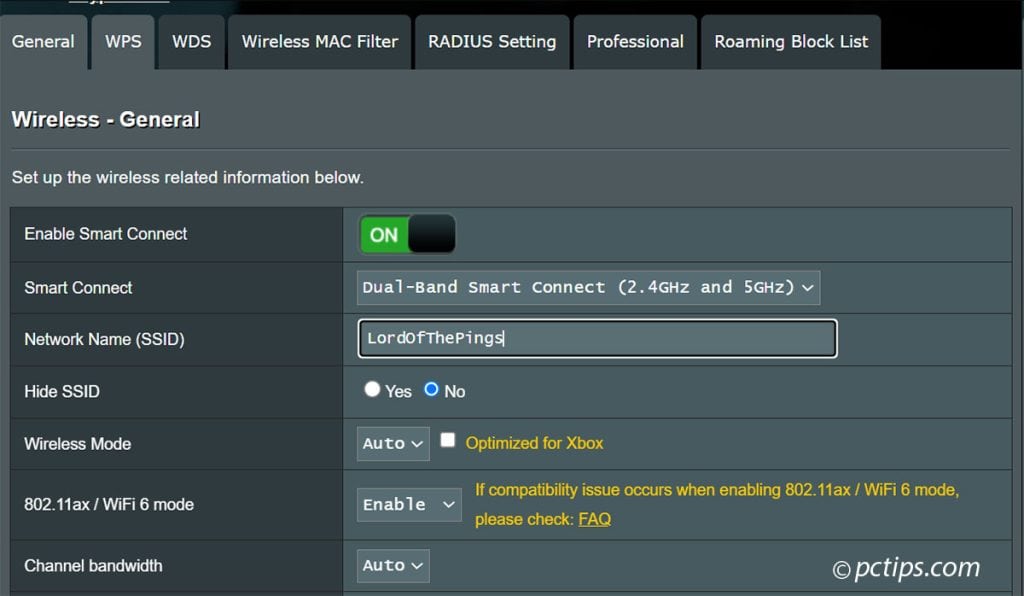
I like to use humorous names like “Ping’s Landing” or “Lord of the Pings“. Adds a bit of fun while still being secure.
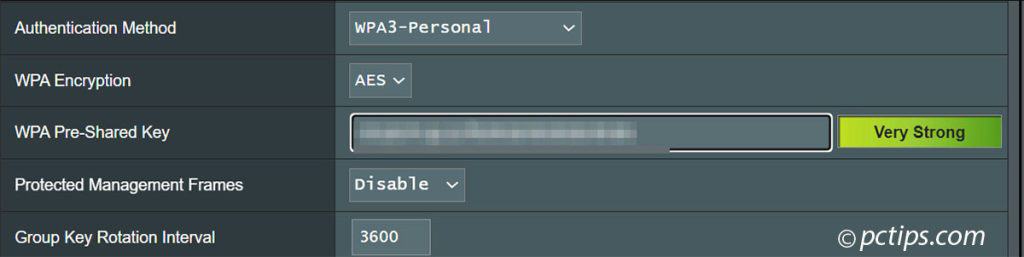
Encrypt Your Wi-Fi With the Latest Standards
Encryption scrambles the data sent over your WiFi network, making it unreadable to anyone who might intercept it.
If your router supports the latest WPA3 standard, enable it immediately.
If not, WPA2 is still secure for most purposes.
Here’s how:
- In your router’s wireless settings, look for the “Security” or “Encryption” option.
- Select “WPA3” if available, or “WPA2” if not.
- Choose a strong passphrase. This is different from your admin password and will be shared with devices connecting to the WiFi.
Avoid using WEP or the original WPA (without the “2”). These older standards are easily crackable nowadays.
And of course, never run an open network without any encryption!
Disable WPS (WiFi Protected Setup)
WPS was designed to make connecting devices to your WiFi easier.
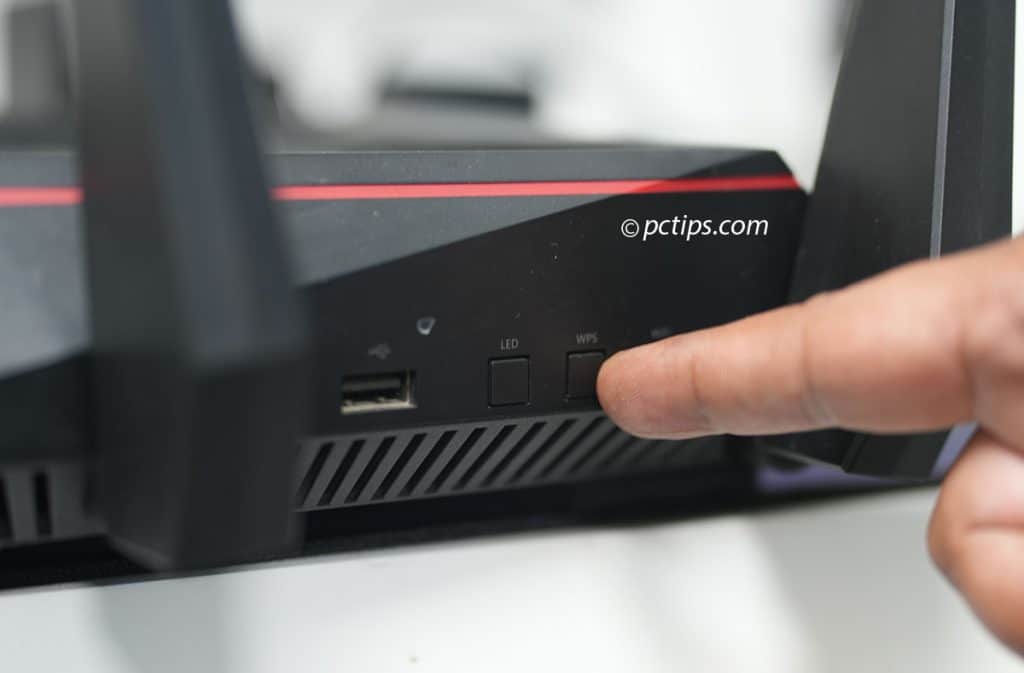
Push a button on your router, push a button on your device, and you’re connected.
Sounds convenient, right?
The problem is, WPS is notoriously insecure.
Hackers can exploit vulnerabilities in WPS to gain access to your network, even if you have a strong password.
To disable WPS:
- In your router’s admin panel, look for “WPS” settings (often under the “Wireless” or “Security” sections).
- Disable WPS entirely.
- Save the changes.
Yes, it means you’ll have to manually enter the WiFi password on new devices, but that’s a small price to pay for better security.
Enable MAC Address Filtering
Every device that connects to your network has a unique identifier called a MAC address.
By enabling MAC filtering, you can specify exactly which devices are allowed to connect and block everything else.
Here’s how:
- Find the “MAC Filtering” or “Access Control” section in your router’s settings.
- Choose the filtering mode. I prefer “allow list” mode, which blocks all devices except those you explicitly allow.
- Enter the MAC addresses of your trusted devices. You can usually find a device’s MAC address in its network settings.
- Save the changes.
Keep in mind, MAC addresses can be spoofed.
So while this isn’t foolproof, it’s still an extra layer of security.
Change the Default IP Range
Most routers use common IP ranges like 192.168.0.x or 192.168.1.x.
Changing this can throw off potential attackers and make your network harder to map.
I prefer using the 10.x.x.x range since it gives you way more addresses to work with.

Great if you want to set up multiple subnets or VLANs for network segmentation.
Even if you stick with the standard 192.168.x.x, at least change the third octet to something less common.
- In your router’s admin panel, find the “LAN” or “Network Settings” section.
- Look for fields like “IP Address“, “Subnet Mask“, or “DHCP Range“.
- Change it to something less common, like
10.0.0.xor172.16.0.x. - Save the changes and reboot your router.
Note that this will disconnect all your devices, and you’ll need to reconnect them to the new network.
Even if you don’t change your IP range, at least change the default router admin IP (usually 192.168.1.1 or 192.168.0.1).
This makes it harder for attackers to guess.
Set Static IPs for Important Devices
By default, your router assigns IP addresses to devices dynamically as they connect (known as DHCP).
This can make it harder to keep track of what’s on your network.
Consider assigning static IPs to your regular devices:
- In your router’s DHCP settings, find the option to reserve IP addresses for specific MAC addresses.
- Enter the MAC address and desired IP for each device you want to make static.
- Save the changes.
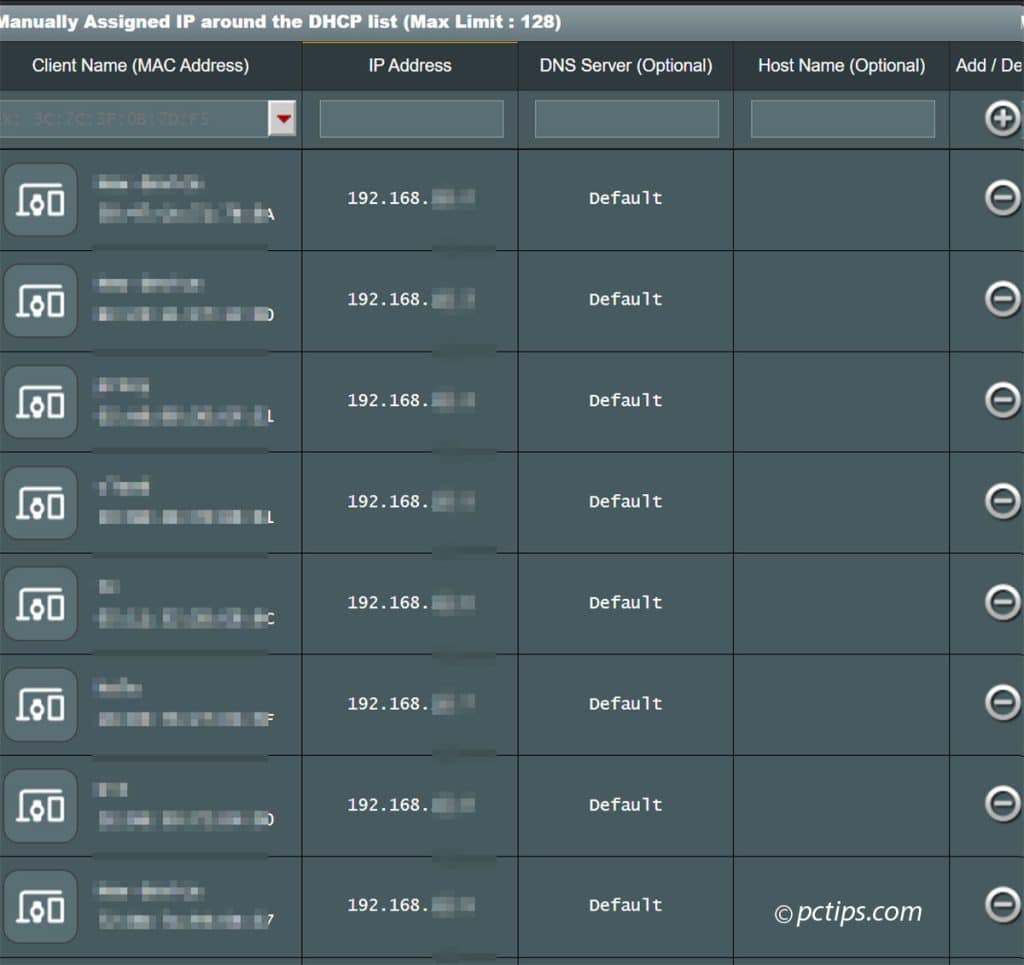
This way, your devices will always get the same IP, making it easier to spot unfamiliar devices on your network.
Use Custom DNS Servers
Domain Name System (DNS) is like the phone book of the internet.
It translates human-friendly URLs like “www.pctips.com” into machine-friendly IP addresses.
Your ISP’s default DNS servers might not be the fastest or most secure.
Consider switching to a reputable third-party DNS service:
- Find the DNS settings in your router’s admin panel.
- Change the DNS server addresses to your chosen provider. Some popular options:
- Cloudflare: 1.1.1.1 and 1.0.0.1
- Google: 8.8.8.8 and 8.8.4.4
- Quad9: 9.9.9.9 and 149.112.112.112
- OpenDNS: 208.67.222.222 and 208.67.220.220
- Save the changes.
I personally use Cloudflare’s DNS after testing various DNS providers.
It’s fast, secure, and they have a strong privacy policy.
Some routers even support DNS-over-HTTPS (DoH) or DNS-over-TLS (DoT) for added encryption.
Set Up a Guest Network
If you frequently have visitors who need WiFi access, set up a separate guest network.
It’s a win-win: your guests get WiFi, and your personal network stays private.
To set up a guest network:
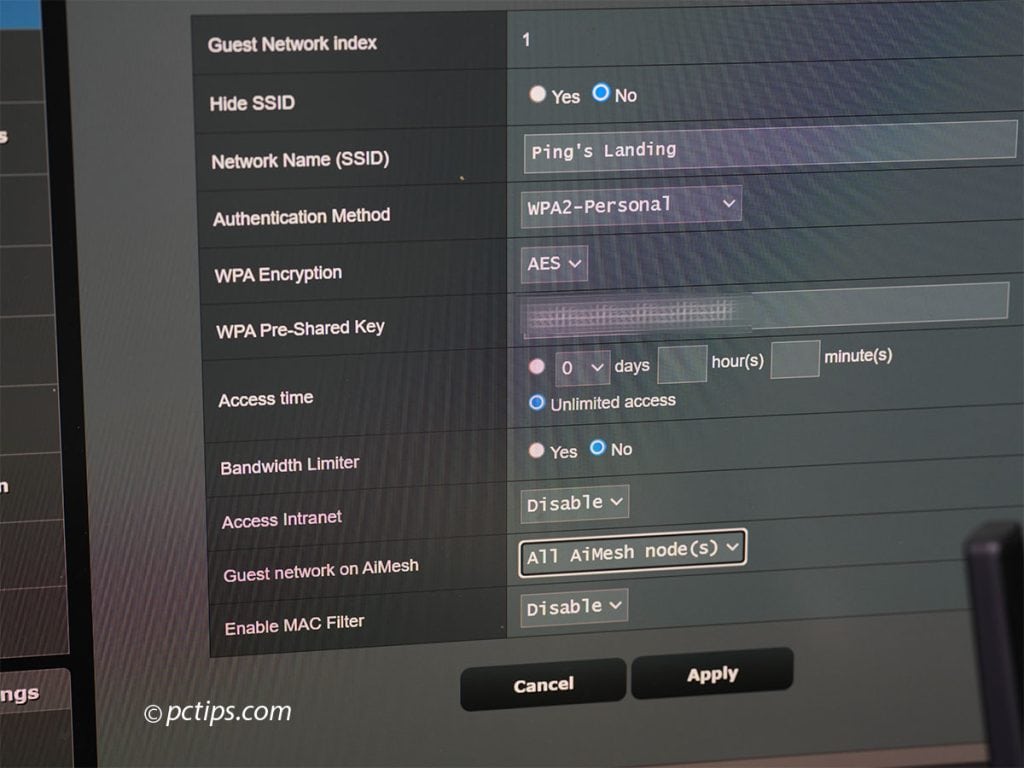
- Look for “Guest Network” settings in your router’s admin panel.
- Enable the guest network and give it a name (SSID).
- Set up a password for the guest network. It can be simpler than your main WiFi password.
- Configure the guest network’s settings. I recommend:
- Enabling client isolation (prevents guests from seeing each other’s devices)
- Disabling access to the router’s admin panel
- Limiting the bandwidth available to guests
Set Up Parental Controls and Content Filtering
If you have kids (or just want to block certain types of content), many routers offer built-in parental controls and content filtering:
- Look for parental control or content filtering options in your router settings.
- Enable the feature and configure it to your needs.
- You can typically block specific websites, categories of content, or set time limits for internet access.
- Some routers let you apply different rules to different devices.
Remember, tech-savvy kids might find ways around these controls, so they’re not a substitute for open communication about online safety.
Disable Unused Services and Ports
Your router likely has various services running that you might not need, like Telnet, SSH, or UPnP.
Each open port is a potential entry point for attackers.
Closing unused ports reduces your attack surface.
To do this:
- In your router’s admin settings, find the Administration or System section.
- Disable anything you don’t actively use (e.g., remote management, UPnP, Telnet, TFTP, SSH, FTP).
- Check for any open ports that aren’t needed and close them.
Only open ports that you specifically need for services or devices you use.
Review Connected Devices Regularly
Most routers have a section showing all connected devices.
Make it a habit to check this list periodically:
- Find the list of connected devices (often under “DHCP clients” or “Attached devices“).
- Review the list and verify that you recognize all devices.
- If you spot anything unfamiliar, investigate further or consider changing your WiFi password.
Reviewing your list of connected devices regularly is key for:
- Spotting unauthorized devices (like a neighbor piggybacking on your WiFi)
- Identifying outdated devices that might have security flaws
- Seeing what’s hogging the most bandwidth
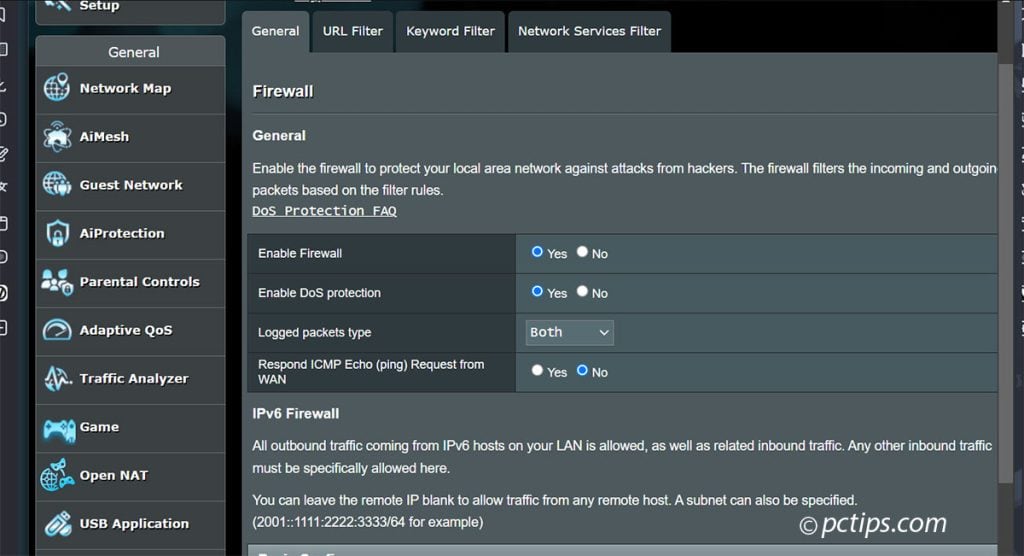
Enable the Built-in Firewall
Most routers include a basic firewall, but it’s not always enabled by default:
- Look for firewall settings in your router’s admin panel.
- Enable the firewall if it’s not already active.
- Configure it to block incoming connections by default.
- Set up any necessary exceptions for services you use.
A properly configured firewall is your first line of defense against many common attacks.
For advanced users, I recommend looking into open source firewall solutions like pfSense or OPNsense, which offer more granular control and advanced features.
But for most home users, the built-in firewall is a solid start.
Activate DoS Protection
Denial of Service (DoS) attacks try to overwhelm your router with traffic, making it unresponsive.
Some routers have specific settings to protect against DoS attacks.
To check:
- Search for DoS protection in your router settings (sometimes under security or firewall options).
- Enable it if available.
- Configure any additional settings as recommended by your router’s documentation.
While home networks aren’t usually the primary targets for DoS attacks, it’s still a valuable layer of protection.
Use Your Router’s Built-In Security Tools
Some routers, like my ASUS RT-AX89X, come with built-in security tools powered by anti-malware companies.
For example, ASUS routers have “AiProtection” powered by Trend Micro.
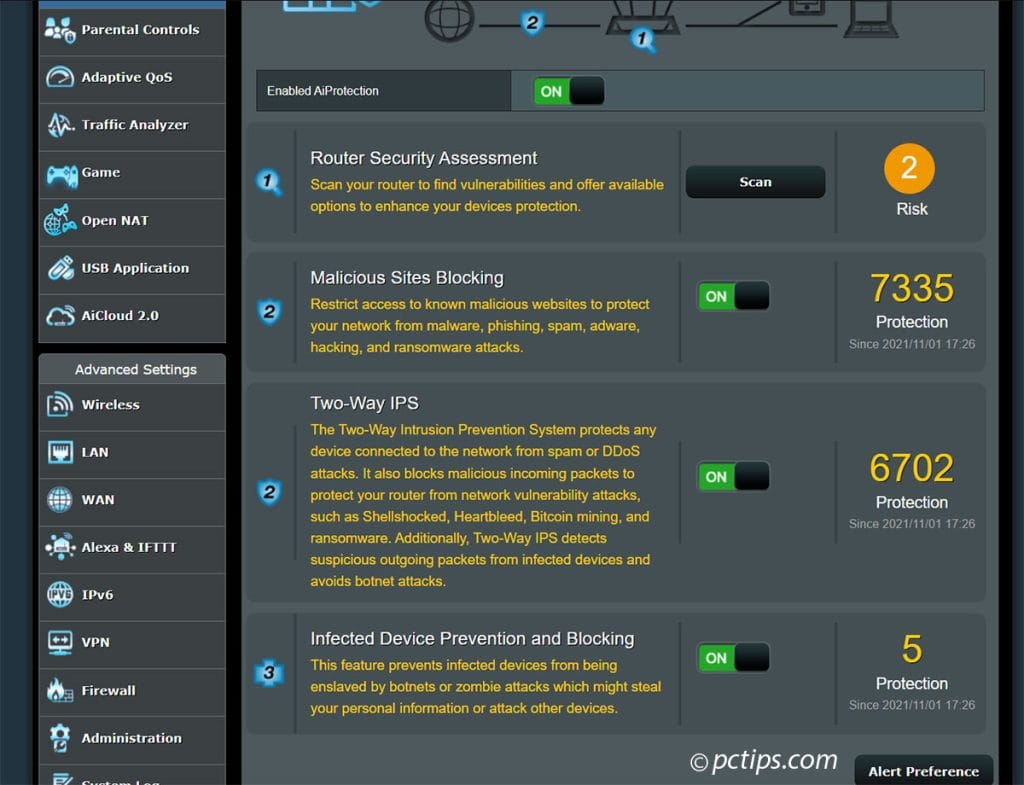
It provides real-time network monitoring, malicious site blocking, vulnerability protection, and infected device blocking.
To use these features:
- Look for a security center or related settings in your router’s admin panel.
- Enable the security features.
- Configure them as needed (e.g., set up alerts, review blocked threats).
These tools can provide an added layer of protection.
But keep in mind, they often require sharing some data with the service provider.
Review the privacy policies and only enable features you’re comfortable with.
Use HTTPS for Router Administration
If your router supports it, always use HTTPS when accessing the admin panel:
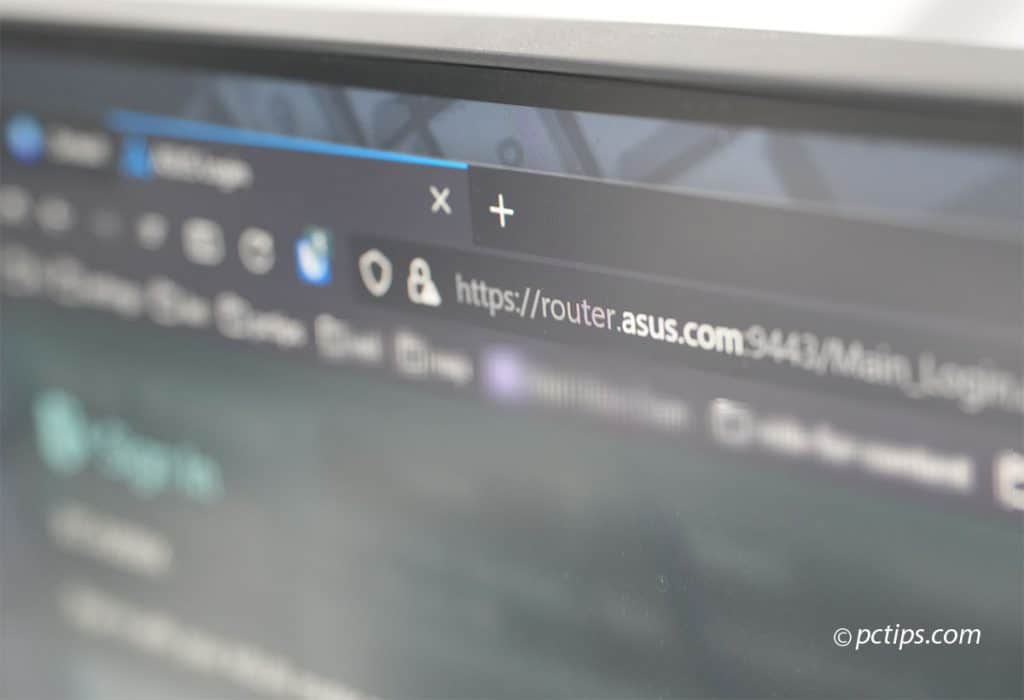
- Look for an option to enable HTTPS administration.
- Once enabled, always use “https://” when typing your router’s IP in the browser.
- Your browser should show a lock icon, indicating a secure connection.
This encrypts the connection between your computer and the router, preventing eavesdropping on your admin sessions.
Enable Logging
Router logs capture valuable info about all the activity passing through.
You can see things like:
- Successful and failed login attempts
- What devices connected when
- Any unusual traffic patterns or errors
This information is pure gold for troubleshooting issues and identifying potential security breaches.
For example, if you see a bunch of failed login attempts from an unfamiliar IP, that could be someone trying to hack in.
Enabling logging varies by router, but usually it’s as simple as:
- Finding the logging settings in your router’s admin panel.
- Enable logging if it’s not already active.
- Set it to log both incoming and outgoing traffic if possible.
- Configure log retention settings (how long logs are kept).
- If your router supports it, set up alerts for suspicious activity.
Keep Your Router’s Firmware Updated
A 2018 study by the American Consumer Institute found that over 80% of home routers have unpatched vulnerabilities.
Many of these could be fixed by simply updating the firmware.
Router manufacturers regularly release firmware updates to patch security vulnerabilities and add new features.
Don’t neglect this critical step:
- Check for a “Firmware Update” section in your router’s admin panel.
- See if there’s an option for automatic updates and enable it if available.
- If not, make a calendar reminder to check for updates monthly.
- Always download firmware updates directly from the manufacturer’s website.
Backup Router Configurations Regularly
After spending time optimizing your router’s settings, the last thing you want is to lose all that work:
- Look for a backup or export settings option in your router’s admin panel.
- Save your router’s configuration file to a secure location.
- Update this backup whenever you make significant changes.
If you ever need to reset your router or replace it entirely, you can use the backup file to quickly restore all your customized settings.
Don’t Forget Physical Security
If someone can physically access your router, they can do a lot of damage.
I once had a neighbor’s kid reset my router by accident during a party.
A little physical security goes a long way!
Here are some physical security tips:
- Place your router in a secure, central location in your home.
- Keep it out of sight from windows to prevent outsiders from seeing it.
- If your router has a reset button, make sure it’s not easily accessible.
- Consider using a lockable network cabinet for extra protection.
Use Open Source Router Firmware
For the ultimate in router security and customization, consider flashing your router with open source firmware like:
These third-party firmwares give you tons of advanced features and granular control.
You can easily set up VPN tunnels, QoS rules, custom scripts, and more.
Plus, the open source code is constantly reviewed by the community for security issues. Bugs tend to get found and fixed quickly.
The downside is that flashing custom firmware can be tricky and may void your warranty.
It’s not for the faint of heart!
But for power users, it can be a great way to get the most out of your router.
Choose a Secure Router
All the security configurations in the world won’t help much if your router itself is inherently insecure or poorly designed.
When router shopping, look for:
- Support for the latest wireless security standards (WPA3, etc.)
- Regular automatic firmware updates
- Built-in security features like firewalls, VPN support, and malware protection
- Well-known, reputable brands with a track record of taking security seriously
Some brands I recommend:
- Ubiquiti (AmpliFi, UniFi, etc.)
- Asus (especially their AiMesh routers)
- Mikrotik (for advanced users)
- Linksys
- Cisco (for businesses and enterprises)
But there are plenty of great options out there.
Do your research, read reviews from trusted sources, and choose one that fits your needs and budget.
Personally, I use this Mikrotik switch with RouterOS. I love the advanced features it offers.
But it does require some networking know-how to set up and manage.
For a more user-friendly option, I’ve been impressed with Asus’ high-end models like the RT-AX89X.
They strike a good balance between ease of use and advanced functionality.
Their AiProtection feature, powered by Trend Micro, offers enterprise-grade security for home users.
The Netgear Nighthawk series is another solid choice, especially if you need extensive parental controls.
Remember, the most feature-packed router isn’t always the best choice.
Consider your specific needs and technical comfort level when making a decision.
Router Security Checklist
Let’s wrap up with a quick checklist to ensure you’ve covered all the bases:
- Change the default admin username and password
- Change the default SSID
- Enable the highest level of WiFi encryption available (WPA3 or WPA2)
- Disable WPS
- Enable MAC address filtering
- Change the default IP range and router IP address
- Set static DHCP reservations for your devices
- Use a secure DNS provider
- Set up a guest network for visitors
- Enable parental controls and content filtering
- Disable unused services and ports
- Review the list of connected devices regularly
- Enable the built-in firewall
- Enable DoS protection
- Use your router’s built-in security tools (if available)
- Enable HTTPS for the router’s admin panel
- Enable security logging
- Keep the router’s firmware updated
- Regularly back up the router’s configuration
- Physically secure the router
- Enable Quality of Service (QoS) settings
- Disable Universal Plug and Play (UPnP)
- Disable remote management
- Disable ping response from the WAN interface
- Enable network segmentation, if possible
- Set up a separate network for IoT devices
- Consider using a VPN for added security and privacy
Treat this list like a buffet – you don’t have to eat everything in one sitting!
Just try a few dishes at a time.
Personally, I’d start with:
- Changing default settings
- Using strong WiFi encryption
- Updating Firmware
- Setting up separate networks for guests and IoT
And as always, if you found this guide helpful, consider sharing it with your friends and family.