The Fastest Way to Rename Multiple Files
Last Updated:
Ever tried to copy photos from your phone or camera, only to find thousands of images with names that make no sense?
Or rename thousands of files to adhere to a naming convention?
You might want to remove certain unnecessary characters, or append some new text, change the extension, metadata, date format, and so on.
Making such changes one by one is impractical. It’ll take you HOURS, if not straight up multiple DAYS!!
This is why everyone should try a batch-renaming tool like Bulk Rename Utility (BRU) at least once.
It’s simple enough that anyone can learn to use it in minutes and powerful enough to rename thousands of files in seconds.
Getting Started with Bulk Rename Utility (BRU)
I’ll suggest some alternatives at the end. But I feel that BRU is the best bulk-rename tool for most people, so I’ll use it for demonstration.
Download the setup file from the official site.
There’s a portable version if you prefer that. It provides almost the same features as the installed version.
And there’s a command-line version too if you want to schedule jobs and repeat rename tasks without user intervention (more on that later).
For now, just install BRU and launch it.
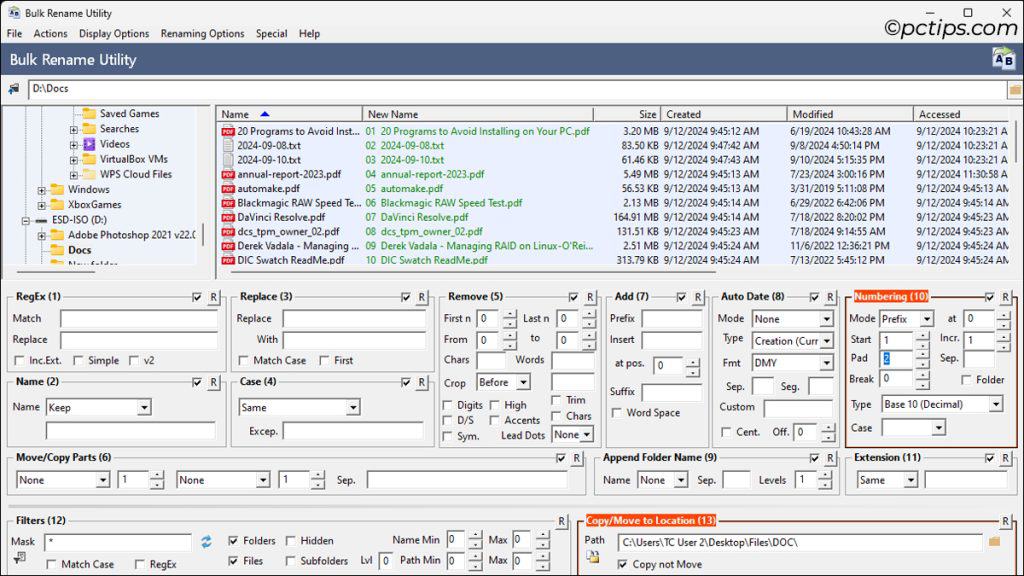
The UI can seem intimidating at first, but trust me, you’ll get used to it in 5 minutes.

Use the directory tree at the top left to locate your files. Select the ones you want to rename.
BRU gives you a preview of new filenames before you commit the changes.
So, don’t worry about accidentally messing things up. Play around with all the options to your heart’s content.
I’ll explain what they all do with real-world examples of when they’re useful.
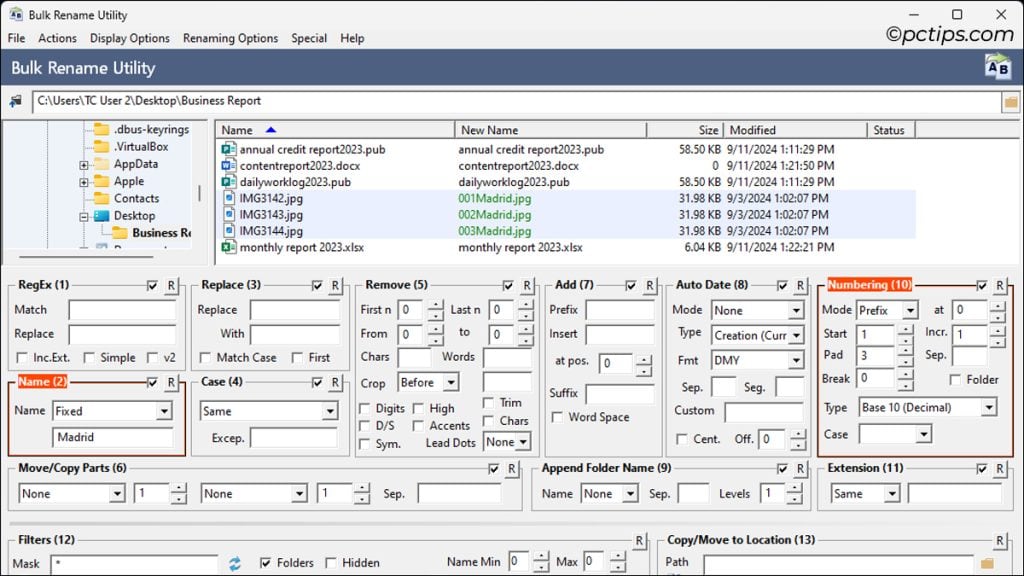
Name
This option lets you operate on the current filename.
- Keep – ensures original filename remains unchanged (default).
- Remove – removes the original filename.
- Reverse – reverses the name.
- Fixed – specifies fixed new name. Useful if combined with Numbering option later (e.g., 001Madrid, 002Madrid, 003Madrid).
Remember what I said – you can preview without applying the changes. So, make sure to try out every option as you read along. Hands-on experience is the fastest way to learn.
Replace
Replaces certain text strings with another.
For instance, I’ve replaced 2023 with 2024 to duplicate and reuse these templates.
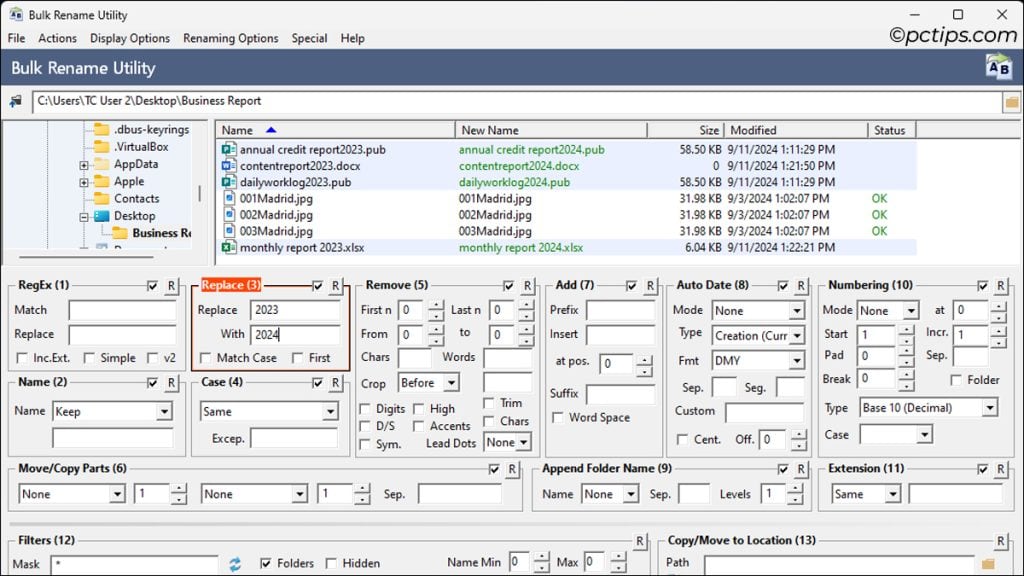
You could change the date format or separator (e.g., 20231015 to 10/15/2023 or 15.10.2023 or 2024/07/11).
Match Case toggles on case-sensitive replacement. And First replaces only the first match.
You can also specify multiple replacements with the pipe separator (e.g., Replace 2023|Report With 2024|Template).
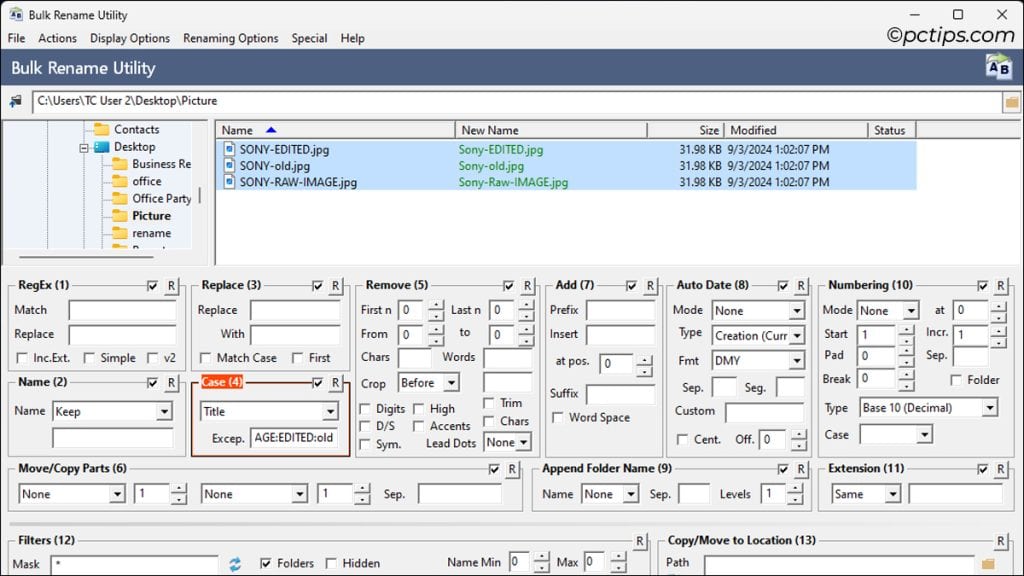
Case
Changes the case of file and folder names.
- Lower – converts all letters to lowercase.
- Upper – converts all letters to capital.
- Title – applies title case. So, all words separated by a space, bracket, or dash start with caps.
- Sentence – applies sentence case. The first word after a full stop is capitalized.
- Title Enhanced – applies title case but with certain exceptions (words like a, an, the, or, on, but aren’t capitalized)
You can also combine Excep. with other options to change the case with exceptions.
E.g., I used IMAGE:EDITED:old as the exception and watch how title case changed the filenames:
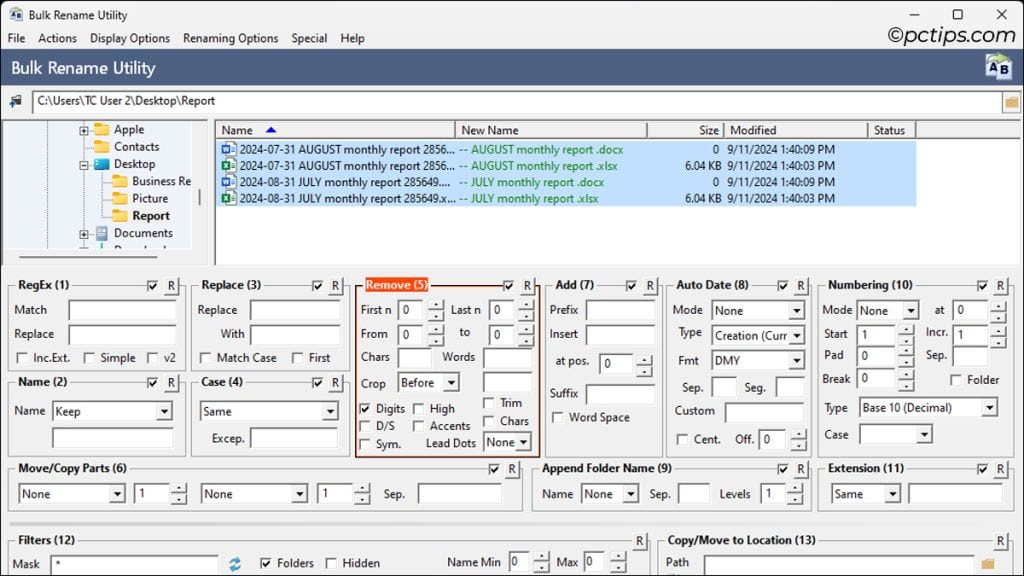
Remove
Removes parts of the filename.
- First n – Remove the first n characters (e.g.,
MustHaveAppsturns intoHaveAppsafter removing the first 4 characters). - Last n – Remove the last n characters.
- From/to – Remove the specified positions (e.g., 5th to 7th characters).
- Chars – Remove specified characters (e.g., remove all occurrences of E, A, $).
- Words – Remove words (separated by spaces).
- Crop – Remove parts after the specified characters. Can also use a wildcard (*) with the Special option.
- Digits – Remove all digits (0-9).
- Trim – Remove leading and trailing spaces.
- D/S – Replace double spaces with single spaces.
- Accent – Replace accented characters with non-accented versions.
- Chars – Remove all characters.
- Sym – Remove all symbols.
- Lead Dots – Remove . or .. from the start of filenames (useful for files from Android, iOS, macOS, and Linux).
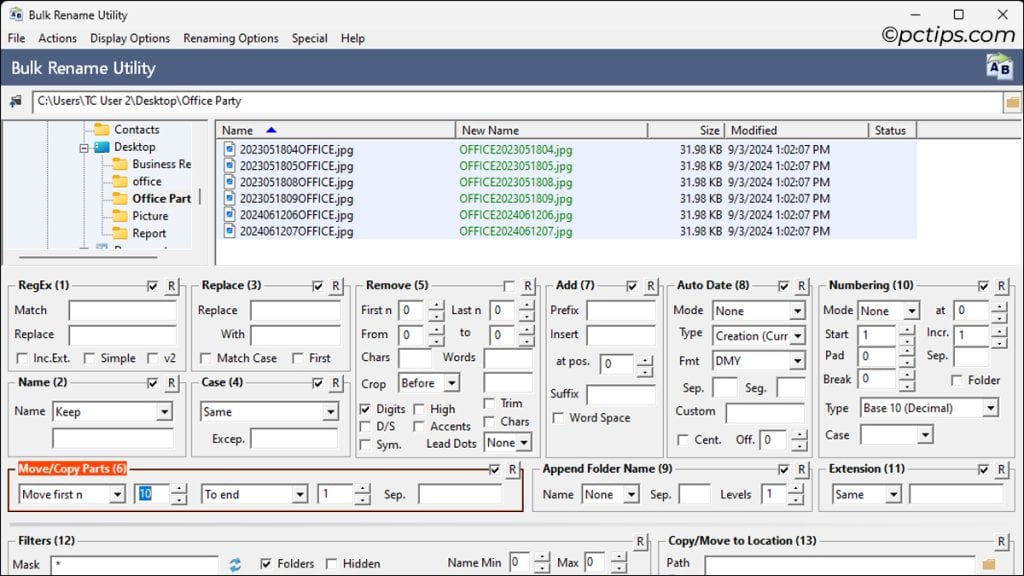
Move/Copy Parts
Moves or copies specified text to a different part of the filename.
For instance, the last 8 characters of your screenshots might be the date.
If the metadata is corrupted, you could move the date to the start to organize the images chronologically.
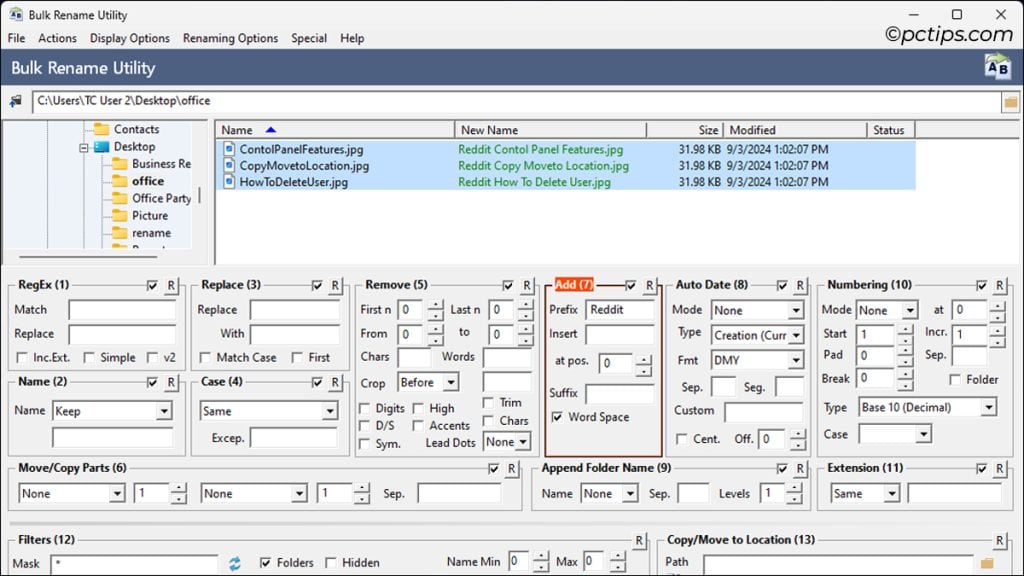
Add
Adds a prefix or suffix to the filename.
For instance, you could add a prefix to group all images downloaded from Reddit or a suffix to all songs from an album.
You can also insert a fixed string at any position with the Insert at pos. options.
And here’s where things get spicy:
The Add option turns from simple to extremely powerful when you use File properties.
Go to Renaming options > ID3 / Exif Data / File Properties from the menu bar. Enable all 3 extract options here and refresh with F5 to fully explore its capabilities.
You can extract tags like photo taken date, song artist, track number, file size, file properties, etc, and use them for bulk renaming.
For instance, enter %z in the Prefix field to add the file size to the start of the file names.
EXIF Tags
When renaming JPEG or other image files that support EXIF, you can use these tags in the Prefix, Insert, and Suffix fields:
%a– Aperture%c– Comments%ma– Camera Make%mo– Camera Model

You can also specify EXIF tags by their property name like so: <(exif:propertyname)>
E.g., select a photo and try adding these tags as the suffix:
<(exif:Make)><(exif:Model)><(exif:ImageResolution)><(exif:DateTimeOriginal)><($exif:DateTimeOriginal)><(#exif:DateTimeOriginal)><(exif:GeoLocation.GPSDateStamp)>
ID3 Tags
For MP3 files, you can extract tags like the Artist and Title for bulk renaming:
%r– Artist%k– Album%t– Title%k– Track No.
Windows File Properties
Right-click a file and select Show List of File Properties.
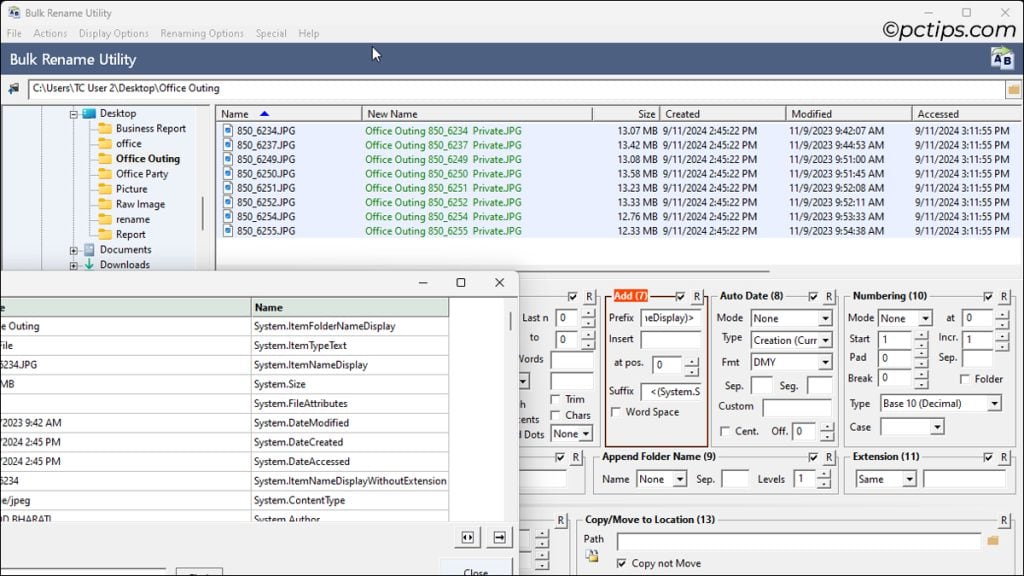
Similar to EXIF, you can use the property names when bulk renaming. E.g.,
<(System.ItemFolderNameDisplay)><(System.Size)><($System.DateCreated)><(System.FileOwner)><(System.SharingStatus)>
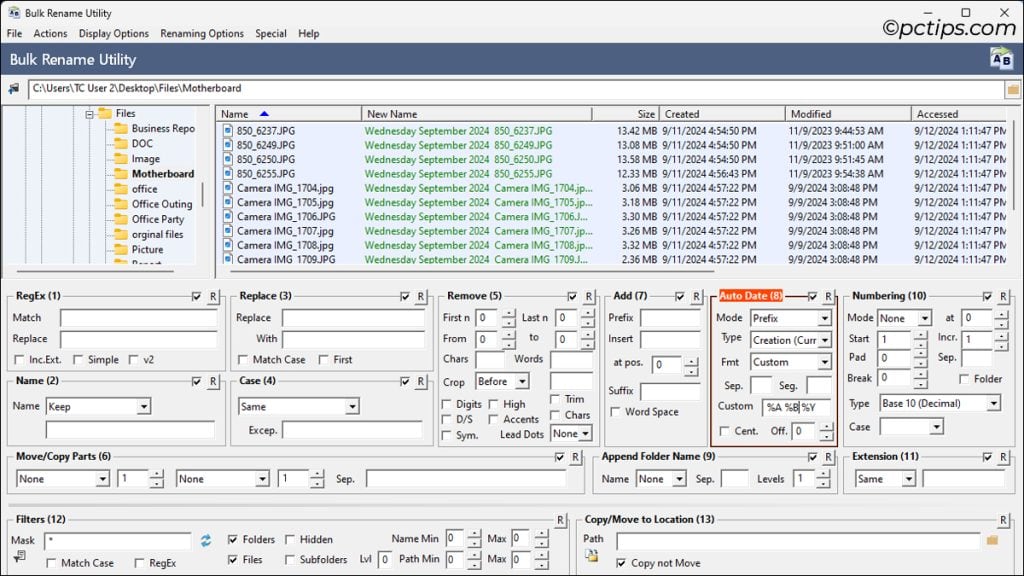
Auto Date
Adds dates to the filename or updates the EXIF data of files.
To change the filename,
- Select the Mode (Prefix or Suffix).
- Select the Date Type (Creation, Modified, Accessed, Taken, Current, Item Date).
- Select the Date Format.
- Add spaces via the Sep. and Seg. fields.
- Use Cent to toggle between 2 or 4 digits for the year.
- Use Custom to append custom date formats like
%A(weekday),%B(month),%z(time zone name), etc.
The date should now be included in the filename.
If you’re trying to change the timestamp of the files, select either Creation (New), Modified (New), or Accessed (New) and rename.
Append Folder Name
Adds the name of parent folders to the filename.
- Pick whether to add the folder name as a prefix or suffix.
- Add a separation character (space, dash, etc).
- Set how many parent folder names to include with levels.
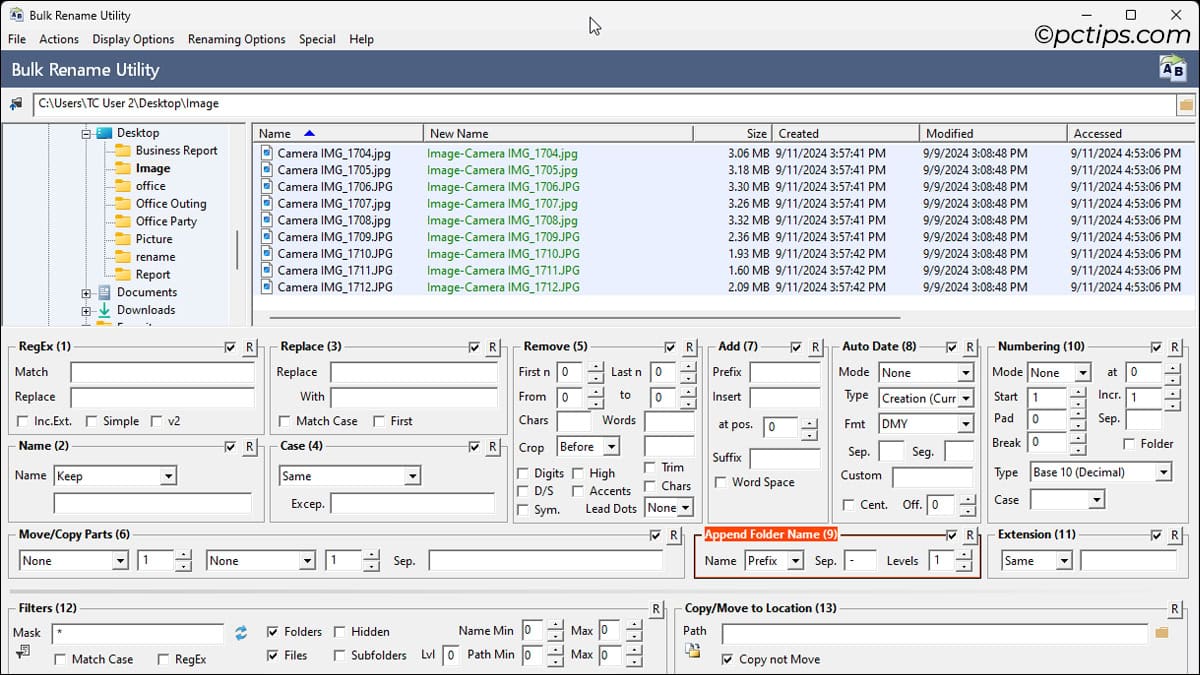
It’s that easy!
Numbering
Adds numbers.
This is an extremely useful feature for grouping and organizing files.
- Select the numbering mode (prefix, suffix, both, insert at specific position).
- Pick the starting number, increments, and separator.
- Padding changes the number of digits.
- Break resets the count (e.g., 2 resets the count when the second digit changes).
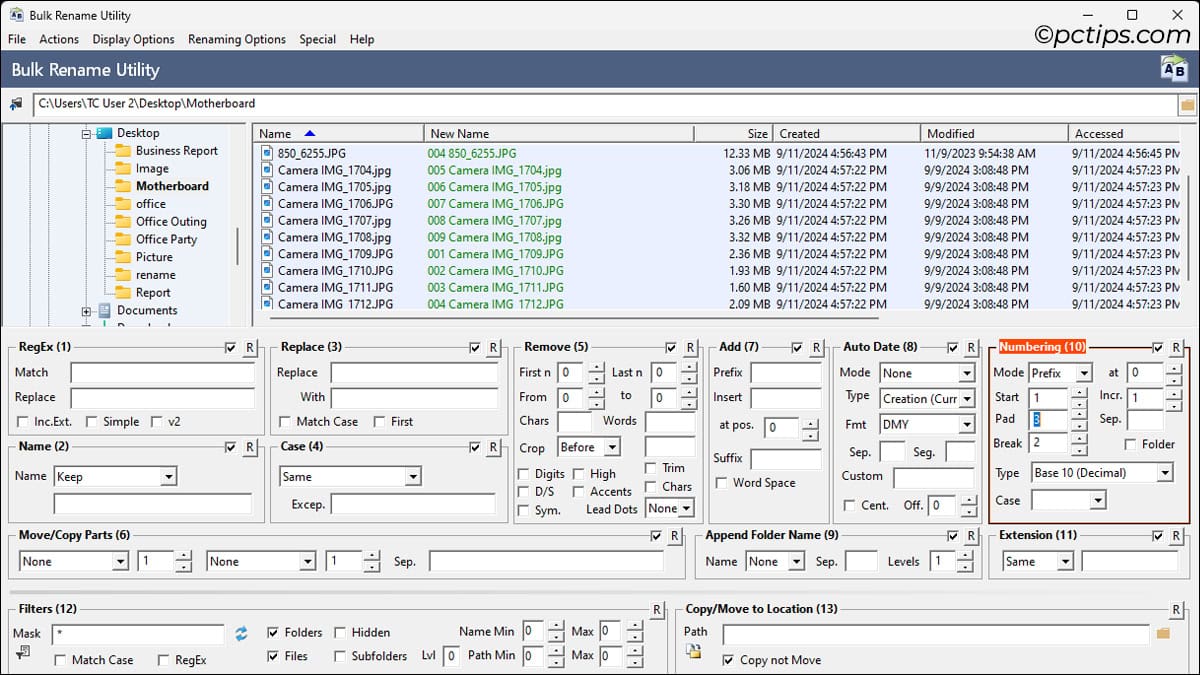
If you have a lot of images with gibberish names, numbering them like this can make them easier to identify and refer to.
Extension
Modifies the file name extension.
People often need a renaming utility to fix a collection of files with messed-up extensions. The Fixed option does exactly that.
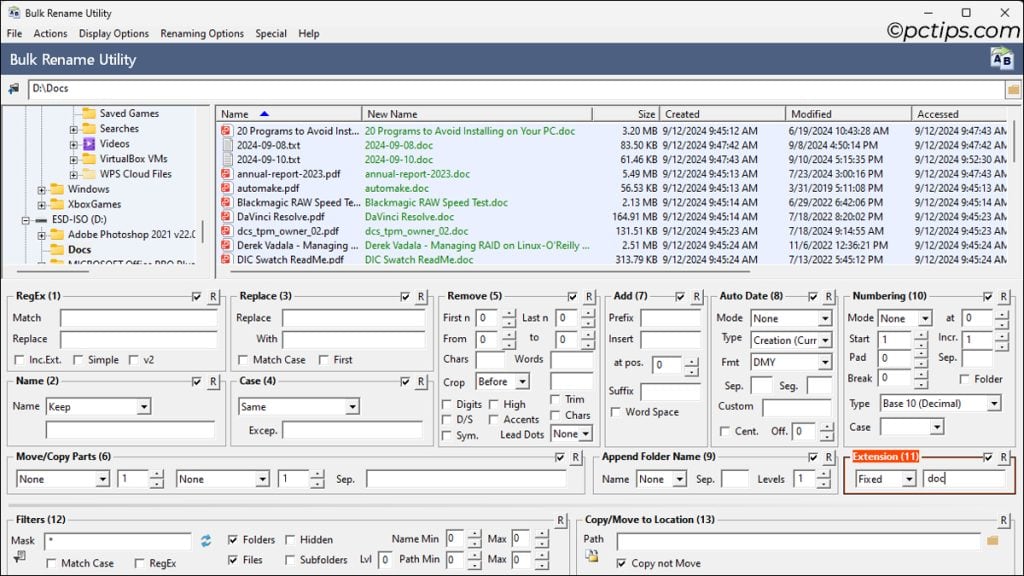
It replaces current extensions with a new one.
The other options can remove file extensions, add a secondary extension, or change the case.
Filters
Controls which files and folders are displayed.
- Mask – The default (
*wildcard) shows all files and folders. You can use other strings and wildcards to control the items shown. E.g.,*.mp4– List all MP4 files.IMG*– List all items starting with the string IMG.“* !*.pdf”– List everything except PDF files.“Sony RAW*”– Use double quotes to search for text with space in between.
- Lvl – Recursively scan up to this level.
- Hidden – Show hidden files/folders.
- Name Min/Max – Only show files/folders with name length within this range.
- Path Min/Max – Only include paths with lengths matching this range.
- Condition – Use Javascript conditions to filter. E.g.,
name.endsWith(/[a-k]/)– Show items that end with ‘a’ to ‘k’.ext.isBlank()– Show items that have no extension.exif('taken').isBetween('the beginning of last month', 'today');– Show items with the EXIF taken date between last month and today.
The Subfolder checkbox is particularly useful when combined with other options.
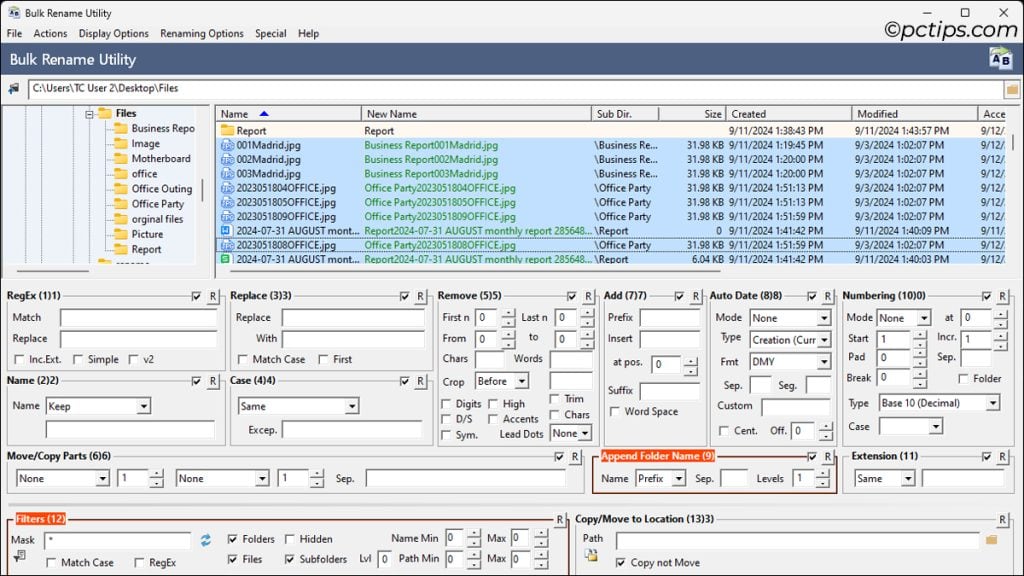
For instance, I’ve seen a lot of people ask how they can rename files inside multiple levels of subfolders at once. They typically want to append the parent folder names to each file.
For that, you could enable the Subfolder checkbox to list all files. Then, select the files, append the folder name, specify the levels and you’re good.
Copy/Move to Location
Copies or moves the renamed files.
Sometimes you’ll want to keep the original files intact. BRU can duplicate files by copying them to a different location and renaming them.
You can also disable the Copy not Move checkbox to move the original files instead of creating duplicates.
Special
Perform special actions on files.
BRU supports 4 special actions.
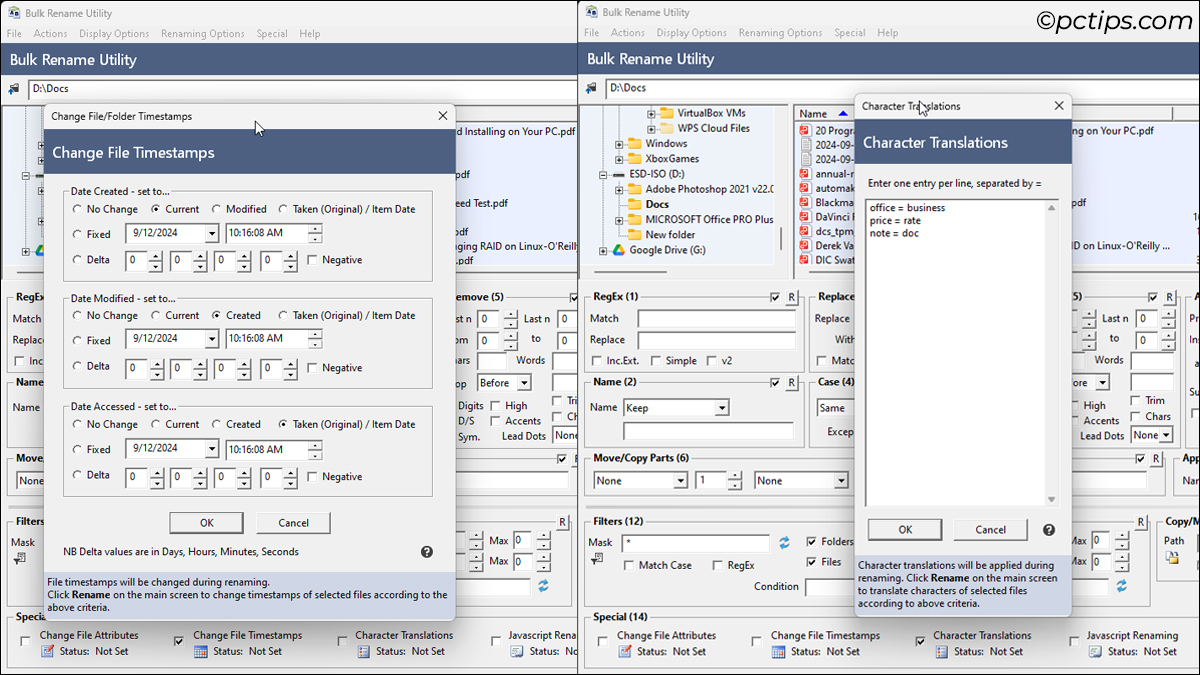
- Change File Attributes: Clear the status or set it to Read Only, Hidden, Archived, or System.
- Change File Timestamps: Change the Created, Modified, and Accessed dates.
- Character Translations: Auto-translate the characters you’ve chosen (e.g.,
$automatically turns intoDollar,040turns intoA, orcopyrightturns into©). - Javascript Renaming: Create powerful JS scripts to rename according to a loop or pattern (100+ examples here).
RegEx
Use regular expression Match and Replace.
RegEx allows for highly customized/powerful renaming based on pattern matching.
I recommend you stay away from this as the renaming options covered so far are more than enough for the average user.
RegEx has a major learning curve and is only worth exploring for those already familiar with it.
However, if you’re up for a challenge, you’ll find 700+ discussions and examples on the BRU forum.
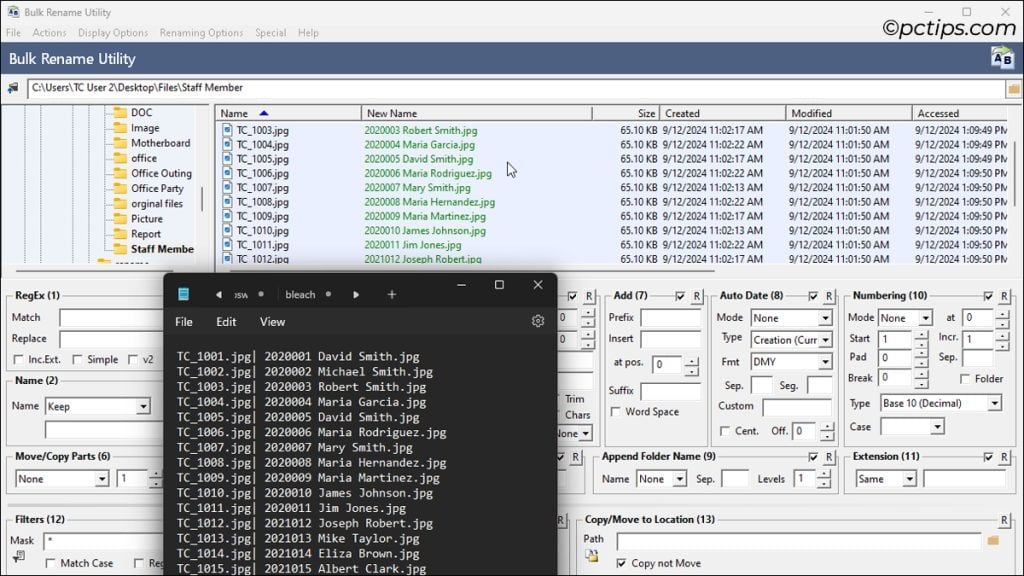
Rename Using Doc or Excel Sheet
If you work with databases (e.g., employee database, student list, customer record), you likely have Excel sheets with thousands of entries.
You might have photographs or documents of these people that are somewhat organized. But the files might be named poorly (e.g., generic photo name like IMG31205).
This is a common real-world problem for professionals.
In such cases, concatenate the columns so that current filename/path and new desired filename line up, separated by a pipe or a comma ( | or , ).
Copy this entire column, paste it into Notepad, and save the file.
In BRU, select Actions > Import Rename Pairs and import the text file.
Select all the files to rename and you should be able to preview the correct names.
The BRU forum has an excellent video guide that demonstrates this full process if you’re interested.
Bulk Rename from Command-Line
If you downloaded the command-line version earlier, you’ll have access to command-line scripting and scheduling capabilities.
The downloaded archive includes a manual as well. Explore it and you’ll learn the parameters to:
- Append date
- Append parent folder name
- Replace name
- Auto-number
- Change case
- Change file attributes, and more
Combine the scripts with the Windows Task Scheduler and you’ll have a powerful tool to handle auto-generated files like log files.
General BRU Tips
Here are some quick tips to improve your BRU experience:
- Assuming you included the context menu feature during installation, you can right-click in File Explorer and select Bulk Rename Here.
- The
Rbutton at the top-right of each section resets the configs. The checkmark toggles the feature on/off. - If you’ve crafted a custom renaming config that you like, you can save it from the File Menu (Save or Favorite).
- Explore the Actions, Display Options, and Renaming Options for more preferences.
- Select Help > Contents for quick help. Refer to the BRU manual for detailed explanations of every single option. If you plan to use BRU for work and want to master it, check out the operations manual vol I and II (extremely in-depth).
What Other Options Do You Have
I can recommend three alternatives:
- DupeGuru: Useful if you’ve got a lot of duplicate files with different names and you want to detect and rename the duplicates only.
- PowerRename: A simpler renaming tool with a less intimidating UI.
- Advanced Renamer: Good if you need cross-platform support (macOS and Windows).
But if possible, I would recommend you stick to BRU.
As I said, the feature-packed UI initially scares away a lot of people. But in reality, the app is super simple to use and anyone can get started with it within 5 minutes.
And the more you get used to it, the better you’ll be able to utilize its powerful renaming capabilities.
If anything confuses you or you need help with a specific renaming task, let me know in the comments!
And if you know someone who might find this tool useful, please consider sharing this guide with them!