How To Troubleshoot Issues With Your Monitor
Last Updated:
I’ve encountered a range of problems with monitors.
The most absurd issue was when the monitor kept turning on and off. I’m not just referring to display going off randomly – it continuously power cycled!
Another unusual incident was when my old LCD display kept flickering after setting custom resolution.
These are just a few.
You could be seeing some other form of messages, visual artifacts, or a just a black screen.
After testing every monitor here at our workplace, I can confirm that these are the top reasons for monitor malfunctions:
- Loose connection or damaged cables/ports
- Mismatched resolution or refresh rate
- Outdated or conflicting monitor/graphics drivers
- Misconfigured display or power settings
- Incorrect selection of input source/projection option
- Issue with PC rather than monitor
Don’t stress! I’ve got you covered, no matter what kind of situation you’re in. But before anything else, let’s get into the basics.
First, Inspect Monitor LED
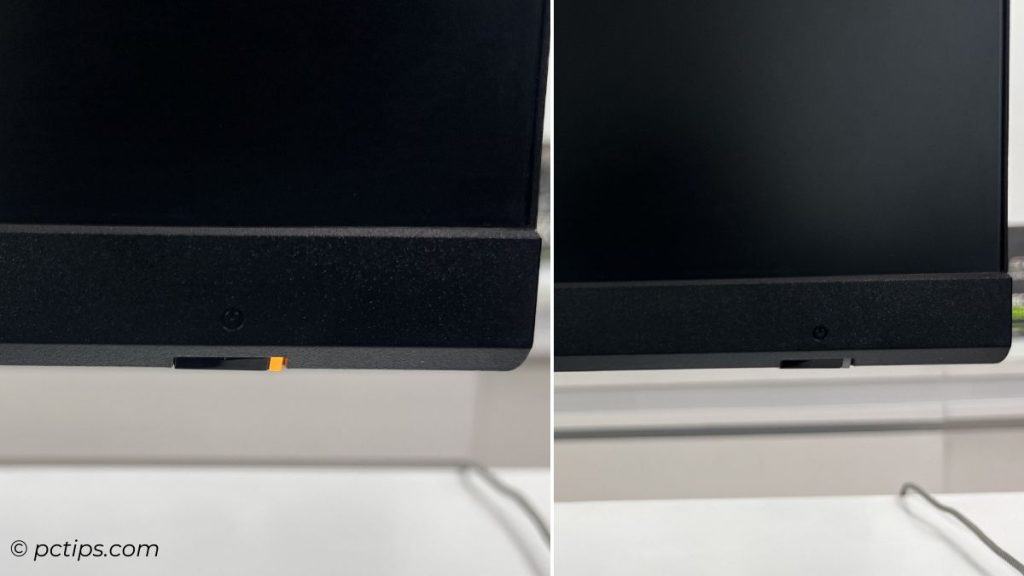
Whenever I face any sort of monitor-related problem, my first instinct is to check the LED. This gives me an idea on which part needs my utmost attention.
Also, do you see an error/message on the screen? This lets you identify the culprit even more easily.
Here are the different scenarios you may encounter:
| LED | Error/Message | Meaning | Problem Source |
| No light | No | Monitor isn’t receiving power | Power cable/port |
| Blinking light | Entering Power Saving or Standby Mode | Monitor is in standby or low-power mode | Input Source |
| Light is on but no display | No Signal, Input Signal Not Found, No HDMI Signal, etc. | Something wrong with the video cable or a problematic input source | Video cable, Input source |
| No | Issue with Windows or the monitor it | Operating System, Drivers, Monitor | |
| Input Signal Out of Range | Old monitor can’t adopt to the high display settings | Refresh rate or resolution | |
| Light is on, there’s display, but an error on screen | Input Signal Out of Range | Secondary monitor unable to keep up with the primary | Refresh rate or resolution |
Basic Troubleshooting Steps
Whatever might be your problem, the following solutions often turn out to be helpful. So, let’s start with that.
- If there’s no LED, try reconnecting the power cable, use a different power outlet, and don’t forget to check the AC-to-DC connection.
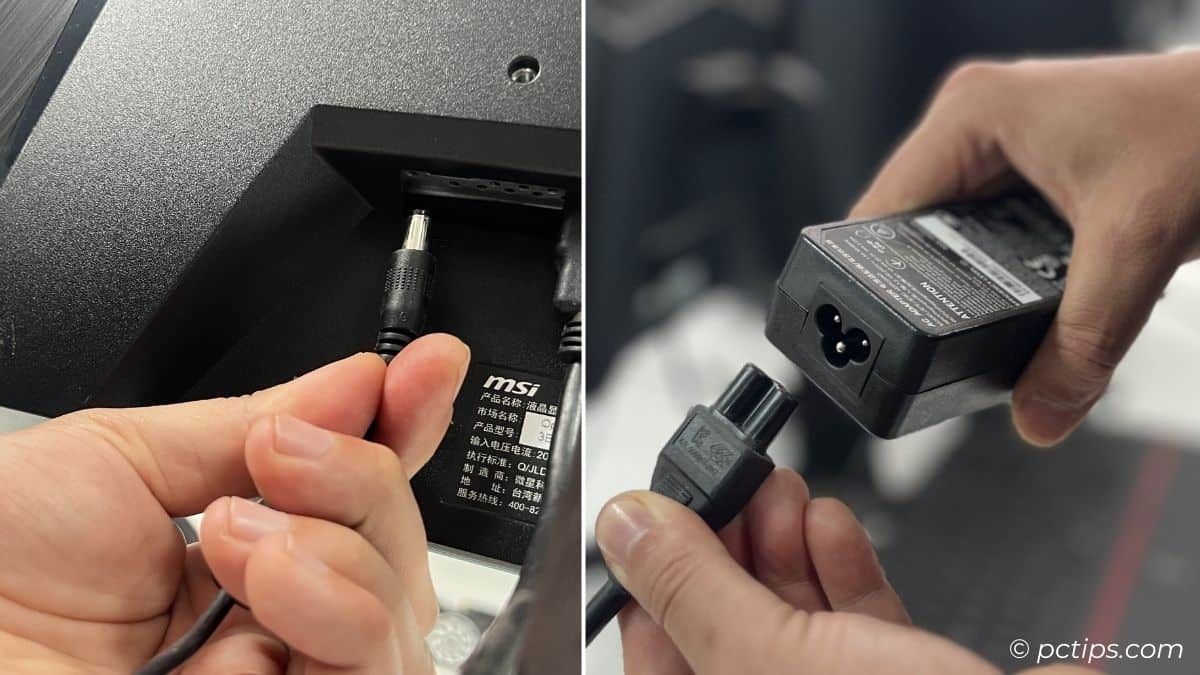
- A faulty power adapter? The only option is purchasing a new one. But a faulty power port means a complete monitor replacement!
- If there’s LED (solid or blinking) but no display,
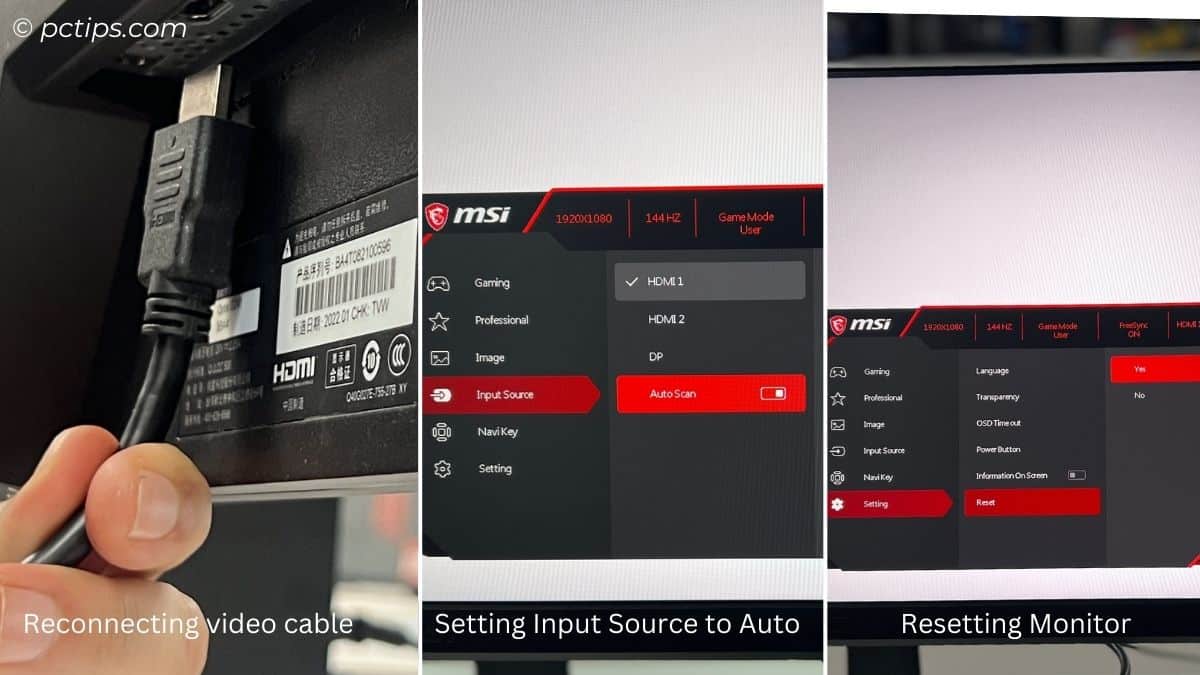
- Try reconnecting the video cable.
- Use the correct adapter (for e.g. DP-to-HDMI and HDMI-to-DP aren’t the same!).
- Change input source from the OSD menu.
- Reset monitor settings from the OSD menu.
- Perform hard reset – turn off monitor, disconnect all cables, and wait 5-10 minutes before reconnecting.
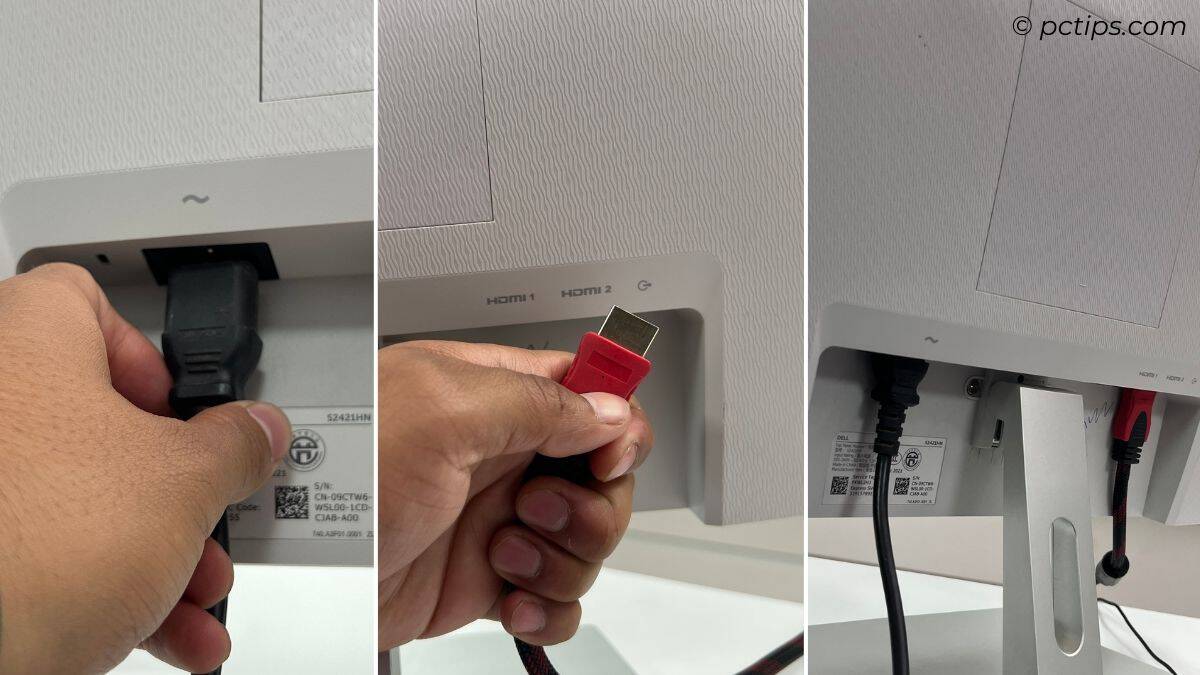
- Notice visible damage with the video port or cable? Try using a different connection.
- But if your monitor had previously short-circuited, it overheats way too much, or has unusual artifacts, that’s a sign it could be failing!
Don’t forget that the issue can lie in the input source too. To verify this, connect your monitor to a different system (for eg, a laptop).
In case it still doesn’t work, there’s something wrong with the monitor itself.
But if the display works this time, your PC is probably experiencing a NO POST issue.
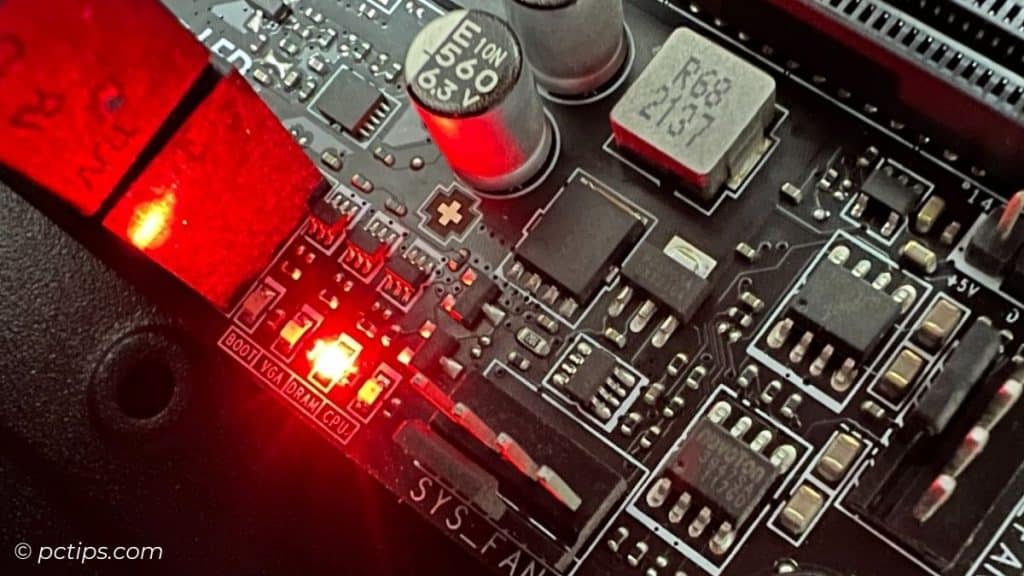
In this scenario,
- Check if you can hear beep codes or see light/hex codes during startup.
- Make sure to use the graphics card port (not the motherboard!).
- Try reconnecting the PCIe cable, replace it (if damaged), and reconnect the card.
- If you’re trying to use the motherboard port, be sure the CPU supports integrated graphics.
- Try enabling IGPU from BIOS.
- Clean and reseat the RAM.
- Try booting with one stick and replace the faulty one.
- New PC build and no display? Try updating BIOS and reassembling the parts.
- Otherwise, contact vendor for support or replacement.
We’ve dealt with all the basic issues. Now, I’ll help you troubleshoot different scenarios one by one. Of course, you may jump directly to the relevant section as well.
PC Turned On But Display Remains Black?
Before we begin, I truly hope that you’ve tried all the mentioned solutions above.
Even if the problem persists, the following solutions can turn out to be helpful.
Restart Windows Explorer
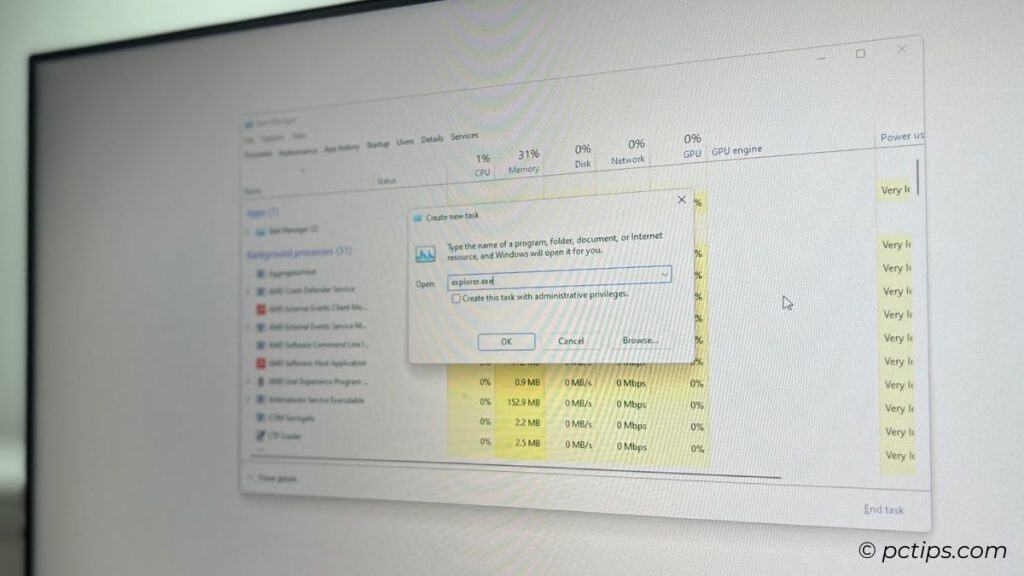
explorer.exe‘ task to fix it.Sometimes, the monitor goes black, white, or even blue. But you’re able to see your mouse cursor.
Thinking of restarting your PC? Yes, that certainly fixes your problem, but let me offer you a much simpler solution:
Open Task Manager (Ctrl + Shift + Esc) > File > Run new task > explorer.exe > hit Enter.
Your monitor should be back to life!
Reset, Update, and Rollback Drivers
No cursor and monitor is just black? I highly doubt there’s something wrong with your graphics or monitor drivers.
Let’s start with the most simple trick – Windows + Ctrl + Shift + B. This resets the graphics driver, fixing possible glitches.
If it doesn’t help, try booting into safe mode or use a spare display device to:
- Update Windows. It should come with the latest drivers.
- Check Advanced options > Optional updates. If you find graphics/monitor driver here, kindly proceed updating them.
- Uninstall the previous drivers using DDU (Display Driver Uninstaller). This is especially the case if you recently changed graphics card.
- Visit the manufacturer’s website > your product’s support page. Find the latest driver, download it, and proceed to install them.
- Rollback your drivers or Windows if your monitor isn’t working after updating to the latest.

Display Randomly Going Black?
As I’ve been saying from the very beginning, check your LED. There can be two situations here:
- It’s just the display that’s randomly flickering (LED stays on)
- Your monitor is turning on and off (even the LED goes on and off)
The aforementioned solutions usually work for the second case. But if they don’t, the power/video cable is showing sign of damage. Replacement is the only option!
I’m having a similar problem with the BenQ EW2440Z monitor at my office. The power cable is loose and it keeps going on and off at random intervals.
Hold on! Check Sleep Settings Too
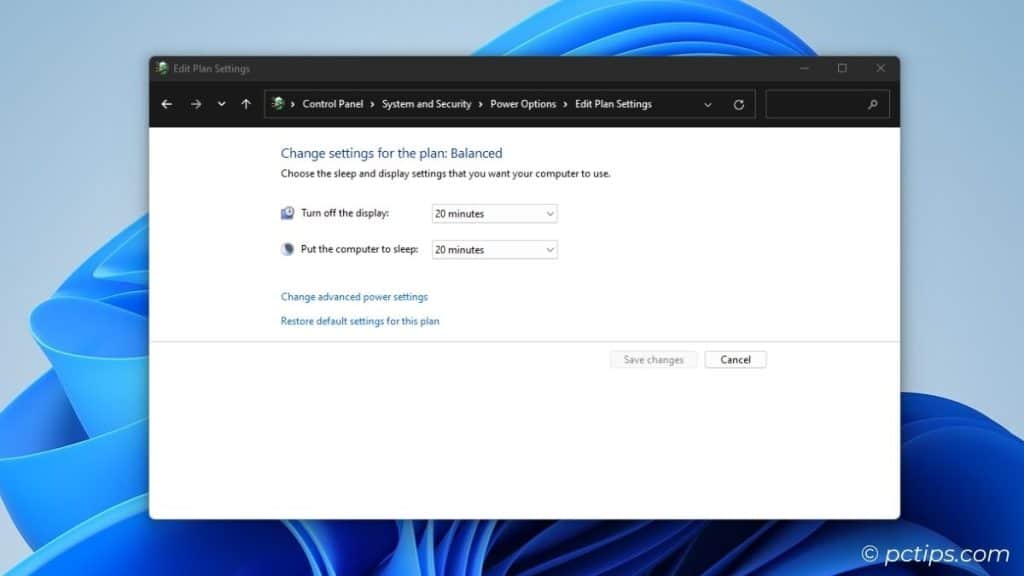
I know this is silly but some of you might have kept the screen inactivity or sleep settings extremely low.
So, it’s a no brainer that your monitor goes black whenever inactive. And you’ll feel like it’s going randomly black. Here’s the workaround:
Run > powercfg.cpl > Change plan settings > Increase ‘Turn off the display’ and ‘Put the computer to sleep’ > Save Changes.
Monitor Says ‘Input Signal Out of Range’
Recently, in my old Viewsonic VA2226w monitor (where I had set custom resolution), the following message appeared after hooking up a second screen:
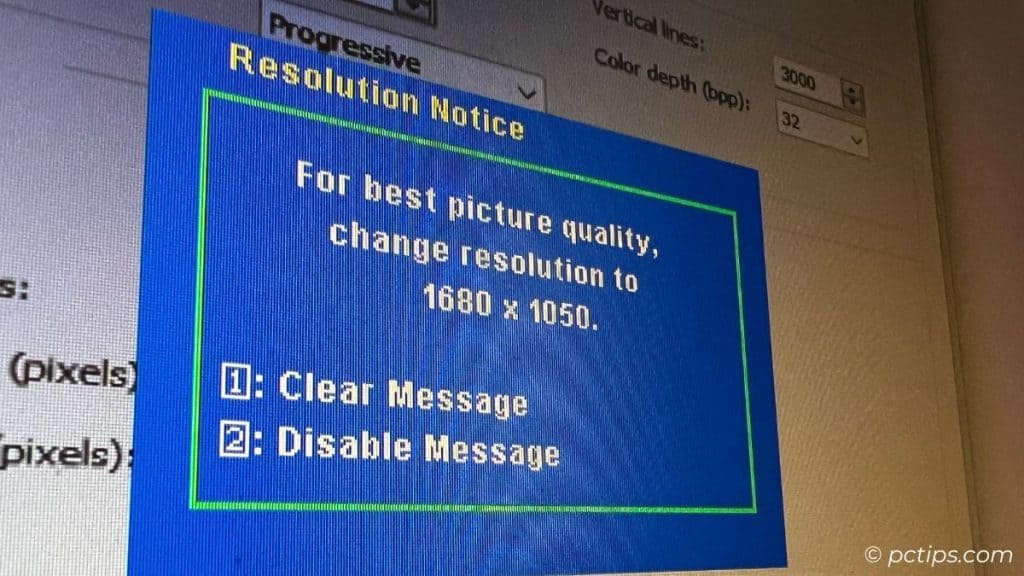
Although the display was working fine, the error kept popping. Big distraction, no?
But in this scenario, the solution is in the message itself. Take a look closely. It either says to change the resolution or refresh rate.
If there’s a black screen with a similar error, enter Safe mode and change the setting from here.
Monitor LED Blinking Continuously?
Some monitors, like my MI Redmi G24 and Dell S2421HN both go to low-power mode once they fail to detect the input source.
It’s even followed by a ‘No signal’ message and the LED light keeps blinking after that.
You see, this is a special feature in monitors to save power when no input source is connected.
So, it’s the same as monitor with no display even if the PC is turned on. To fix this, try all the solution I’ve mentioned above.
Monitor Not Working After Sleep
There can be two possible scenarios here too:
- Case 1: Your PC is itself not waking up
- Case 2: PC wakes up but monitor stays off
Let’s fix case I first.
You need to restart your PC the first time. Then, we’ll change the related setting so that you don’t experience the problem again.
Allow Your Peripherals to Wake Up the PC
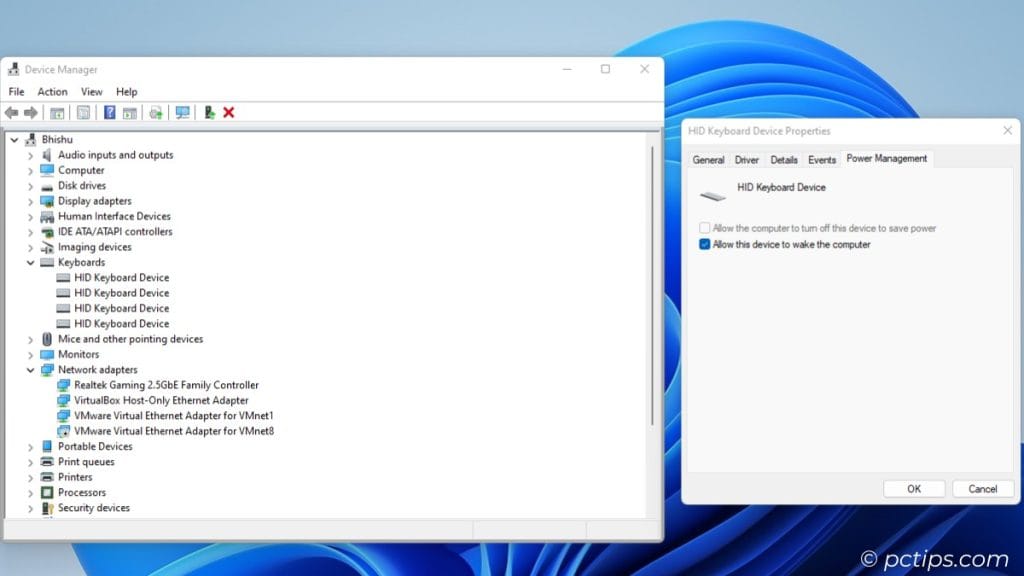
It’s very likely that your peripheral isn’t configured to wake up your PC at all. Here’s what you should do:
- Launch Device Manager.
- Expand your peripheral driver (mouse/keyboard).
- Double-click on each driver to view Properties. Do this until you find the one with Power Management tab.
- Here, ensure the ‘Allow this device to wake the computer’ is checked.
Tweak Advanced Power Settings
Sometimes, power configuration can also conflict with your monitor. This is a rare case but it’s worth changing the settings.
Open Run > powercfg.cpl > Change plan settings > Change advanced power settings.
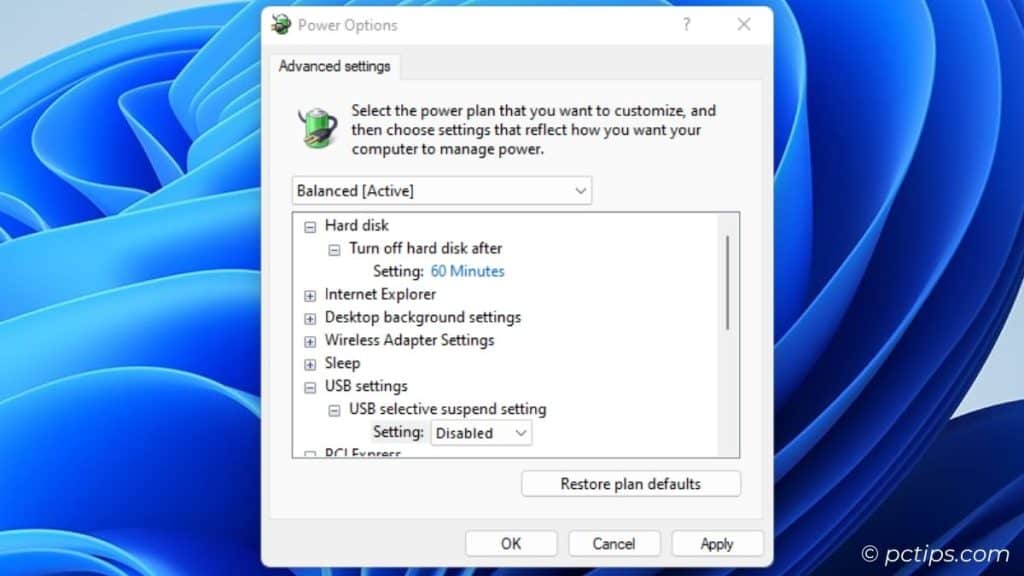
Then,
- Hard disk: Increase time
- Sleep > Hibernate after: Never
- USB selective suspend: Disabled
Disable Fast Startup
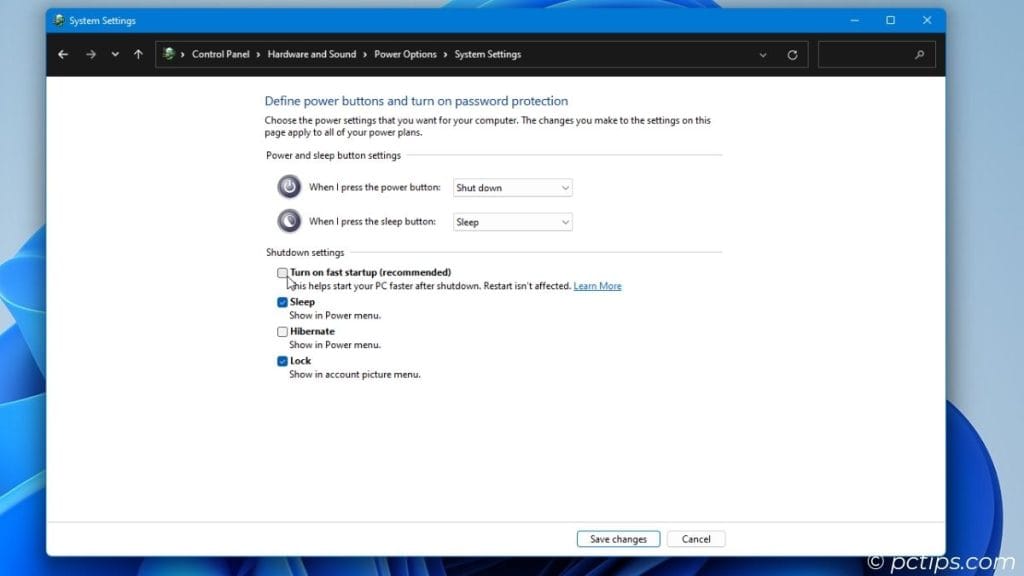
It could be that this feature isn’t able to properly initialize all the connected devices when your PC wakes up from sleep.
Choose what the power buttons do > Change settings that are currently unavailable > Uncheck ‘Turn on fast startup’ > Save changes.
Check Deep Sleep in Monitor
This solution is for case II.
Few monitors come with a deep sleep or standby option. If your PC is waking up but the monitor isn’t, it’s likely that this setting is conflicting with Windows Sleep.
Open up your monitor menu and check for the relevant setting. Turn it off and see if this resolves the problem.
Laptop’s External Monitor Not Working?
Whether your second monitor is not turning on or randomly going black, let me help you troubleshoot it.
Before you proceed, make sure to check all the cables.
Check Projection Options
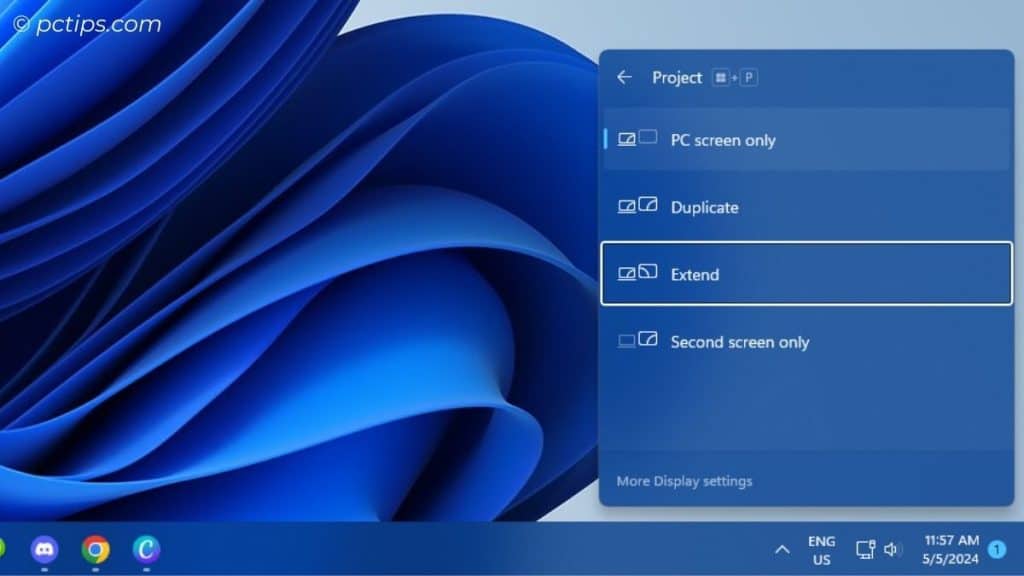
Use Windows + P. See the Project options in the bottom-right corner now?
Set it to Duplicate or Extend.
Already set to one of this? I often toggle from Extend to PC Screen Only and back to Extend, and this solves the problem for me.
Tweak Display Settings
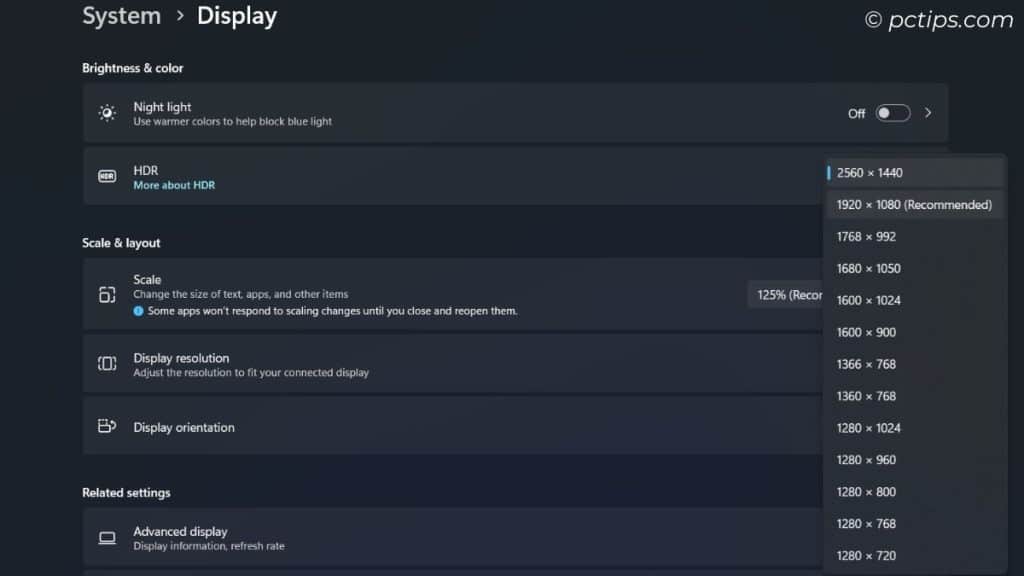
It’s worth noting that even resolution or refresh rate mismatch can lead to this problem.
While most monitors adapt to the setting, others won’t and may lead to black screen.
- Using your laptop screen, right-click on desktop > Display settings. Here, set to the recommended resolution.
- Then, go to Advanced Display and lower the refresh rate. Set the one that your monitor supports.
- Also, try tweaking other settings, like HDR, hardware-accelerated GPU scheduling, and Freesync.
Docking Station Not Detecting Monitor?
In this case, first make sure all the cables from computer-to-docking station-to-monitor are properly connected.
If everything seems fine, here are the important things you need to check.
Ensure Video Compatibility
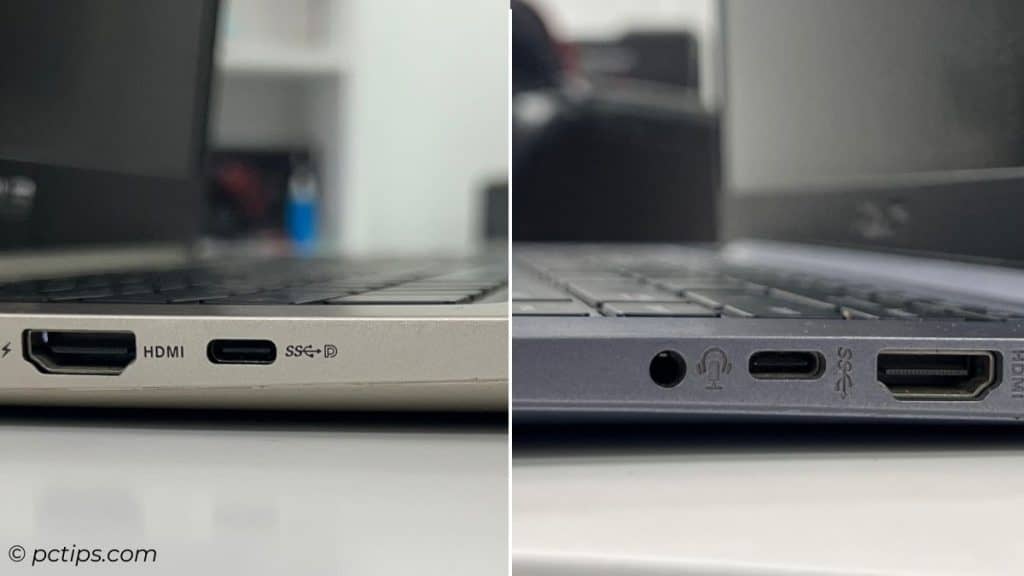
Not all USB-C ports carry video!
My MSI B550M MORTAR motherboard has a USB-C 3.2 Gen 2 port but it doesn’t support video output. Yours could be a similar case.
Look for specifications online to verify this.
In most systems (like my ASUS X580VD laptop), you’ll even find a DisplayPort logo. This indicates that port is support DisplayPort Alt mode.
Use the Correct Port in Dock
Let’s see if you can spot my mistake when connecting three monitors to my laptop:
- Monitor 1 via laptop’s HDMI
- Monitor 2 connected to dock’s HDMI port
- Monitor 3 connected to dock’s USB-C 3.0 port
Something wrong with the third monitor? Yes, you’re right! The 3.0 port doesn’t support video output.
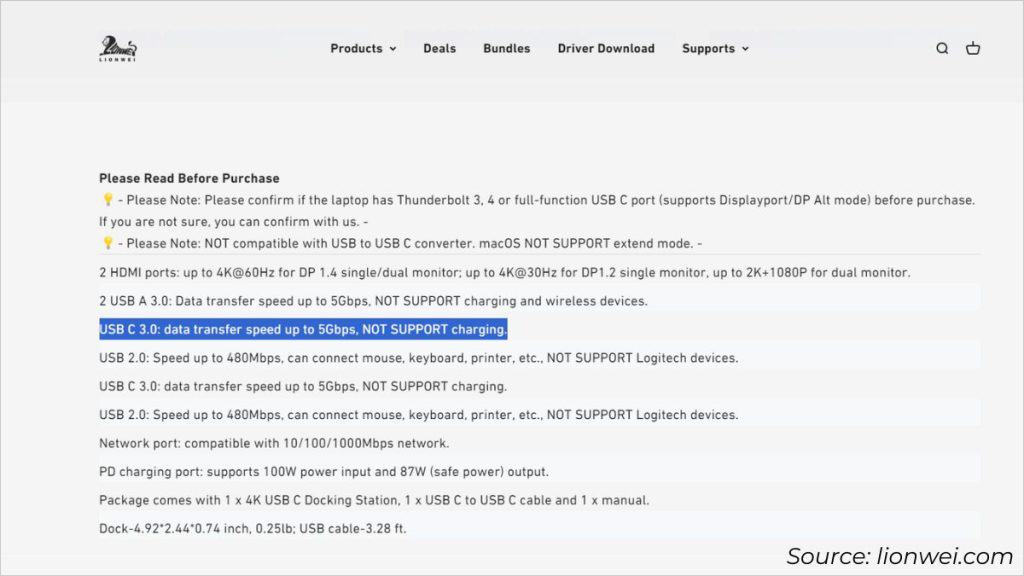
Lucky for me, my Lionwei docking station has a DP port. Now, all three monitors are working optimally.
Update the Firmware and Drivers
While MST and Thunderbolt drivers get installed automatically, you need to manually download the provided software for DisplayLink docks.
Even if that doesn’t help, check the manufacturer’s support page for possible firmware updates.
Check this out! Dell offers a dedicated utility to update your dock’s firmware. It even suggests to update to the latest BIOS and Thunderbolt driver before proceeding.
Dock Still Not Working?
For some, it’s only the monitor that doesn’t work via docking station. In this case, other data-based peripherals (like, keyboard, mouse, flash drive, etc.) all tend to operate optimally.
But what if your dock isn’t detected by the PC (even after updating the drivers)?
Then, it could be either two things – your computer doesn’t support this dock or the device is itself failing.
Interestingly, Dell has even published an entire list to check dock compatibility with different laptops. See if your manufacturer provides this too.
Multi-monitor problems: Additional Display Not Working?
There are still a few things you need to understand when setting up multiple displays. Just connecting them doesn’t necessarily mean they will start working optimally.
Here are a few troubleshooting tips to get your second or third screen up and running.
Basic Solutions First
You’ve probably tried these steps already. But you need to rule them out before proceeding to other fixes:
- Check cable connections
- Update all your drivers
- Make sure your device is capable of multi-monitor support
- Change resolution and refresh rate
Try Force Detecting
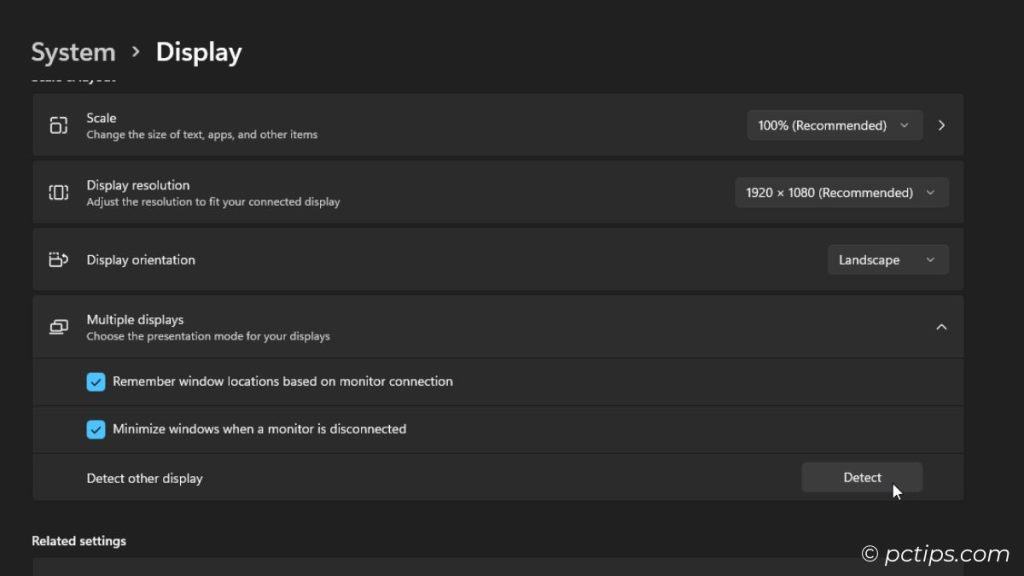
Navigate to Windows Display Setting to see if your monitor is showing up.
Didn’t find one? Expand Multiple Displays and hit the Detect button.
Hopefully You’ve Not Daisy Chained!
When you give this a thought, it sounds too good to be true! Connecting PC to first monitor, then hooking up the second screen to first, third to second, and so on…
Unfortunately, its actual working is far from what we can imagine.
The thing is – daisy-chaining doesn’t work with all cables. It has the following requirements:
- You need Thunderbolt or DisplayPort 1.2 cable.
- Your monitor should support the dedicated ports.
- The monitor should come with the MST (Multi-Stream Transport) feature.
In fact, there’s even mode. Here’s what Dell has to say on daisy-chaining.
It’s funny that you could be trying to daisy-chain using HDMI. Still, you learned something new today!
Monitor With Horizontal Lines or Visual Artifacts
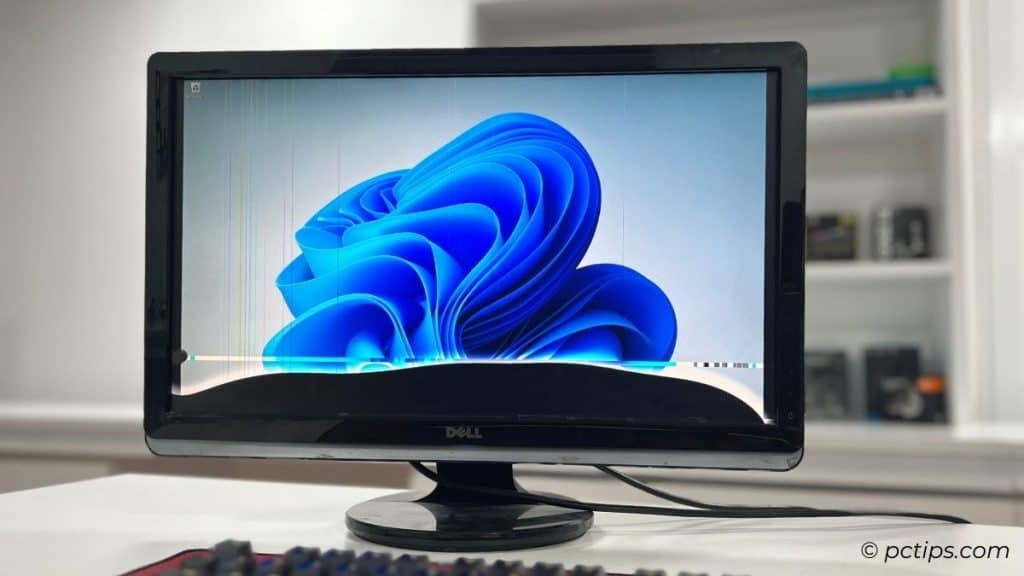
Such an unpleasant visual artifact (as shown above) is definitely a sign of failing monitor. But in some cases, the issue is fixable.
For example, here’s what I experienced on my old Viewsonic monitor:
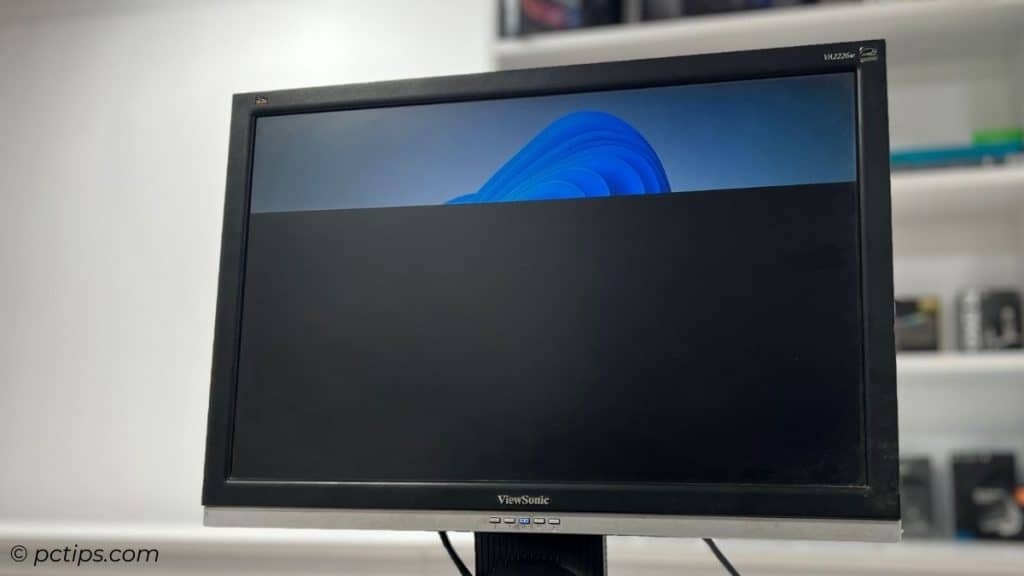
I lowered the resolution to solve my problem.
If the problem persists, try performing soft and hard resets. Also, you can try upgrading to a higher cable version.
New monitor with horizontal signs and artifacts? I still remember when ASUS acknowledged the severe backlight bleeding issue with their ROG Swift PG279Q in 2016.
You see, some vendors may replace the product if the issue is seen prevalent with multiple users.
Still Having Issues?
I did miss out on one important thing above – check your monitor’s user manual too!
Some manufacturers offer dedicated troubleshooting steps for each problem there.
And if this is a new monitor, immediately contact the manufacturer. Your product was probably dead on arrival. They should replace it for sure!
Were you able to solve your problem? Now, bookmark this article so that you can check for solutions again in case you experience a different problem in the future.
How We Tested
For this troubleshooting guide, our team conducted comprehensive testing on twelve different monitors within our workspace and additional units available at our home.
Here’s the complete list:
- MSI Optix G241
- MSI Optix G241V E2
- MSI Optix G273
- Samsung C32HG70QQN
- Samsung LF22T354FHWXXL
- Dell S2421HN
- BenQ EW2440Z
- Dell ST2220L
- Viewsonic VA2226W
- BenQ G2400Q
- MI Redmi G24
- Koorui 27E6QC
As you can see, these monitors represent a diverse range of brands, sizes, and types.
Certain monitors had naturally exhibited specific issues that we were investigating. But in other models, we deliberately simulated different failure modes and errors.
This thorough testing spanned nearly a week and we even consulted professional repairmen and technicians for final validation.