50 Microsoft Word Features That Will Save You HOURS
Last Updated:
Microsoft Word is packed with so many features that people often feel overwhelmed when trying to break out of their old ways.
If that’s you, you’ve landed at the right place.
New Word users can seriously benefit from learning the most important shortcuts.
Veterans can add underrated features to their repertoire like converting and editing PDFs in Word or running macros.
No matter who you are, I’m confident you’ll find some useful features that you didn’t know about before in this guide.
Master These MS Word Shortcuts
Shortcuts are THE place to start if you want to improve at Word. Shift + Arrow keys to select text, Ctrl + B to bold the text, Ctrl + Backspace to delete words; everyone knows the basics.
That’s not what this section is about. Instead, here are some underused shortcuts to try in MS Word:
| Shortcut | Action |
| F4 | Repeat the last action |
| Double-click mouse | Select a word |
| Ctrl + click | Select a sentence |
| Triple-click | Select a paragraph |
| Ctrl + Scroll | Quickly zoom in or out |
| Ctrl + F1 | Show/hide the ribbon pane |
| Ctrl + H | Access the Find and Replace tool |
| Ctrl + Plus | Subscript selected text |
| Ctrl + Shift + Plus | Superscript selected text |
| Ctrl + ] | Increase the font size |
| Ctrl + [ | Decrease the font size |
| Shift + F5 | Find the most recent edits |
| Shift + F7 | Find synonyms in the thesaurus |
| Shift + Alt + Arrow Keys | Switch the position of paragraphs (up or down) |
| Shift + Alt + D | Insert a Date field |
| Alt + Q | Access the search tool |
Switch the Case Instantly
Select a sentence or paragraph and press Shift + F3 to cycle between sentence case, upper case, and lower case.
Or, press Ctrl + Shift + A for upper case specifically.
These are extremely useful shortcuts for fixing case errors in a document.
Enhance Your Writing with Copilot
Copilot is Microsoft’s AI-powered personal assistant for Windows. It’s also integrated into a lot of other services including Word for Microsoft 365.
In this version, Copilot can summarize documents and list the key points to ease your reading.
When writing, it can provide ideas for the topic you’re working on, create an outline, or even write the entire document.
It can also help you rewrite existing content to correct any errors or change the overall tone.
AI is making incredible leaps, and you’ll be able to do even more amazing things in the future with Copilot. This is a tool that you should absolutely learn and keep up with.
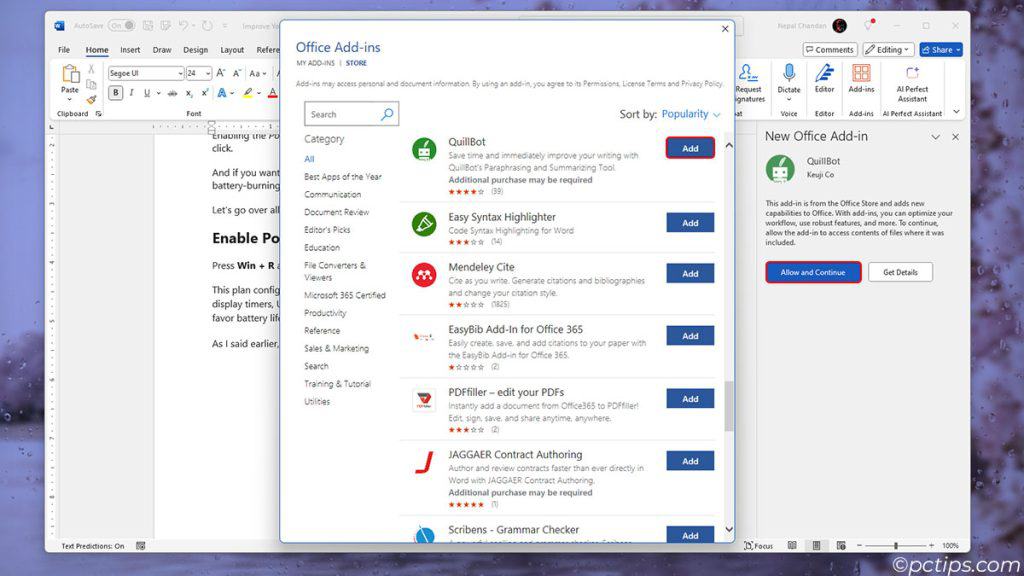
Upgrade Word with Add-ins
The Office store has hundreds of plugins to enhance different aspects of Word.
Research and AI writing assistants, template managers, translators, proofreaders, QR generators, code formatting tools, stock photo providers; I could go on and on.
Go to File > Get Add-ins. Or, click on Get Add-ins from the Insert tab and check out all the ones on offer.
Related: 30+ Must-Have Google Chrome Extensions
Customize AutoCorrect Options
Type (c) and it’ll automatically turn into ©. (tm) turns into ™ and \degc turns into ℃.
Word has hundreds of predefined values like these. Go to Word > Options > Proofing > AutoCorrect Options to check them out.
Word automatically fixes typos that are defined here.
Try filling in the Replace and With sections to add custom autocorrect entries.
If you frequently use certain special characters, you could add easy shortcuts for them here. The same goes for long phrases that you regularly use.

For instance, set it up so that when you type eml, it automatically transforms into your full email address. Or, if you write a lot of tutorials, lmk could change into Let me know if you have any other questions.
Create a few shortcuts like these, and you’ll quickly notice your efficiency rise.
Insert Items Faster with AutoText
You probably know you can insert pictures, shapes, icons, 3D models, charts, and so on in Word.
Try this: select one of them and press Alt + F3.
In the Name section, enter an abbreviation for this item and press OK (e.g., insert a block arrow of the perfect size and name it arrow or whatever you want).
This will save the item as an AutoText building block.
Type in a few characters like arr and press F3 to insert the saved item.
Frequently repeated long phrases, email signatures, shapes and diagrams, pictures; anything that you use a lot, you can insert easily like this.
Insert ASCII or Unicode Characters
Ever needed to use special characters like ©, £, or ∞? I typically use the Character map to insert such non-standard characters.
But there’s an alternative way too.
To insert ASCII characters, hold down Alt and type the character code on the numeric keyboard (e.g., Alt + 0176 to insert the degree symbol).
To insert Unicode characters, enter the character code, then press Alt + X (e.g., type 221A, then press Alt + X to insert the root symbol).
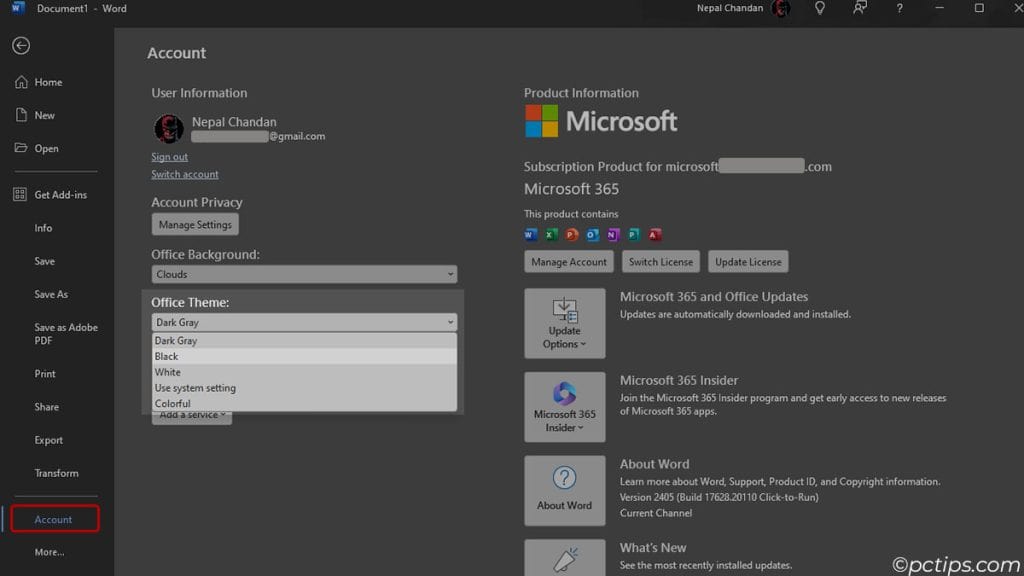
Enable Dark Mode
A lot of people feel significantly less strain on their eyes with dark mode compared to lighter themes. It’s not all anecdotal either; studies have shown the same trend.
But enabling dark mode via Windows Themes doesn’t affect MS Word. This is because MS Word has its own theme settings.
Go to File > Account and select the Office Theme to try it out.
Edit PDFs in Word
Try this: right-click a PDF file and select Open with > Word. Or, drag and drop a PDF to the Word start page.
Word will make a copy of the PDF and convert it to a doc format.
This will allow you to edit the contents and save the edited copy as a PDF again (without affecting the original PDF file).
Export as PDF
Don’t share documents in Word doc format. The document formatting and layout can break on other devices; a common rookie mistake.
Save them as a PDF instead.
Expand the Save as type menu and select PDF to do this.
This will ensure your documents look the same across devices and platforms (Windows, macOS, phones, etc).
Share Documents Easily
Click on the Share from the home tab. Or, go to File > Share and check out all the ways to share documents without leaving Word and interrupting your workflow.

You can upload the doc to OneDrive and send the link via Email. Or, send it as a PDF or XPS attachment.
You can even present this document online directly with the Office Presentation service. You’ll get a shareable link that people can use to tune in to your presentation from their browsers.
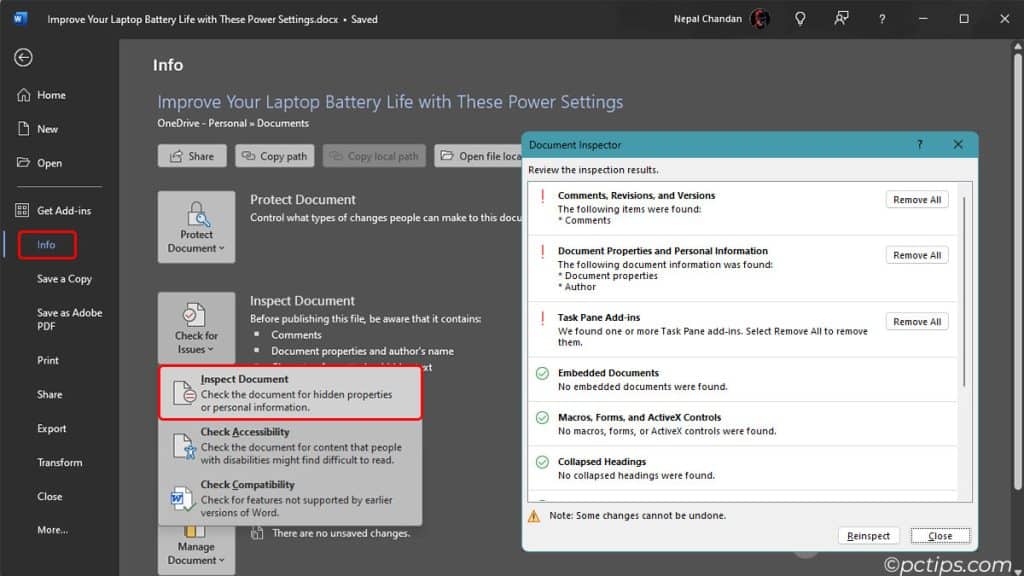
Strip Metadata Before Sharing
Word docs often include content like comments, revisions, hidden metadata, personal info, hidden text, invisible content, etc.
Such content often gets unintentionally leaked when shared.
To ensure this doesn’t happen, always go to File > Info > Check for Issues > Inspect Document and verify that no sensitive info is included before sharing docs.
Password Protect Your Documents
Sensitive private data like financial or medical reports, intellectual property, etc should be password protected at the minimum.
This method isn’t flawless, and depending on how critical the data is, you should consider opting for more secure methods involving 2FA.
But at least it’s a start.
Go to File > Info > Protect Document > Encrypt with Password to try it out.
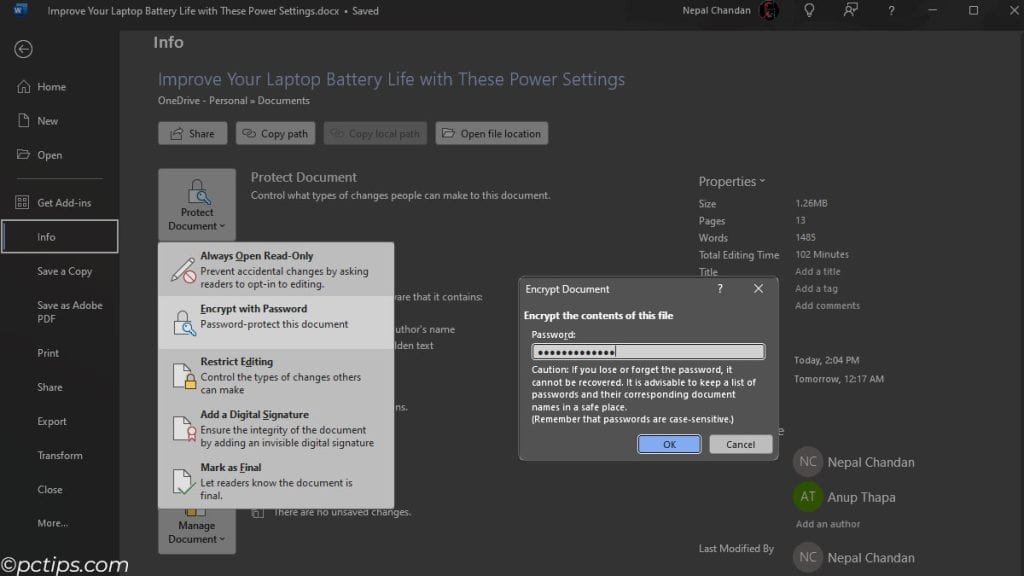
You’ll also find more security features in the same section like restricting editing or adding an invisible digital signature (useful to ensure document integrity and verify the identity of the signer).
Move Text with F2
Ctrl + X and Ctrl + V may not work on some keyboards due to damaged keys. Or, you may be using those hotkeys for other purposes.
In such cases, here’s an alternate way to move text:
Highlight a text block and press F2.
Move the cursor to where you want to paste the text, then press Enter.
Paste Items from the Clipboard
Much like the Clipboard History feature in Windows, a lot of people don’t know about Word’s clipboard.
Click on the dropdown arrow next to Clipboard to check it out.
The items you’ve copied are stored in up to 24 different slots here.
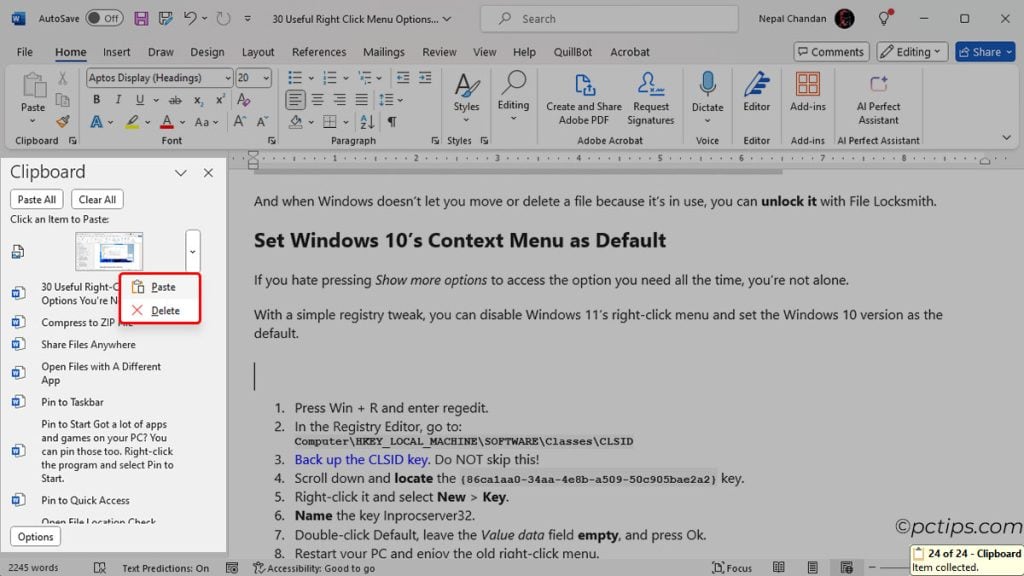
That’s right, the stuff you copied an hour ago is still stored here. This is pretty handy when you need to store and paste multiple items.
Move Content with the Spike
Spike is a special AutoText entry for reorganizing the contents of a document or assembling content from multiple sources.
Try this: select a block of text and press Ctrl + F3 to cut it. Add a few more blocks to the spike like this.
Then, press Ctrl + Shift + F3 to empty the spike and paste all the content copied so far.
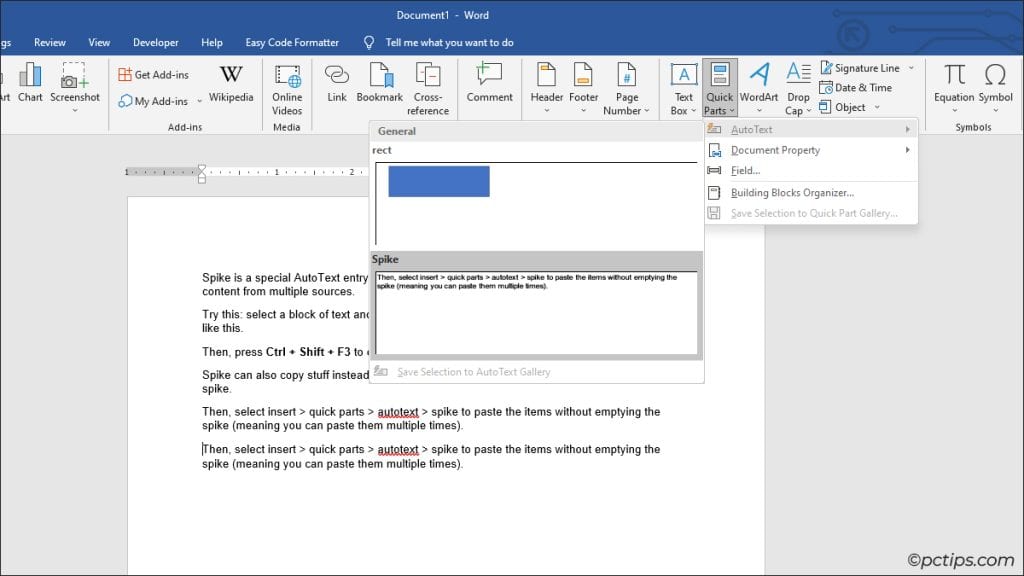
Spike can also copy stuff instead of cutting. Press Ctrl + F3, then Ctrl + Z to copy items to the spike.
Then, select Insert > Quick Parts > AutoText > Spike to paste the items without emptying the spike (meaning you can paste them multiple times).
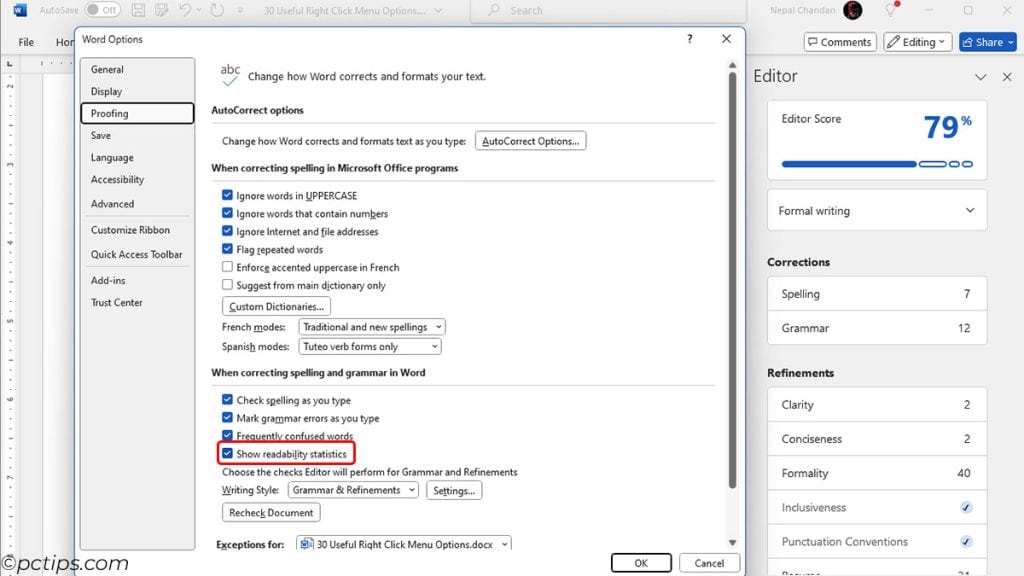
Enable Readability Stats
Readability is an important metric for any kind of writing (especially for web content).
Go to File > Options > Proofing and enable the Show readability statistics checkbox.
Now, press F7 and deal with any spelling & grammar errors.
Word will display your document’s readability stats afterward. Make sure they’re in line with your audience’s reading level.
Use AI to Refine Your Document
Pressing F7 in certain Word versions like Word for Microsoft 365 brings up the Editor.
It’s an AI-powered writing assistant that can suggest ways to improve spelling & grammar, clarity, conciseness, formality, vocabulary, and more.
Try this: highlight some text, right-click, and select Rewrite Suggestions.
No need to repeat the same phrase/expression throughout your article anymore!
Customize Grammar Style
Writing styles can vary a lot depending on the writer and platform.
Bloggers tend to use concise sentences with slang and inclusive language. Academic writers stick to formal language, but their sentences tend to be wordy.
Go to File > Options > Proofing and click on Grammar Settings to customize such preferences.
Now, Word won’t raise incorrect flags as much as before.
Collab Online with Other Authors
Word for Microsoft 365 lets you coauthor documents online in real-time.
Save your document in OneDrive and share the link to try this out.
You’ll see the changes every author is making instantly.
Bookmarks and Comments
Bookmarks can help you mark and quickly access important locations.
Similarly, comments can denote your thoughts on a section and what kind of changes it might need.
If you collaborate with other writers or editors and work on long documents, you’ll find these features especially useful.
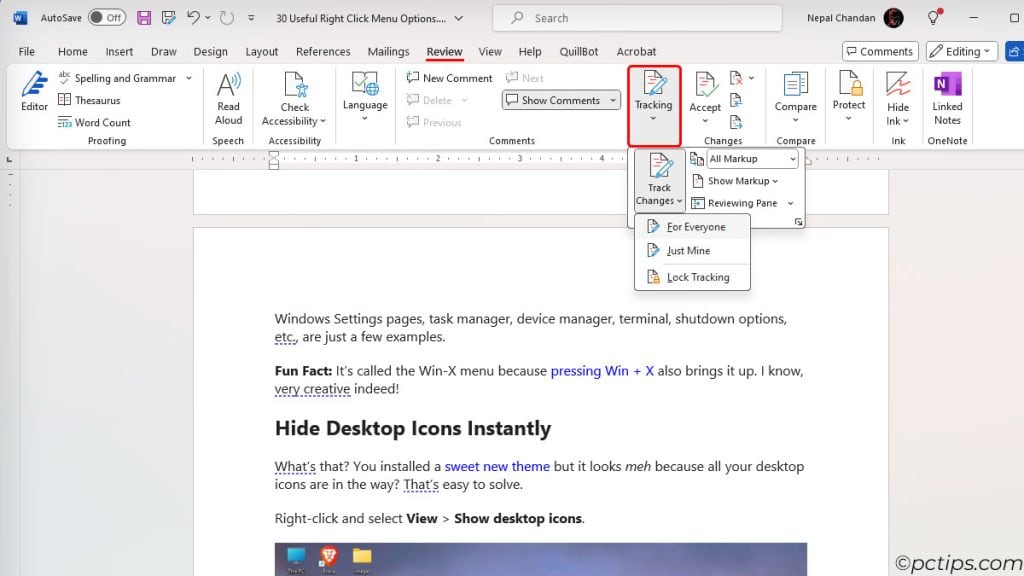
Track Changes
When editing long documents and collaborating with others, you’ll likely make a lot of changes.
Comments and bookmarks can help mark the changes, but there’s a better way.
Go to the Review tab and click on Track Changes.
Now, you have a much better way to keep track of every single change by different people.
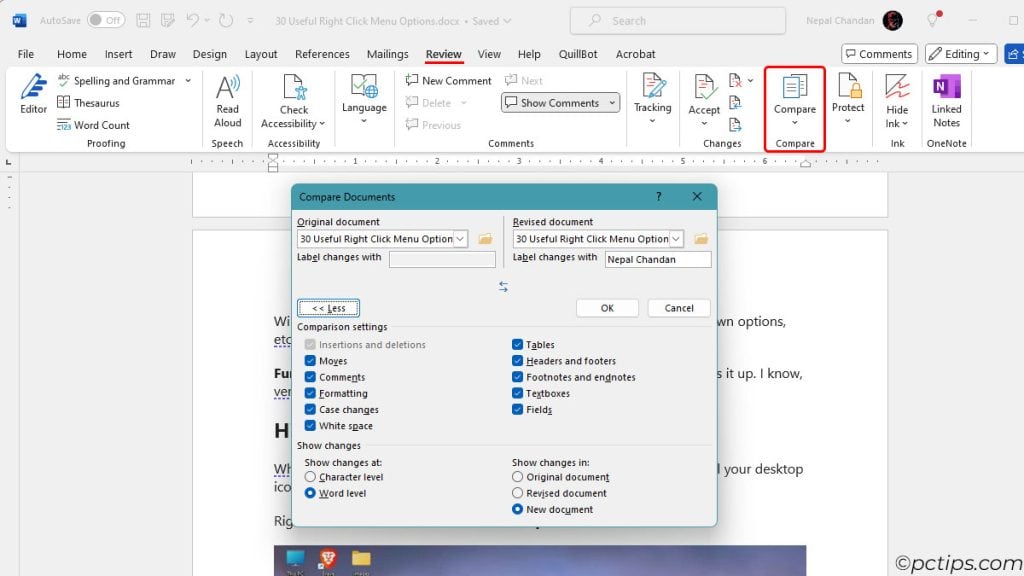
Compare & Combine Documents
Sometimes, you’ll have two different versions of a document, both created by yourself or one of them by someone else.
With short documents, it’s possible to manually check, compare, and combine them.
But with lengthy ones like legal documents or novel drafts? No chance!
In such cases, go to Review > Compare and use the Compare and Combine tools.
Take Linked Notes
If you use OneNote for research and note sharing, you’ll be happy to know that it’s built-in to Word via the Linked Notes feature.
Try it out from the Review tab.
You might take notes while researching multiple Word documents. You might also take notes from other sources like web pages or PowerPoint presentations.
All of the notes will be organized and easily accessible from one location in OneNote.
Research with Smart Lookup
Word has a built-in Bing search tool for when you need to quickly look up something without opening an entire browser and getting distracted.
Highlight a word, right-click, and select Search to try it out.
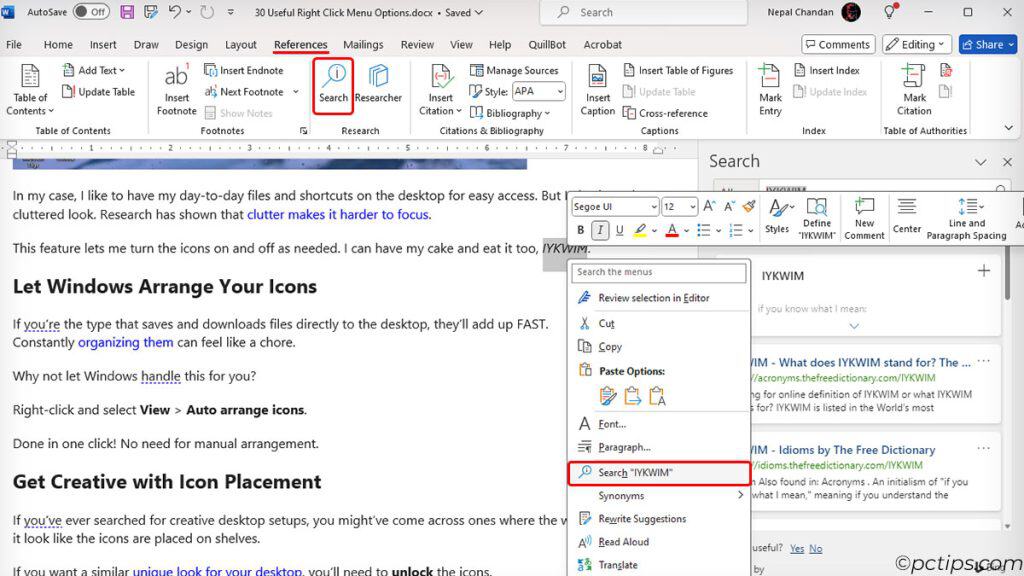
You can also access it from the References tab. The benefit to this method is that in some Word versions, you’ll also find a feature called Researcher here.
Enter any topic and it’ll suggest relevant resources and help you find and cite sources. It’s a very helpful tool, especially for academic research.
Related: 30+ Google Search Tricks You’ll Wish You Knew Sooner
Translate with Microsoft Translator
Word has a built-in version of Microsoft Translator. It’s useful for quickly translating certain phrases to/from another language.
Select some text, right-click, and select Translate to try it out.
Or, go to Review > Translate to translate the entire document.
Proofread with Read Aloud
Having another voice read a document out loud is invaluable for proofreading and identifying blindspots that you wouldn’t have found yourself.
Word has some narrator features to help with this.
Go to Review > Read Aloud to narrate the entire document.
Alternatively, you can narrate specific sentences or sections with the Speak tool.
Go to File > Options > Quick Access Toolbar. Choose commands from All commands, select Speak, and Add it.
Now, highlight some text and click on Speak from the quick access toolbar.
Some Word versions also support the Immersive Reader feature in the View tab. It lets you manage the page color, text spacing, syllable breaks, etc to craft a more immersive reading experience.
Type with Your Voice
Here’s the opposite feature – voice dictation.
Click on Dictate from the Home page or press Alt + `.
Use this feature to quickly jot down your thoughts, create a rough draft, or even write the entire document vocally, whatever suits your fancy.
Safe Mode
If you’re a long-time Word user, you’ve likely had to deal with corrupt templates or add-ins at some point.
Safe Mode will open Word with the default configs, letting you bypass and troubleshoot such problems.
Press Win + R and enter winword /safe to launch Word in safe mode.
Related: 100 Run Commands Every Windows User Should Know
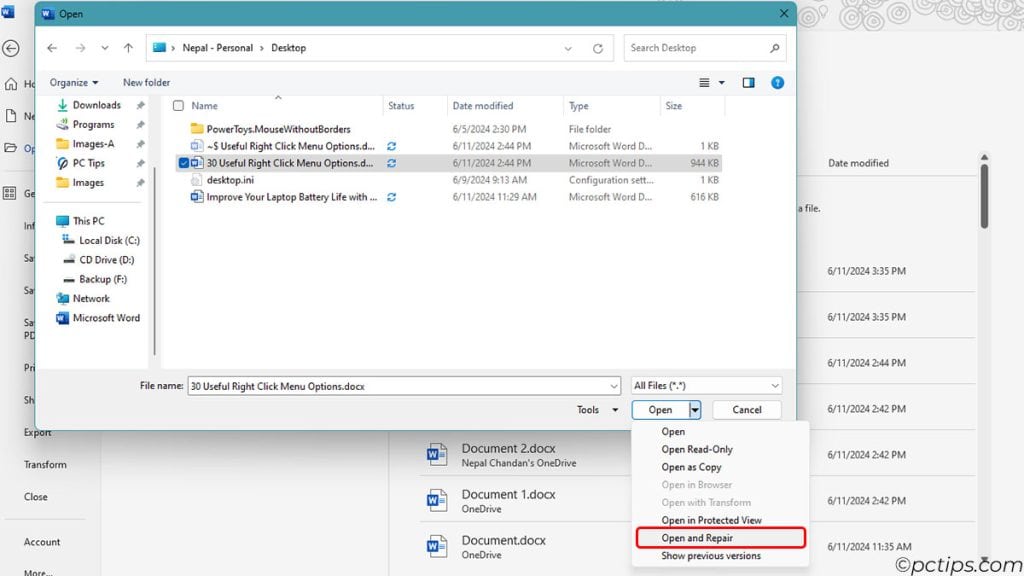
Repair Corrupt Word Docs
Sometimes, it’s the document that’s corrupt rather than Word. If it was the only copy, you might be worried that you’ve lost your data. But don’t lose hope just yet.
In Word, go to File > Open > Browse.
Select the file and try the Open and Repair option.
AutoRecover Files Manually
The PC abruptly shuts down or Word crashes and all the unsaved work is gone; I’m sure most of us can relate.
Word generally suggests an auto-recovered version on the next launch, but this doesn’t always happen.
In such cases, go to File > Options > Save.
Click on Browse next to the AutoRecover file location and try to locate the file manually.
Increase AutoSave Frequency
Go to File > Options > Save once again.
Here, consider reducing the Save AutoRecover Info frequency to as low as 1 minute.
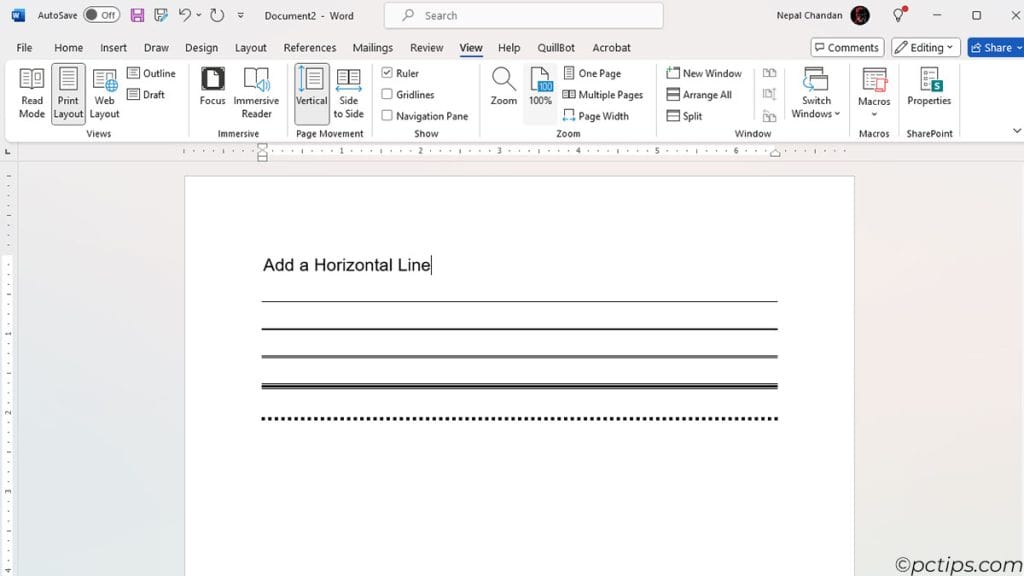
Add a Horizontal Line
Sometimes you’ll need a horizontal line to separate sections. Use these methods to insert the right type of separator:
- Three hyphens ( – ) then press Enter for a normal line
- Three underscores ( _ ) for a thicker single line
- Three equal signs ( = ) for a double line
- Three hashes ( # ) for a triple line
- Three asterisks ( * ) for a dotted line
Remove the Gap Between Pages
By default, pages are separated by a large gap (page break & white space for header and footer).
Double-click the gap to stop displaying the top and bottom margins.
This may not look as good, but it’s way better for readability.
Use the Correct Type of Break
Many new Word users use Enter as the only way to break up text. But this can mess up the layout when editing the document later.
Learn these basic shortcuts and you’ll save your editor and yourself many headaches:
Enter: Paragraph breakShift + Enter: Line breakCtrl + Enter: Page break
Show Formatting Marks
If the formatting is already messed up and you can’t figure out why, enabling the formatting marks can help.
Press Ctrl + Shift + * or click on the Show marks button from the Home tab.
Now, you can ensure that the formatting is correct and consistent throughout the document.
Paste Without Formatting
Word doesn’t support Ctrl + Shift + V to paste without formatting.
Due to this, I’ve seen people copy web content to Notepad, and then copy it to Word. I’m not judging, but there are more efficient ways.
Use the Ctrl + Alt + V shortcut to paste without formatting.
Or, select a text block and try Ctrl + Space to remove character-level formatting.
It’s also possible to set Keep Text Only as the default paste method.
Go to File > Options > Advanced and configure the Paste preferences in the Cut, Copy, and Paste section.
Now, you can use Ctrl + V to paste text without the formatting.
Related: 30 Must-Know Notepad Tips for Windows Users
Copy Formatting with Format Painter
If you want to copy formatting from one section to another instead, there are multiple methods.
Select the source text and press Ctrl + Shift + C. Then, select the target text and press Ctrl + Shift + V to apply the source formatting.
Or, put the cursor on the source and click on Format Painter (home tab).
Now, just paint over whatever other section you want to convert.
Double-clicking Format Painter allows you to paint multiple times.
Advanced Find and Replace
Finding a specific section in a long document is often akin to looking for a needle in a haystack.
If you don’t want to waste your time, learn to use the Find and Replace tool.
Press Ctrl + H to bring it up and expand the Search options with the More >> button.
Apply filters like case match, prefix match, and wildcards. Or, search based on styles and fonts.
Related: Find Files INSTANTLY With Everything
Try Different View Modes
Word loads to the Print Layout by default, most people never bother trying out the other view modes. But if you frequently use Word, they can serve you well.
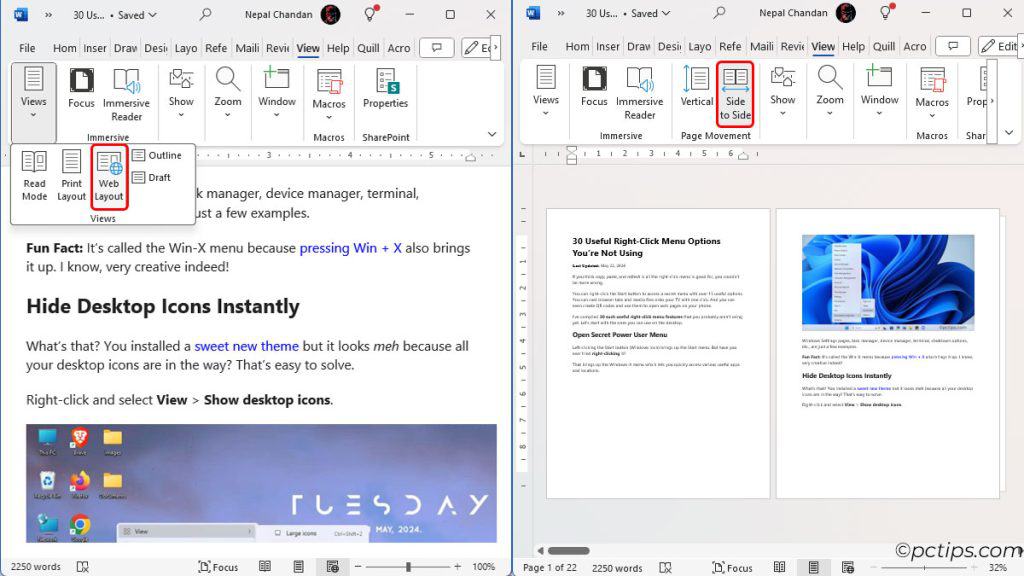
Read mode replaces the writing tools and menus with ones for reading, and optimizes the page for the same.
Web layout emulates how the document would look as a webpage.
Outline view displays the contents as bulleted points and is useful for rearranging the document and creating subsections.
Side to Side is useful when you want to work while comparing two pages next to each other.
Multiple Pages lets you work with even more pages simultaneously.
Focus mode hides all the unnecessary menus and lets you work without distraction.
There are also the Arrange all and Split views, ruler and gridline tools, and more. These features are worth trying out; don’t sleep on them like most people.
Quick Tip: You can also press Ctrl + F1 to hide the Ribbon pane.
Explore the Insert Options
You may be used to inserting tables, shapes, and pictures in Word. But Word can do a lot more.
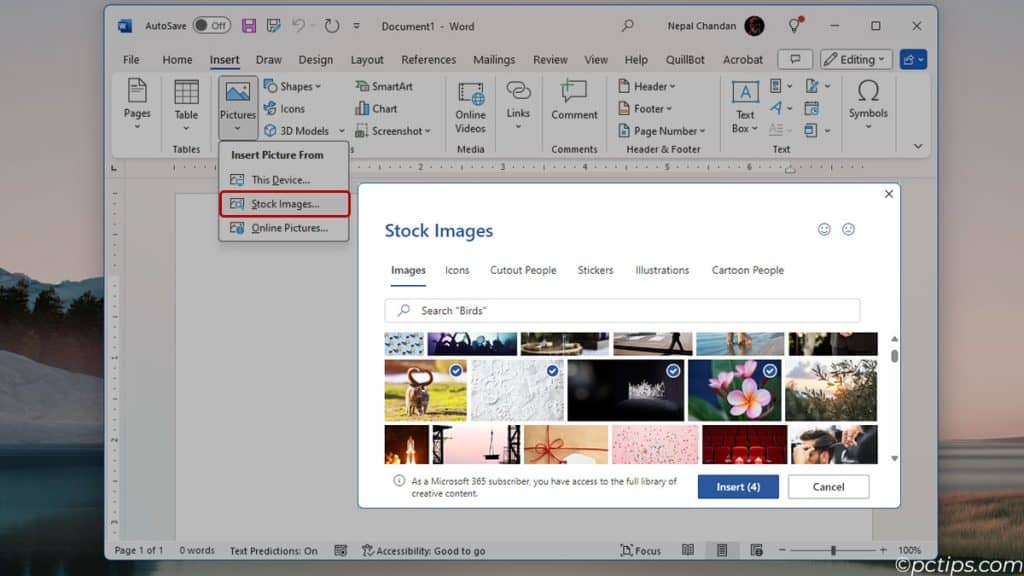
Stock images or photos from Bing search, charts using Excel, stock icons, cutouts, stickers, 3D models, and equations; you can make your document a lot more engaging without ever leaving Word.
You can even embed online videos that will play directly from the website.
Add Your Scanned Signature
Scanned signatures are standard for certain documents like official letters. I recommend that you create a reusable one if you’ll repeatedly use it.
Insert a scanned photo of your signature and make any cropping/color correction adjustments as needed.
Then, press Alt + F3, name the shortcut sign or anything else, and press OK.
Now, you can type sign and press F3 to insert the signature anytime you want.
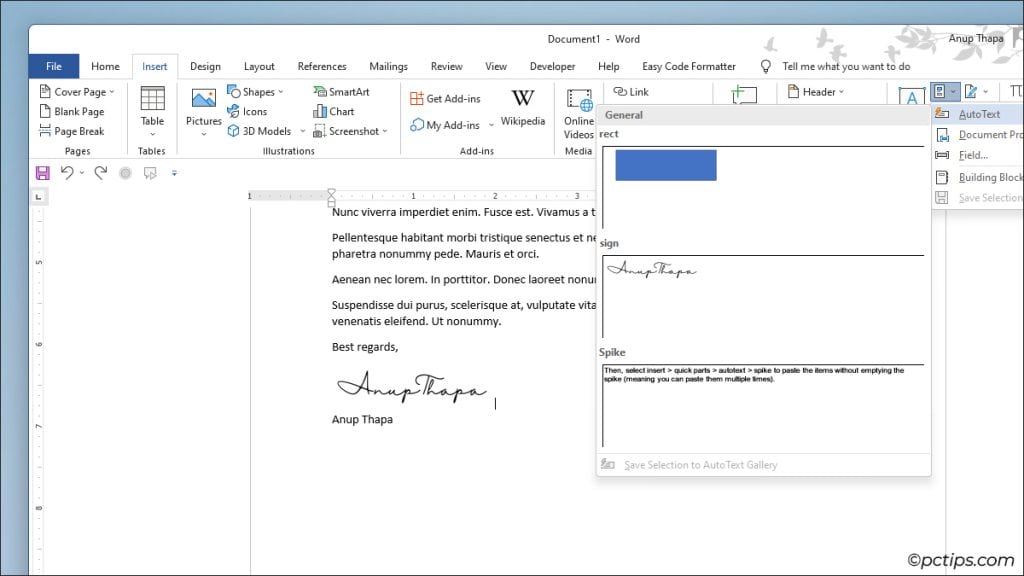
We explored this feature earlier in the Insert Items Faster with AutoText section if you need more detailed steps.
Note: If you’re trying to insert a Signature Line rather than a photo of your sign, you’ll find the option at the right end of the Insert tab.
Craft a Persuasive CV with Resume Assistant
You probably know about the Resume templates in Word. They’re quite useful, no doubt! But if you want to create a great CV, you should use the Resume Assistant as well.
It’ll provide examples of how people portray their skills and work experiences on LinkedIn, and suggest ways for you to do the same.
No matter what position you’re crafting the CV for, it’ll personalize the CV and help you stand out.
Sort Text, Numbers, and Dates
Have you ever had to analyze data like client lists or purchase history? These tend to involve names and dates.
Arranging the data alphabetically or chronologically can make it much easier to go through.
To do this, select the data and click on the Sort button from the Home page.
Then, choose to sort by text, number, or date, and press OK.
Create Custom Templates
Work/school often have specific requirements about formatting and such. If you regularly need to work on the same kind of documents, creating a custom template is a good idea.
Explore the premade templates and ones from online first to see if they fit your needs.
If they don’t, create a new document and format it as needed. Then, save it as a Word template.
From now on, you can go to File > New > Personal to find your custom template.
You’ll have a preformatted workspace instead of starting from scratch every time.
Customize and Use the Status Bar
Here’s a great quick tip: right-click the Status bar and enable/disable the options according to what you need.
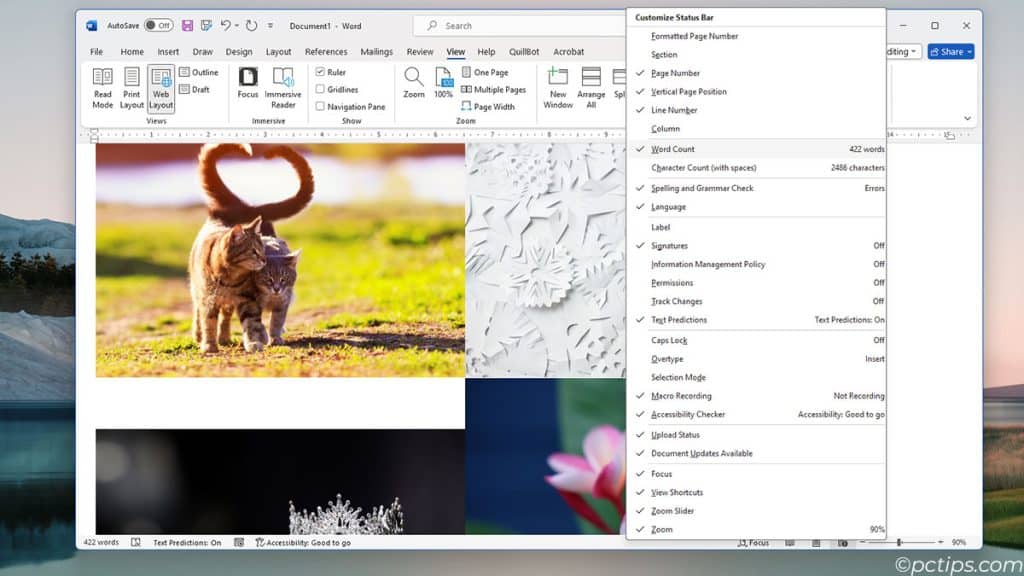
The Status bar is extremely useful for easily checking things like the word count or toggling features like the proofreader, change tracker, accessibility checker, etc.
Related: Customize the Windows Taskbar
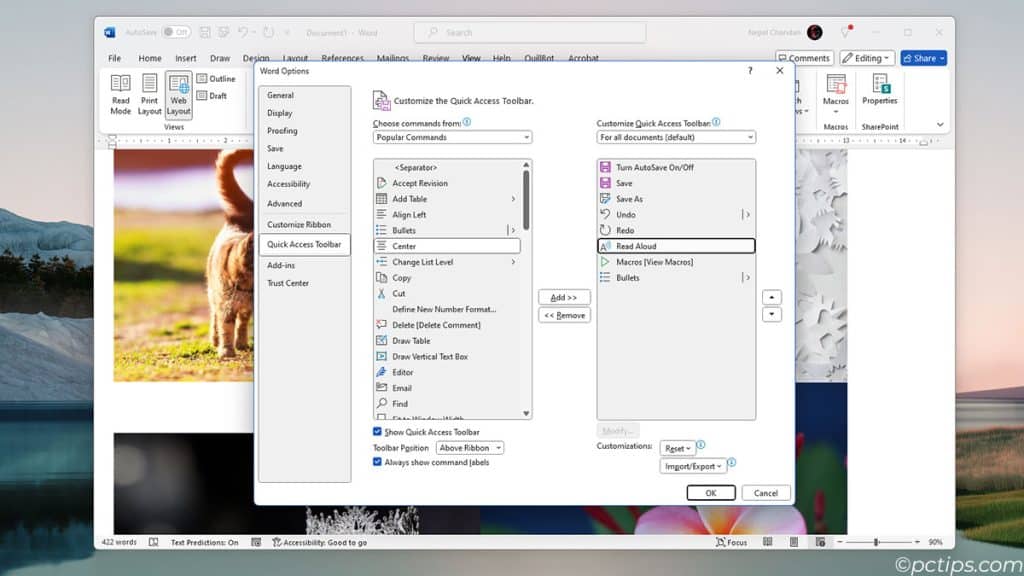
Customize the Quick Access Toolbar
As the name implies, the Quick Access toolbar is for features that you use a lot and need to quickly access.
If you’re trying to become more productive, customizing it is a good idea.
Go to File > Options > Quick Access Toolbar.
We added the Speak feature in the Read Aloud section earlier. Add other features to the toolbar in the same manner; bullets, macros, a calculator, whatever you need.
Customize the Ribbon Pane
Right-click the Ribbon pane and select Customize the ribbon.
On the right side, you can add new tabs to the Ribbon (like the Draw tab to enable inking features, or the Developer tab to use dev features like creating fillable forms).
Or, you can create your custom tabs and groups and add commands to them from the left side.
People often use this feature to gather their most used tools and features in one custom-made tab.
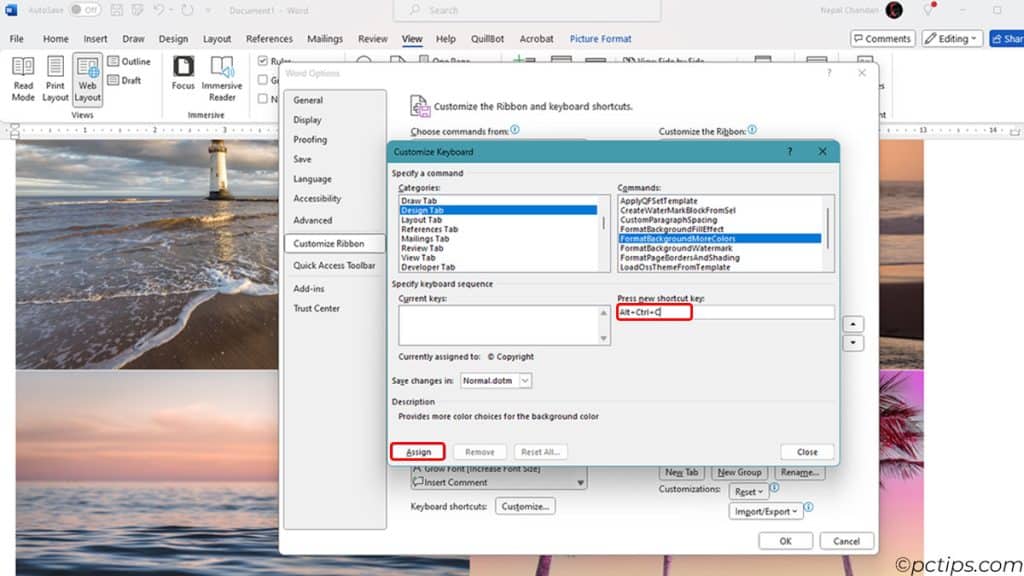
Set Custom Keyboard Shortcuts
Most people dislike certain Word shortcuts and would prefer to customize them but never actually get around to doing this.
Maybe it’s the zoom control shortcut, or one to insert a picture or symbol, or to apply a certain font; it could be anything.
Go to File > Options > Customize Ribbon and click on Customize beside Keyboard shortcuts.
Find the command, read the description to verify it’s the correct one, and then specify the keyboard sequence here.
Record and Run Macros
A macro is a recorded series of actions. Think of the most repetitive tasks you perform regularly.
You might often create a custom table or check the entire document for redundant spaces.
With Macros, you can record the actions once, then simply run the macro to automate it from next time onwards.
I’ll admit Word macros are not as powerful/useful as ones in Excel, but they’re still a feature worth trying.
Go to View > Macros > Record macro to try it out.
Keep Leveling Up Your Word Skills
Please understand that even with all these underrated features, this guide is no more than just a starting point.
You can double-click on any part of the document to start typing there. You can convert tabbed text to a table or a table to a graph for presentations.
You can use Mail Merge for printing and sending emails in bulk, or use =lorem() and =rand() to insert placeholder text.
Word has hundreds of tricks and features like these that you aren’t using yet. It’s a powerful program, much more so than most people realize.
We’ll bring more guides to help you get even better at Word, MS Office, and Windows in general, so stay tuned!