How to Make Brave Browser Faster
Last Updated:
Brave’s built a reputation as a privacy-focused Chrome alternative, but honestly — it comes with a ton of stuff most of us never use.
The good news?
You can strip it down to a lean, mean browsing machine in about 10 minutes.
I’m going to walk you through exactly how to debloat Brave on your desktop.
After following these steps, you’ll notice several improvements:
- Faster performance: Fewer features mean less resource usage
- Cleaner interface: More screen space for actual browsing
- Fewer distractions: No more notifications about features you don’t use
- Better focus: A minimal browser helps you concentrate on what matters
- Improved privacy: Disabling unnecessary features reduces potential data collection
I’ve been running a debloated version of Brave for months, and the difference is substantial.
Pages load faster, the interface is cleaner, and I’m not constantly dismissing prompts about crypto rewards or AI assistants.
Cleaning Up the Home Screen/New Tab Page
The first thing you see when opening a new tab is often the most cluttered part of Brave.
All those cards, news feeds, and sponsored images create visual noise that slows you down.
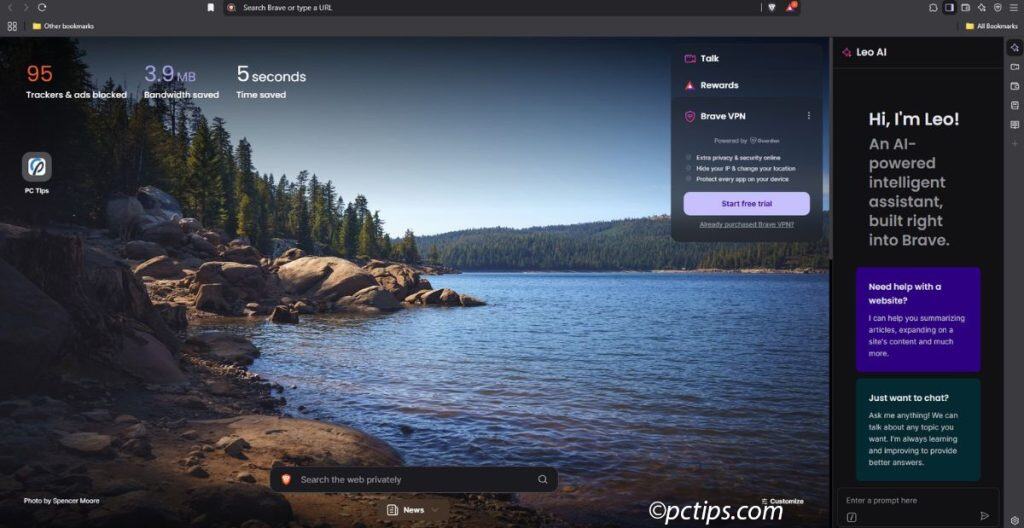
Fortunately, Brave makes customization straightforward once you know where to look.
Let’s start by accessing the dashboard controls:
Access Dashboard Customization
- Open a new tab in Brave
- Look for the small “Customize” button hiding in the bottom right corner
- Click it to reveal all available options
This single menu contains every visual customization option for your new tab experience.
My Recommended Cleanup Steps
Now that we’re in the right place, here’s a breakdown of what I recommend cleaning on your dashboard:
- Eliminate Brave News
- Scroll down to find Brave News at bottom of new tab page
- Click “No Thanks” to properly disable it
- Brave News consumes background resources even when not visible.
- WARNING: Brave News will reappear after updates unless you explicitly decline it this way.
- Simplify Search Options
- There’s a big search box in the middle of your new tab page, which is redundant when you already have the address bar.
- Find “Search” in the customization menu and toggle it off

- Clean Up the Background
- Disable “Show Sponsored Images” in the Background Image section- these are just advertisements disguised as pretty pictures
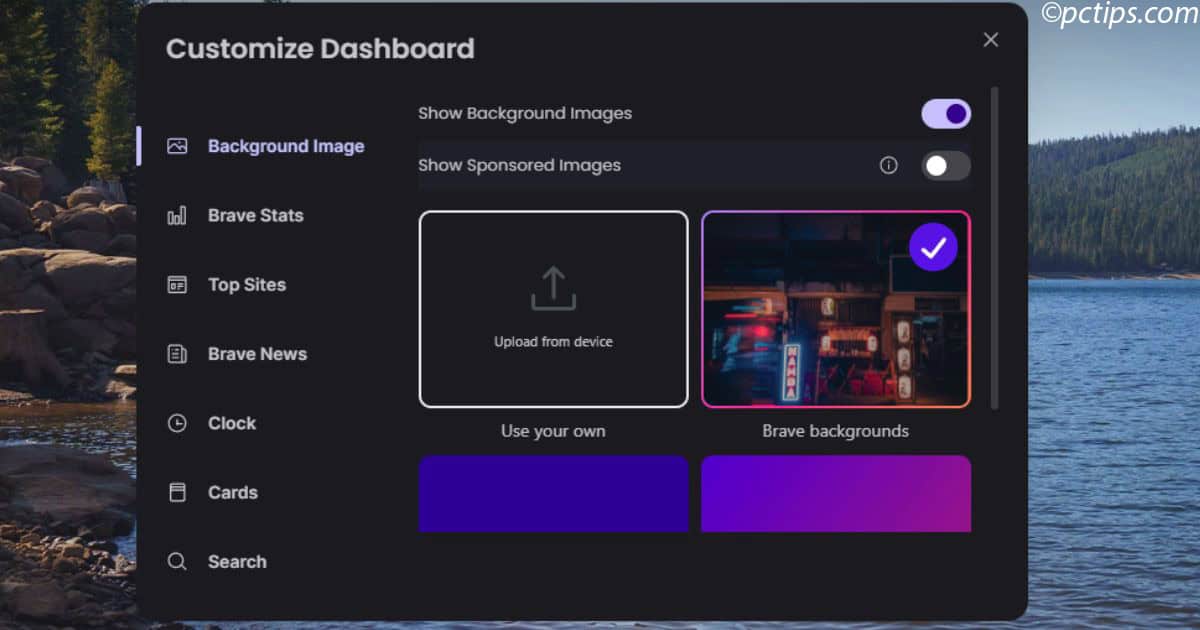
- I personally keep “Brave backgrounds” enabled since they’re ad-free and actually quite nice
- For true minimalists: disable all backgrounds for a clean gradient that won’t distract from your work
- Note: You can always upload custom background images if you prefer personalization.
- Disable “Show Sponsored Images” in the Background Image section- these are just advertisements disguised as pretty pictures
- Remove Unnecessary Elements
- In the “Top Sites” section, Disable “Top Sites” – in my experience, these become visual clutter that you rarely click
- In the “Cards” section, Turn off the main “Cards” toggle instead of toggling each card individually

- This prevents future bloat, as Brave adds new cards with updates
- Recommendation: Keep “Brave Stats” visible – seeing how many trackers are blocked actually motivates better browsing habits.
Decluttering the Toolbar and Address Bar
Now let’s tackle all those icons at the top of your browser.
Here’s what to remove from the browser toolbar:
Step 1: Remove Unnecessary Icons
Right-click on each of these icons and select “Hide” to remove them from view:
- Brave Rewards icon (the BAT token symbol)

- Brave Wallet icon (if it appears in your toolbar)
- Brave VPN icon (if you use a different VPN solution)
- Leo AI icon (if you don’t use Brave’s AI assistant)
Note: These features will still exist in Brave but won’t clutter your visual space.
Step 2: Simplify the Sidebar
The sidebar contains various tools that you might not need constantly visible.
Even though it’s not terribly cluttered by default, I recommend a complete reset:
- Click the sidebar icon to open it first
- Take a moment to review what’s there – Brave Talk, Brave Wallet, bookmarks, etc.
- Right-click on each item and select “Remove” to clear it out
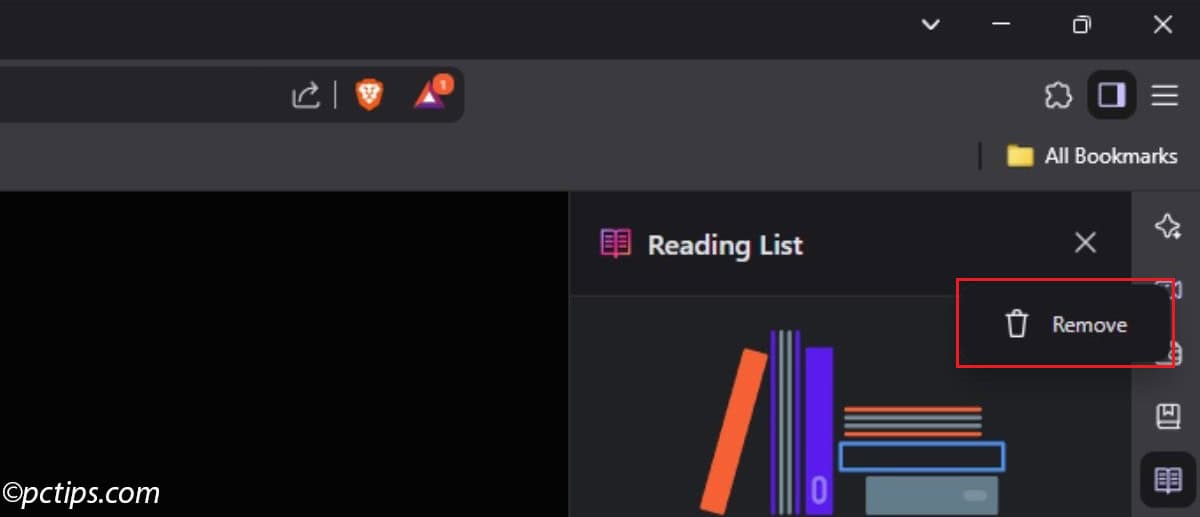
- Keep only the features you genuinely use
- If you remove all items, the sidebar icon disappears automatically
- You can also arrange them in priority order – put your most-used tools at the top
This approach gives you a clean slate and lets you build a sidebar that matches your actual preference.
I’ve found that most users only regularly use 1-2 sidebar features at most, so why keep the extras?
Pro tip: Right-click the sidebar icon itself and select “Hide sidebar icon” to keep all functionality without the visual element.
Step 3: Hide the Bookmarks Bar
The bookmarks bar sits just below the address bar and can take up valuable space:
- Right-click in any empty area of the toolbar
- Look for “Show bookmarks” in the context menu
- Select “Never” to completely hide it
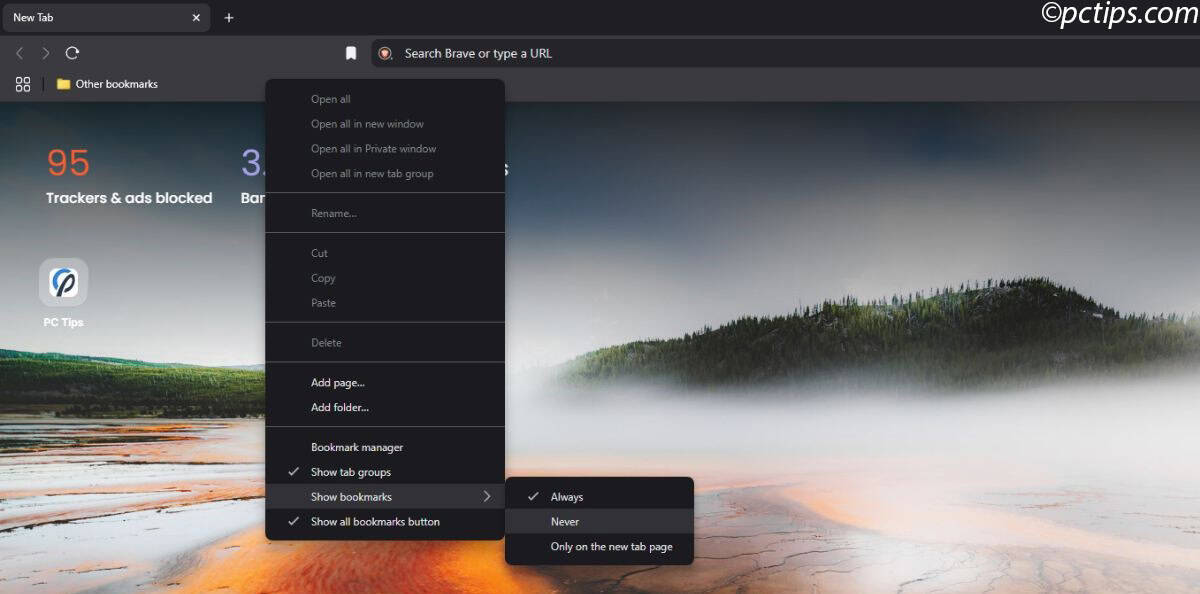
- Alternatively, choose “Only on new tab page” if you still want access on your start page
Tip: Even with the bookmarks bar hidden, you can still access all your bookmarks through the sidebar or by pressing Ctrl+Shift+O
I’ve found this makes browsing significantly more pleasant.
By now, your new tab page should look dramatically cleaner.
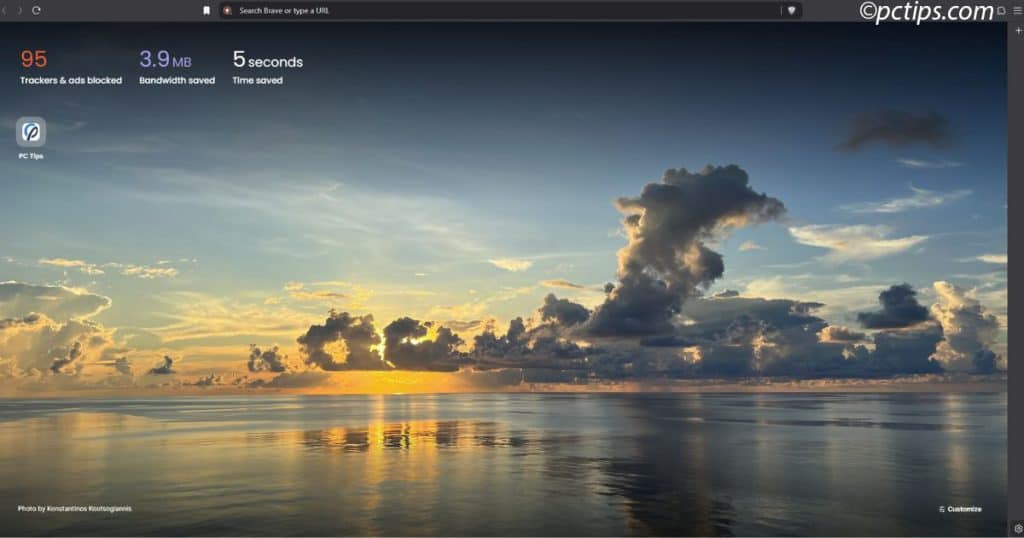
Gone are the distractions, leaving you with a serene, focused interface.
Debloat Brave Settings
Now let’s go deeper by adjusting settings that control how Brave behaves:
- Click on the hamburger menu (☰) in the top-right corner
- Select Settings
Appearance Settings
Under the Appearance section:
Show Bookmarks button: Disable this if you use keyboard shortcuts (Ctrl+D or Cmd+D) to bookmark pages
Address Bar Autocomplete
The address bar autocomplete suggestions can become incredibly cluttered:
- Navigate to Appearance → Auto-complete suggestions
- Uncheck these unnecessary options:
- “Quick commands”
- “Leo AI Assistant”
- “Top sites”
- Keep only essential suggestions:
- “Browsing history”
- “Bookmarks”
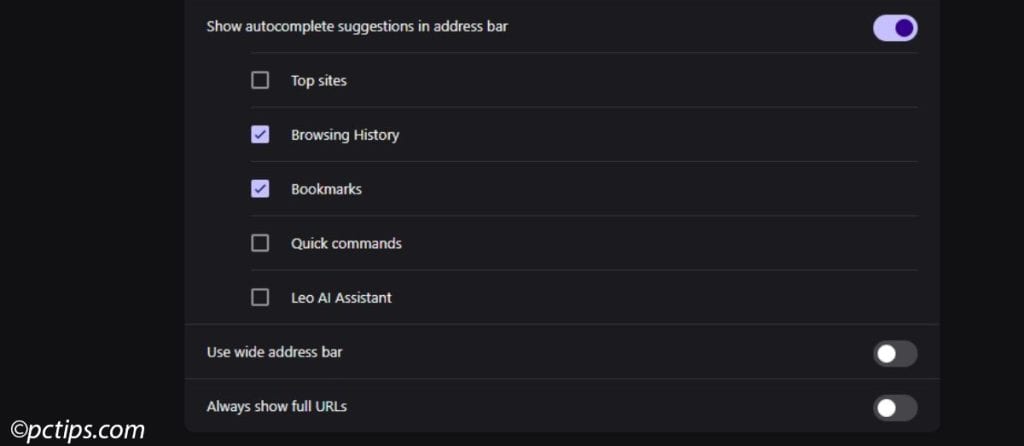
Remember: After disabling autocomplete features, restart your browser for changes to fully take effect.
Shields & Content Settings
Under Shields:
- Show number of blocked items: Hide this counter for a cleaner toolbar (you’ll still see the number when hovering)
- Set “Trackers & ads blocking” to Aggressive.
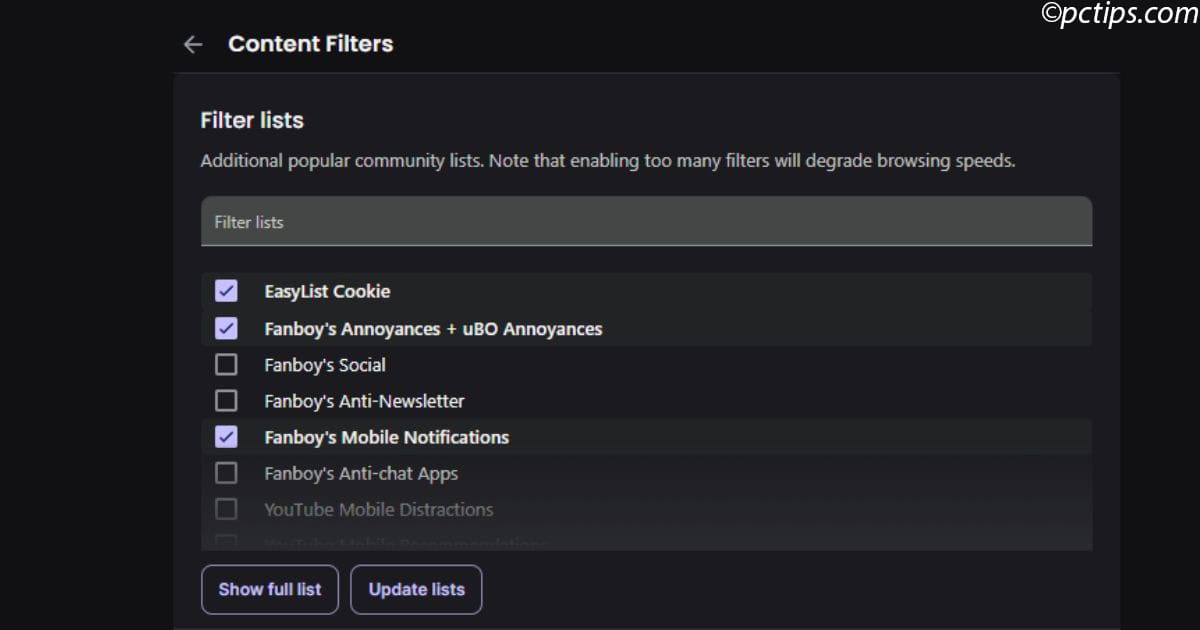
- Content filtering: Enable “Fanboy’s Annoyances + uBO Annoyances” to block cookie notices.
Data Collection
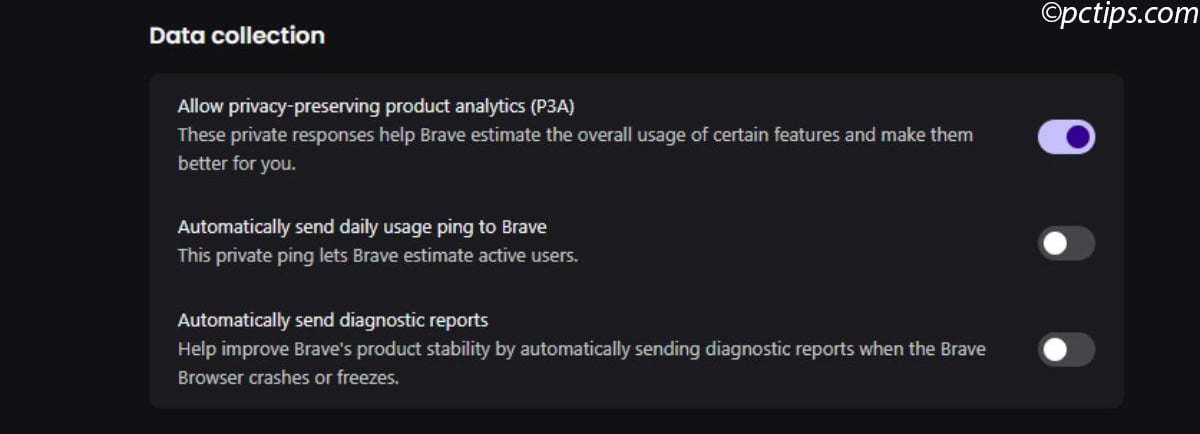
Under Privacy and security > Data Collection:
- Disable “Automatically send daily usage ping to Brave” to reduce what Brave collects about you
Web3 Features
If you don’t use cryptocurrency or blockchain features: Navigate to Web3:
- Set Default Ethereum wallet to No fallback
- Set Default Solana wallet to No fallback
- In the Web3 Domains,
- Disable “Resolve Unstoppable Domains domain names and Unstoppable Domains privacy considerations”
- Disable “Resolve Ethereum Name Service”
- Disable “Resolve Solana Name Service”

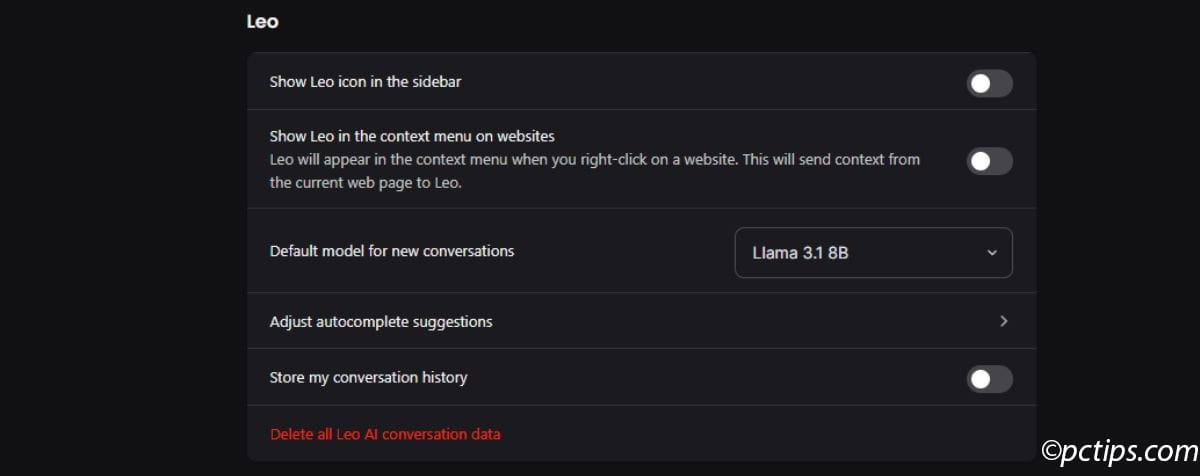
Leo AI Assistant
If you don’t use Brave’s AI assistant: Go to Leo:
- Turn everything off
- Click “Delete all Leo conversation data”
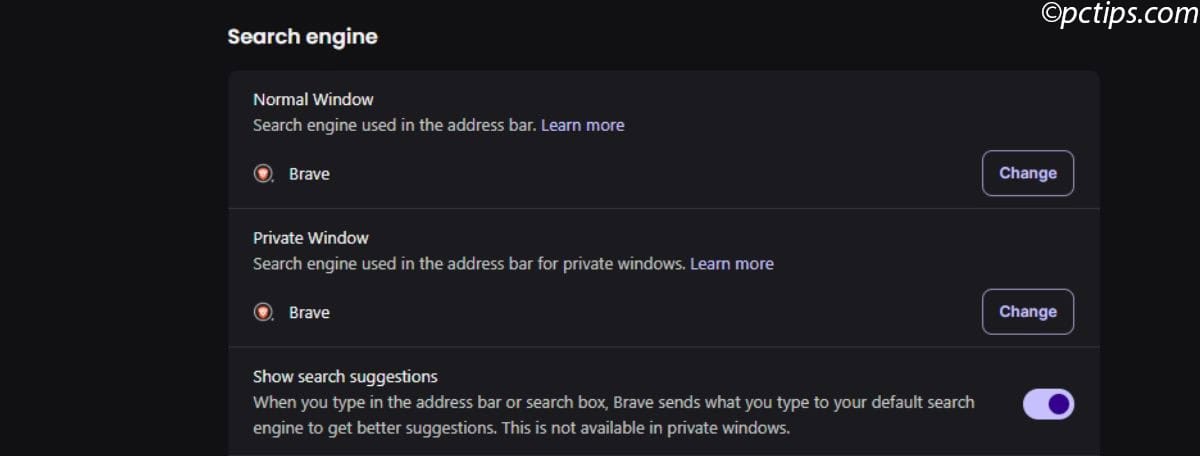
Search Engine Settings
Under Search engine:
- Select a search engine you prefer (Brave Search is actually quite clean by default)
- Consider disabling “Show search suggestions” if you find them distracting
Password Management
Storing sensitive data in your browser is a security risk.
Under Autofill and passwords:
- Password Manager — Turn this off completely
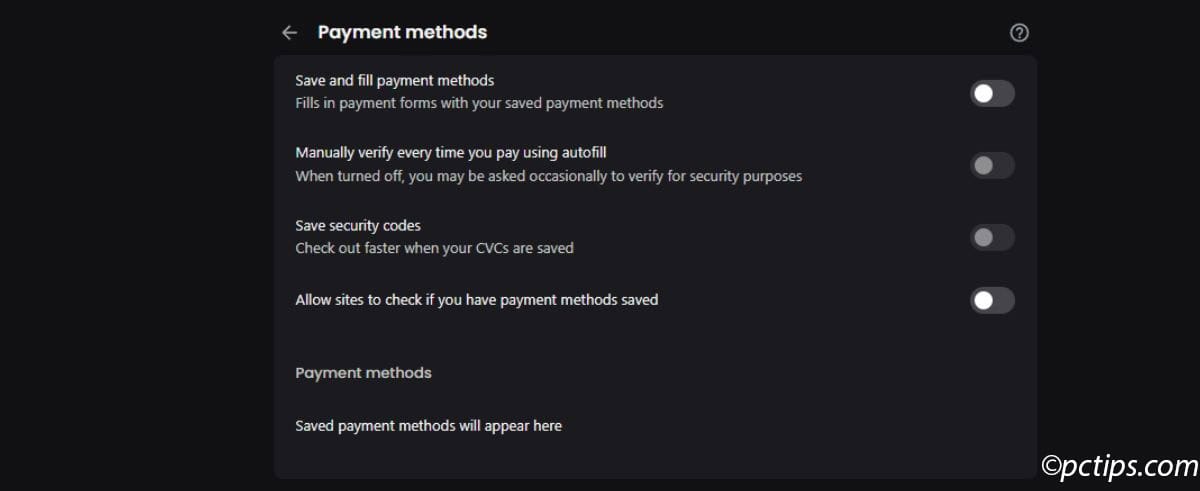
- Payment methods — Disable all options:
- “Save and fill payment methods”
- “Save security codes”
- “Allow sites to check if you have payment methods saved”
- Addresses and more — Turn off:
- “Save and fill addresses”
Use a dedicated password manager instead for better security across all your devices.
Speed Reader: A Feature Worth Keeping
Brave’s Speed Reader strips away clutter from articles and blogs:
- Go to Settings > Content
- Enable “Speedreader” for a cleaner reading experience
- Try it by visiting an article and clicking the Speed Reader icon in the address bar
This gives you a clean reading experience on compatible sites.
You can always manually activate it by clicking the Speed Reader icon that appears in the address bar on article pages.
Debloating Brave on Mobile
Let’s tackle the mobile version of Brave now.
I just did this on a fresh iOS install, but most of these steps work nearly identically on Android too.
The mobile version can be just as cluttered as desktop if you don’t take a few minutes to clean it up.
Step 1: Remove Brave News
The first thing you’ll notice on a fresh install is Brave News taking up valuable screen space. Simply scroll down to Brave News and tap the “X” button in the corner. That’s it!
Quick Tip: Sometimes Brave will show a random popup asking to “make Brave better” by collecting data. If you see this, just opt out — it often appears after installation rather than during setup.
Step 2: Customize Your Actions
The “My Actions” feature gives you quick access to certain functions, but most of them are useless clutter:
- Tap the three dots in the bottom right corner
- Tap on “My Actions” near the top
- Review the list and delete anything you won’t use regularly

I personally wipe the whole thing clean, but you might find some genuinely useful — maybe “History” or “Night Mode” if you use those often.
Be ruthless here; you can always add them back later.
Step 3: Configure Shields & Privacy
This is where Brave’s real value shines through:
- In Settings, tap “Shields and Privacy“
- Set “Trackers & ads Blocking” to “Aggressive” for maximum protection
- Check out “Auto Shred” — this is Brave’s forgetful browsing feature
- I recommend setting it to “site tabs close” for a good balance
- This automatically wipes site data when you close tabs
- Under “Content Filtering,” be sure to enable “Fanboy’s Annoyances + uBO Annoyances” list
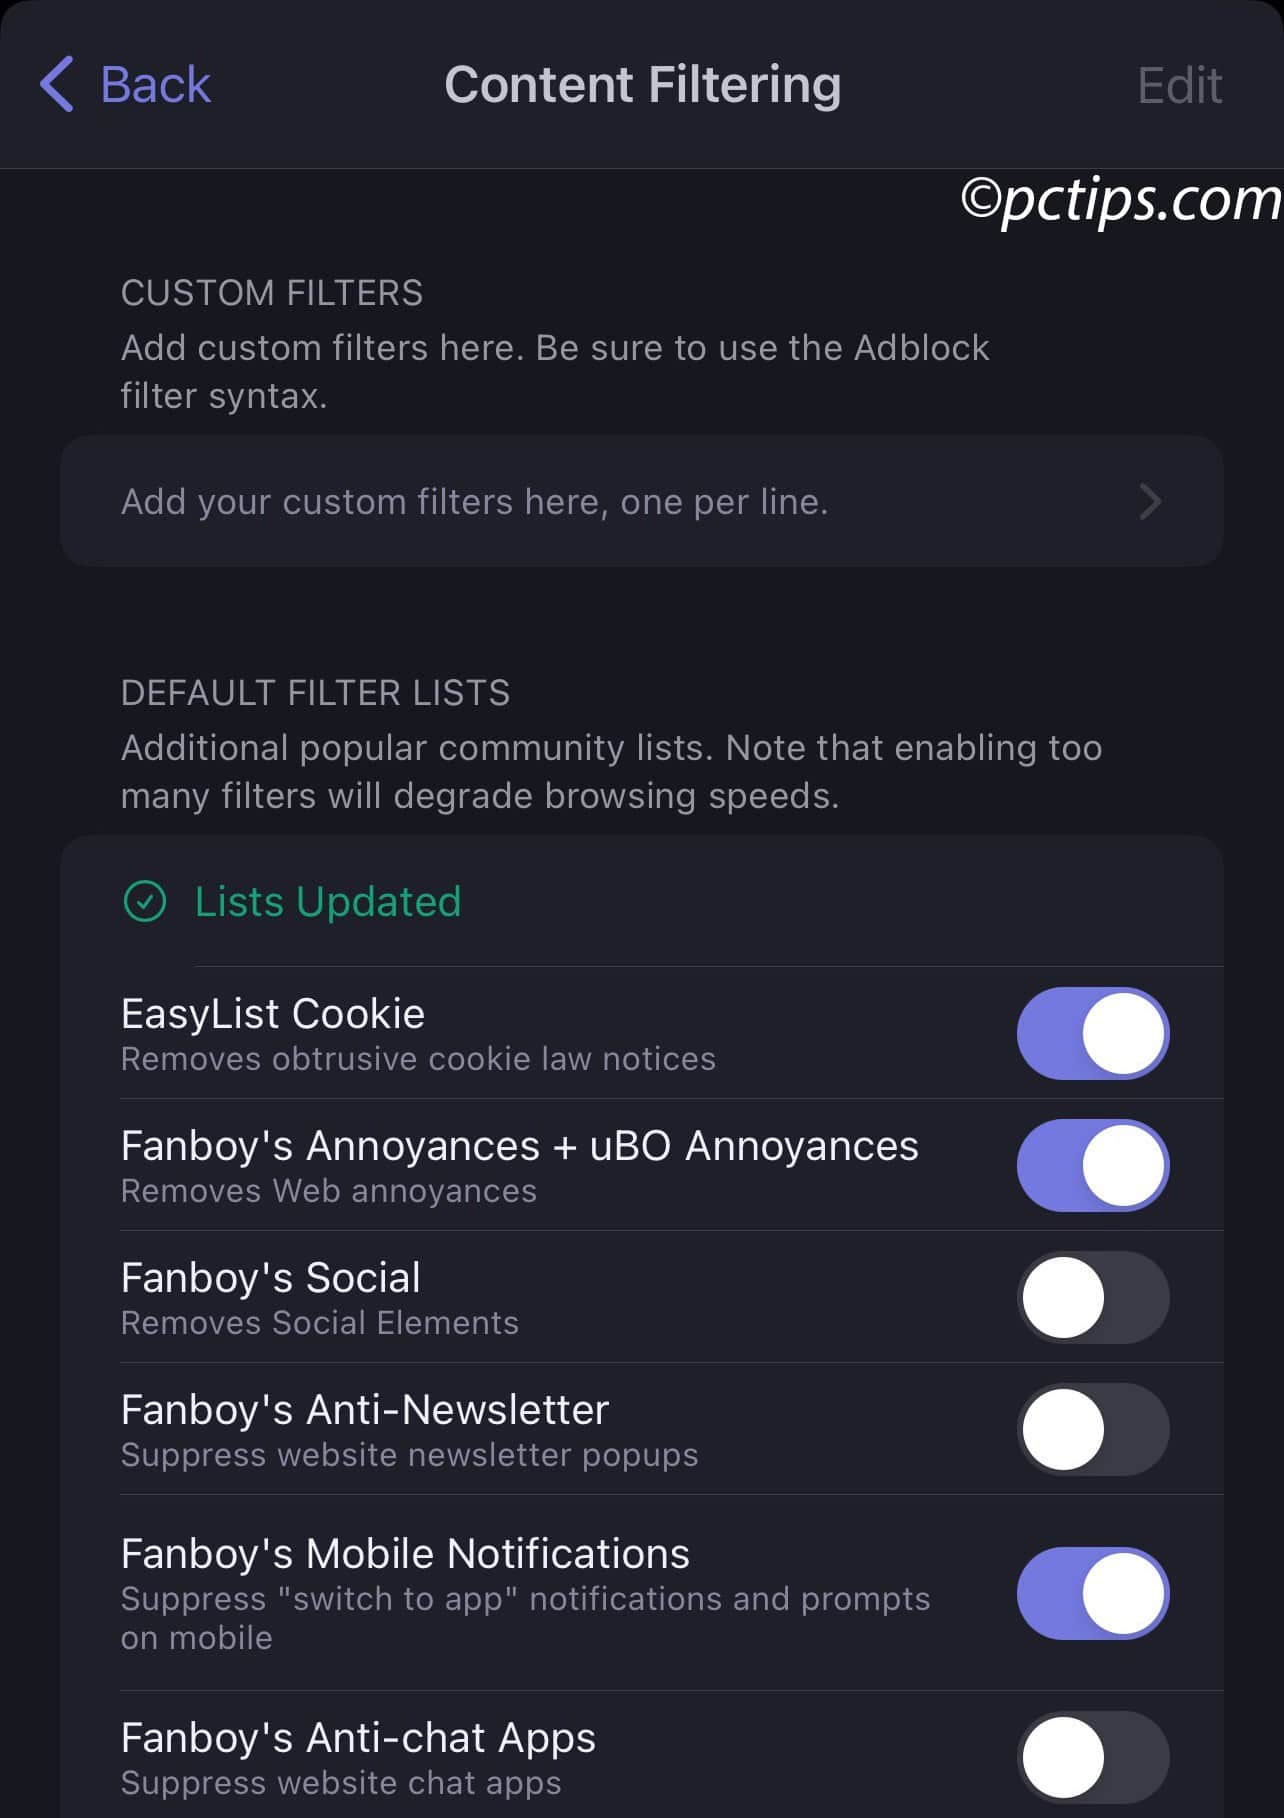
- While you’re here, tap “Update Lists” to ensure you have the latest protection
- Scroll to the bottom and disable “Automatically send daily usage ping to Brave”
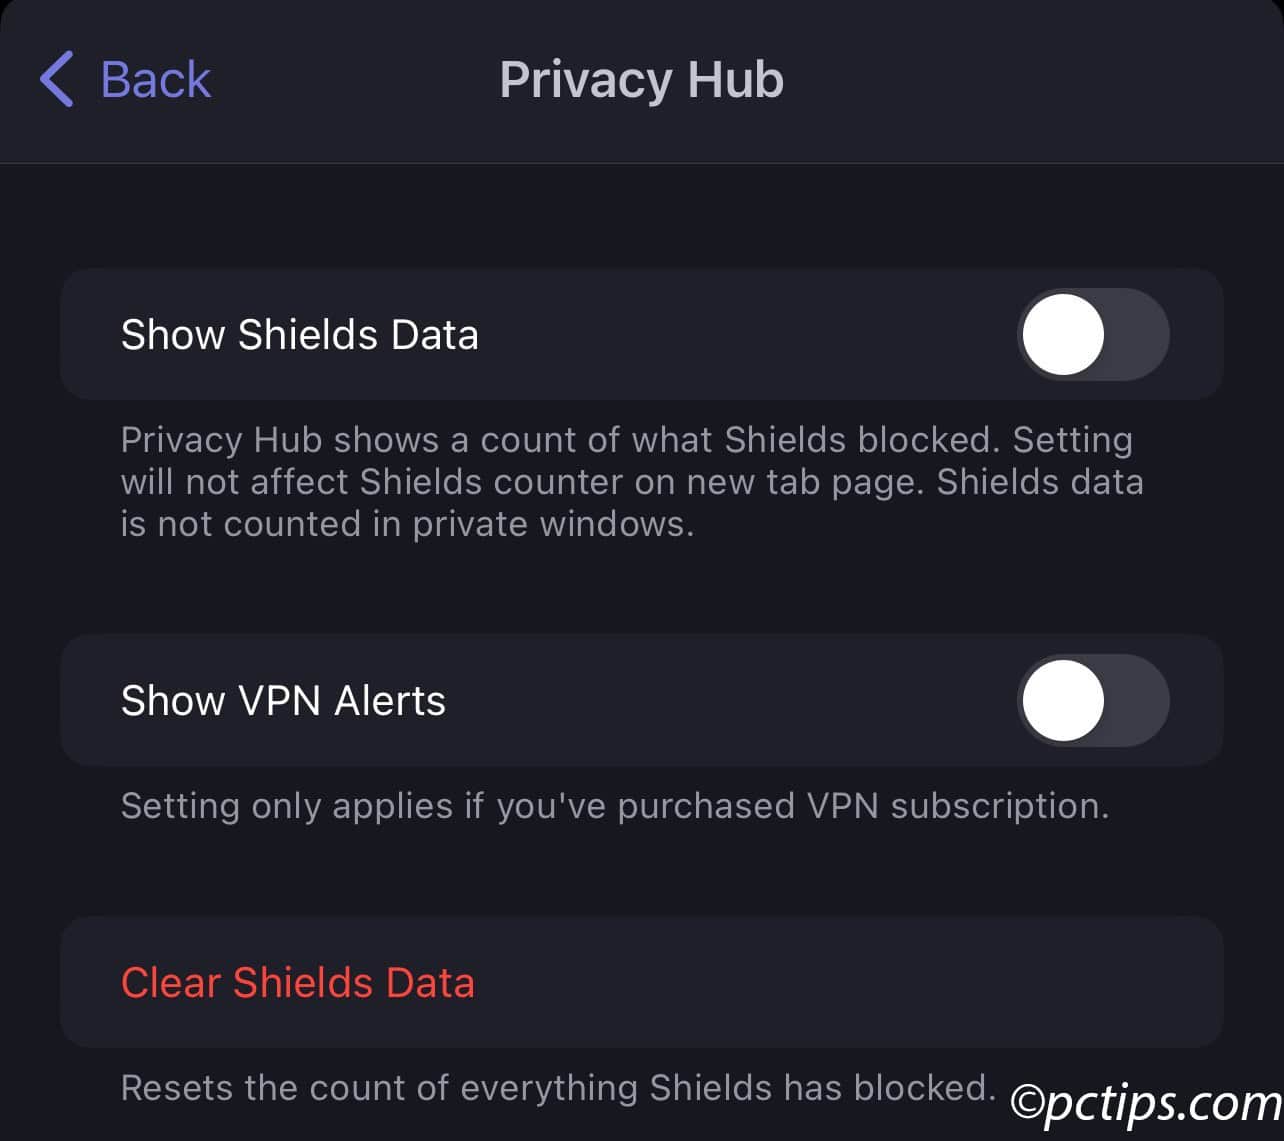
Step 4: Clean Up the Privacy Hub
There’s some sneaky bloat hiding in the Privacy settings:
- Scroll down in the Shields and Privacy page to find “Privacy Hub”
- Disable “Show Shields Data” if you don’t need those tracker-blocking stats on your home screen
- Turn off “Show VPN Alerts” — especially annoying if you don’t use Brave’s VPN
Step 5: Disable Leo
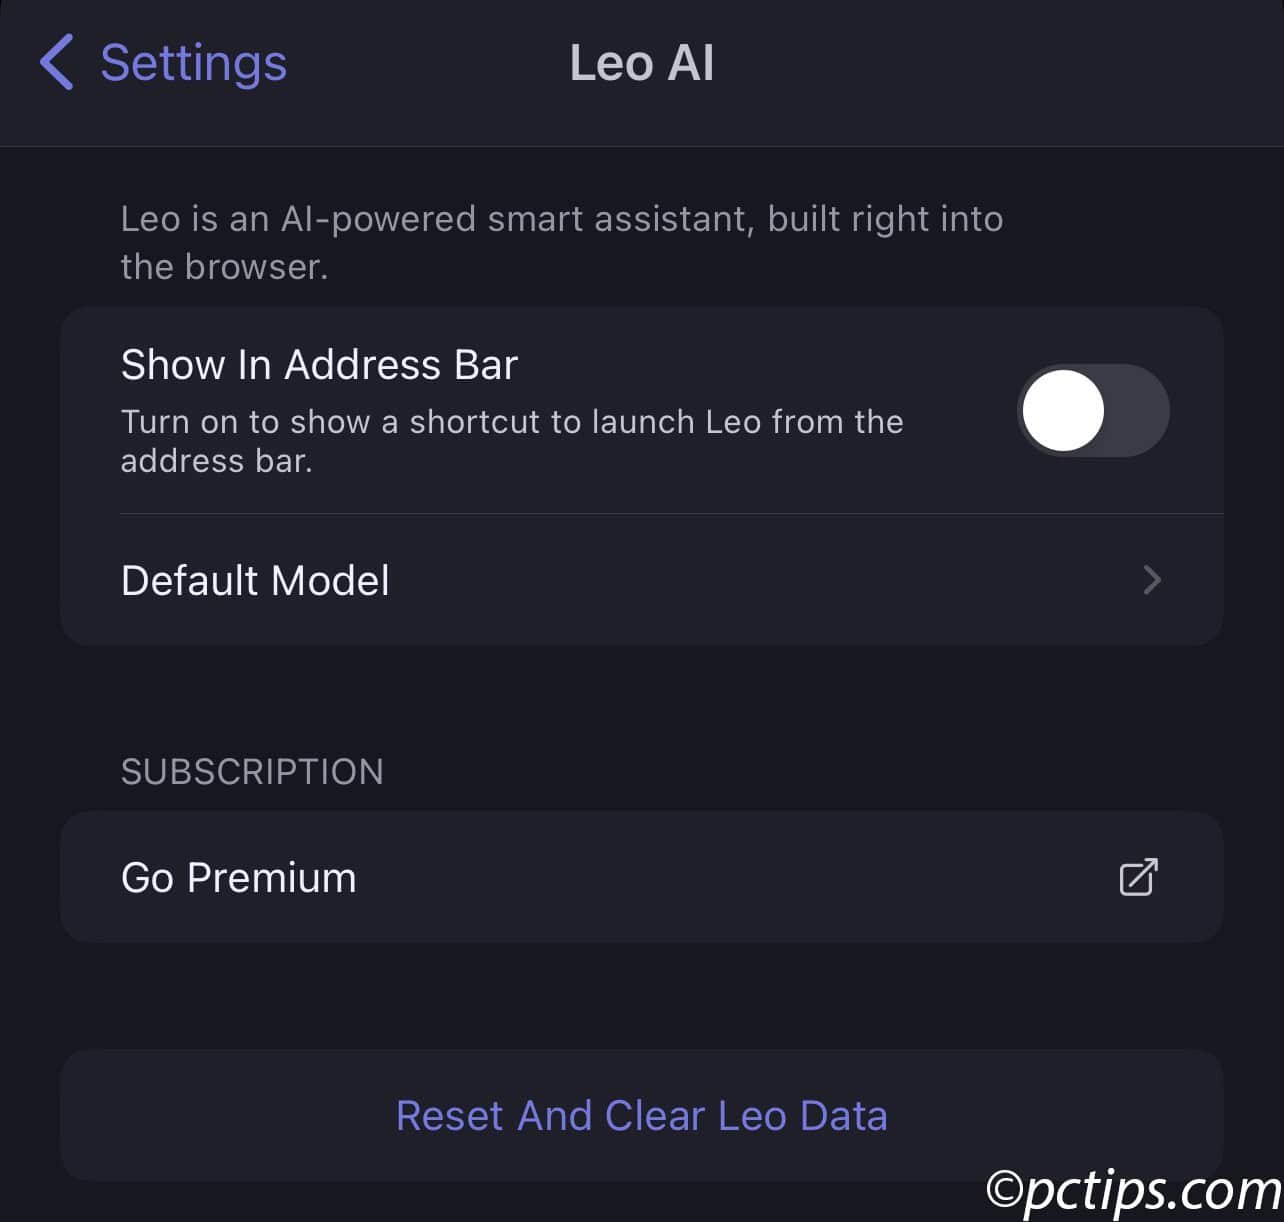
Leo and other features can clutter your address bar:
- Find the Leo section in Settings
- Here, toggle off “Show in Address Bar” option
Step 6: Clean Up Web3 Features
If you’re not into crypto and blockchain stuff:
- Go to the Web3 section
- Disable all the options listed there individually
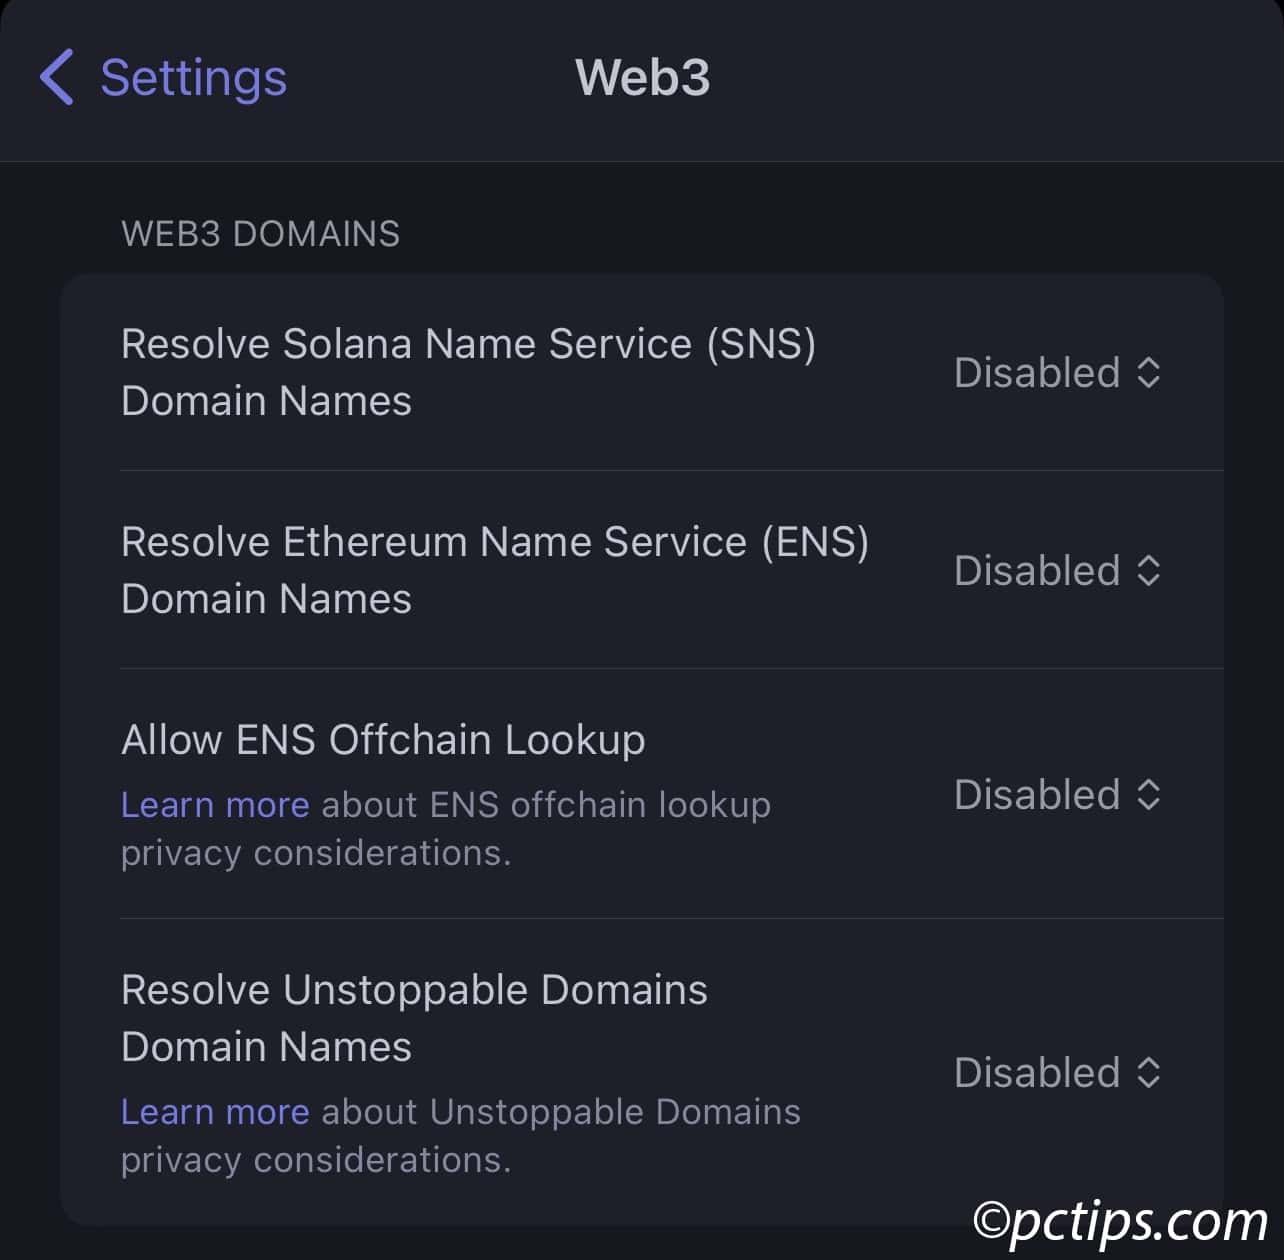
- These won’t impact normal browsing anyway, but why keep them active?
Step 7: Customize Search Engine Settings
Just like on desktop, you can clean up search behavior:
- Find “Search Engines” in Settings
- Set your preferred default search engine
- Disable “Show Browser Suggestions” and/or “Show Search Suggestions” based on preference
Step 8: Hide the Brave Rewards Icon
This one’s tricky — they hide it in a different spot than you’d expect:
- Go to “Display” in Settings (not in Rewards!)
- Find “Hide Brave Rewards Icon” and toggle it on
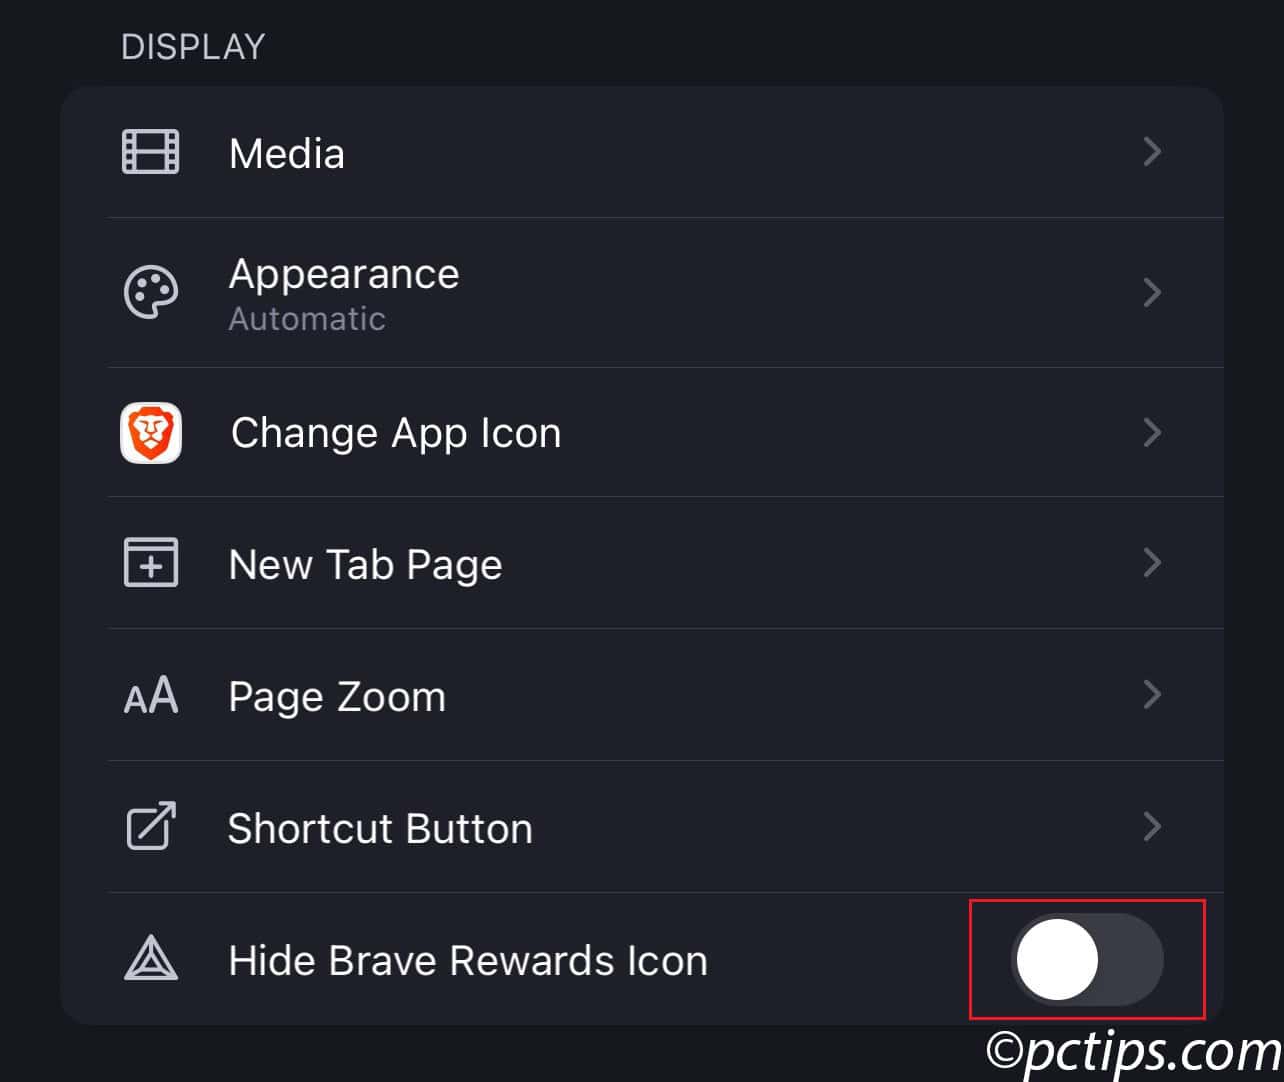
- That little triangle icon disappears instantly
Step 9: Clean Up the New Tab Page
Get rid of those sponsored images and other junk:
- Still in Display settings, tap “New Tab Page”
- Switch from “Sponsored Images” to “Default Images”
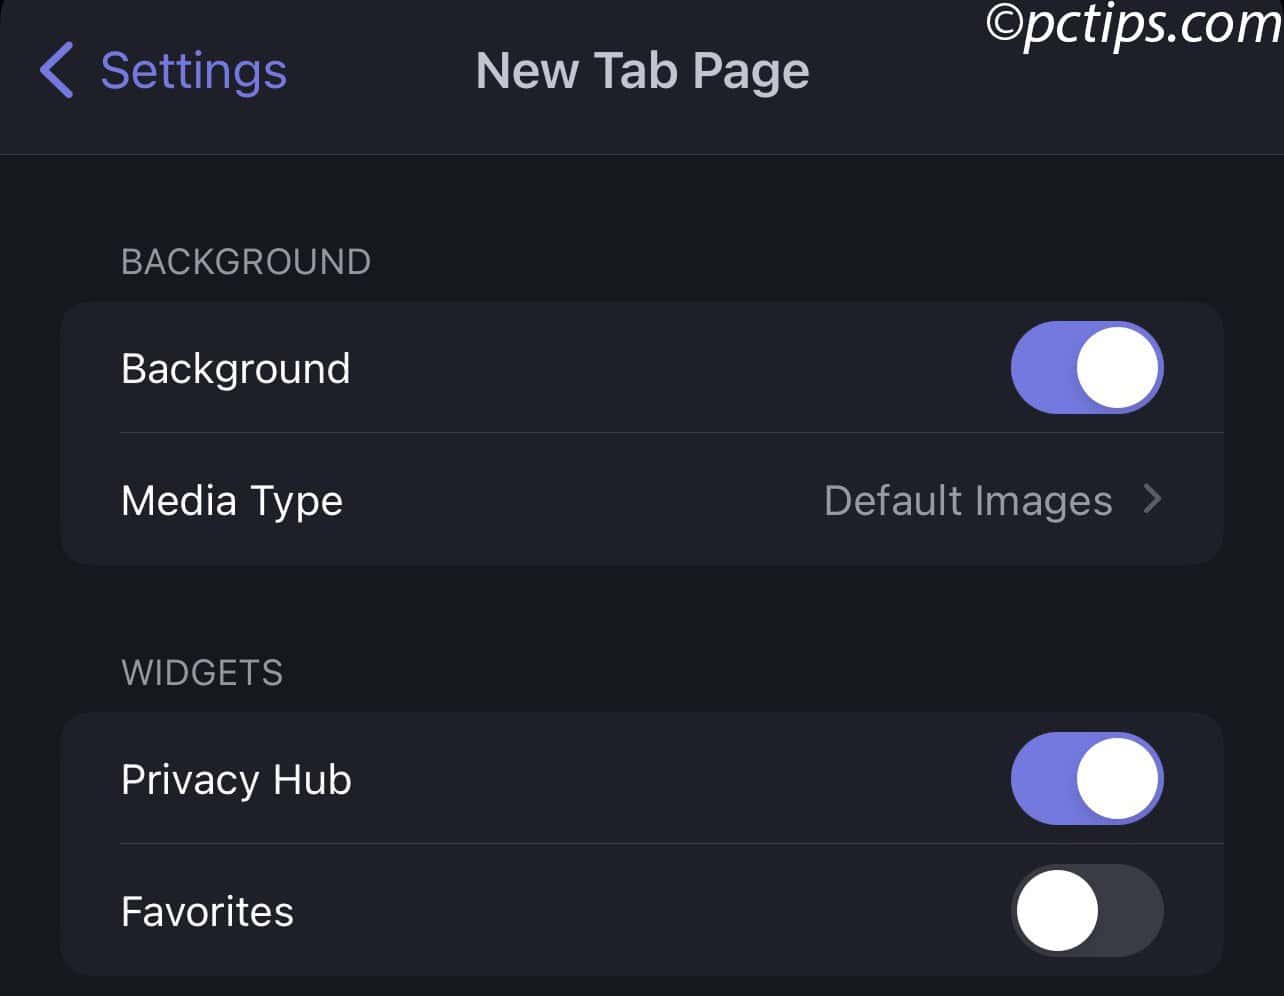
- Hide elements you don’t use:
- I always hide “Favorites” since I never use it
- The “Privacy Hub” can stay if you like seeing your stats
Step 10: Adjust Interface Preferences
A few final tweaks for usability:
- Under “Display,” consider setting Appearance to “Automatic” to follow your system settings
- Try the “Night Mode” feature if you want dark mode on all websites
- Warning: This sometimes breaks site layouts, so toggle it off if you notice problems
- Choose between “Top Bar” or “Bottom Bar” for controls
- I prefer bottom bar since phones are huge these days, makes it easier to reach
- Customize the tabs bar to your liking
- Consider disabling “Logins and Passwords” in favor of a dedicated password manager
And that’s it! Your mobile Brave should now be wonderfully lean and focused on what matters.
The whole process takes about 3 minutes but saves you from countless annoyances down the road.
Wrapping Up
Brave’s core value is its privacy-focused approach to browsing.
By stripping away the features you don’t need, you’re getting back to that essence — a browser that protects your privacy without getting in your way.
The steps in this guide take a short time to complete, but the payoff is a dramatically improved browsing experience.
Have you tried debloating Brave?
Which features did you keep and which did you ditch?
Drop a comment below — I’d love to hear about your experience and any additional tips you might have discovered.