How To Take Screenshots Like a Pro
Last Updated:
If you’re still mashing the Print Screen key every time you need to grab an image of your screen,
I’ve got news for you. You’re doing it wrong!
Hear me out.
I’ve been testing screenshot tools for over a decade now. And I can say with absolute confidence – there are WAY better options out there.
Using Print Screen is like trying to cut a steak with a butter knife.
Sure, you’ll eventually hack your way through… but it’s messy, time-consuming, and the end result is pretty rough.
You with me?
Why Print Screen Sucks
Before we dive into the good stuff, let’s take a moment to dunk on Print Screen and talk about why it’s just not cutting it anymore:
- It captures your ENTIRE screen. Hope you weren’t planning to crop out those embarrassing tabs you have open!
- You have to paste the capture into another program to do anything with it. Way too many steps.
- No built-in annotation tools. Want to highlight something? You’re outta luck, Chuck.
- Zero customization options. It’s Print Screen’s way or the highway.
Honestly, every time I’m forced to use Print Screen, a little part of me dies inside.
0/10, would not recommend.
It’s 2024, let’s do better.
Snipping Tool
Snipping Tool is a built-in Windows utility that lets you quickly capture all or part of your screen, add basic annotations, and save the image – all in a few clicks.
No more Print Screen + Paint nonsense.
Snipping Tool has been around since Windows Vista but it still amazes me how many people don’t know about it. You’re missing out!
I’ve been using Snipping Tool exclusively for screen grabs for years now.
Here’s why I love it:
- Versatile snipping modes – freeform, rectangular, window, or full-screen
- Instantly annotate with a pen, highlighter, or eraser
- Quick access via keyboard shortcut (
Windows Key + Shift + S) - Need to record your screen? Hit
Windows + Shift + R - Copies image straight to clipboard for fast pasting
- Automatically prompts to save images so you never lose a snip
Related: 100 Most Useful Keyboard Shortcuts Everyone Should Know
But hey, Snipping Tool is just the beginning.
Let me introduce you to my real screenshot squeeze…
Enter Flameshot
Now we’re talking!
Flameshot is a slick open-source screenshot program that packs a surprising punch for a free tool.
- Snap a screenshot with a single keystroke
- Instantly annotate with text, arrows, lines, blur, and more
- Built-in upload support for Imgur
- Drag and drop saving
- Clean and intuitive interface
- Completely customizable annotation tools, shortcuts, and UI
- Capture mouse cursor
- PIN feature to keep screenshots floating while you work
- Cross-platform for Windows, Mac and Linux
The only knocks on Flameshot – no scrolling capture, basic editor, and you can’t capture GIFs or video.
But for a free/open-source basic screenshot utility, Flameshot is fire!
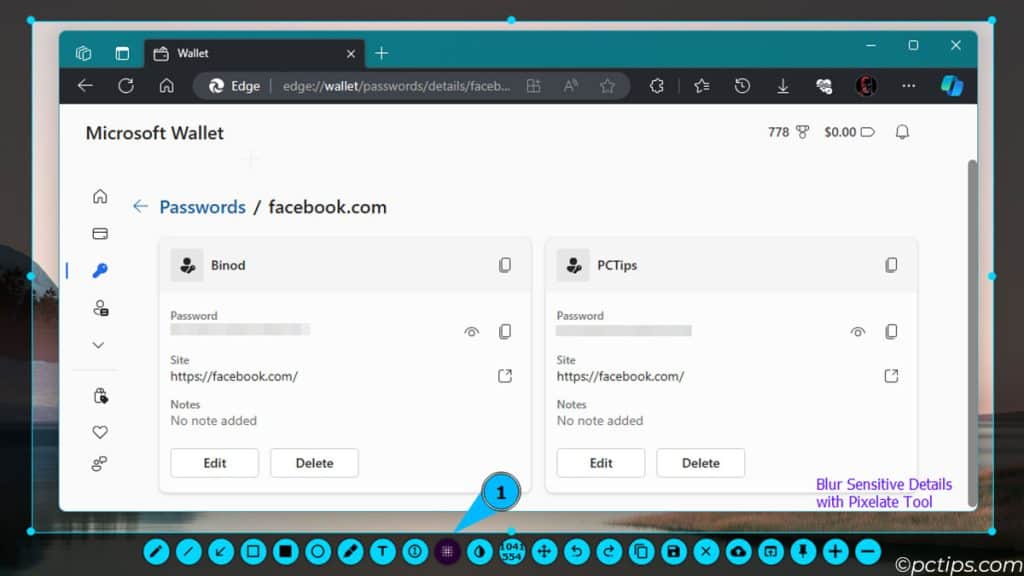
I can’t tell you how many times I’ve used the blur tool to quickly redact sensitive info before sharing a screenshot.
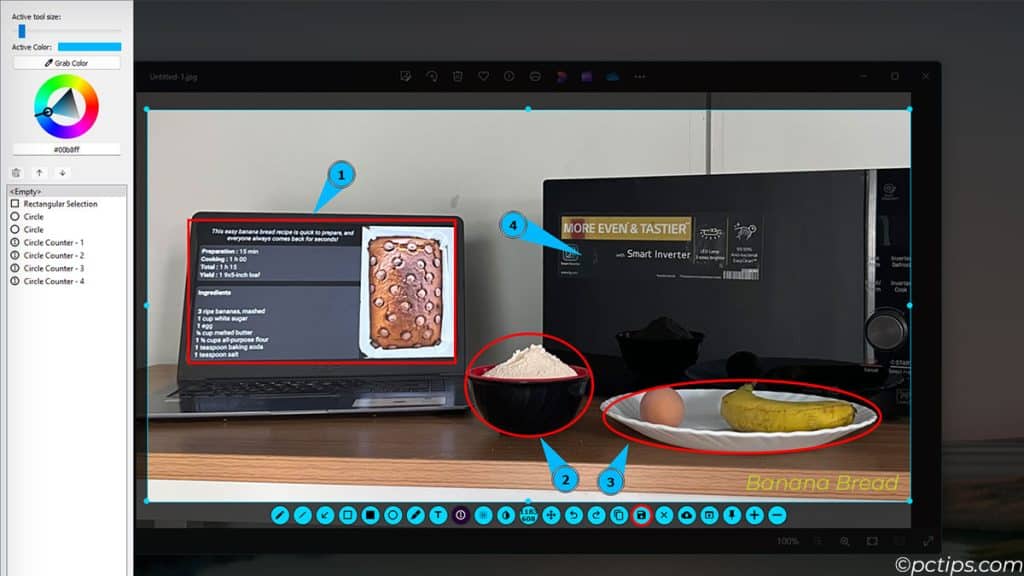
Or how the numbered text boxes have saved my bacon when putting together tutorials and documentation.
Related: 20 Things to Never Share Online
Here’s How to Get Started
First things first, you need to install Flameshot on your system.
Grabbing Flameshot is stupid simple:
- Head over to https://flameshot.org/
- Smash that download button and snag the version for your OS
- Install it like the total pro you are
- Bask in the glory of your snazzy new screenshot sidekick
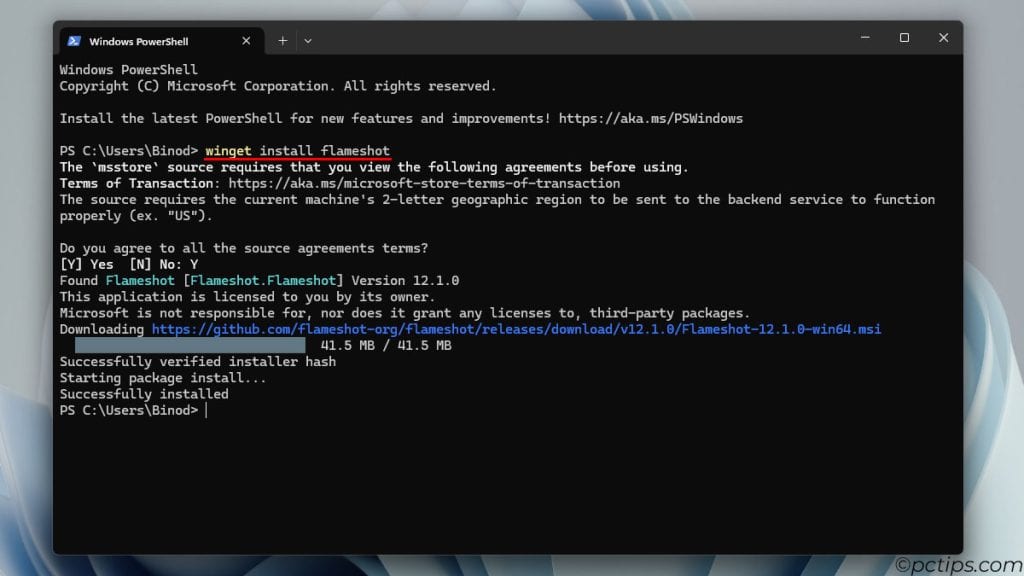
Alternatively, if you’re a command-line wizard, you can use winget to install Flameshot.
Just open your terminal and type: winget install flameshot
Taking Your First Screenshot
Now that you’ve got Flameshot installed, it’s time to take it for a spin.
- Look in your system tray for the Flameshot icon (it’s the one that looks like a little flame)
- Right click it and select “Take screenshot“
- Your screen will dim and you’ll see the Flameshot interface pop up
- Click and drag to select the region you want to capture
- Annotate to your heart’s content using the tools at the bottom
- Click the save button to finish your screenshot
See how easy that was?
With Flameshot, you can grab the exact region you need, annotate it in seconds, and have a pixel-perfect screenshot ready to share.
But we’re just scratching the surface here.
Keep reading to discover them all!
Replacing Print Screen with Flameshot
To make Flameshot your default screenshot tool, you’ll want to disable the regular Print Screen key:
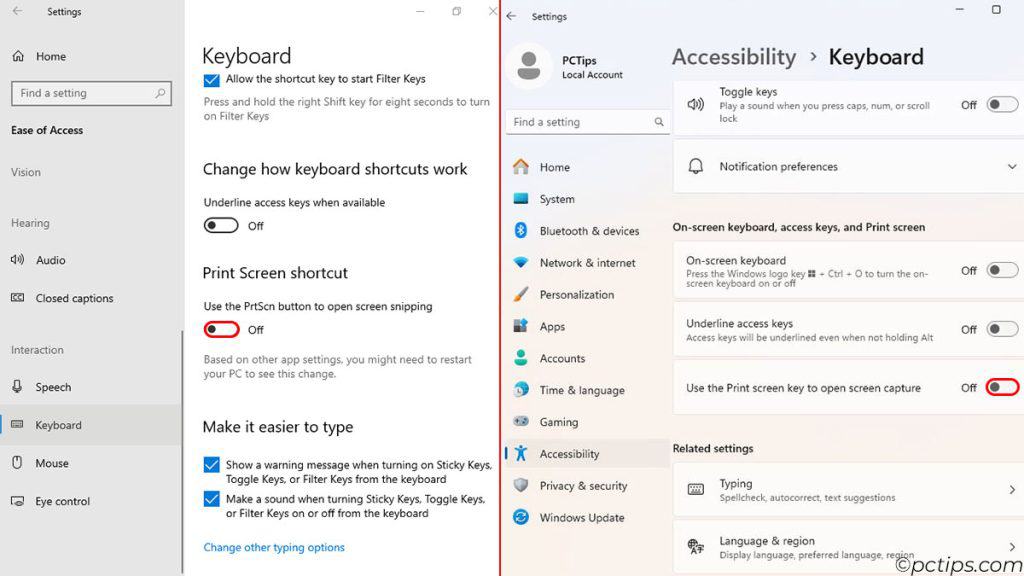
- Windows 10: Settings -> Ease of Access -> Keyboard -> Use the PrtScn button to open screen snipping -> Off
- Windows 11: Settings -> Accessibility -> Keyboard -> Use the Print screen key to open screen capture -> Off
Then hop into Flameshot’s configuration window and set up custom hotkeys.
To do so,
- Right-click the Flameshot icon in your system tray and select “Configuration.”
- Click on the “Shortcuts” tab and prepare to have your mind blown.
- Map the various hotkeys as per your liking
Now every time you hit Print Screen, Flameshot will launch instead of the default screenshot tool.
Share Links, Not Files
Screenshots are often most useful when you can easily share them with others.
Rather than dealing with email attachments or Slack uploads, Flameshot lets you upload your screenshot and share a link with just a click!
Related: 21 Tips to Check If a Link Is Safe Before You Click
The secret is Flameshot’s Imgur integration.
Here’s how to set it up:
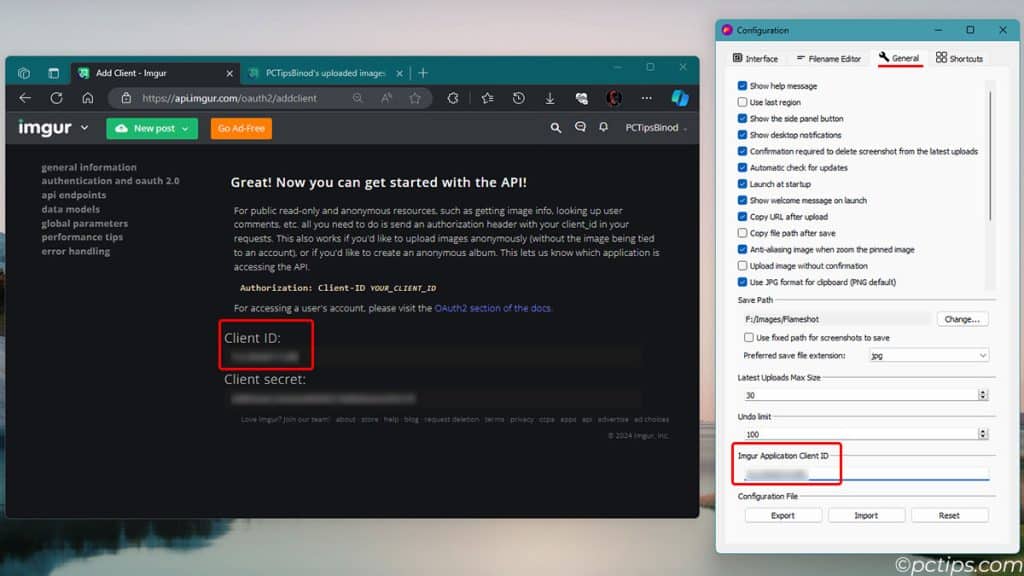
- Sign up for a free Imgur account if you don’t already have one
- Go to the Imgur application registration page
- Fill out the application registration with the following details:
- Application name: Flameshot
- Authorization type: OAuth 2 authorization without a callback URL
- Authorization callback URL: leave this blank
- Application website: you can leave this blank or put https://flameshot.org/
- Email: enter your email address
- Hit “Submit” and you’ll be given a unique Client ID for your application
- Copy this Client ID
- Open Flameshot, right-click the tray icon and open the configuration window
- Switch to the “General” tab
- Paste your Imgur Client ID into the “Imgur Application Client ID” field
Now, after you snap a screenshot, just click the upload icon in the toolbar.
In seconds, your screenshot will be uploaded to Imgur and the link copied to your clipboard, ready to paste and share!
Related: 14 Killer Copy and Paste Tricks You Need to Know
Pro Tip: I have Ctrl+U mapped to trigger the Imgur upload for lightning-fast sharing.
While Flameshot is my go-to, there are a few other screenshot tools worth mentioning.
ShareX
Aw snap, it’s ShareX!
This is my personal favorite screenshot tool for its insanely deep feature set and customization.
Don’t let the basic UI fool you – ShareX is a serious power user’s dream for screen capture, file sharing, automation, and more.
ShareX can capture screenshots in every possible way – regions, windows, full screen, scrolling, OCR, web page, monitor, etc.
But it does so much more than screenshots!
It can record GIFs and videos, create image thumbnails, scan QR codes, hash check files, FTP upload, and a ton of other crazy useful stuff I didn’t even know I needed til I had it.
The annotation tools are fully featured with all the shapes, text, blur, steps, and unicorn magic you could ask for.
It’s got badass automated workflows to capture, edit, save, upload/share the screenshots in one fell swoop.
The amount of app integrations and upload destinations is staggering – Imgur, Dropbox, Google Drive, OneDrive, and dozens more.
ShareX is the screenshot tool to end all screenshot tools.
It’s open-source, completely free, and stupidly powerful.
The only downside is it can be a bit overwhelming for casual users, and it’s Windows-only.
If you want to dive deeper into ShareX, check out our comprehensive guide: Mastering Screenshots with ShareX. Highly recommended!
Download: https://getsharex.com/downloads
Greenshot
Another strong contender in the free and open-source arena is Greenshot.
It hits the sweet spot of advanced features in a user-friendly package.
All the expected capture modes are here – region, window, full screen, last region.
The image editor is more robust than most, with all the annotation essentials plus effects like shadow, torn edge, and drop shadow.
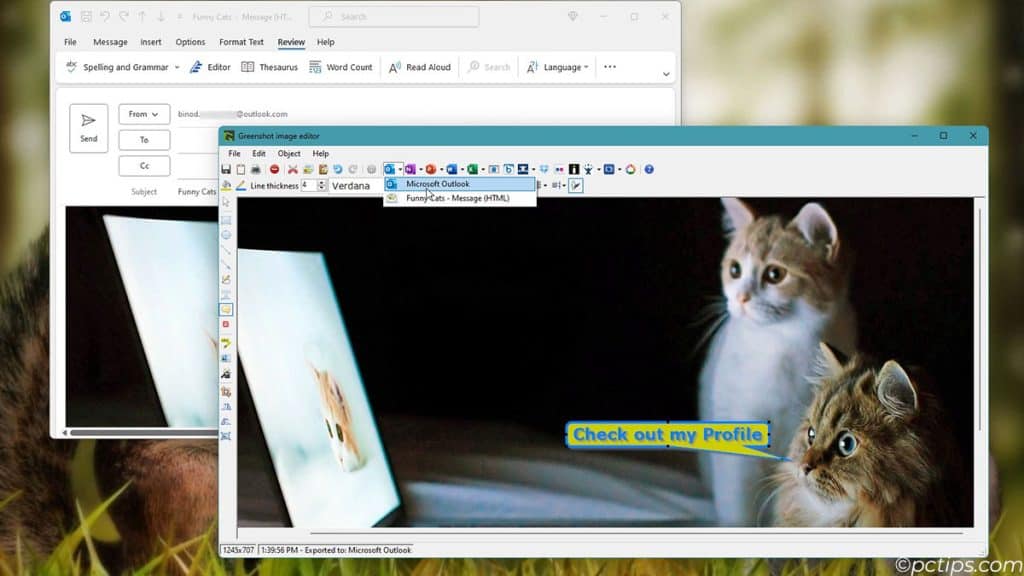
One of my favorite Greenshot features is being able to quickly send screenshots directly to MS Office apps like Outlook email, PowerPoint, and Word.
You can also upload to Imgur, Box, DropBox, and other cloud services via plugins.
OCR is supported and it can export to a clipboard, file, printer, and more.
Greenshot is super simple to use, but offers some appreciated advanced options like screenshot delay, keyboard shortcuts, and filename patterns.
It also supports external command plugins for endless customization options.
For a free tool that covers all the bases in a clean interface, Greenshot is a great choice.
Download: https://getgreenshot.org/downloads/
Lightshot
For sheer speed and simplicity, it’s hard to beat Lightshot.
It lives up to its name with an almost impossibly light and fast way to snap what’s on your screen.
Just hit PrtSc, click and drag a region, Annotate, save locally, upload to the cloud, or share a link in seconds flat.
Lightshot has a very minimal, almost Spartan interface compared to the other tools covered here – and that’s by design.
This tool is built for ultra-quick, no-fuss screenshotting.
But it still packs in a fair amount of annotation options and integrates with major cloud services like Google Drive.
The search feature is a neat trick – Lightshot will auto-detect text in your screenshots and let you perform a Google, Yandex or TinEye search.
It’s the little things! If you don’t need a ton of bells and whistles and just want to capture and share screenshots at lightning speed, Lightshot is scary good at it.
Download: https://app.prntscr.com/en/download.html
Built-in Browser Screenshot Tools
Psst…did you know that your browser has surprisingly capable screenshot tools built right in?
Chrome, Firefox, and Edge all pack integrated screenshot utilities now.
- In Chrome, use
Ctrl + Shift + Ito open the Developer Tools, then click the camera icon in the top-left corner. - In Firefox, use
Ctrl + Shift + Sto open the Screenshot Tool. - In Edge, use
Ctrl + Shift + Sto open the Web Capture tool.
Here you can snap a full page capture of the entire scrollable page, or select an area to grab.
It’ll download the screenshot as a full-res PNG. Super handy!
The browser integrations are awesome for the simplicity and speed of capture.
No software to install, just do it right in the browser!
But for heavy editing or more capture options, you’ll want a dedicated screenshot app.
Awesome Screenshot
Speaking of browser tools, the ever-popular Awesome Screenshot Chrome and Firefox extension might be just your cup of tea.
With over 3M users, clearly they’re doing something right!
Awesome Screenshot makes it dead simple to snap a capture of a browser tab, a region, or the entire visible page.
The annotation options are surprisingly robust with essentials like rectangles, circles, arrows, lines, and blur.
Unique tools like stickers, color filters, and emoji stamps add some fun flair to screenshots.
But the killer feature here is being able to collaborate on screenshots with team members.
You can upload your capture, add comments, and invite others to markup the image.
Awesome Screenshot integrates with popular tools like Jira, Asana, Trello, Github, Gmail, Slack, Twitter and more.
Pricing starts at $6/month for unlimited image hosting, PDF export, and other goodies.
But it’s free to use for local screenshots!
Browser extensions can’t do full desktop capture like the heavy-duty tools, but Awesome Screenshot handles in-browser capture like a champ.
Download: https://www.awesomescreenshot.com/
Tips for Next-Level Screenshots
Now that you’ve got the right tools, here are a few pro tips to level up your screen-grabbing game:
- Use hotkeys – Time is money! Set up global hotkeys to trigger your preferred screenshot modes instantly from anywhere.
- Upload for sharing – Steer clear of email attachments. Upload screenshots to get a link you can easily IM, tweet, embed, etc. Your recipients will thank you.
- Narrate with annotations – A few quick arrows, boxes and text labels can make a basic screenshot so much clearer. Don’t be afraid to mark that baby up!
- Use the blur tool to protect sensitive info. I can’t tell you how many times this has saved me from accidentally sharing something I shouldn’t have. Just select the area you want to blur, adjust the intensity, and your secrets are safe!
- Take advantage of the delay capture feature. Need to screenshot a pesky menu or tooltip that disappears as soon as you move your mouse? Set a delay of a few seconds and get ready to capture that elusive shot.
- Customize your color palette. Make your annotations stand out by tweaking Flameshot’s color options to match your personal style. Neon green arrows? Why not!
- Set a custom save directory to keep your screenshots organized from the start
- Use the magnifier tool to zoom in on small UI details for pixel-perfect annotations
Use Cases
So now that you’re a power screenshot user, what can you actually use it for?
So glad you asked! Here are just a few of the ways I use these screenshot tools every day:
- Bug Reports: Quickly snap a screenshot, highlight the issue, add a text explainer and upload to my issue tracker in seconds
- Tutorials: Use the numbered steps tool and text annotations to create easy-to-follow visual guides for everything from app walkthroughs to game hints
- Chat Responses: Answering a tricky question in Slack or Discord? Snap a quick screenshot, annotate with arrows and text and share the link for an instant visual aid
- Design Feedback: The annotation tools are perfect for quick UI tweaks and visual suggestions on design mockups
- Data Viz: Grab charts and graphs, add captions and highlights and share links for easy data-driven discussions
Really, anytime a picture saves you a thousand words, These tools are there to help you grab it, tweak it and share it faster than ever.
Never Hit Print Screen Again!
Friends don’t let friends use Print Screen.
Now that you’ve seen how these tools can up your screenshot game, there’s no going back to PrtScn purgatory.
Equipped with annotation superpowers, cloud sharing, GIF magic, and custom workflows, you’ve got everything you need to step up your screen clipping swagger.
I encourage you to experiment with different tools, find the one that fits your workflow best, and start capturing screenshots like a pro.
If you found this article helpful, please consider sharing it with your friends and colleagues.