How to Permanently Delete Files
Last Updated:
So you think you’re deleting files from your computer. But are you really?
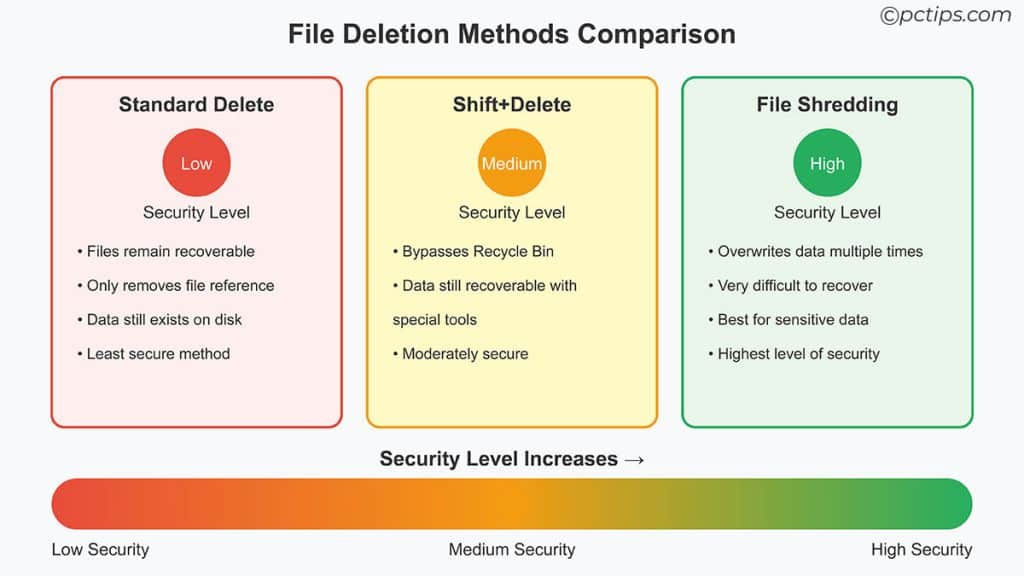
If you’re just hitting the Delete key or dragging files to the Recycle Bin, I hate to break it to you, but you’re not deleting anything.
Those “deleted” files are still lurking on your drive and can be recovered with just a few clicks.
Let me explain.
The Problem With the Recycle Bin
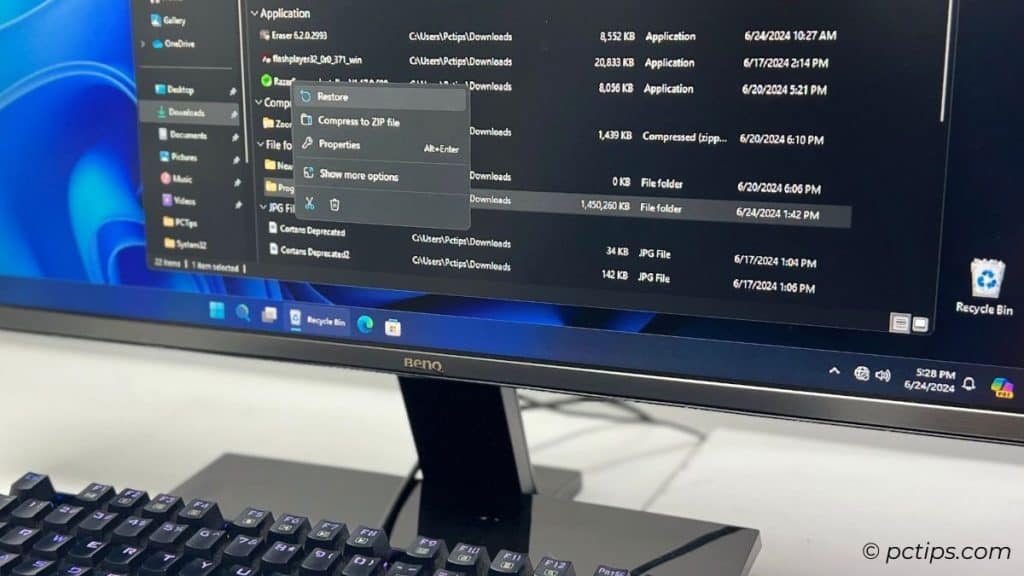
The Recycle Bin seems so convenient.
Just drag files there and poof! They’re gone, right? Wrong.
The Recycle Bin is basically a staging area for files that are marked for deletion, but not actually deleted.
Think of it like the garbage bin in your kitchen – the trash is still there until you take out the garbage.
With the Recycle Bin, your “deleted” files are just moved to a special hidden folder.
They still exist on your hard drive, taking up space.
And anyone with access to your computer can easily restore those files with a few clicks.
The Risks of Improper File Deletion
When you casually delete files, they’re not actually gone.
The space they occupy is marked as available, but the data remains intact until overwritten by new files.
This means anyone with basic recovery software can easily undelete your sensitive documents, financial records, or embarrassing photos. Yikes!
Proper permanent deletion protects you from:
- Data breaches and identity theft
- Compliance violations (HIPAA, GDPR, etc.)
- Reputation damage and embarrassment
- Legal liability and lawsuits
- Blackmail and extortion
How to Make Sure Deleted Files Are Really Gone
To permanently delete a file, You’ve gotta bypass the Recycle Bin entirely.
It’s dead-simple with this small trick: press Shift + Delete when deleting files.
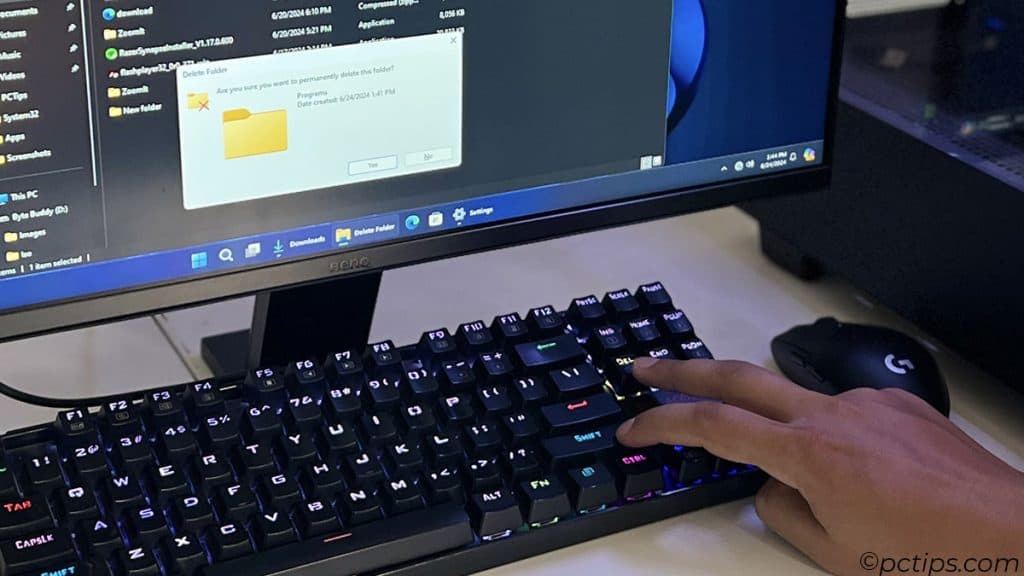
This will permanently delete the files, skipping the Recycle Bin. No take-backsies!
Side note: if you’re curious, I wrote a whole article about the 100 most useful keyboard shortcuts. Check it out!
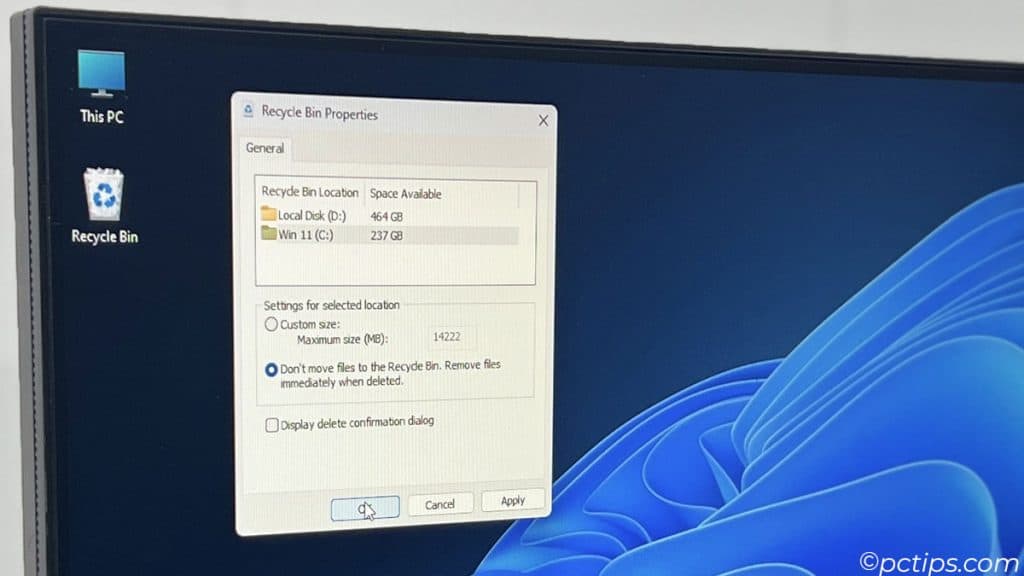
Tweak Your Recycle Bin Settings
If you don’t want to use Shift+Delete all the time, you can adjust your Recycle Bin settings to bypass it automatically.
Here’s how:
- Right-click the Recycle Bin icon on your desktop and choose “Properties“.
- Select the drive and “Don’t move files to the Recycle Bin. Remove files immediately when deleted.“
- Click OK to save your new settings.
Warning: With this setting, files deleted with the regular Delete key will be permanently erased. Be careful!
But even with this option, your files still aren’t 100% gone.
With the right tools, they could potentially still be recovered, because deleting a file just removes it from the drive’s index, but doesn’t actually erase the data.
For the truly paranoid, we need to go deeper.
Shred Files with Cipher
To really nuke a file, you need to overwrite its data so it can’t be recovered.
And Windows has a built-in way to do this: the Cipher command.
Cipher is a command line tool that can overwrite deleted data with random numbers, making it unrecoverable.
Here’s how to use it:
- Open the command prompt. Hold
Win and press R, then type “cmd“. (more run commands) - Navigate to the folder containing the file(s) you want to shred. Use the cd command (e.g.
cd D:\Users\Binod\Desktop). - Type
cipher /w:FolderNameand hit Enter. Replace “FolderName” with the name of the folder you want to shred.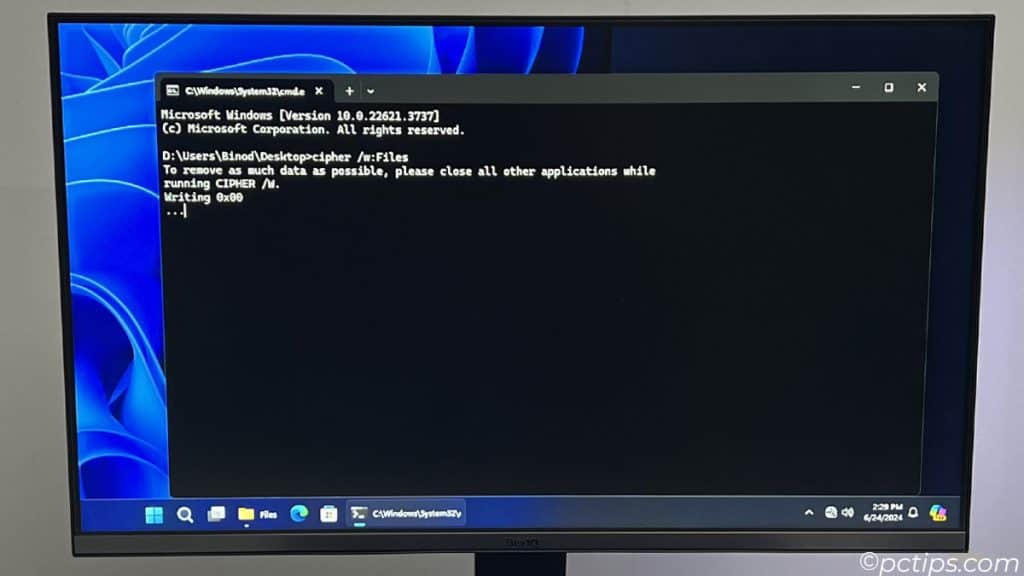
Cipher will overwrite all the deleted data in the specified folder with random numbers.
This takes some time, especially for large files/folders, but it’s the most effective way to permanently delete files short of physically destroying the drive.
Use File Shredding Software
If the command line isn’t your thing, there are plenty of “file shredder” programs you can use to securely erase files.
These tools overwrite the file data with gibberish so it can’t be recovered.
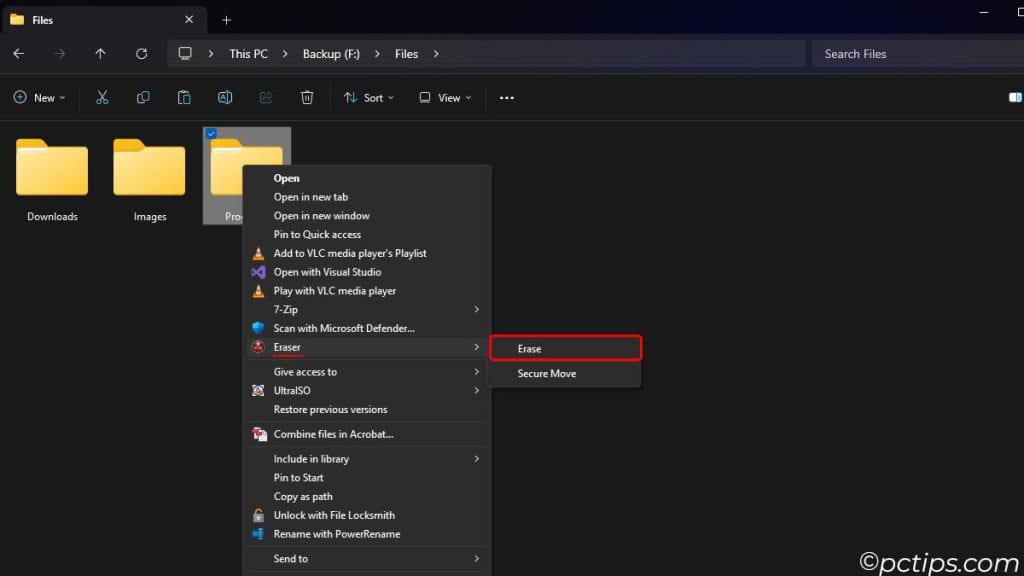
My go-to shredder is a free tool called Eraser.
It integrates right into Windows Explorer so you can just right-click a file or folder and choose “Erase“.
It has several data destruction methods to choose from based on how sensitive the data is.
To use Eraser:
- Download and install Eraser from https://eraser.heidi.ie/download/
- Right-click the file/folder you want to shred and select “Erase” from the context menu
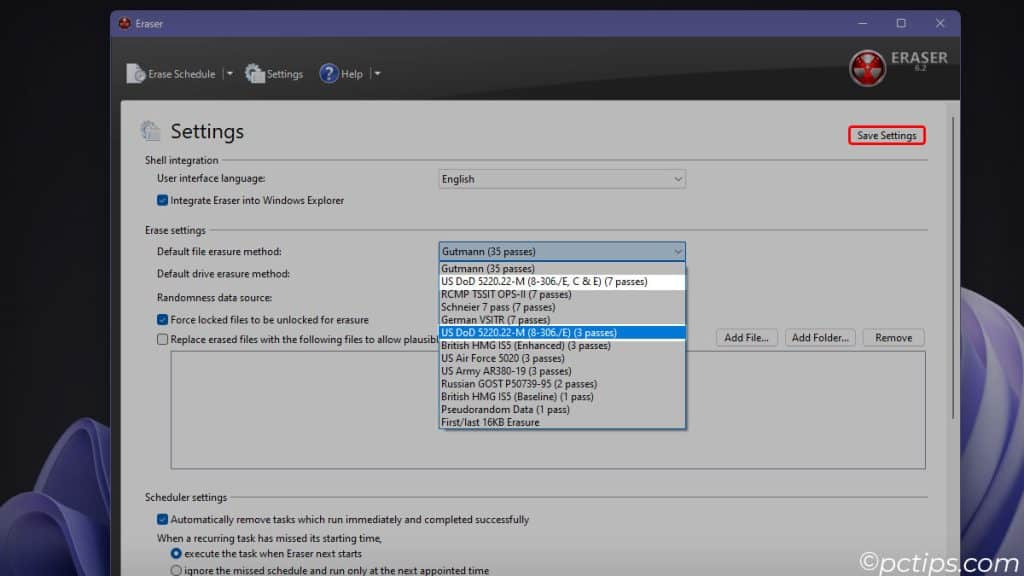
Eraser offers several overwrite methods.
For most everyday purposes, I’d say the 3-pass or 7-pass options are plenty.
The 35-pass Gutmann wipe is probably overkill unless you’re guarding nuclear launch codes.
To choose your preferred erasure method:
- Open the Eraser settings by clicking “Settings“
- Under “Default file erasure method“, choose your preferred option (I recommend DoD 5220.22-M for a good balance)
- Click on “Save Settings”
Eraser and similar shredding tools are great for permanently erasing sensitive data, but they’re overkill for everyday use.
I only break ’em out for the really sensitive stuff.
Choose the Right Shredding Method
Not all shredding algorithms are created equal.
If you really want your files wiped off the face of the earth, pay attention to how many passes your shredder uses:
- 1-pass methods overwrite data once. Quick, but still potentially recoverable by fancy schmancy forensics labs.
- 3-pass methods overwrite data with 3 different patterns. Safe from all but the most determined (and well-funded) snoops.
- 7-pass methods use a standardized pattern from the U.S. Department of Defense. Now we’re playing with the big boys.
- 35-pass Gutmann method is borderline paranoid, but virtually impossible to recover data from. Use this one if you’re really serious.
Ultimately, there’s no one “best” method, but more passes = more security.
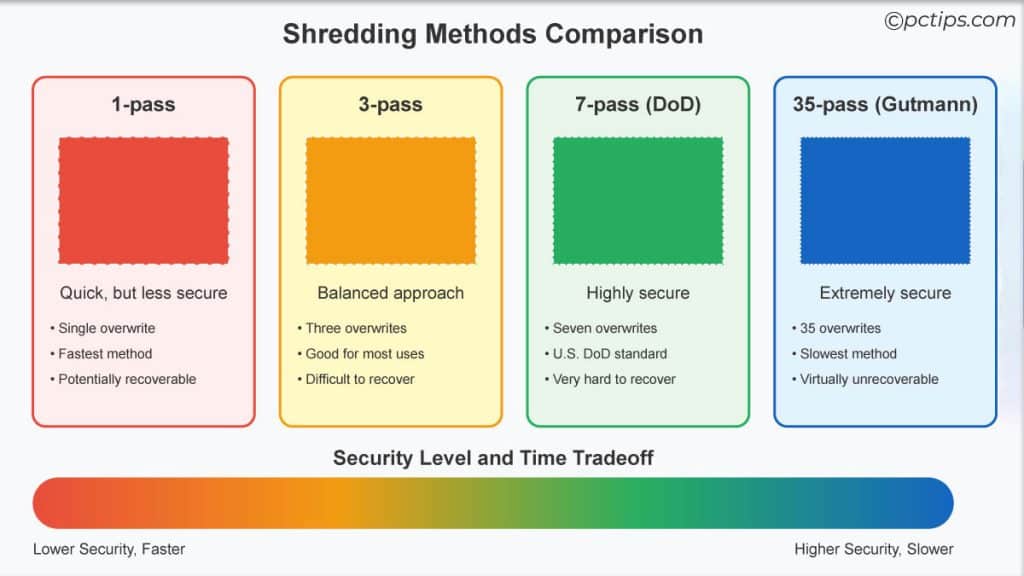
I recommend DoD 5220.22-M for general use. It provides strong security without sacrificing too much speed.
Overwriting data multiple times with random patterns makes it exponentially harder to recover.
Wipe Entire Drives With DBAN
Sometimes you need the nuclear option – wiping a drive completely clean.
Maybe you’re selling an old computer, or donating a hard drive.
You don’t want ANY of your data left behind.
For this, you want DBAN – Darik’s Boot and Nuke. DBAN is a free boot disk that securely erases every sector of a hard drive.
Warning! DBAN destroys EVERYTHING on the drive, forever.
That means the OS, programs, and all files. It will turn your drive into a blank slate.
This is only for when you are getting rid of a drive.
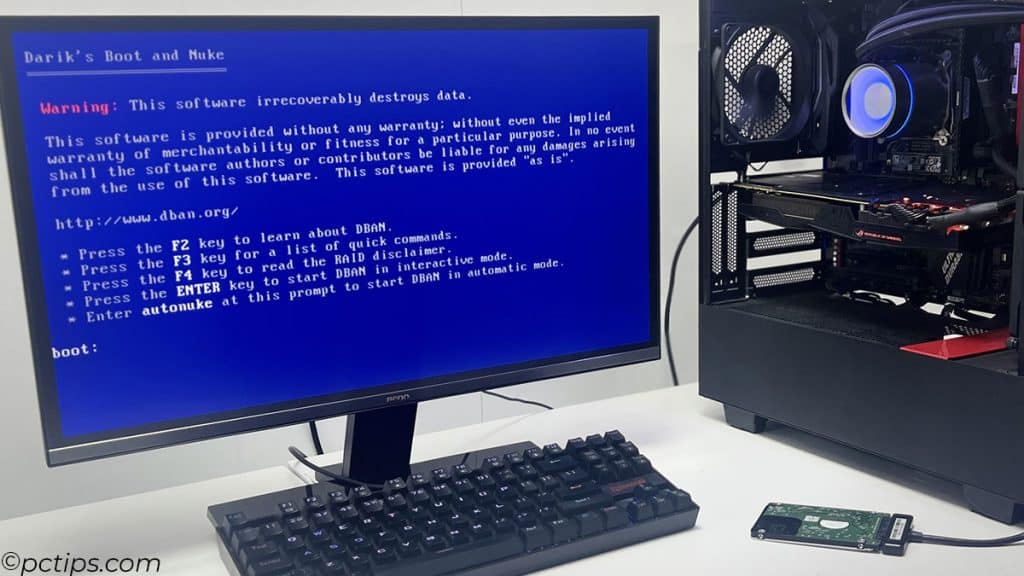
To use DBAN:
- Download the DBAN ISO image and burn it to a CD or flash drive
- Boot the computer from the DBAN disk. You may need to change the boot priority in the BIOS.
- Choose which drives to wipe. You can wipe multiple drives at once.
- Select the erasure method. DoD Short (3 passes) is usually good enough.
- Confirm and start the wipe. For a large drive, this could take many hours.
When it’s done, the drive will be completely clean – no OS, no files, no nothing.
This is the tool I use before donating or selling old computers. .
No one is recovering anything from a DBAN-wiped drive, I promise you that.
Warning: DBAN will erase the entire drive, including all partitions and operating systems. Use with caution, and remember – HDDs only!
For SSDs, see below.
SSD vs HDD
Important! Secure deletion works differently on SSDs.
With SSDs, you can’t directly overwrite individual files like you can with HDDs.
SSDs store data differently and have built-in wear leveling that prevents specific sectors from being overwritten.
For SSDs, you need to use the drive’s built-in secure erase command, which will reset all data blocks to a clean state.
It’s kind of like using DBAN, but built into the SSD firmware.
How you activate the secure erase command varies by manufacturer.
In general, you’ll need to:
- Boot into your BIOS settings
- Look for a “Secure Erase” or “Sanitize” option for your SSD
- Follow the prompts to erase the drive
Some SSDs also support secure erasure through the manufacturer’s tools, like Samsung Magician or Crucial Storage Executive.
When in doubt, check your SSD maker’s website for specific instructions.
For everyday SSD deletion, the normal methods are fine – your deleted files will be automatically cleaned up by the TRIM command.
But for sensitive data, always use the SSD’s built-in secure erase.
Encrypt Before Deleting
Rather than relying on thorough deletion, I’m personally a fan of always-on encryption.
If all your files are scrambled with strong encryption before they ever hit your hard drive, it doesn’t really matter if they get deleted securely or not.
Without your encryption key, no one is reading those deleted files whether you overwrite them or not.
Related: How to Create Super-Strong Passwords (That You Won’t Forget!)
I recommend using an open-source encryption tool like VeraCrypt.
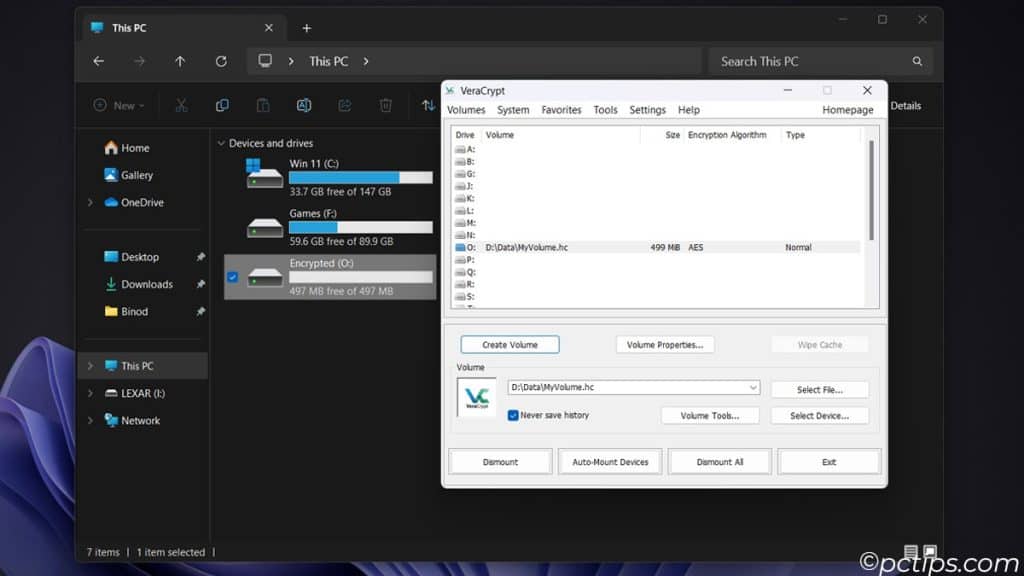
Just remember, if you lose the password, the files are gone forever.
Encryption is serious business.
The Cloud Never Forgets
Speaking of the cloud, you should know that cloud storage services (Google Drive, iCloud, OneDrive, Dropbox, etc) retain file data even after you delete it.
When you delete a file in cloud storage, it usually goes to a “trash can” and is kept for ~30 days before being purged.
But even after that, the data may remain on the cloud provider’s servers in backups and caches.
Cloud providers are not in the business of securely erasing data – they’re in the business of keeping it in case you want it back.
Each service has its own deletion policies and procedures, so check with your provider.
If you have very sensitive data stored in the cloud that you want to delete, your best bet is to encrypt it before uploading to the cloud in the first place.
Physical Destruction
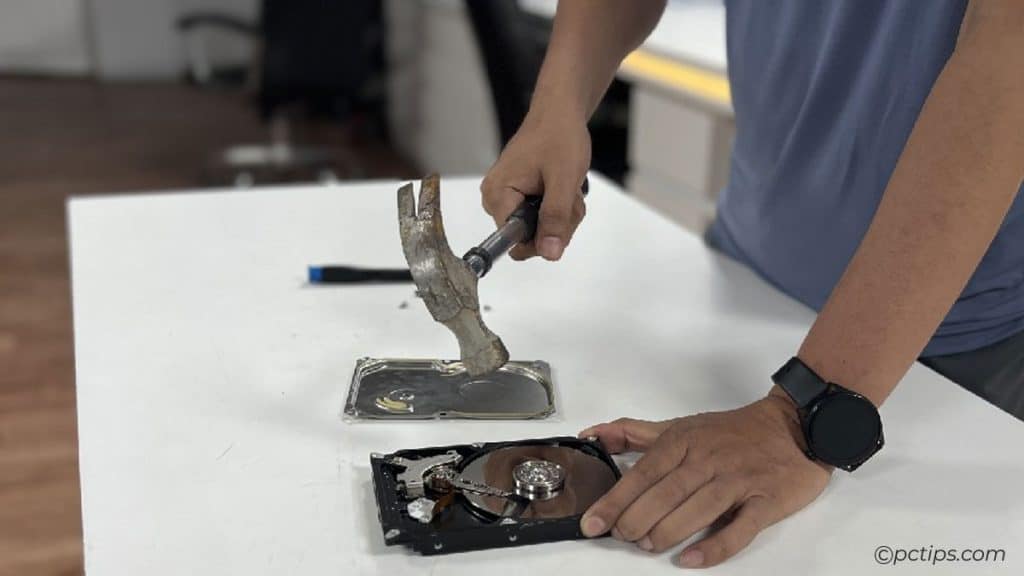
For the ultimate in data destruction, you can’t beat physical annihilation.
Take the hard drive out of the computer and beat it to pieces with a hammer.
Drill some holes in it.
Bash it on the ground.
Heck, toss it in a fire.
Just be sure to protect your eyes!
This is really only for the extremely paranoid, those who work with the most sensitive data, or those who live in a spy movie.
For everyone else, a software wipe is sufficient.
Don’t Forget About Backups & Copies
One final word of warning – deleting a file securely doesn’t do diddly squat if you’ve got backups or copies floating around elsewhere!
Don’t forget to scrub your backups, external drives, thumb drives, CD-Rs, cloud storage – anything that may have had a copy at some point.
The job ain’t done till you’ve tracked down and wiped out every last trace.
Delete… Properly.
- The Recycle Bin doesn’t actually delete files, it just marks the space as usable. Deleted data can be easily recovered.
- Use Shift+Delete to bypass the Recycle Bin for instant permanent deletion
- Tweak Recycle Bin properties to always delete files immediately
- Overwrite free drive space with Cipher to prevent deleted file recovery
- Use file shredder apps like Eraser to securely delete individual files
- Choose multi-pass shredding methods for better security
- Encrypt your files from the start to make secure deletion a non-issue
- Wipe drives completely with DBAN before selling or donating
- Use built-in Secure Erase on SSDs instead of traditional shredding
- Physically destroy drives for the ultimate in data destruction
- Don’t forget to wipe backup copies too! One copy is all it takes to recover your secrets
If you found this guide helpful, give it a share so your friends can also learn the secrets of proper file deletion.
And remember, if you have any burning questions, I’m always just an email away at [email protected].