How to FREE Up More than 100GB+ Of Disk Space
Last Updated:
Let’s dive into some practical tips to reclaim a TON of space on your hard drive.
I’ve been testing out different methods and tracking down the biggest space hogs, and I’m excited to share what I’ve learned.
If you’re ready to go from “Disk Full” errors to more than 100GB of free space, read on!
Analyze Disk Usage
The first step is to figure out what’s actually eating up all that space. And for that, you need a disk visualizer.
My personal favorite is WinDirStat (free). It scans your drive and shows you a treemap of your entire drive, allowing you to see at-a-glance what’s hoarding space.
The bigger the box, the more space that directory or file is occupying.
I love how WinDirStat uses different colors to represent different file types.
Makes it dead simple to spot the space-hogging culprits.
When I ran it on my own machine, the big red blocks immediately revealed my Steam games were the biggest offenders. Over 150 gigs tied up in games I hardly play anymore!
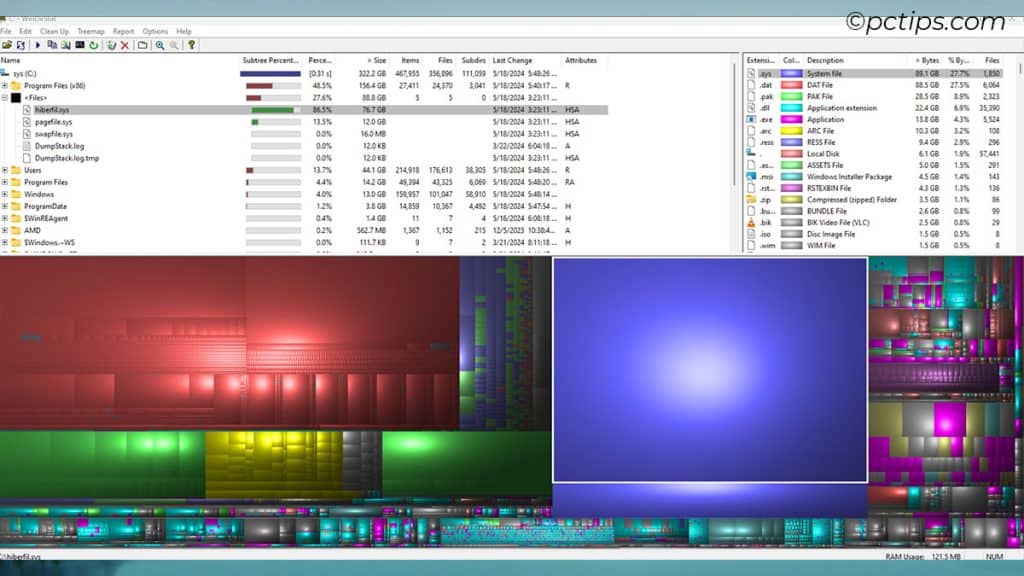
Digging deeper, I found:
- hiberfile.sys: 76.7GB ( shocking? )
- pagefile.sys: 12GB
- Users folder: 44.1GB (AppData alone was 23.3GB, Downloads was 18.3GB)
- WinSxS folder: 5GB
Before you start deleting things left and right, make sure you have backups of any critical files. Better safe than sorry!
Remove Unnecessary Files
Okay, now that you’ve ID’ed the top culprits, it’s time to get ruthless.
Do you really need all 8 seasons of Game of Thrones clogging up your drive?
Or those vacation photos/videos from 5 years ago you never got around to editing?
Be honest with yourself. If you haven’t opened a folder in months (or years!), there’s a 99.9% chance you don’t need it anymore.
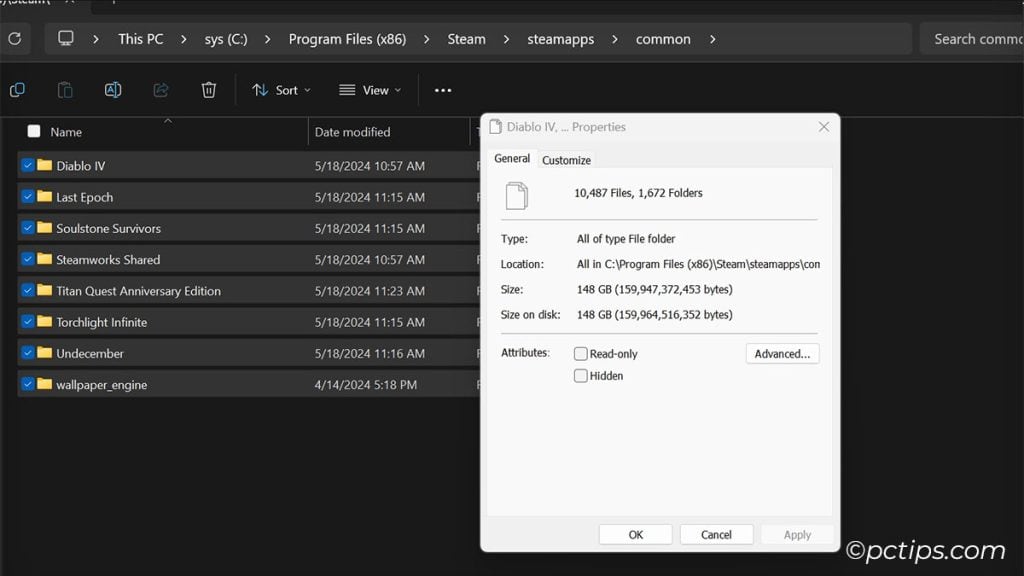
Those Steam games I spotted in WinDirStat. Let’s be real, I’m not going to be playing most of them again anytime soon.
And hey, I can always re-download them later if I get the itch.
So goodbye games, hello 148GB of reclaimed space!
Uninstall Unused Apps and Games
I get it, you’re an app junkie. You’ve gotta try every new release.
But chances are, half the programs sitting on your drive haven’t been touched since the day you installed them. Time for an app audit!
Open Settings -> System -> Installed Apps and sort the list by install date or size.
For leftover files, use Revo Uninstaller.
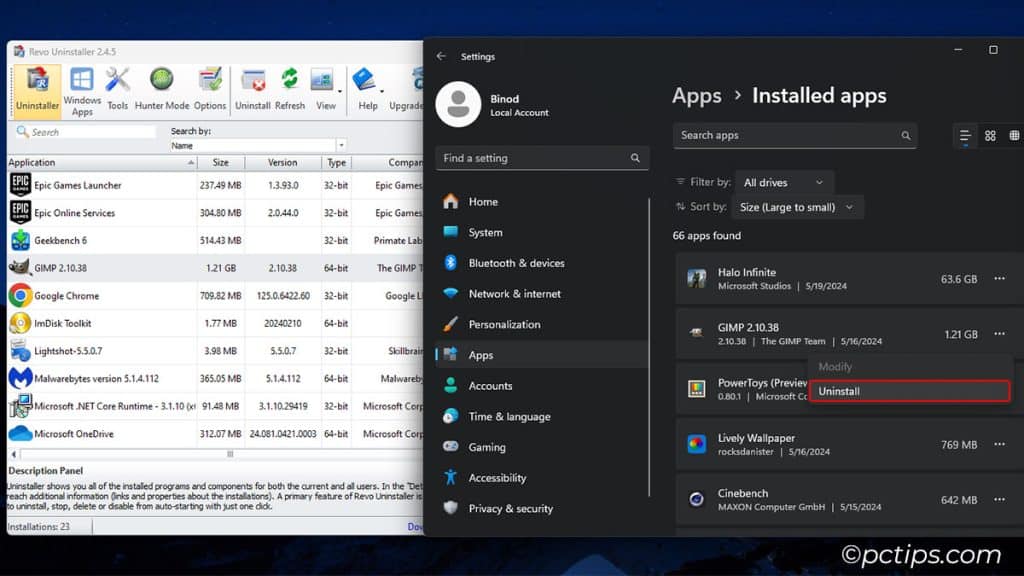
Any program you haven’t used in a few months gets the boot.
And pay special attention to apps and games that include “HD Textures” or “Bonus Content” – those can easily add tens of gigabytes of bloat.
Clean Up Your Downloads
If your Downloads folder is anything like mine, it’s a black hole where files go to be forgotten, forever.
PDFs, setup files, linux ISOs, star wars gifs…they all pile up in there over time.
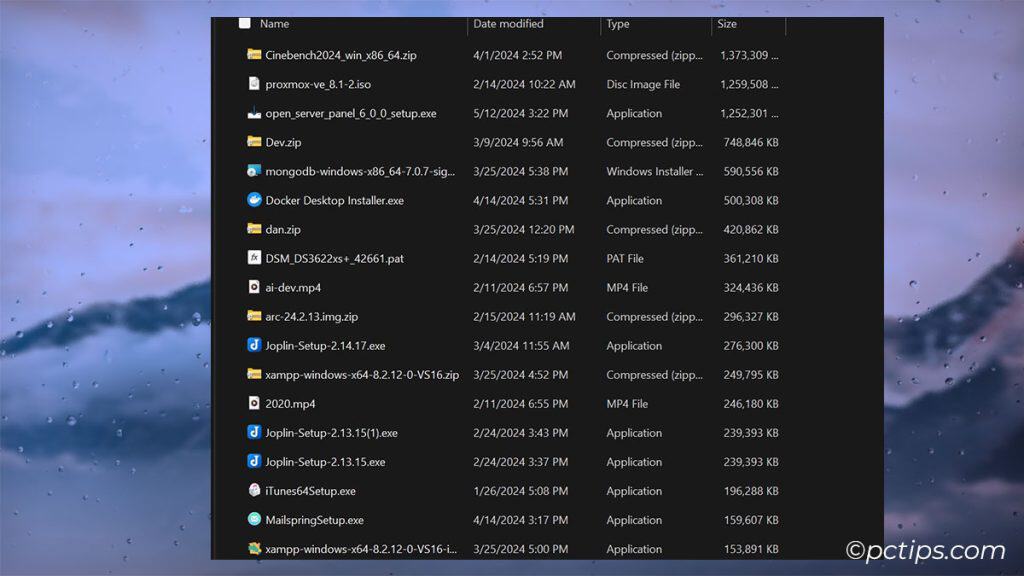
Follow these tips to keep it under control:
- Sort by file size and delete the biggest offenders
- Move installer files and disk images to an “Installers” folder
- Delete “crdownload” files (failed/incomplete Chrome downloads)
- Keep only the most recent Downloaded file for apps you update regularly
- Establish a monthly cleanup routine so it never gets out of hand
Purge Unnecessary App Data
You’d be amazed how much space is wasted on temporary app files and caches you don’t need.
The biggest offenders are usually web browsers (Firefox/Chrome) and media/design apps like GIMP.
Here’s how to show those apps who’s boss:
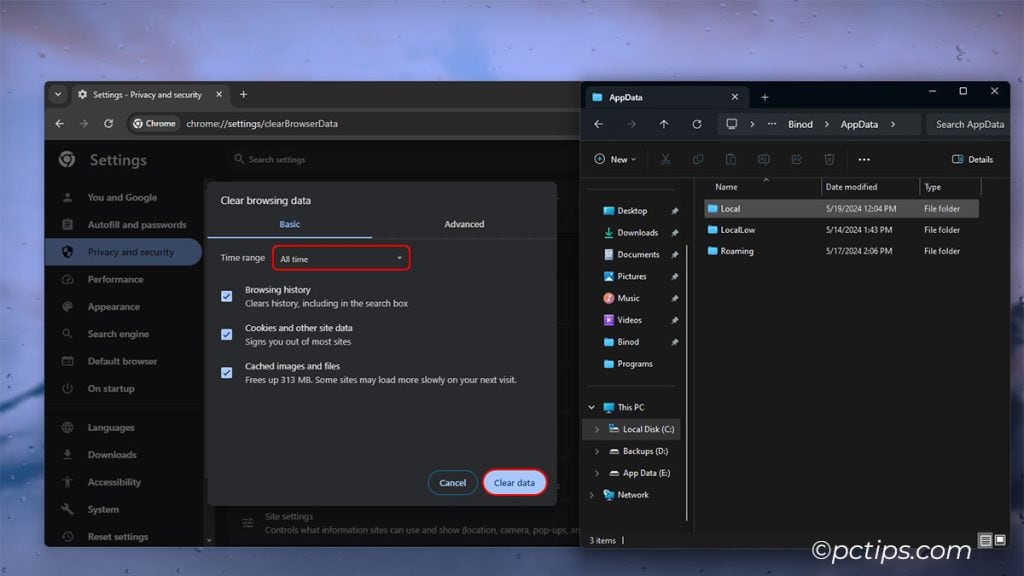
- In Chrome, go to Settings -> Privacy and Security -> Clear browsing data. Check all the boxes and set the time range to “All time”.
- Open your AppData folder (press Win+R and type %appdata%). This is where most programs store their settings, caches, and other miscellaneous files. Drill down into the Local, LocalLow, and Roaming subfolders to really dig deep.
- Consider moving app cache locations to a secondary drive using symlinks if you’re really tight on space.
Compress Rarely Used Files
Bet you got some rarely used files ( (backups, raw video footage, high-res photos, music production projects, etc.) just eating up space.
Time to put ’em on a diet with compression.
Zipping files with tools like WinRAR or 7-Zip is an easy way to shrink things down without losing data.
First off, grab yourself a compression commander like WinRAR or 7-Zip.
Just right-click on a folder, select “Add to archive“, and watch the magic happen.
Move Files and Apps Elsewhere
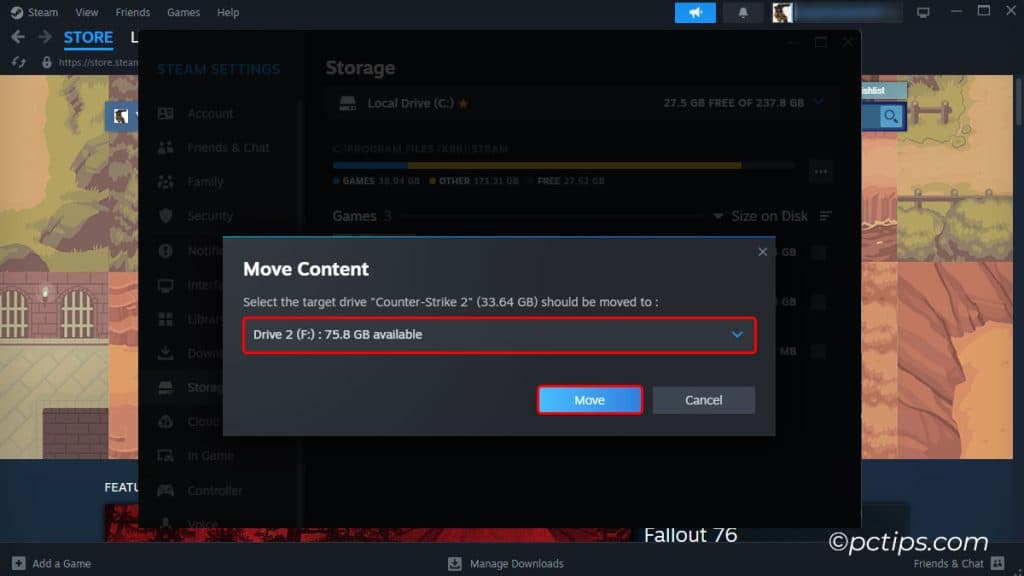
If you’re down to the wire and still need space, consider moving some of your biggest directories to another drive.
Steam lets you easily move game installs. And you can always redirect user folders (Documents, Pictures, Desktop, etc.) by right-clicking them and going to Settings -> Storage.
For other programs, try creating a symlink so the app still thinks it’s on C: Drive after moving it. Steam Mover is great for this.
Eliminate Duplicate Files
Duplicate files are more common than you think!
Especially if you’re in the habit of doing manual backups or shuffling files between multiple drives.
Tools like dupeGuru make it dead simple to find and zap the copies.
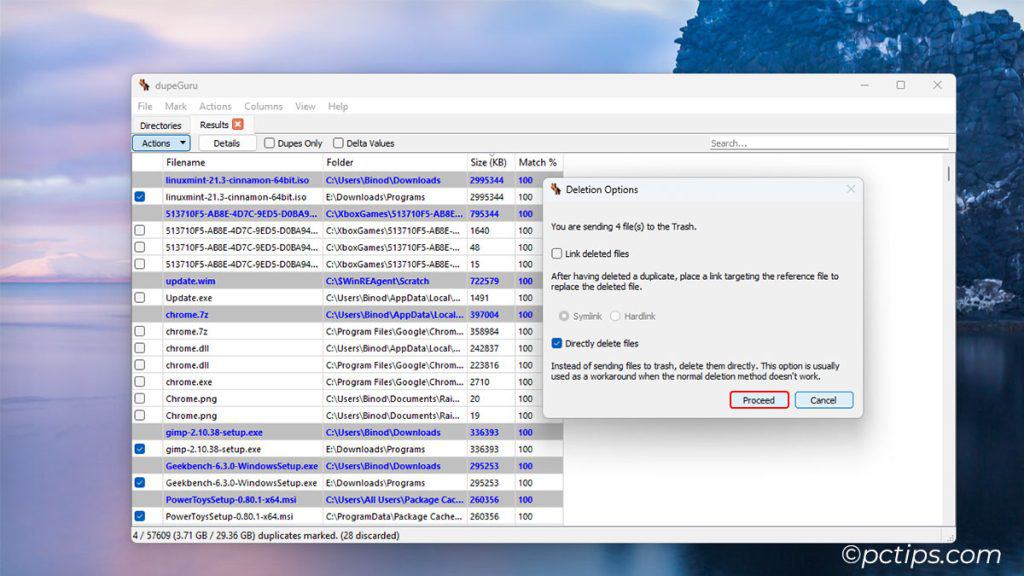
Just point it at a drive or folder and let it work its magic.
When I last ran dupeGuru on my bloated photo library and was shocked to discover over 50GB of wasted space.
Adopt good file management habits to prevent future dupes. Use clear naming conventions and folder hierarchies.
Note: Adopt good file management habits to prevent future dupes. Use clear naming conventions and folder hierarchies.
Clean Windows Bloat
Over time, Windows can start to feel bloated and sluggish.
But there are a bunch of built-in tools you can use to whip it back into shape!
- Run the Disk Cleanup tool to eliminate temp files, offline web pages, old Windows versions, and more. You can even clean up system files!
- Disable hibernation to delete the giant hiberfil.sys file. In Command Prompt (run as Admin), enter: powercfg /hibernate off
- Reduce the size of your pagefile. Right-click This PC -> Properties -> Advanced System Settings -> Advanced tab -> Performance Settings -> Advanced tab -> Change virtual memory
- Enable Storage Sense to automatically free up space by removing junk like temporary files and emptying the Recycle Bin.
- Clear out old Windows Update files using the Disk Cleanup tool. It can remove gigabytes of obsolete update junk!
- Manage System Restore points and shadow copies. Reduce the disk space allocated in System Protection settings.
- Delete the “Windows.old” folder that’s left behind after a feature update. No need to hang onto the previous version forever!
- Clean up the WinSxS folder using the built-in StartComponentCleanup command.
- Reduce the size of File History versions. In the File History control panel, click Advanced Settings and reduce the “Keep saved versions” time.
- Delete old System Troubleshooting history in the Diagnostics & Feedback settings page. Why even keep those ancient breadcrumbs?
- Empty your Recycle Bin regularly. Storage Sense can do this automatically, or make it a habit to do it manually every week.
- The DriverStore folder can accumulate a lot of old driver packages. Use the Disk Cleanup tool to find and remove the ones you don’t need anymore.
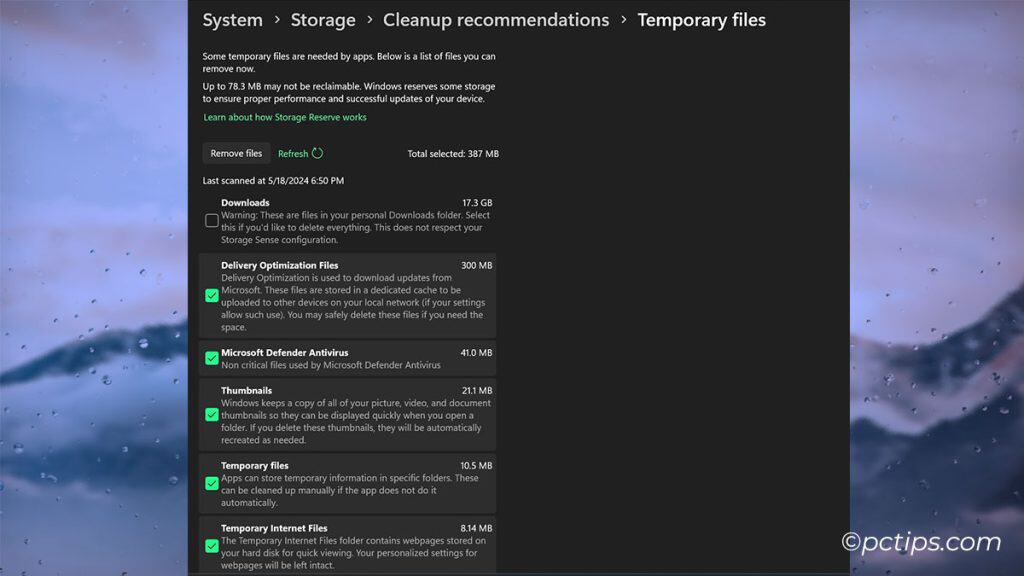
- Delivery Optimization files (used for Windows Update sharing) can take up a ton of space. Disable the feature or reduce the Max Cache Size to keep it under control.
- Delete non-critical Windows Defender/Microsoft Security Essentials files like old definition updates.
- Uninstall unused languages in Region settings to free up a few gigs. Do you really need Windows in Swahili?
- Clear out old File Explorer history (jump lists, frequent folders, recent files, etc.) in File Explorer Options.
- Use CompactOS to compress Windows binaries and system files. It can save you 1-2GB on 32-bit systems or 2-5 GB on 64-bit.
- Flush the DNS cache, Font Cache Service cache, Windows Update cache, and any other temporary system cache folders you come across.
- Set up an automated maintenance routine using Task Scheduler so you don’t have to remember to do these things manually!
- Check out the Disk Cleanup Recommendations tool for even more space-saving suggestions. It’ll scan your drive and flag files that are safe to delete
Prune Phone/Tablet Backups
If you’ve ever backed up your phone or tablet to your PC, those backups may still be hanging around months or years later taking up space.
Go to C:\Users[YourUserName]\Apple\MobileSync\Backup on Windows or ~/Library/Application Support/MobileSync/Backup on Mac.
Delete any ancient backups for devices you don’t even own anymore!
Still Desperate? Time to Upgrade or Reset!
Still bumping up against your storage limit?
It may be time to consider upgrading to a larger drive. With 4TB+ SSDs being so affordable now, this is a great option, especially for laptops.
Here are Some top picks:
- WD_BLACK 4TB SN850X (Best Overall, my personal favorite)
- SAMSUNG T9 Portable SSD 4TB (Best External)
- Crucial P3 4TB PCIe Gen3 (Best Budget, Bigger Size)
- Crucial P3 2TB Gen4 (Best Budget)
Or if you’re feeling bold, a complete Windows reset might be just what the doctor ordered.
Sometimes starting fresh is the best way to de-clutter.
But make sure you have a FULL backup first!
You Did It!
Congratulations, you’ve reclaimed a massive amount of disk space!
Whether you freed up 50GB or 500GB, that’s room you can now use for the things you need and enjoy.
But the battle against disk bloat never ends.
To keep your drive lean and mean:
- Audit your apps and files every few months. Purge the stragglers!
- Set up automatic cleanup routines with tools like Storage Sense.
- Be mindful of what you download. Ask “Do I really need this?” before clicking Save.
- Move large, rarely-used files to external storage, the cloud, or compress them.
So, what’s your final space-saving tally?
What junk file caches surprised you the most?
Do you have any other space-saving tips I missed?
Share your victories (or struggles) in the comments!
If you ever find yourself in the “Low Disk Space” trap again, re-read this guide and show that bloated drive who’s boss.