36 Hidden Facebook Features You Probably Didn’t Know About
Last Updated:
When it comes to a social media app with the largest number of users, Facebook comes second to none.
With more than 3 billion monthly active users, many still miss out on the secret or underutilized features that Facebook offers.
Having used Facebook for the better part of my adult life, here are some hidden features that you didn’t know existed.
Share Your Secrets in Peace
Need to share sensitive information over Facebook Messenger?
Facebook Messenger allows you to start an encrypted chat with disappearing messages, known as a Secret Conversation.
To start an encrypted chat where messages disappear after a set amount of time:
- Open a Messenger chat with your confidante
- Tap on the person’s name at the top
- Turn on “Disappearing messages”
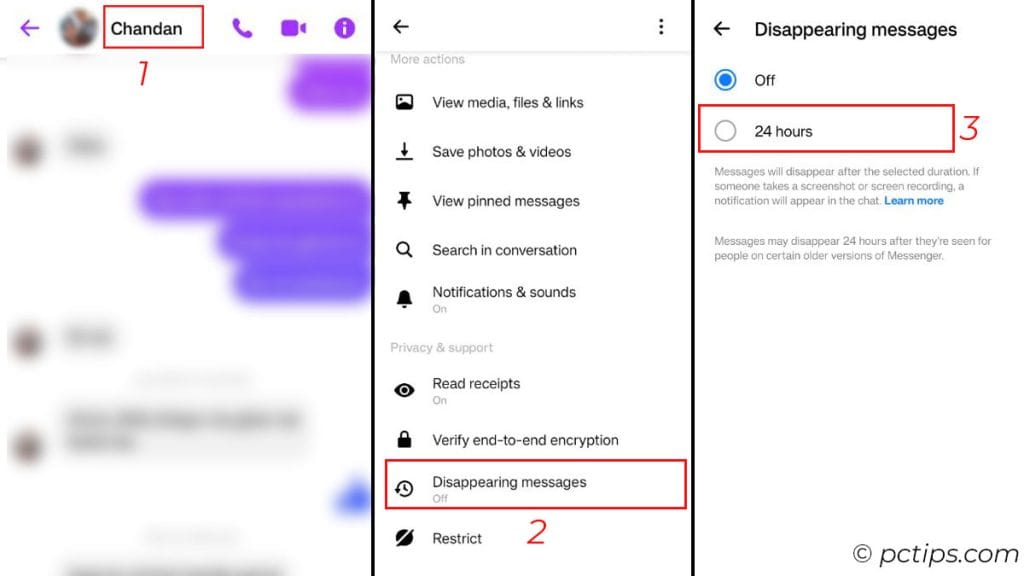
Now you can gossip about anything, formulate covert plans, or just share silly selfies without worrying about it coming back to haunt you.
Search Engines Can Find Your Profile
Did you know that if you type your name in any search engine, your profile can pop up in the results?
This is one of the crazy features that is enabled by default. So, if you have not changed it, anyone can look you up with a quick Google search.
It’s pretty unsettling that anyone can look up your name and have all the information about you.
Now, if you want to improve your online presence it’s best that you enable this setting. But for normal users, it’s better to keep it disabled.
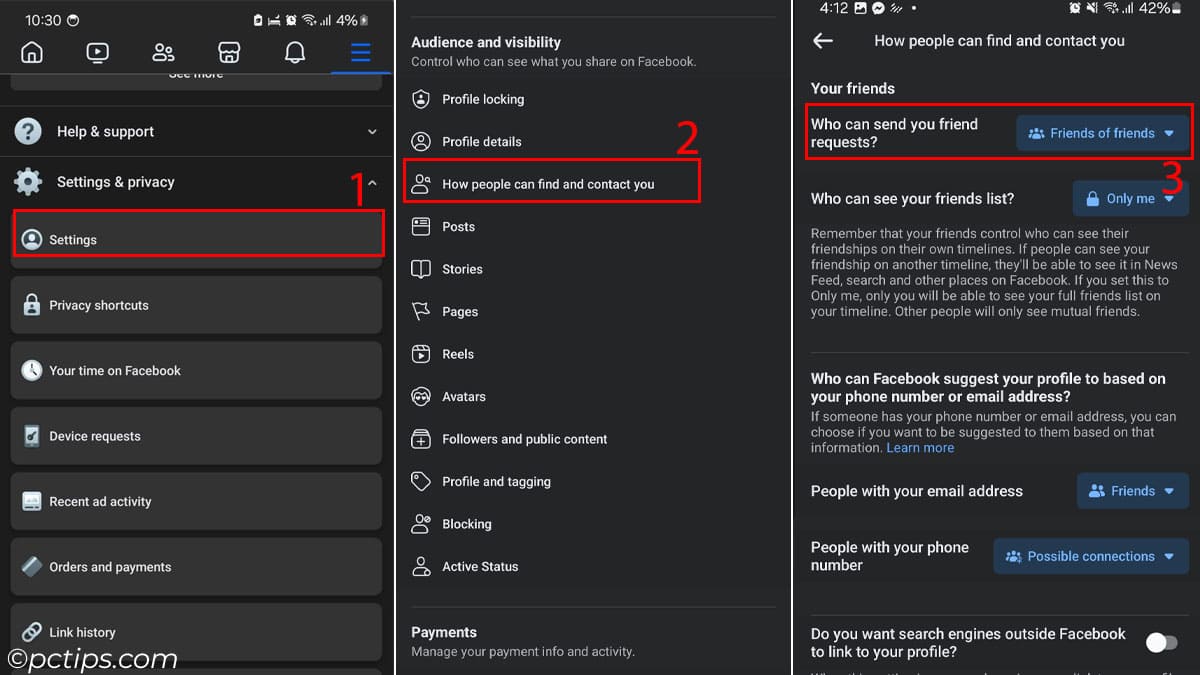
- Click on your profile on the home screen
- “Settings & privacy” > “Settings“
- Click on How people can find you under Audience and Visibility.
- Disable Do you want search engines outside Facebook to link to your profile?
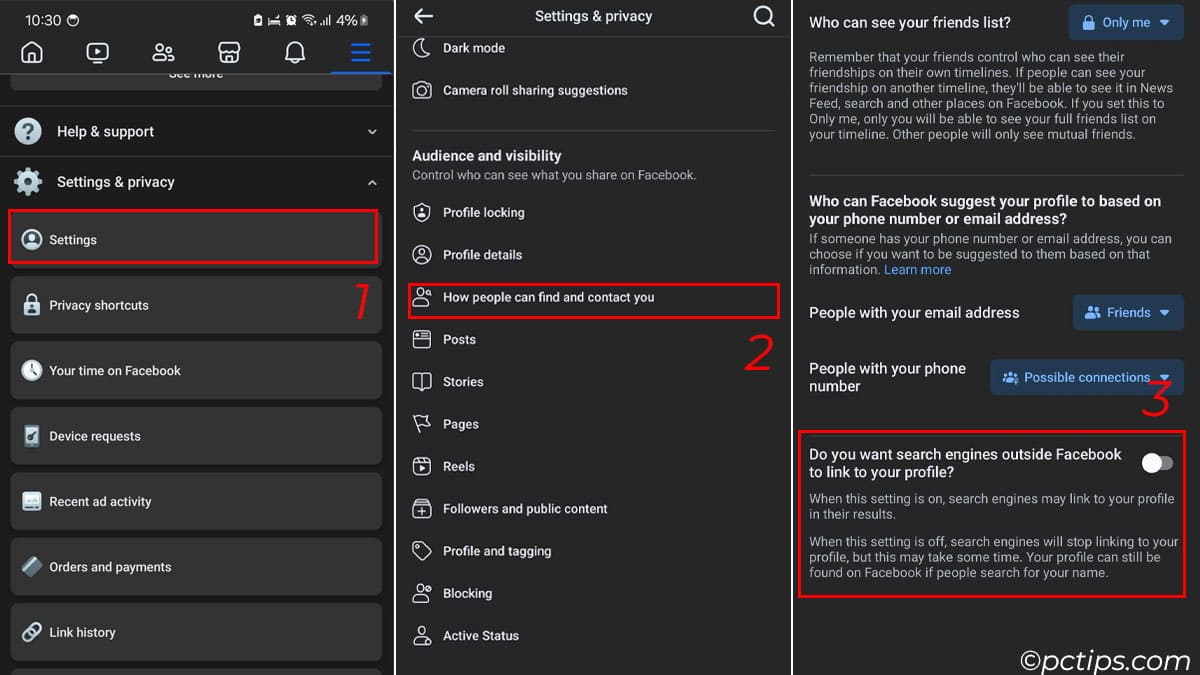
Note: This setting might take time to change its mode.
Lock Your Profile
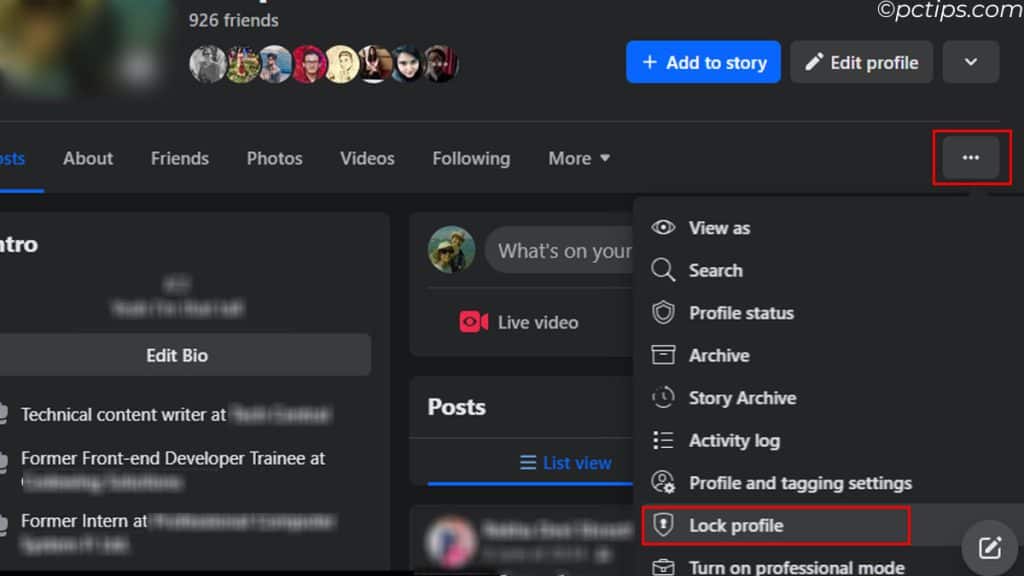
You might have already seen a locked profile.
Its contents are not visible, you cannot click on the profile picture or cover photo, taking a screenshot will not work, and profile details are not available.
So basically, when you lock a profile, it shows a limited view of profile content for people who aren’t your friends. And only a portion of your About info will be visible to everyone on your profile.
If you don’t want people to snoop on your account, you might want to lock your profile.
Just open your profile, click on three horizontal dots, and select Lock Profile. The steps are same for mobile devices as well.
See Who’s Snooping in Your Account
It’s a scary thought, but someone could be accessing your Facebook account without your knowledge.
Luckily, Facebook makes it easy to see all active sessions and end any suspicious ones.
Here’s how:
- Go to “Settings and Privacy” > “Settings” > “Meta Accounts Centre” > “Password and security” > “Where you’re logged In.”
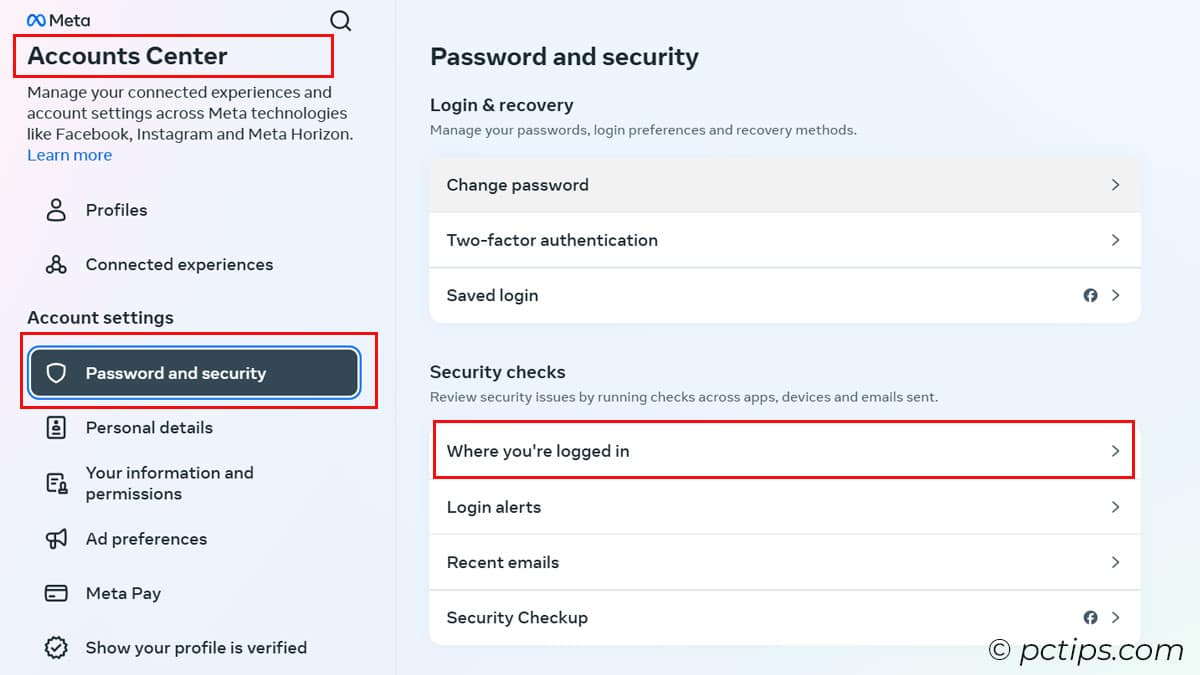
- Here, you’ll see a list of all active sessions.
- If you notice any suspicious sessions, Go to “Select devices to log out” , check the devices you want to log out from, and click on Log out.
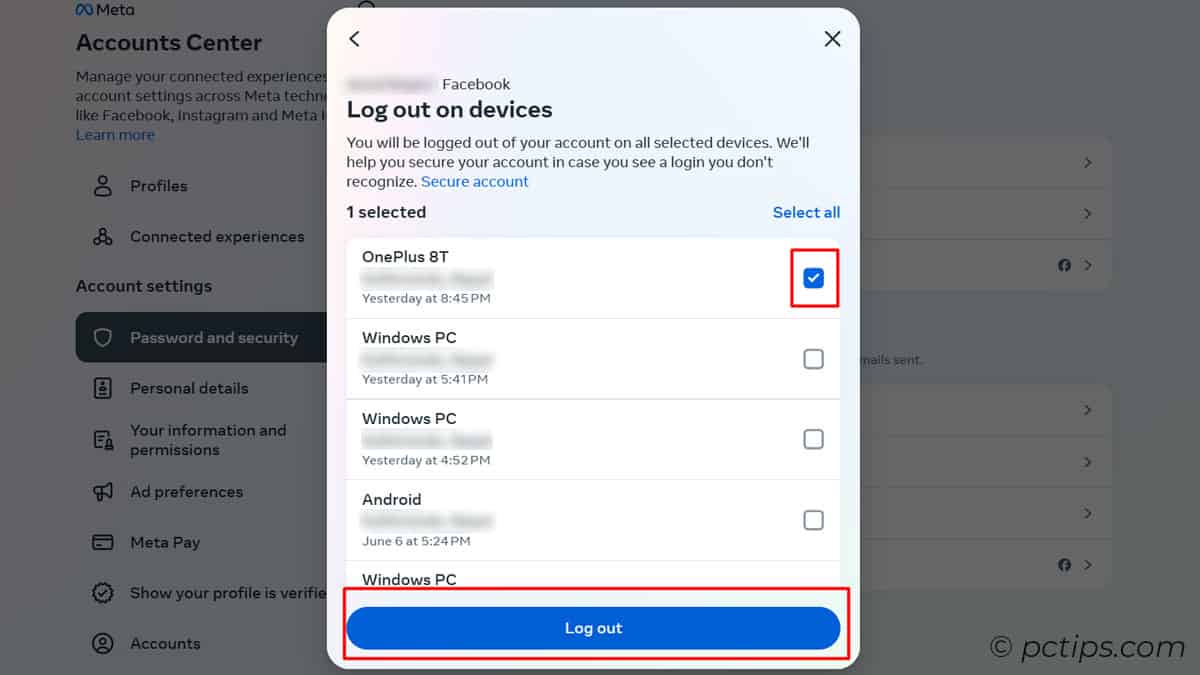
- If you are on your PC, you can directly select the device and log out with one click.
Bonus tip: Turn on “In-app notification” and “Email” alerts from Login alerts for extra peace of mind.
It will notify you if it detects a login from a device or browser you haven’t used before.
This way, you can take action right away if someone gains unauthorized access to your account.
Track Time Spent on Facebook
It’s easy to lose track of time when you’re scrolling through your Facebook feed. But did you know that Facebook has a built-in feature that allows you to monitor how much time you’re spending on the platform?
To access it:
- Go to “Settings & Privacy” > “Preferences” > “Your time on Facebook” > “See your time“
- You’ll see a breakdown of the hours and minutes you spend on Facebook each day
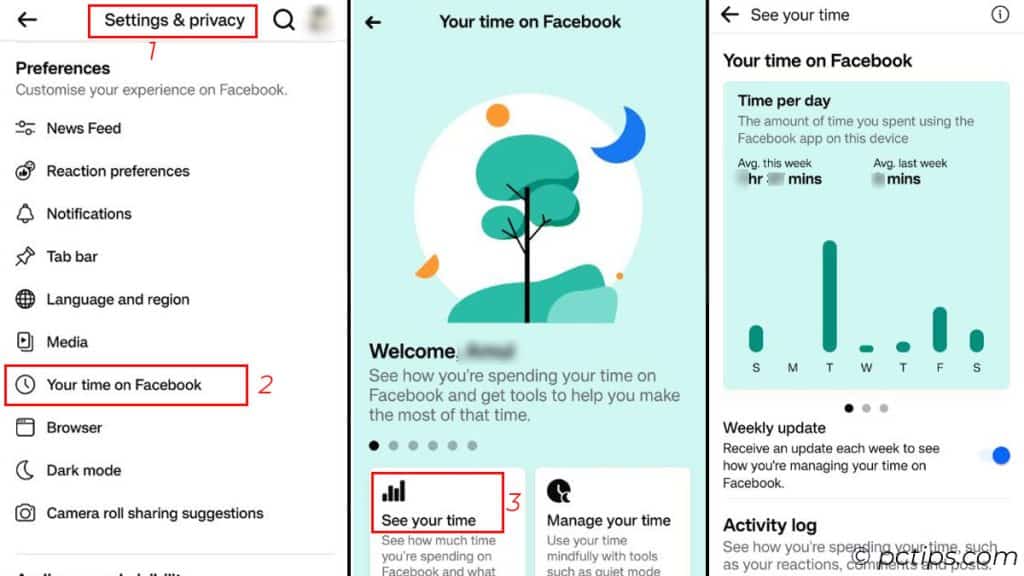
I was shocked when I first saw my daily average.
It motivated me to be more mindful of my Facebook usage and to set limits for myself. Give it a try and see how much time you’re really spending on the platform!
You can even set a daily time reminder or mute notifications.
Mute Annoying Posts in Your Newsfeed
We all have that one friend who clogs up our newsfeed with endless posts about their cat or political rants. But did you know you can hide their posts without unfriending them? Here’s how:
- Click the three dots in the top right of the offending post
- Select “Hide Posts“, “Snooze for 30 days.”
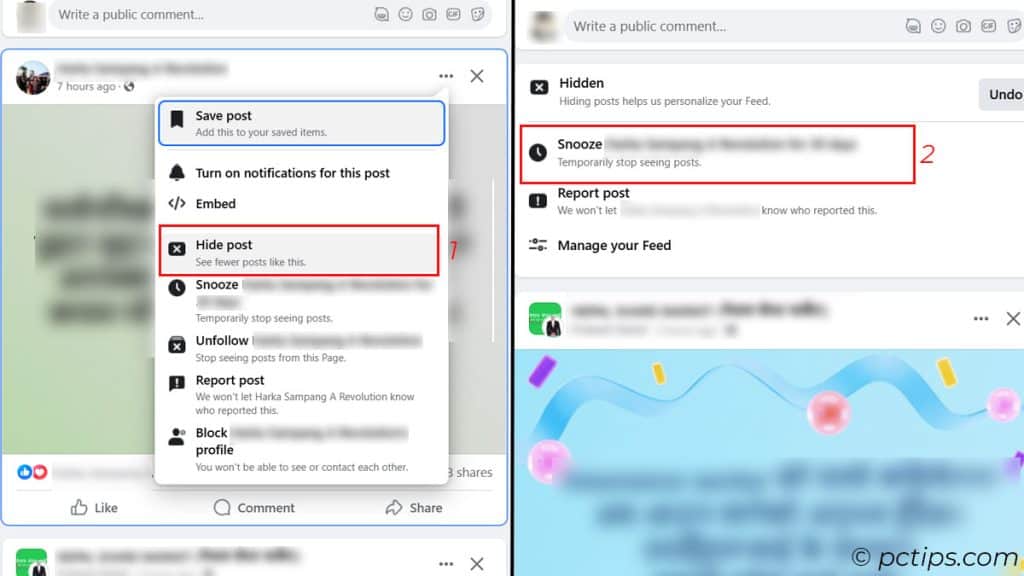
You can also choose “Unfollow” to permanently stop seeing their posts without unfriending them.
Voila! You’ll stop seeing their posts in your newsfeed, but you’ll still remain friends. It’s a great way to curate your newsfeed without any awkward unfriending incidents.
This feature also works on a page or group posts.
Delete Post In Bulk
We all have a bunch of unnecessary posts that appear on our timeline. It could be a tagged post from friends or a birthday wish.
Now clicking on the three dots, and removing tags or hiding from the timeline for one post is fine. But imagine you have hundreds of posts that you want to remove.
This is where you manage posts in bulk.
- Just open your Facebook profile and click on Manage Post under Posts.
- Select Filters and set the type of post that you want to see. Then, press on Done.
- Now, select all the posts that you want to remove, hide, or delete, and click on Next.
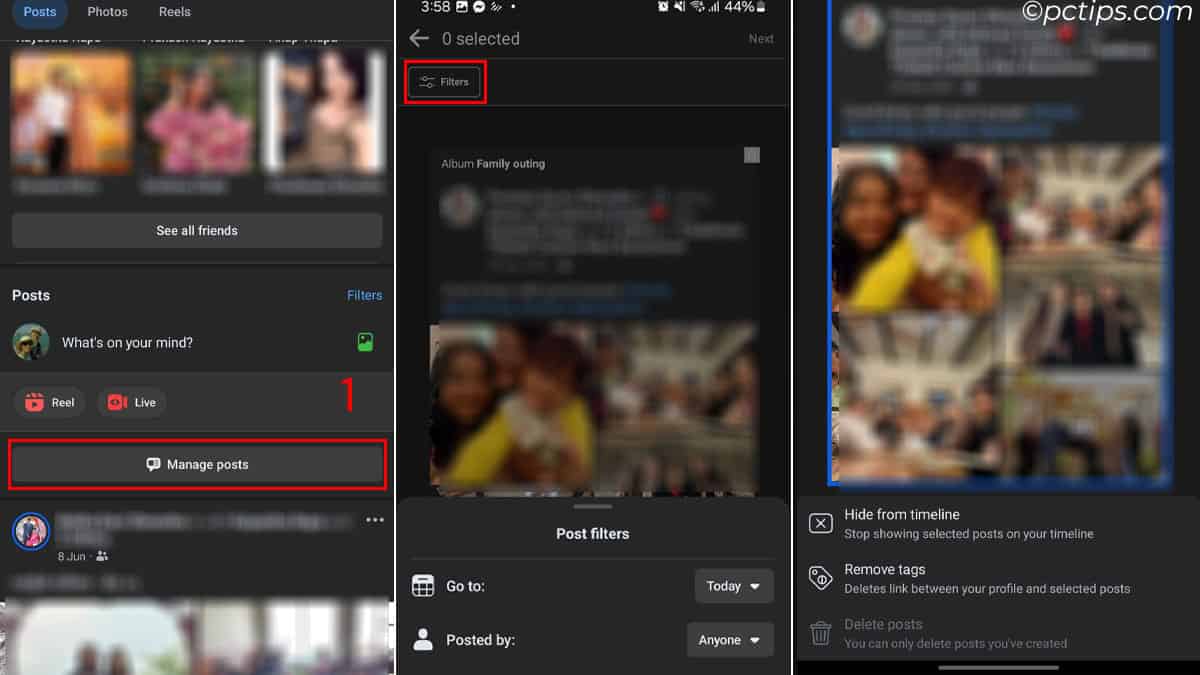
- check the options of Hide, Remove, or Delete, and confirm your choice.
Hide a Picture or Video from a Specific Friend
Sometimes you want to share a post with most of your friends, but there may be one or two people you’d rather not see it. Facebook makes it easy to restrict specific friends from seeing certain posts.
Here’s how:
- Go to the friend’s profile
- Tap on Friends
- Select Edit Friend List
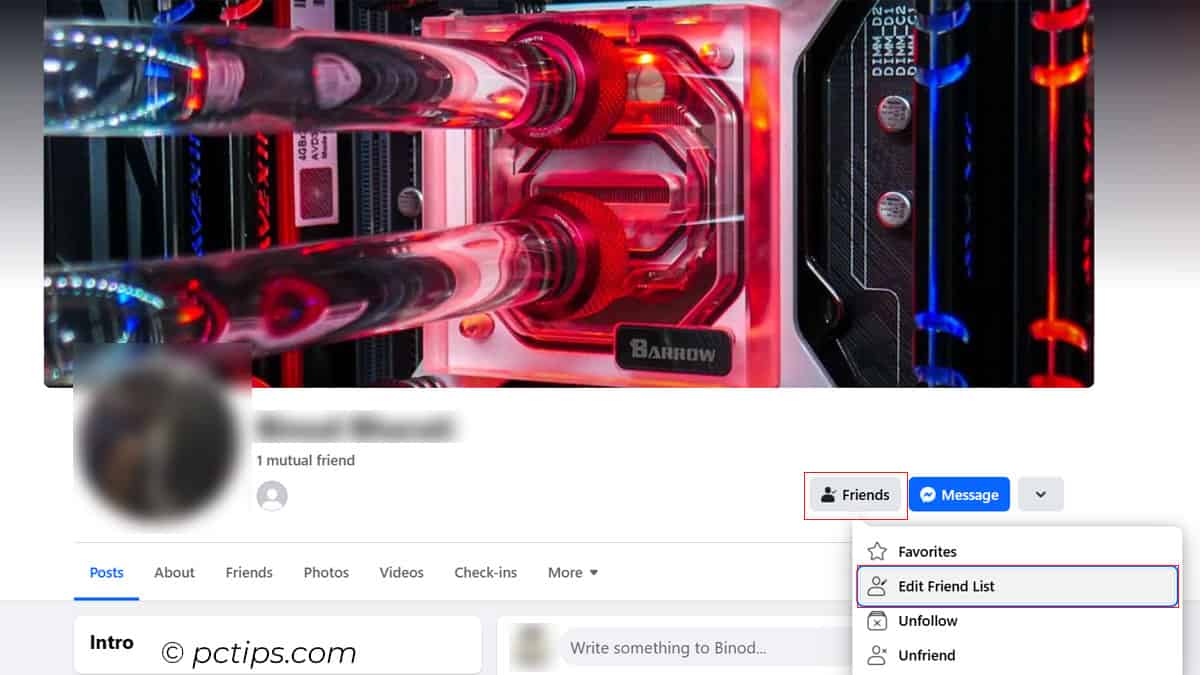
- Choose Restricted
- Make sure the post’s privacy is set to Friends and not Public
This is a great way to maintain your privacy without having to unfriend anyone.
Review Tags before your Friends See it
Tagging is a great feature that allows you to point out specific people in a picture. But the thing is, some of the users, including me, don’t really like our picture seen by others.
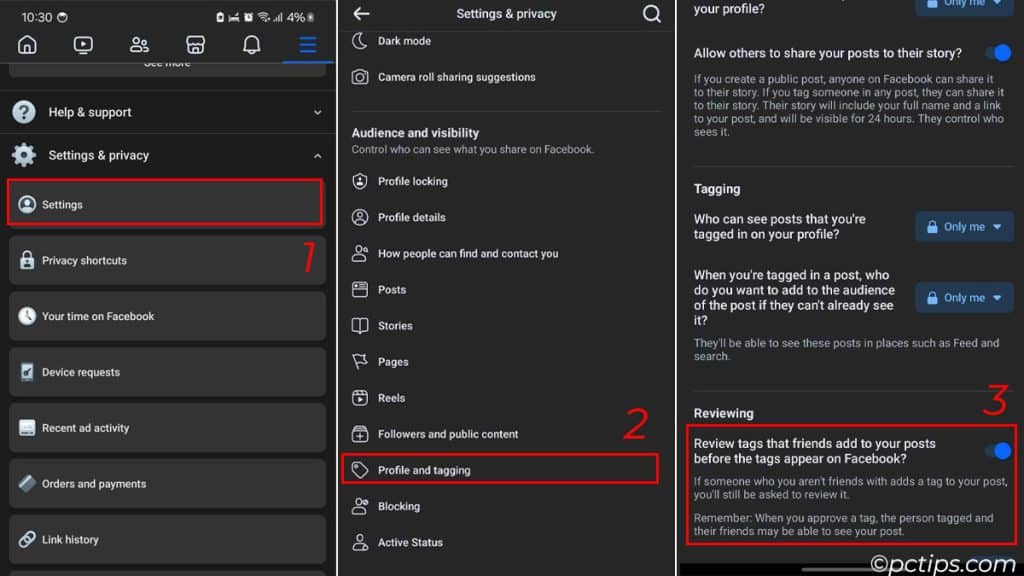
This is where reviewing your tagged post setting comes in.
Whenever a user is tagged in a post or a picture, Facebook gives a choice of whether to add it to the profile or hide it from other users.
If you choose to hide it, it will not appear in your timeline. However, you are not completely removed from the tagged post either.
This setting is available in Profile and Tagging.
Track Comments on Old Posts
Picture this: you left a witty comment on a friend’s post a while back, and now you’re curious about any replies or reactions it might have gotten.
But scrolling through your newsfeed to find that post again? Ain’t nobody got time for that!
Here’s how to find it:
- Go to “Settings and Privacy” > “Settings” > “Your activity” > “Activity log“
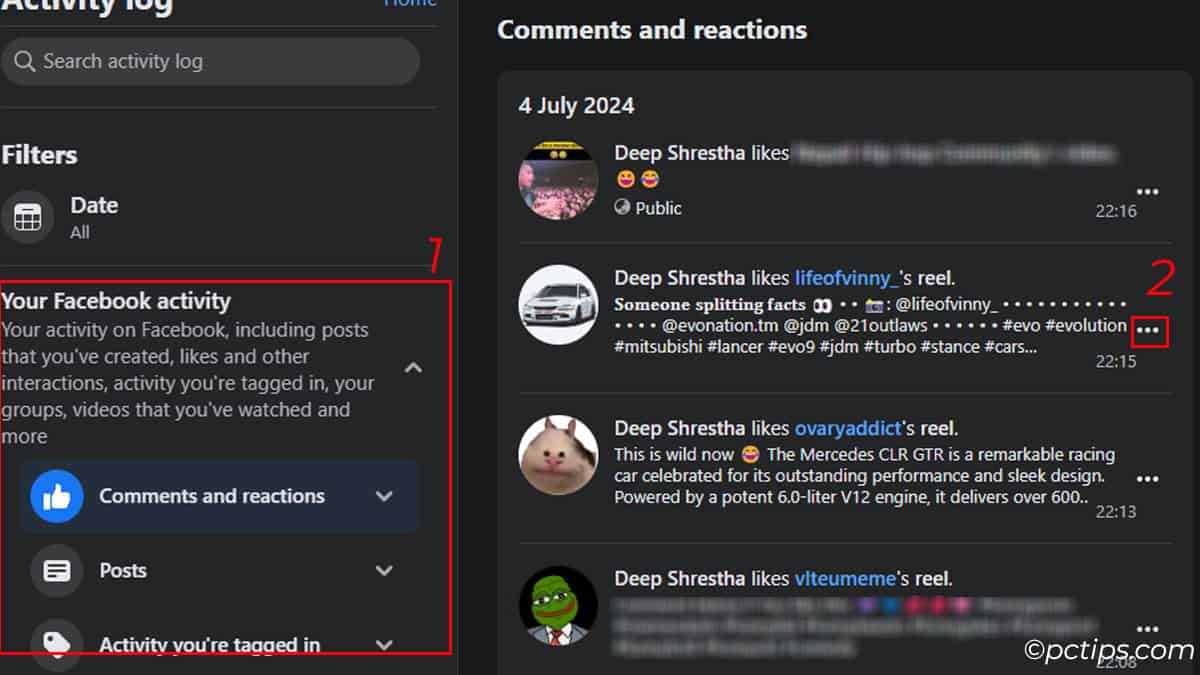
- Here, apply filter by going to “Filters” > “Category” > “Your Facebook activity” > “Comments and reactions” > “Comments“
I know, it’s a bit buried in the menu, but trust me – this feature is a game-changer. No more losing track of interesting conversations or missing out on replies to your witty remarks!
Download a Copy of Your Facebook Data
Have you ever wanted to see all the data Facebook has collected about you over the years? You can actually download your entire Facebook history, including posts, chats, videos, and photos.
Here’s how:
- Go to “Settings and Privacy” > “Settings” > “Meta Accounts Centre” > “Your information and permissions” > “Download your information” > “Download or transfer information“
- Now follow the instructions
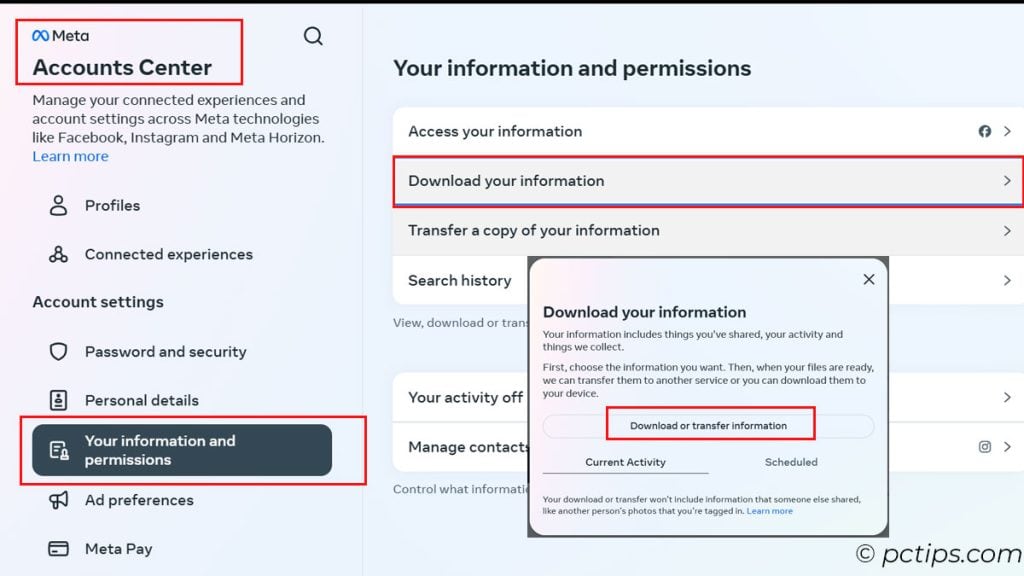
The amount of information it has over you is kind of scary. And it’s a good reminder to be mindful of how much we share online.
Send and Request Money Through Facebook
The future is here, folks – you can officially settle up debts with your friends without ever leaving Facebook. No more “I’ll get you next time!” excuses or awkward Venmo requests.
Here’s how to set up Facebook Payments:
- Go to “Settings” > “Facebook Pay“
- Enter your debit card info and wait for the small verification charge
- Once verified, you can send or request money from friends via Messenger or directly on Facebook
To initiate a payment:
- Open a chat with the friend you want to send/request money from
- Tap the blue plus sign, then tap the green Payments icon
- Enter the amount, select Send or Request, and add a memo
- Confirm the details and like magic, the funds will be on their way!
Once you’re set up, you can send or request money from another user via Messenger or the chat popup on Facebook.
But as with all things money-related, use Facebook Payments wisely.
Probably best not to loan your life savings to some rando in Vegas, no matter how convincing their sob story is in the moment.
Enable the Follow Options for Unknown Users
You might have run into some user profile where instead of the Add Friend button, you see a Follow button.
This allows a user to see the things you post without being your friend. Meaning, they will see what you post but you will not see anything about them.
A pretty handy option if you get a ton of friend requests from unknown users. Just have them follow you instead.
To do this,
- Open Settings and Privacy and open Settings.
- Under Audience and Visibility, click on Follower and Public Content.
- Set Who can follow me to Everyone. You can also check out other settings here.

- Now head over to How people can find and contact you and set Who can send you friend requests to Friends of Friends.
Check Every Facebook Logs
Facebook’s activity logs contain EVERYTHING.
From the posts you’ve reacted to to pages you follow. Every device you’ve used to log in. Any privacy settings you might have changed.
Now I know this is a bit extreme, but it also helps you find out any unusual activity in your account.
See any activity that you are not aware of?? Maybe the account is hacked. That sort of thing.
Here is how you can review activity logs for browsers.
- Open Settings in Settings & Privacy
- Under Your activity, select Activity log.
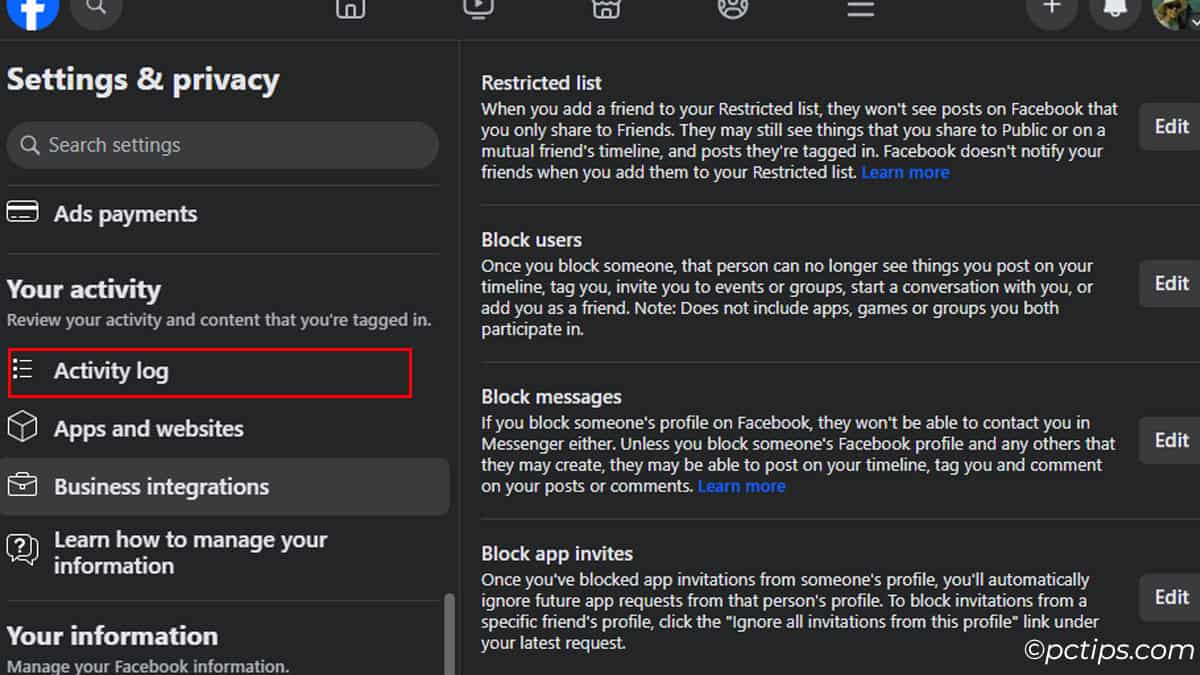
- Here, you will see a list of activities from your account. And you can view or remove them using the three-dotted icon.
But, if you find this tracking creepy and annoying, there’s an easy way to tell Facebook to stop for good. Here’s how:
- Go to “Settings and Privacy” > “Settings” > “Meta Accounts Centre” > “Your information and permissions” > “Your activity off Meta technologies“
- You can clear your activity history and turn off future tracking
Crisis Response
Before I begin explaining this feature, it is to be known that it is only available in the mobile version of the Facebook app.
Facebook tracks media sources from around the globe and runs a crisis response for Facebook users in that area.
It could be an earthquake, wildfire, or god forbid, mass shooting.
If you are in an area where something life-threatening occurred, you will be prompted with a screen that allows you to mark yourself safe so that your friends know.
You can also use this to see if your friends are safe or you can know the recent crisis around the globe.
To view this,
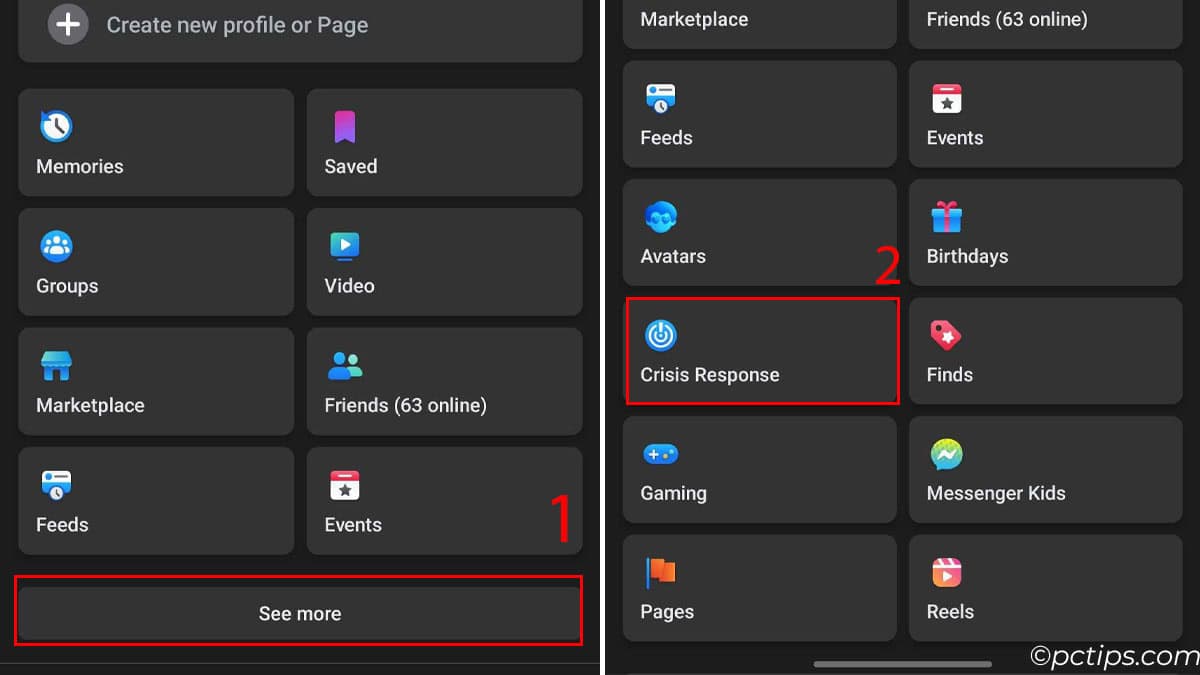
- Press on the hamburger menu in the Facebook mobile app.
- Select See More.
- Scroll down and select Crisis Response.
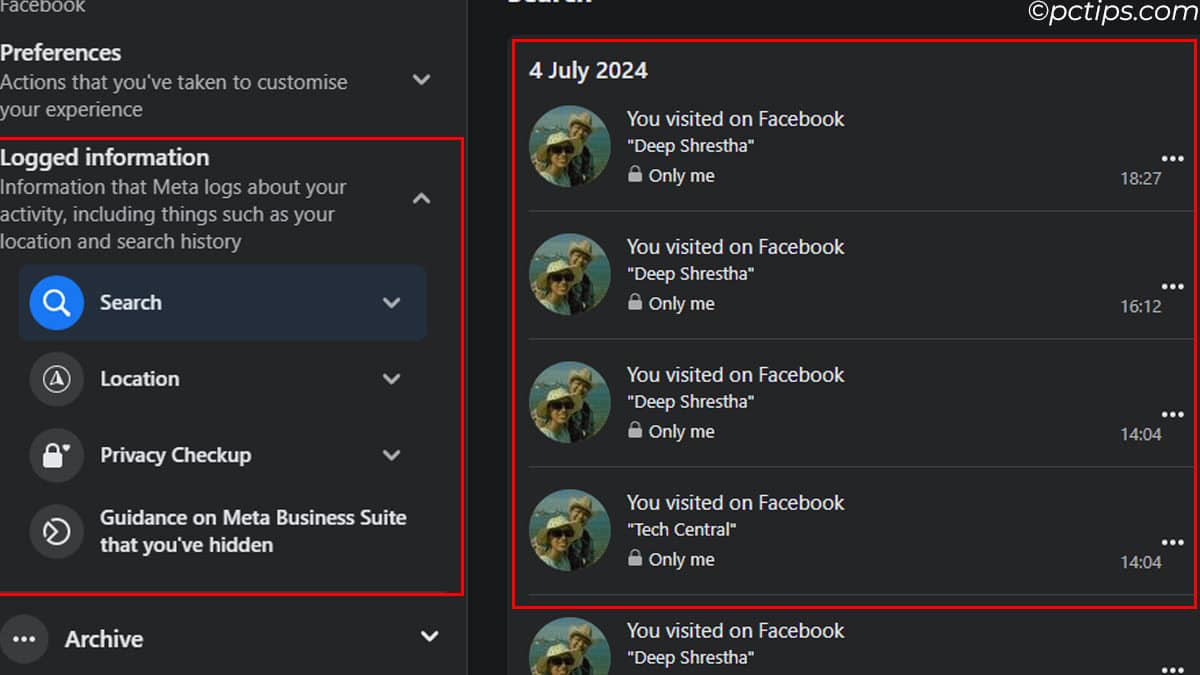
Check All Your Search History
Another information that Facebook keeps track of is Logged settings.
These are all your searches (video, groups, voice, etc.), checked-in locations, and the privacy settings that you changed.
Fortunately, these are only visible to you, and here is how you check logged info.
- Open Settings in Settings & Privacy
- Under Your activity, select Activity log.
- Select Logged Information.
Reorder Your Favorites
Facebook’s algorithm tries to show you the most relevant posts in your newsfeed, but sometimes it misses the mark. If you want to prioritize posts from certain friends or Pages, you can do that too.
- Tap the ham burger icon in the top right corner.
- Scroll down and click “Settings & Privacy.”
- Now tap “Settings.”
- Keep scrolling until you spot “News Feed” under Preferences.
- Finally, tap on “Favorites.”
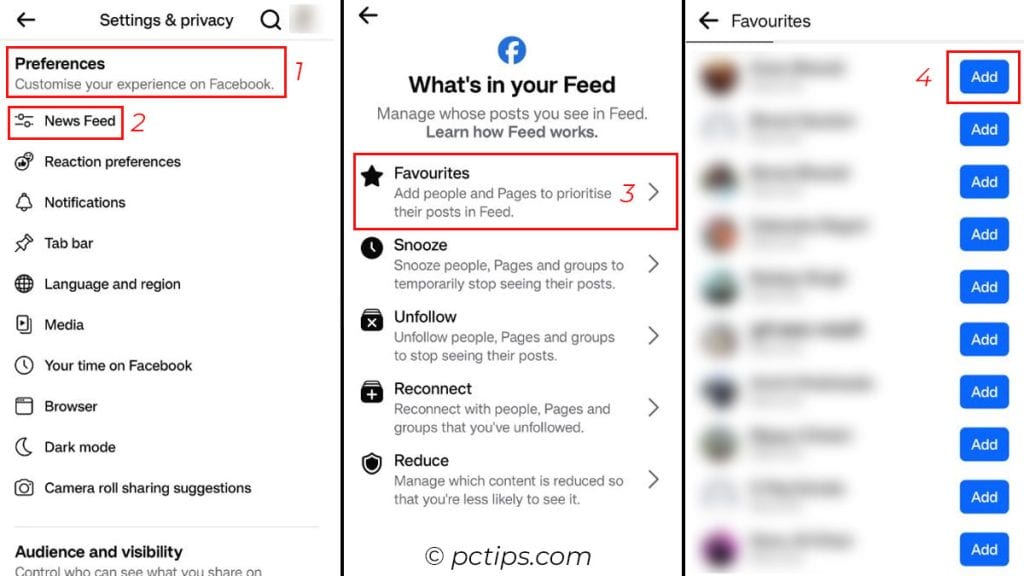
From there, you can choose which friends and Pages you want to see at the top of your newsfeed and notifications. It’s like telling Facebook, “Hey, these are my VIPs. Show me their stuff first!”
Activate Two-Factor Authentication
First up, let’s talk security. You’ve probably heard of two-factor authentication (2FA), but have you actually enabled it on your Facebook account? If not, you’re missing out on a crucial layer of protection against hackers and unauthorized access.
Here’s how to set it up:
Go to “Settings and Privacy” > “Settings” > “Meta Accounts Centre” > “Passsword and Security” > “Two-factor authentication” and follow the prompts and choose your preferred 2FA method (text message , authenticator app or security keys)
Now, even if some hacker cracks your password, they still won’t be able to break into your account without that second code. It’s like putting a deadbolt on your Facebook front door.
I highly recommend using an authenticator app like Google Authenticator or Authy for the most secure 2FA. It takes an extra 10 seconds to log in, but the peace of mind is totally worth it. Don’t wait until it’s too late – enable 2FA now!
Create Your Own Avatar
Avatars are all the rage these days, and Facebook has jumped on the bandwagon.
You can now create your own mini-me to use in comments, stories, and more.
To get started,
- Press on the hamburger menu in the Facebook mobile app.
- Select See More.
- Scroll down and select Avatar.
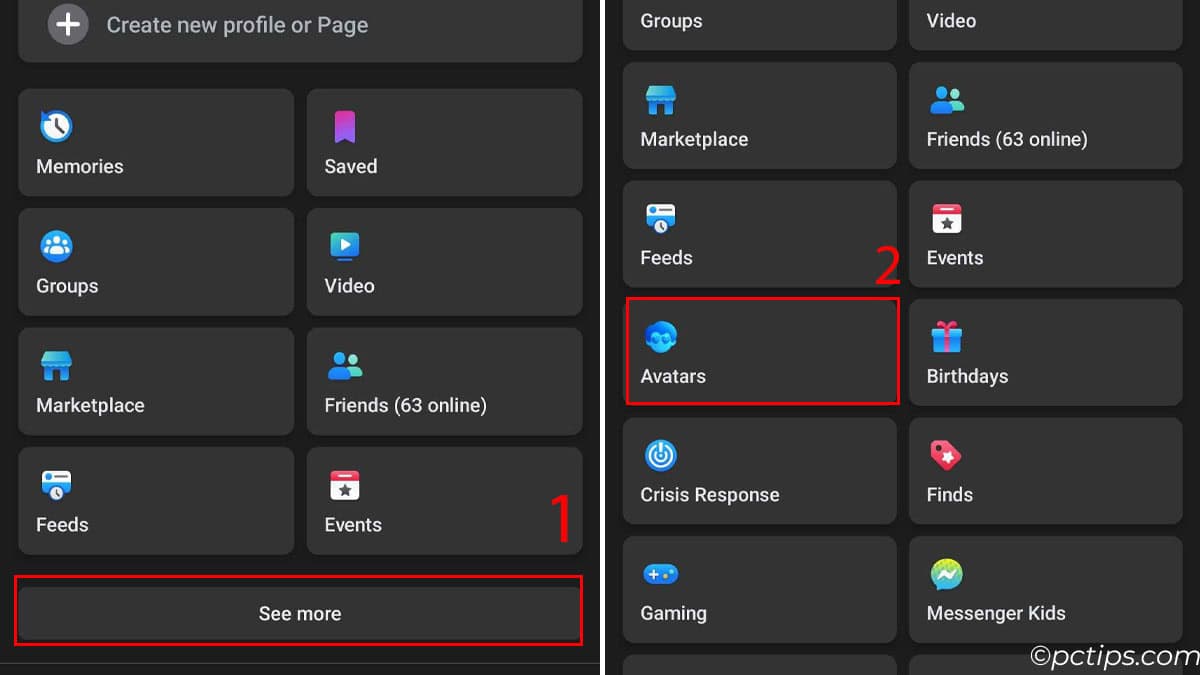
- If it asks for permission, select Only this time.
- Now position yourself and snap a picture of yours.
- It will automatically create an avatar that looks like you. Look at what mine did.

From there, you can customize your avatar’s appearance, hairstyle, clothing, and accessories. It’s like creating a digital version of yourself, and it’s a fun way to express your personality on the platform.
Check Events Happening Near You
With the information you share on Facebook, it recommends events that might interest you.
The information includes location, pages and posts you like, type of work you do, etc.
For example, if you like cycling and like cycling pages, it will recommend cycling events happening around your area.
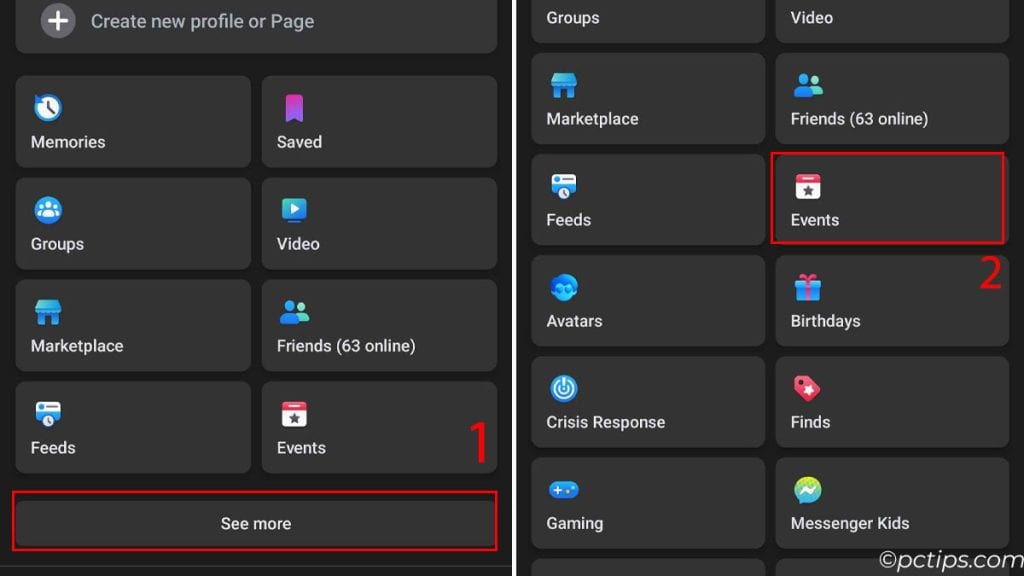
Now this might seem like an invasion of privacy for some users as Facebook is using your personal information.
I’ll let you be the judge.
Control Autoplay Videos
Autoplay videos can be a blessing or a curse. Sometimes they surface content you’re interested in, but other times they’re just annoying and eat up your data. Luckily, you have control over this feature.
- Go to “Settings & Privacy” > “Settings“
- Find “Auto-Play Videos” or Go to “Preferences” > “Media” > “Auto-Play Videos“
- Choose “Off” to turn autoplay off completely, or “On Wi-Fi Only” to enjoy autoplay at home without using mobile data
I prefer keeping autoplay on for Wi-Fi only – that way, I can still enjoy videos without worrying about my data plan.
Customize Your Chat in Messenger
By default, all your chat messages have a blackish-gray background with a blue text background and a Like emoji.
Plain, dull, and boring in my opinion. To change this, you can customize your chat.
Just open Messenger in your browser. Open any chat, click on the info icon, and select Customize chat.
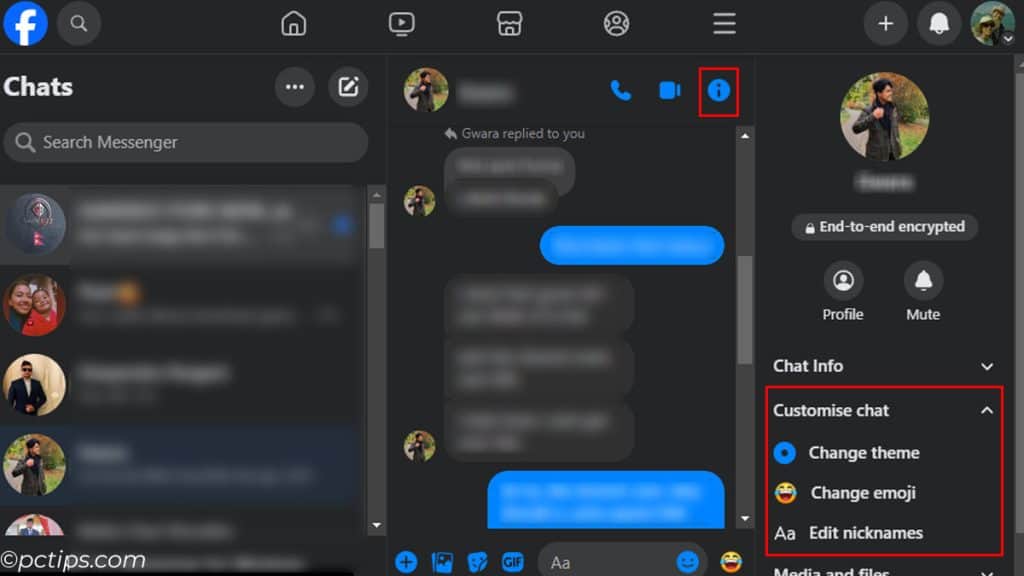
For mobile devices, just open any chat and click on the i icon.
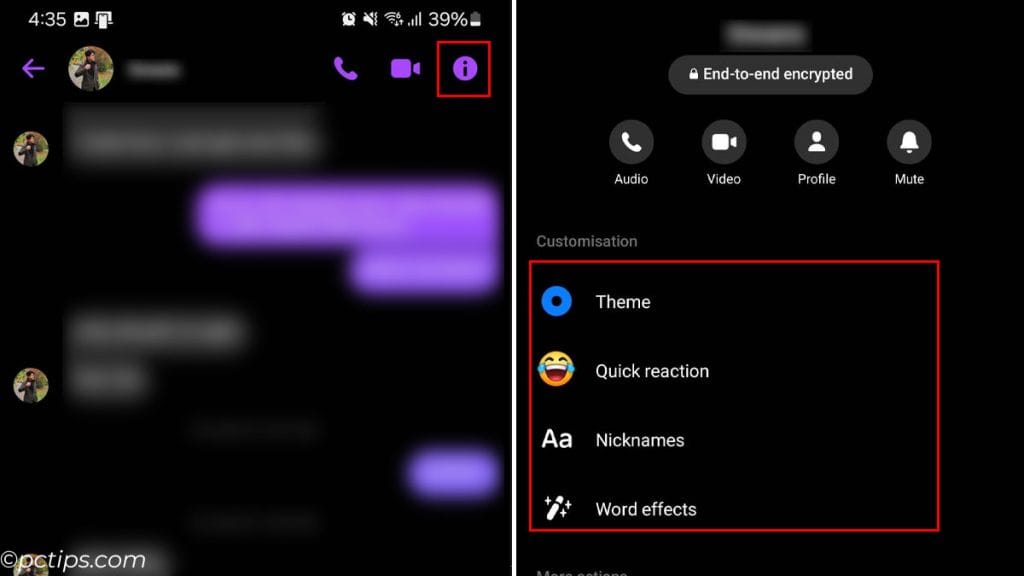
Here you can change chat themes, change chat emojis, edit your or other users’ chat nicknames and even add word effects (in mobile version of Facebook).
This brings color to your messenger and makes each conversation unique and different.
Facebook’s Own Emoji
Did you know Facebook has its own special set of emojis, just waiting to be discovered? They’re like the secret menu at In-N-Out Burger, but for your News Feed.
To unlock these hidden gems, try typing in some of these codes:
- (y) = thumbs up 👍
- <3 = red heart ❤️
- :poop: = pile of poo 💩
- :3 = Cat Face 😺
- :/ or = confused face 😕
- 😀 = Big Grin 😀
- O:-) or O:) = Angel 😇
- ^_^ = Happy Face 😊
- :|] = Robot 🤖
- -_- = unamused face 😒
- <(“) = Penguin 🐧
- O.o = Confused 😕
- (^^^) = Shark 🦈
The catch? These secret emojis only work on desktop, not mobile. But it’s a fun little trick to delight your friends or add extra flair to your comments and posts.
Enjoy sprinkling in those Easter egg emojis like you’re part of an exclusive club. Because you basically are now. You’re welcome.
Video Call With Your 49 Closest Friends
Forget Zoom – Facebook Messenger has a shockingly robust group video call feature that supports up to 50 participants at once. It’s perfect for virtual family reunions, book club meetings, or impromptu dance parties.
Here’s how to get your group video groove on:
- Open the Facebook Messenger app
- Tap the “People” tab on the bottom right
- Tap “Create a Room“
- Select friends to invite or share the link however you like
- Wait for friends to join, then get your gab on!
I’ve used this for everything from family reunions to team meetings to virtual happy hours. The best part? It’s completely free and easy to use. Plus, you can use fun filters and effects to liven things up.
Share Live Location
Gone are the days of verbally telling directions to your friend. Now, you can just share your location using the GPS tracker in your phone.
With this feature, your friend will know your exact location for 60 minutes.
- To send a live location, open a chat in Messenger.
- Click on the + icon and select Location.
- Now, tap Send current location.
You can also share a pinned location instead of a live location if you don’t want Facebook to know your current location. Just click on the pin icon.
Access Your Secret Inbox
Turns out, Facebook filters messages from people you’re not connected with into a separate inbox that’s not super obvious to find.
Some of them are probably spam, but you might discover an important message you never saw.
To access this hidden treasure trove:
- Open Messenger.
- Click on the hamburger menu, three horizontal dots for browser Messenger.
- Select Message request.
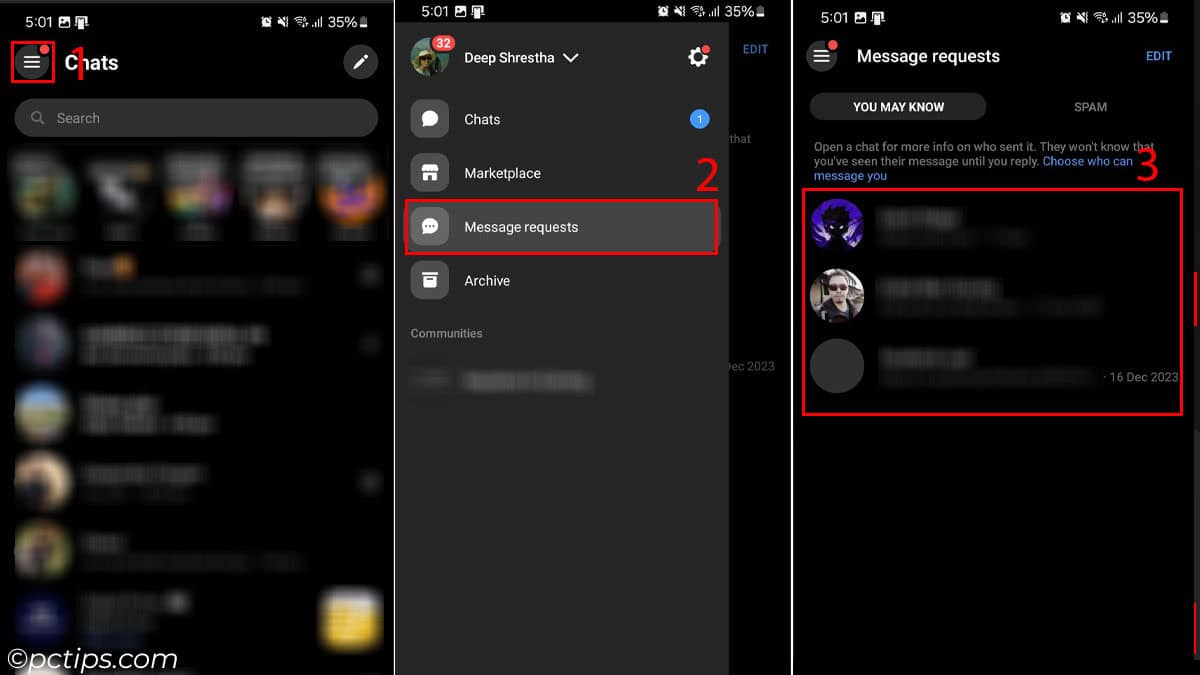
Usually all the messages that you receive from the people who are not your facebook friends go to the “You May Know” folder, while all other spammy messages go to your “Spam” folder.
Now, I can’t promise you’ll find a heartfelt confession of love from your middle school crush in there, but at the very least you’ll have the satisfaction of knowing you didn’t miss any important messages.
Facebook also has a bunch of message request settings that determine where the messages from unknown users are stored.
I recommend you check these settings.
- Go to Settings and Privacy > Settings.
- Click on How people contact you under Audience and Visibility.
- Check for a heading named How you get message requests.
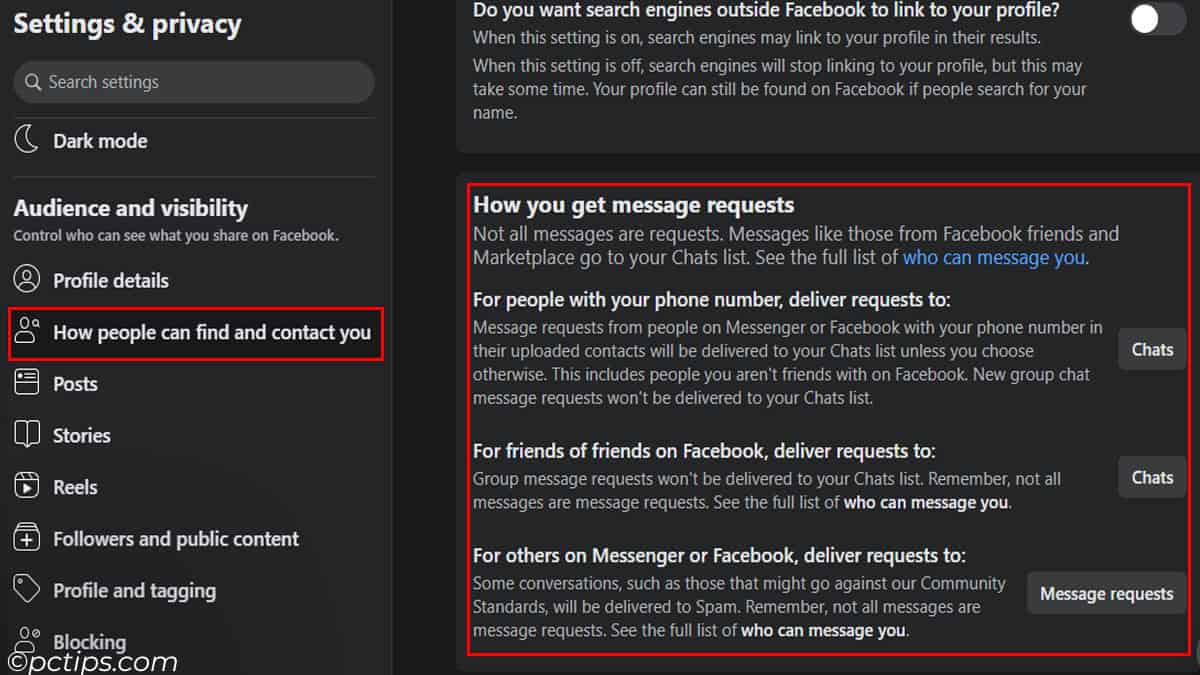
- Here, set the options according to your choice.
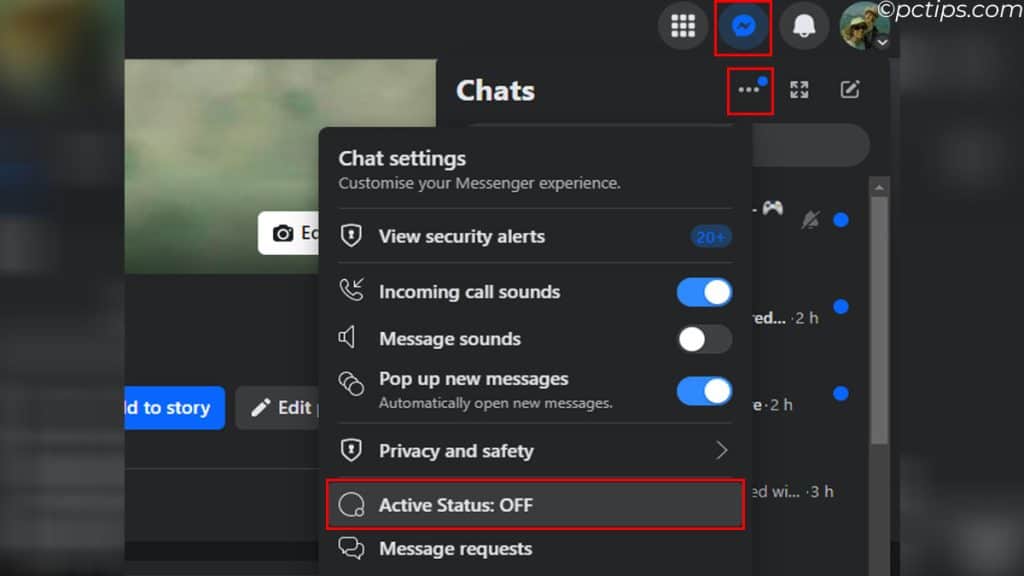
Disable Active Status in Messenger
Sometimes, you just want to browse through your Facebook feed silently. But, whenever you log in to Facebook, it shows your name with a green mark indicating that you’re online.
And the messages start flowing through.
But did you know, you can actually disable this green mark?
If you are browsing using your computer, open Messenger, click on the three horizontal dots and disable Active Status.
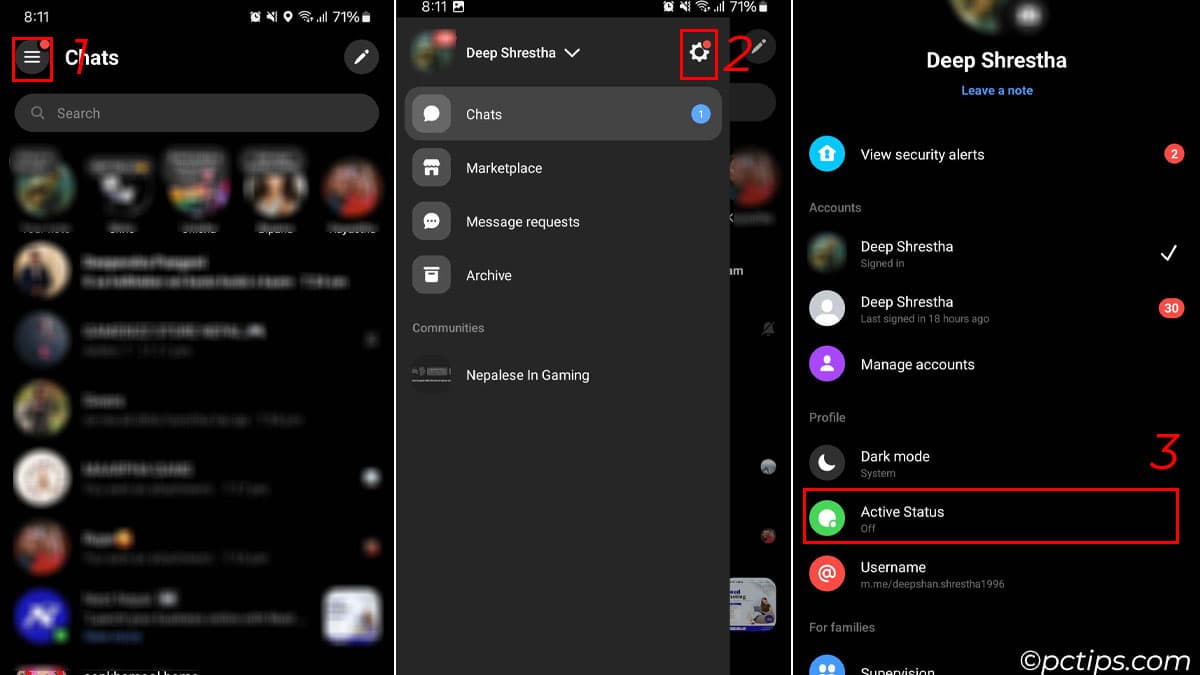
For Mobile users,
- Open Messenger app
- Click on the hamburger menu, select settings, and disable Active Status.
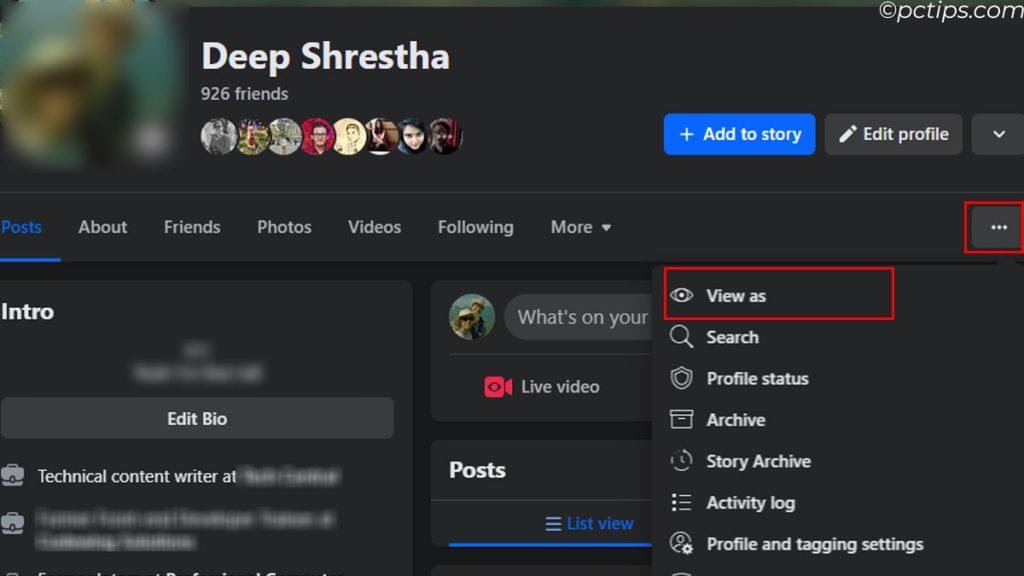
See What the World Sees
Now that you’ve seen others anonymously, do you wanna check what’s actually visible to the public on your profile?
Well, you’re in luck. Facebook’s “View As” feature lets you play detective on your own profile. Let’s dive in and see how this nifty tool works.
- Open up Facebook app and log in.
- Tap on your profile pic or name to visit your page.
- Tap on the three dots (…) near the “Edit Profile” button.
- Choose “View As” from the menu.
You’re now seeing your profile through a stranger’s eyes.
If you notice anything you’d rather keep under wraps, make a mental note and fix it later.
When you’re done snooping, tap the back arrow or “Exit View As” to return.
Use @Mentions in Comments
Have you ever wanted to make sure a particular friend sees your comment on someone else’s post?
Facebook’s @mention feature is a handy trick for looping people into discussions they might otherwise miss.
Just type “@” followed by their name, and they will get an alert that you mentioned them, even if they normally wouldn’t see that post.
It’s a great way to bring someone into an interesting conversation or make sure your comment doesn’t get lost in the fray.
I use this all the time to make sure my friends see posts I know they’d appreciate, or to bring in an expert on a topic being discussed. It’s a small thing, but it makes Facebook feel more like a real conversation.
You can also mention pages, groups, and events to help promote them or encourage others to check them out
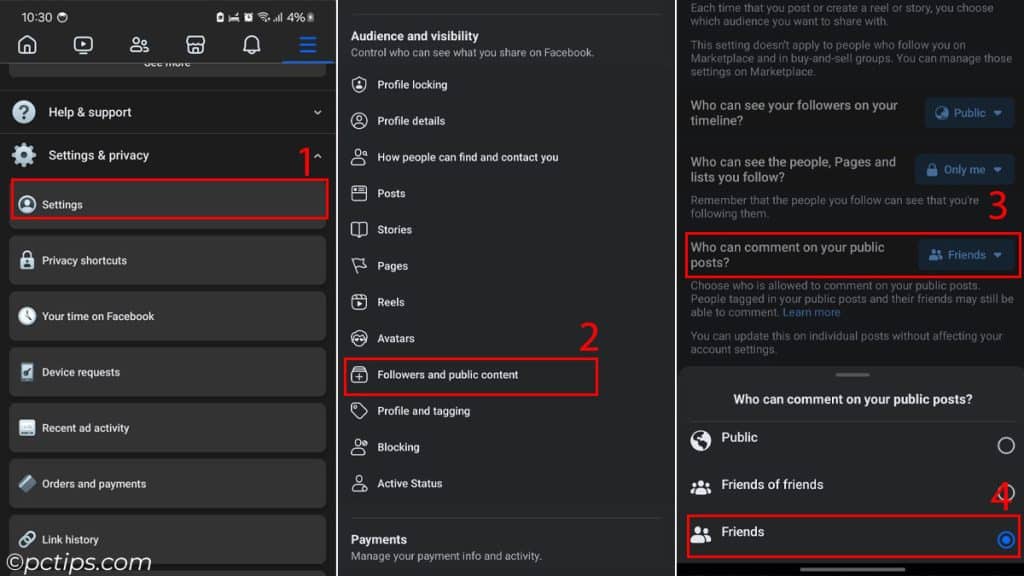
Avoid Public Comments or Hide Them
Facebook comments are not a good place if you have a bunch of public followings.
You can just restrict your posts so that only your friends can see them.
But, if you want everyone to see your post, but don’t want random comments from weirdos, you can stop the public from commenting.
Just Open Settings in Privacy and Settings, head over to Followers and Public Content, and set Who can comment on your public posts to Friends.
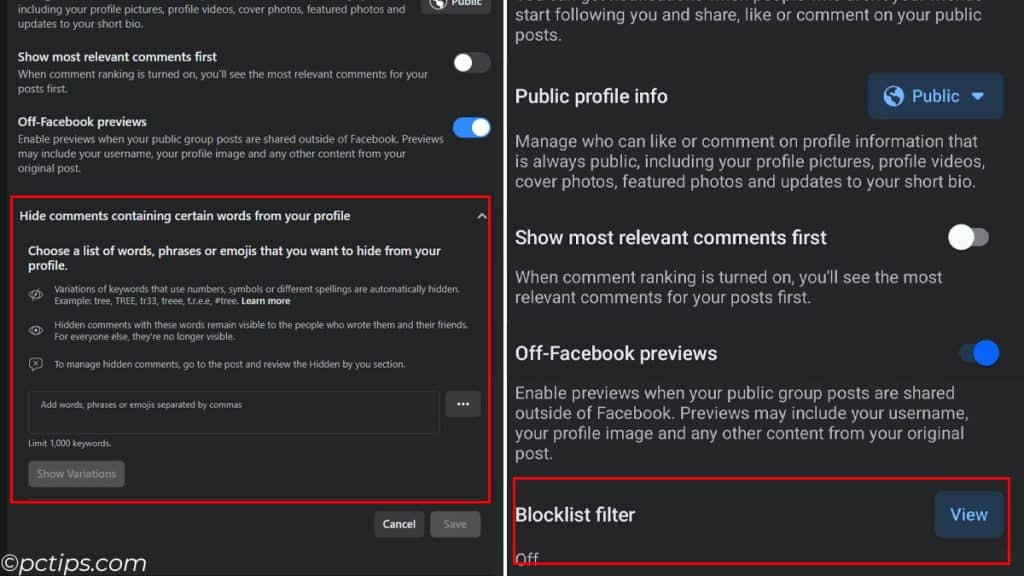
You can also hide certain comments from appearing in your profile.
Just click on Hide comments containing certain words from your profile and type words that you want to avoid. For mobile, this option is named, Blocklist filter.
See Old Stories With Story Archive
If you have shared a picture or video as a story, you should know that these posts are automatically removed after 24 hours.
Well, not actually. 24 hours after posting, the post is removed for everyone except for you. You can still view it in the Story Archive.
Just open your profile, click on the three horizontal dots, and select Story Archive.
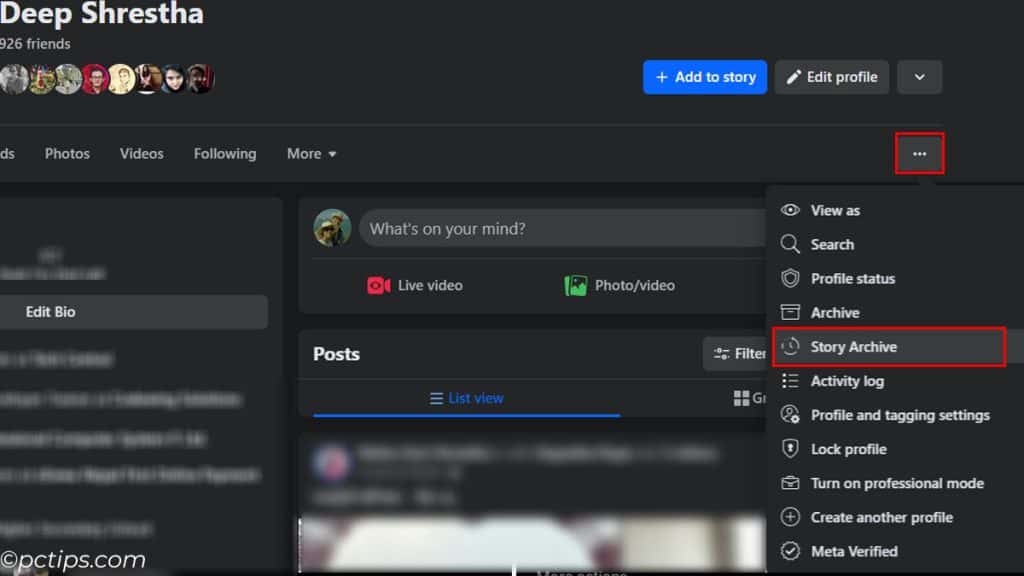
In mobile devices, it will just say Archive, then you need to select Story Archive.
You will see all the stories that you posted in the past.
It’s like a walk down memory lane.
Turn Off Phone Contacts Upload
By default, Facebook vacuums up your data, including your phone contacts, to ‘enhance’ your experience.
However, if you’d prefer not to have your contacts automatically uploaded and receive uncomfortable friend suggestions, follow these steps:
- Go to your Profile menu
- Go to “Settings and Privacy” > “Settings” > “Meta Accounts Centre” > “Your information and permissions” > “Upload Contacts” > “Continuous contacts upload“
With just a few clicks, you can keep your contact list out of Facebook’s clutches and prevent those awkward “How do you know so-and-so” conversations.
Get the Link Address in the Mobile App
If you are on a browser, you can just copy the link in the address bar and share it.
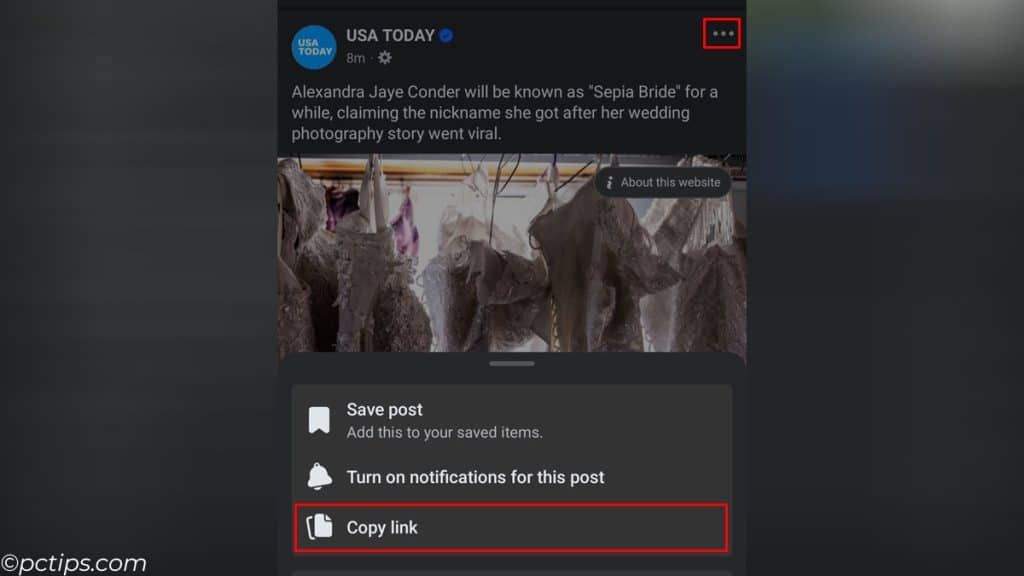
But what about Facebook apps on mobile devices? There is no address bar. But hold on, you can do it.
Just open the post, click on the three dots, and select the copy link.
Well, what about someone’s profile, you might ask. And I say that is possible too.
Again, click on the three dots, and you will see a link to their profile, just hit the copy link.
Use Messenger Without a Facebook Account
Messenger is a part of Facebook, at least it was when they started it.
And most users, including me, thought that I could not use Messenger without a Facebook account.
But that’s not true, even if you disable or deactivate your Facebook account, you can still chat with friends using Messenger.
And even if you don’t have a Facebook account, you can sign up using your phone number.
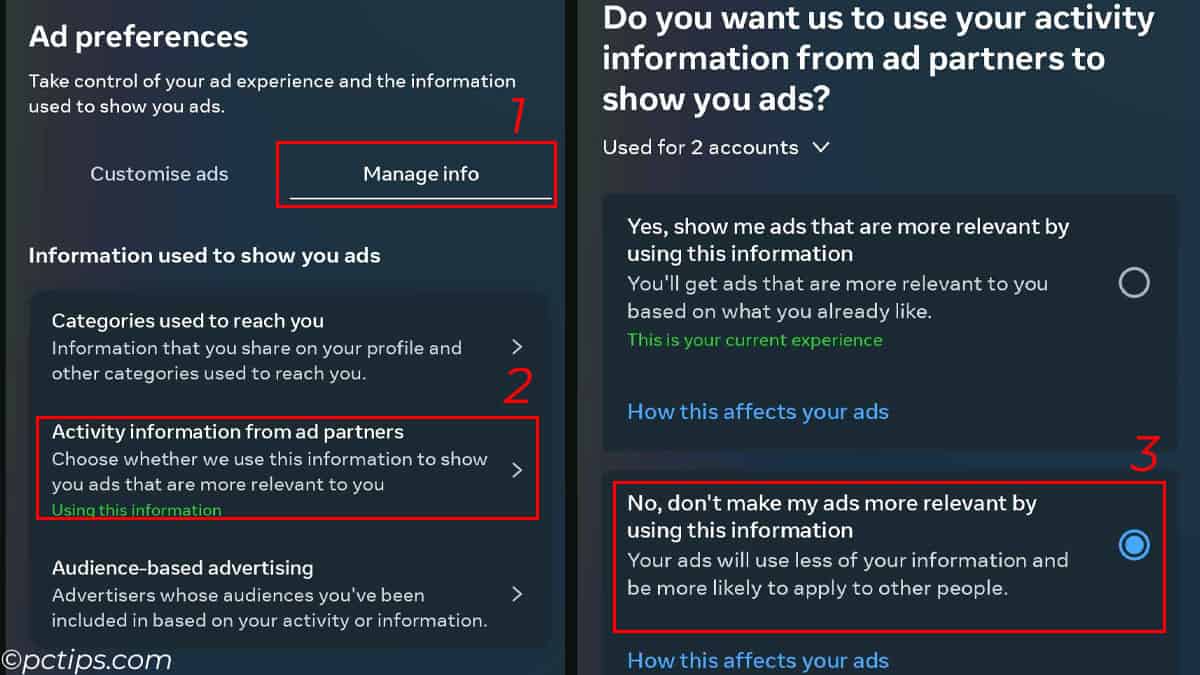
Edit Your Ad Preferences
Ever feel like Facebook ads are spying on your brain? One minute you’re thinking about buying new flip flops, and the next minute – BAM! – seventeen flip flop ads on your Feed. Creepy.
But did you know you can actually take control of your ad experience? Yep, it’s true! Here’s how you can disable this:
- Open Accounts Center from Settings.
- Go to Ad Preference.
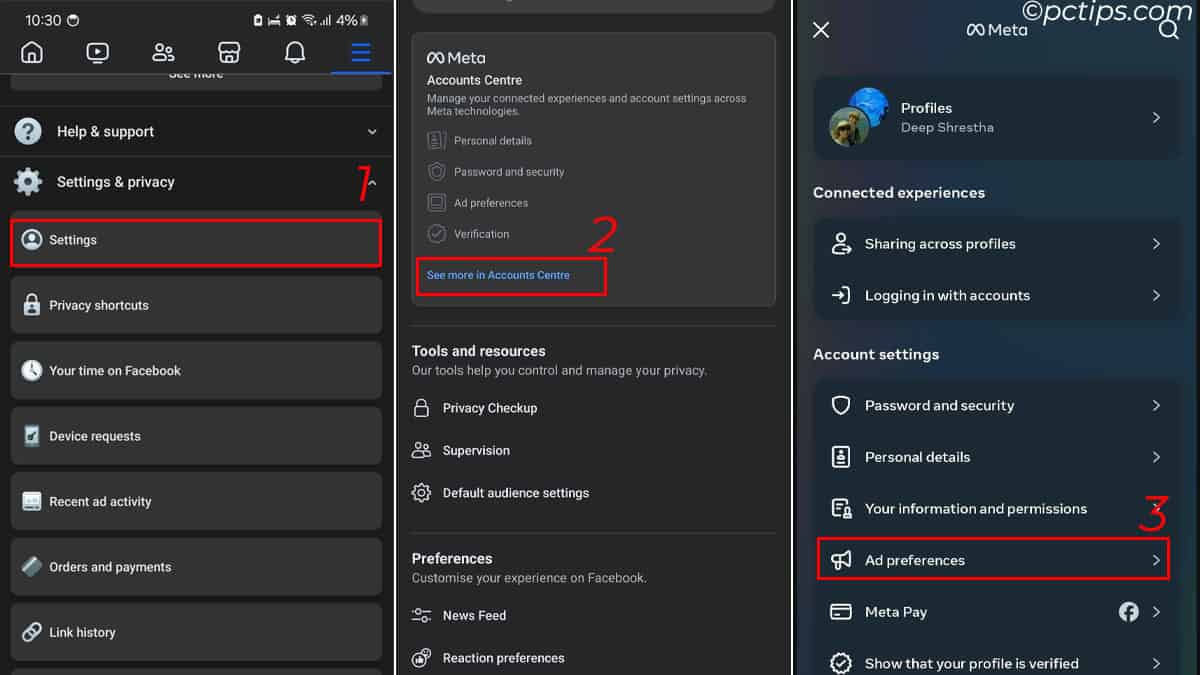
- In the Manage Info tab, Click on Activity Information from ad partners
- Select Review Settings.
- Select No, don’t make ads more relevant, and Confirm.
You can also nix certain topics or advertisers that aren’t floating your boat. Just click “Hide ad topics” or “Hide advertisers” and choose your poison. Buh bye, belly fat pill pusher. See ya never, suspicious “work from home” schemer.
Of course, you could always pay for Facebook Premium to ditch ads altogether. But why shell out cash when you can just spend a few minutes fine-tuning your ad settings for a more zen-like scrolling experience? Your sanity (and wallet) will thank you.
Safeguard Your Profile Picture
You probably have stalked someone at one point or another. I know I have.
And the first thing we all do is probably click on the profile picture for a good look. But, others can do the same with your profile picture.
And if the intent is wrong a third party can download, screenshot, or use it to make a fake account.
To prevent this, you can Turn on Profile Picture Guard.
Just click on your profile picture and select Profile Picture Guard.
Now, users who aren’t your friends cannot open your profile picture.
Note: Profile Picture Guard and Profile Lock features are not available for everyone. You can only find this setting in 14 countries including India and some Middle Eastern countries.
A Note To Remember
Remember that Facebook as a social media is huge and the settings provided are always everchanging.
Therefore, it can be a challenge keeping up-to-date with all Facebook features and settings.
So, what I suggest you do is go to the comments below and share your some hidden settings you know that I haven’t mentioned above.
And of course share it with your friends if you found it useful in anyway.
How can I print this. Too much useful information.
I have 2 different "friends" groups or accounts with whom I share posts that I like in facebook. Somehow I have "paused" being able to share with them & cannot figure out how I did it or how to undo it? Can you help me, please? Thanks in advance. PJKeenum
PJKeenum, to be clear about your question, are you talking about a Messenger chat group or a separate Facebook group? If you're talking about the Facebook group, you cannot share private posts that only you can see. Another reason you cannot post could be that the admin could have restricted you from sharing posts. If so, I suggest talking to the admin for access.
I can not longer use Blocking to see who is following me. I used to be able to type in following me so I could block them. This feature is no longer accessible.
Hello Kayma, the list of random people you used to see when you input "following me" is a hoax and completely false. The search bar will only show users who have used the word "following me" in their profile. It does not mean they are actually following you. You can read more about it here. Now, the search box in Blocked users works as normal and just shows users name from the blocked list. This is likely why that "feature" is no longer accessible.
Thank you for the comment, Toni. To print, press Ctrl + P on your keyboard and click on Save. It also gives you an option to Save as PDF. You can do that if you want to read this article offline.