The Best Free Duplicate File Finder for Windows
Last Updated:
We frequently stress the importance of backing up files and organizing them here at PCTips.
But in doing so, one problem that bothers a lot of users is duplicate files.
It’s most common with images, but other file types aren’t immune either (videos, docs, ISOs, archives, executables, etc).
If you move your files and backups around a lot, you likely have thousands of duplicate files on your PC.
With a deduplicator like DupeGuru, you could find, filter, manage, and remove these redundant files and free up hundreds of GBs of space.
Why I Prefer DupeGuru
People often backup files to different locations, download the same file multiple times, extract the same archive multiple times, and so on.
While unintentional, such habits lead to duplicate files piling up over time.
This is where deduplication and differencing apps come in.
You’ll find hundreds of deduplicators online. And even programs like WizTree and Everything can find duplicate files as a secondary function.

I’ve tested quite a few such apps over the years, and I’ve found DupeGuru to be the best one. Here’s why:
- It’s free, open-source, and cross-platform (Windows, macOS, Linux).
- It’s fast, lightweight, highly customizable, and focuses on safety.
- It supports multiple scan modes (string-based, MD5 hash comparison, picture block RGB comparison, etc).
- With the latter two methods, you can find duplicates even if the file names are different.
- As it scans with Tags and EXIF data, it can find images and songs that are similar but not exactly the same.
- You can control the Filter Hardness (find somewhat similar files or only exact matches).
- It doesn’t nuke duplicates instantly. You get to compare files and decide how to proceed. In fact, its reference directory and grouping system are specifically designed to minimize the chances of accidentally deleting files.
- Unlike many alternatives that only allow viewing or deleting duplicates, it also supports copy, move, rename, and other actions.
Getting Started with DupeGuru
Open the official DupeGuru page. Download the correct installer according to your device platform.
Select the defaults and proceed with the installation. The installer doesn’t force any junkware on you, so there’s no need to worry about any customization.

When it’s done, search and open DupeGuru.
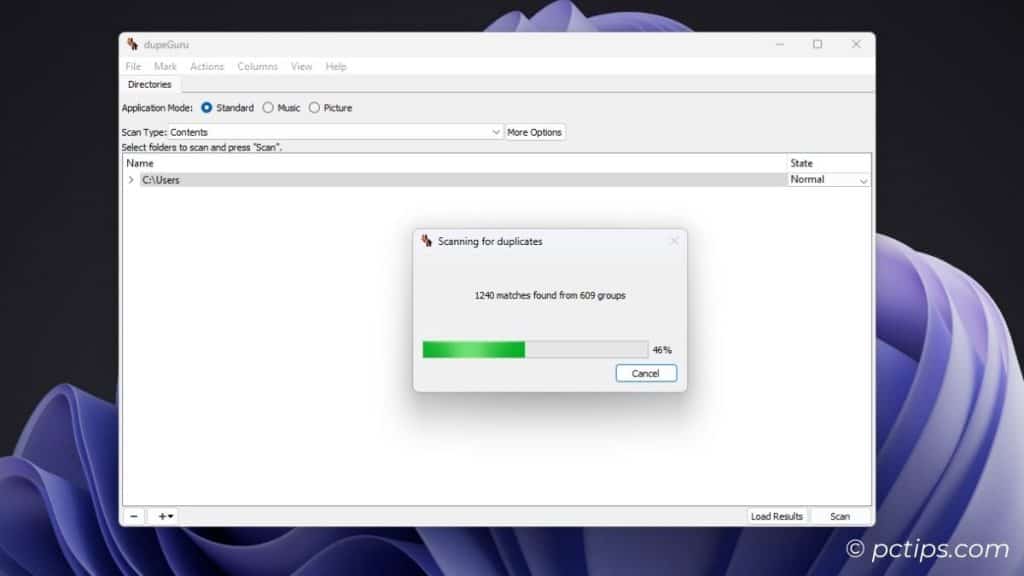
DupeGuru CAN scan your entire drive and find all duplicates, but that will take an hour or more. So, let’s hold off on that for now.
Instead, let’s try some light scans so you can first learn how to use DupeGuru.
- Click on the Add (+) button from the bottom left.
- Select the folders to scan. I’d like to look for duplicates in my
C:\Usersfolder for now.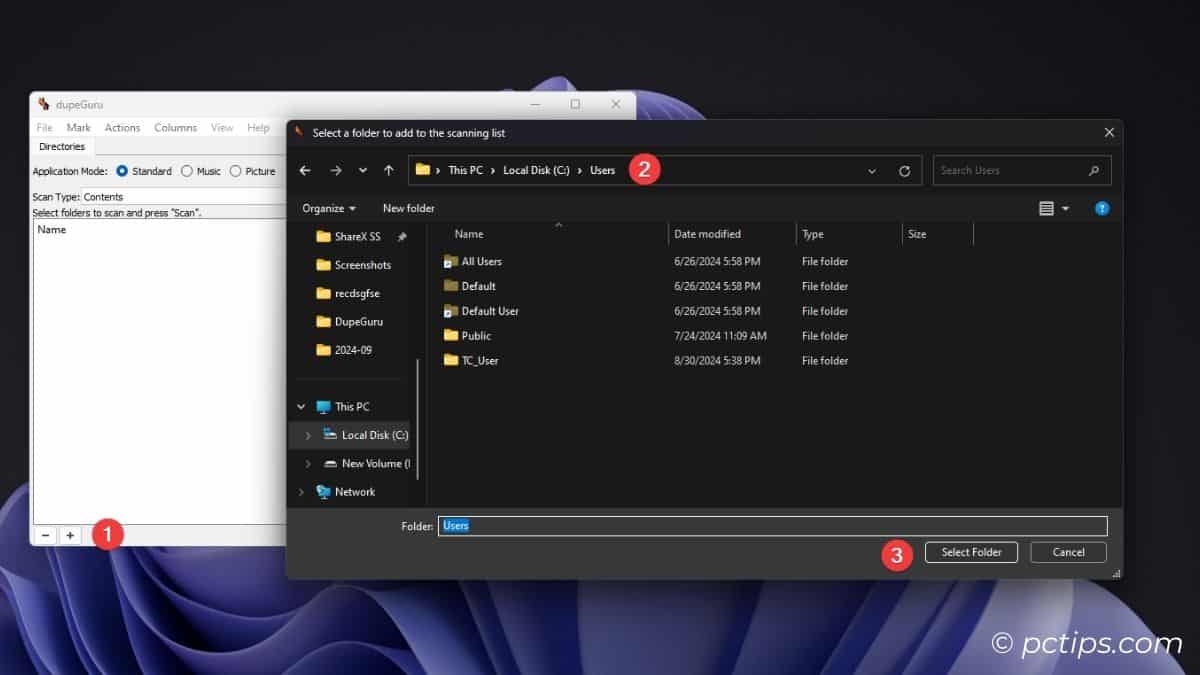
- You can use the Discard (-) button to remove directories later.
Configure the Search Mode
DupeGuru can search in three modes: Standard, Music, and Picture. Each mode lets you select specialized methods to search for the desired type of files.
Standard Mode
This is the general-purpose search mode for scanning all types of files. In this mode, DupeGuru can look for duplicates based:
- Filename: Compares strings to find duplicate files with the same or similar filename.
- Contents: Compares file size and MD5 hashes to find duplicates with the same contents.
- Folders: Works like a Contents scan but finds duplicate folders instead of files.
Music Mode
Music mode is specifically for finding duplicate music files. It can do so based on:
- Tags: Find duplicates with tags like Track, Artist, Album, Genre, Year, etc.
- Contents: Compares file size and MD5 hashes to find duplicate music files.
- Filename: Compares filename strings.
- Filename (Fields): Songs by different artists may have the same name (e.g., Angel by Shaggy vs Sarah McLachlan vs Cyn). This option compares additional fields like the artist to ensure only actual duplicates are listed.
Picture Mode
This mode provides some extremely handy tools for locating duplicate images.
- Contents: Also called Picture blocks mode. DupeGuru opens pictures in RGB bitmap mode, creates 15×15 grid tiles, and compares the average color of tiles in two pictures. If the color difference is low enough, DupeGuru declares it a match and lists the images. Extremely useful feature, but also CPU-intensive.
- EXIF Timestamp: Extracts the
DateTimeOriginaltag from the EXIF data of photos. Two photos with the same tag value are considered duplicates. Modified copies of photos often keep the same EXIF timestamp, so you must take that into account when filtering and deleting duplicates.
Choose the Right Scan Mode
Lots of scan options; which one should you choose?
For now, you could just follow along with me and try:
- Directory:
C:\Users - Application Mode: Standard
- Scan Type: Contents
- More Options: Defaults
This test scan should take no more than a few seconds to a few minutes.
Later, once you’ve got the hang of things, feel free to customize the search parameters to find exactly what you need.
That could be a picture block search in your photos backup folder, a music tag search across your entire PC, contents search in your Downloads folder, or anything else.
Related: 36 Windows Search Tricks to Find Any File in Seconds
Analyze the Search Results
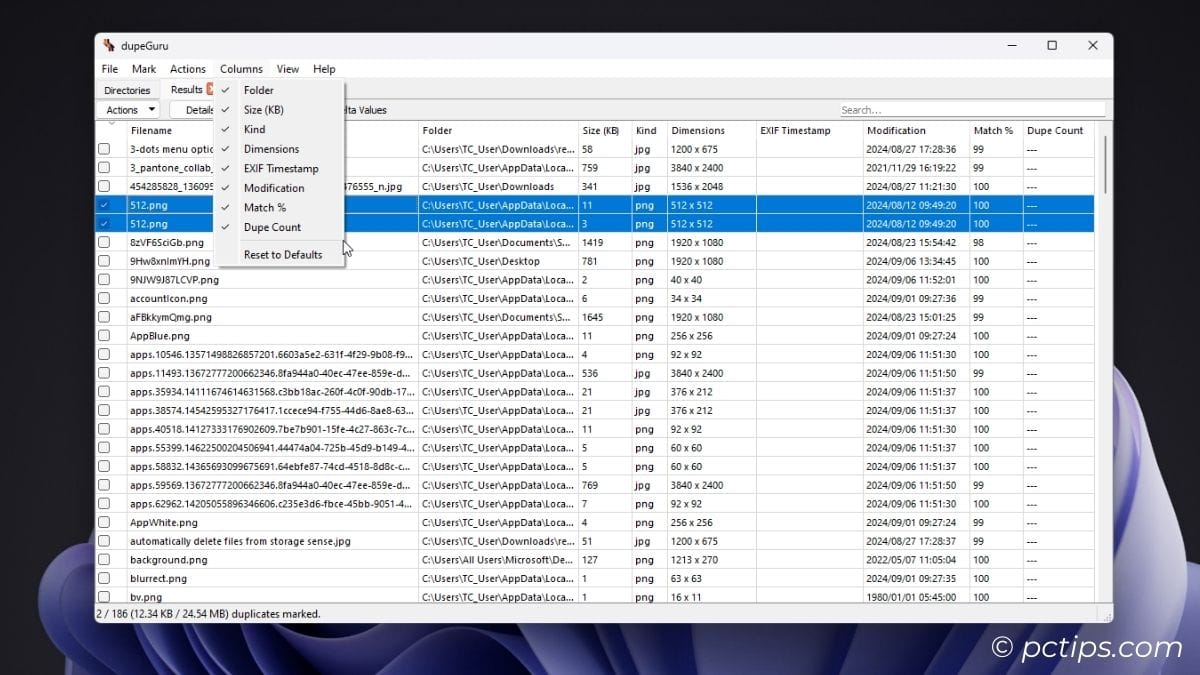
You’ll see the Filename, Folder Path, Size, and Match % fields by default.
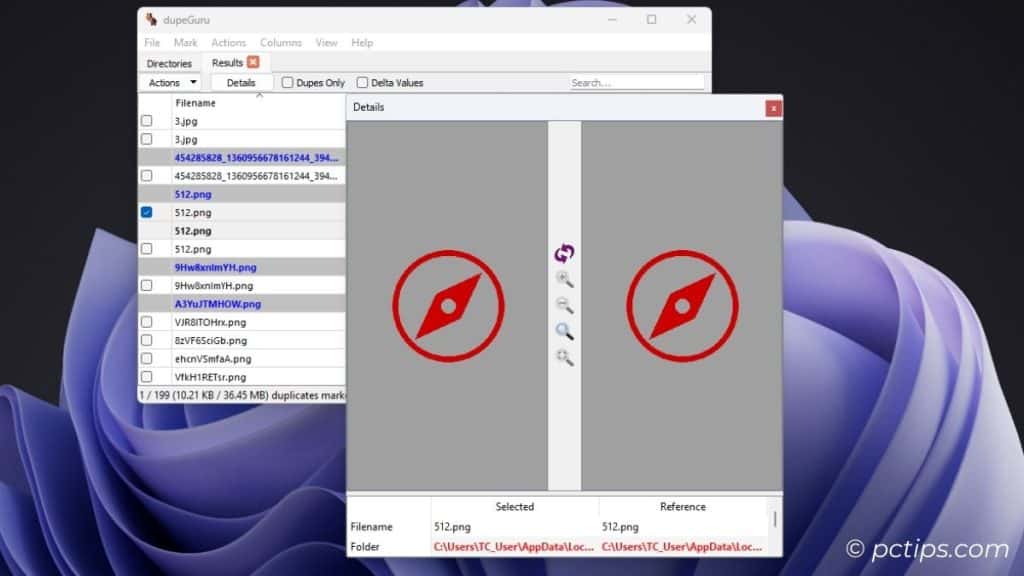
Keep these key points in mind when viewing the scan results:
- The reference file (original) is listed first in bold letters. One or more duplicates are listed below.
- Reference files can’t be marked. But duplicates can be marked, then copied, deleted, and more.
- Since we searched based on contents, you’ll find items with different file names. But their actual content is the same.
- You can search for specific files from the top-right.
- Enable the Dupes Only filter if you only want to view duplicates.
- Toggle on Delta Values to compare the items (e.g., show the difference between the original and duplicate file size).
- You can use Shift + Arrow keys to highlight (select) the items. Or, you can use drag-click with the left mouse button.
- Press the Details button to compare selected items.
- Press Space to mark the highlighted items.
- Ctrl + A also works if you want to mark everything at once.
- You’ll find more options in the Mark menu at the top (mark none, invert, etc).
You Might Like: 20 Keyboard Tricks You Need to Know
Move, Copy, Delete, Rename
We’re going to try some actions now. So, ensure only files you can afford to lose are selected or marked.
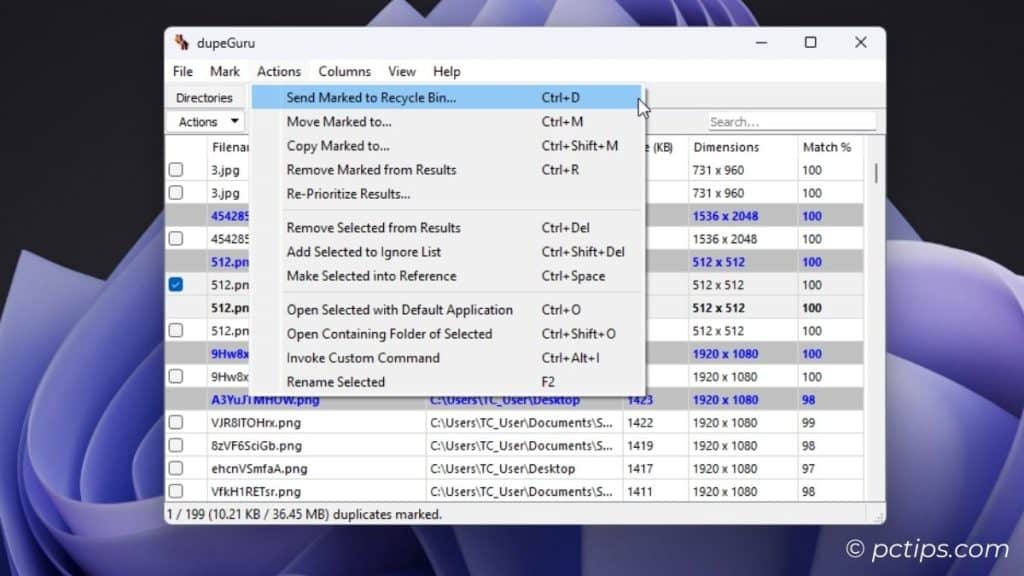
From the Actions menu, you can-
- Send marked items (checkbox enabled) to the Recycle Bin
- Move marked items
- Copy marked items
- Rename marked items
- Remove marked items from the list
- Remove selected items from the list
- Open selected items (highlighted) with their default app
- Open containing folder
- Make selected into reference (consider this file as the original that you want to keep), and more
Customize DupeGuru
You’ve learned how to perform a basic search from start to end. Now, let’s explore how you can get the most out of DupeGuru and make it the best tool for your exact needs.
Improve Result Readability
The main risk with bulk file operations is accidentally deleting the wrong files. To help prevent this, I recommend these UI changes:
- Open the Columns tab and enable all the options for more data.
- Open the View tab and enable Directories, Scan Results, Ignore List, and Exclusion Filters for easy navigation.
- Press Ctrl + P or select View > Options.
- Switch to the Display tab.
- Increase the Font Size to 11 or higher.
- The color scheme is up to preference. I find that a red foreground color (text) is easy on the eyes. Feel free to pick dark mode or other schemes.
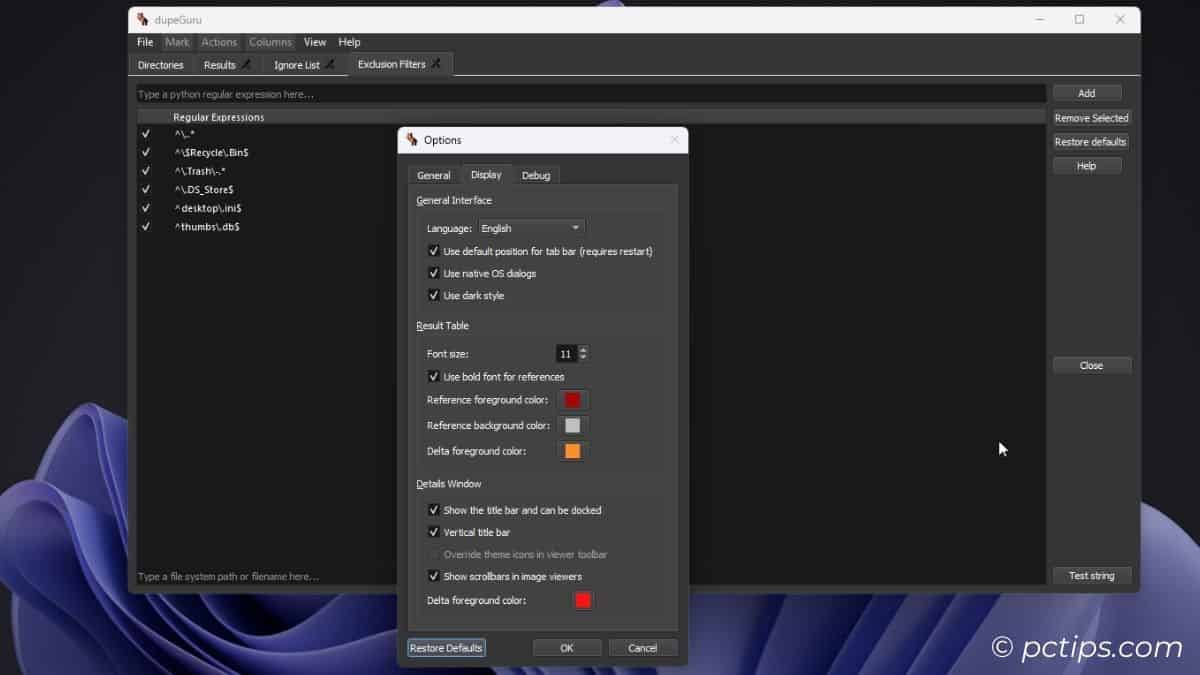
Restart the app to apply the changes fully. The results should be much more informative, accessible, and readable now.
Advanced Search Options
In Standard mode, click on More options.
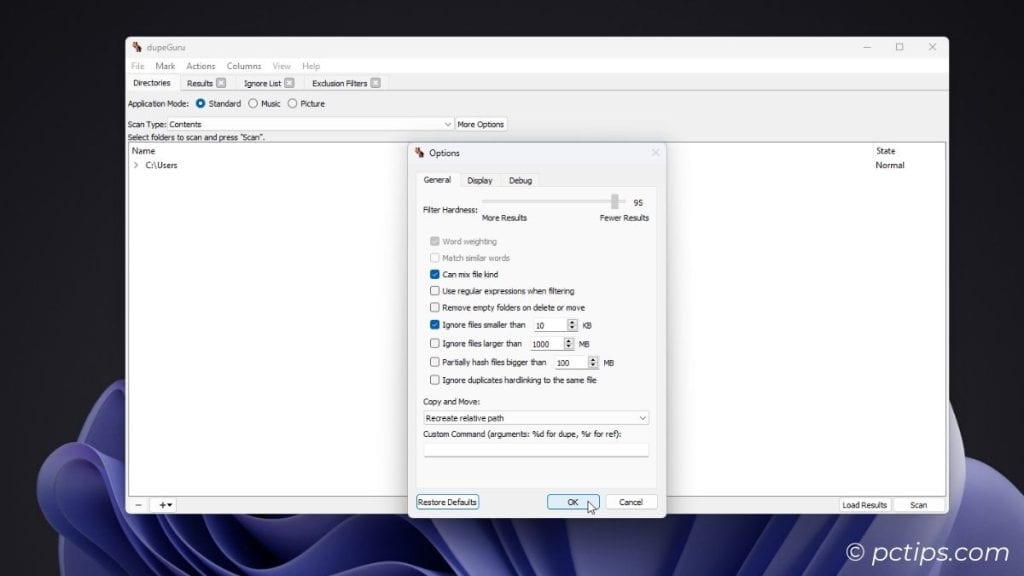
Depending on which scan type you’ve selected, you’ll have access to some useful options like:
- Filter Hardness: The strictness for considering files as duplicates. Lower hardness lists similar files while 100% only lists exact matches.
- Match similar words: Similar words (e.g., only one letter is different) are also counted as matches. Use sparingly as it can return a lot of false positives on large searches.
- Can mix file kind: Let the app group files with different extensions as duplicates.
- Use regular expressions when filtering: Treat your exclusion filter and search filter queries as regex.
- Remove empty folders on delete or move: Empty folders are removed. Reduces clutter.
- Ignore files smaller than: Set a minimum file size filter.
- Ignore files larger than: Set a max file size filter.
- Partially hash files bigger than: Useful if comparing contents of large files and partial matches are acceptable.
- Restore Defaults: Reset all preferences to default.
In Music mode, you’ll see an extra option called Tags to Scan (select exact tags to use for file comparison.)
In Picture mode, you can enable Match pictures of different dimensions. This lets the app group pictures of different dimensions as duplicates.
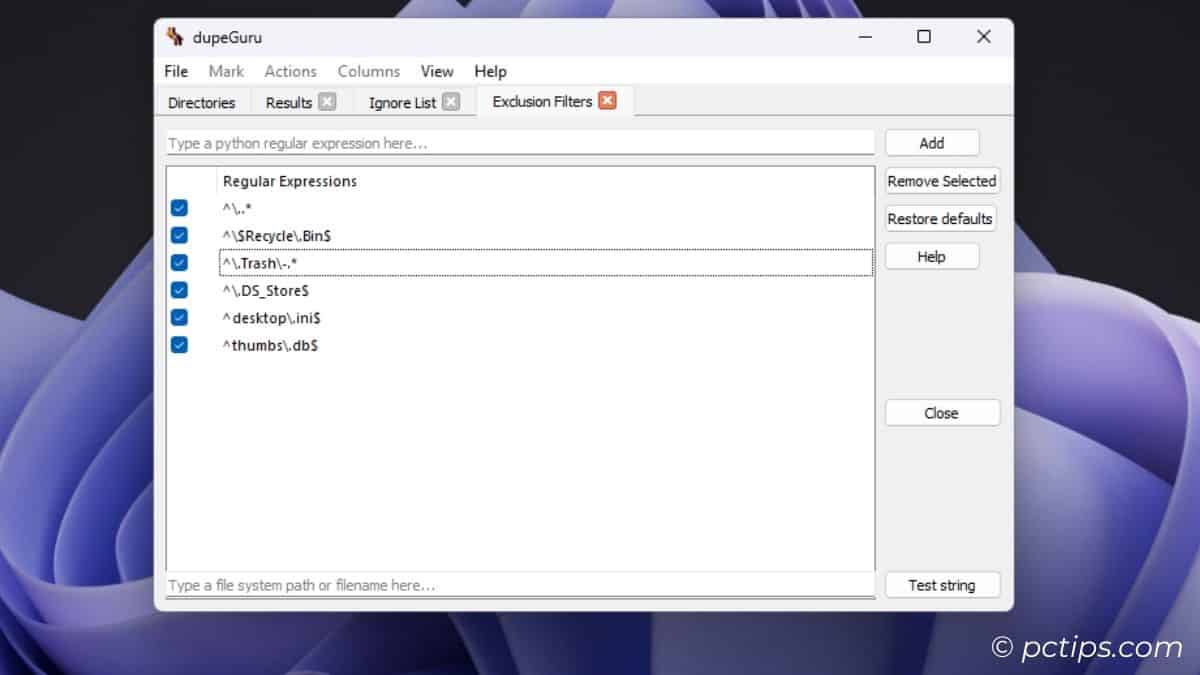
Exclude Folders from DupeGuru Scan
When you add a directory, you can set the Folder State from the right.
The default state is Normal.
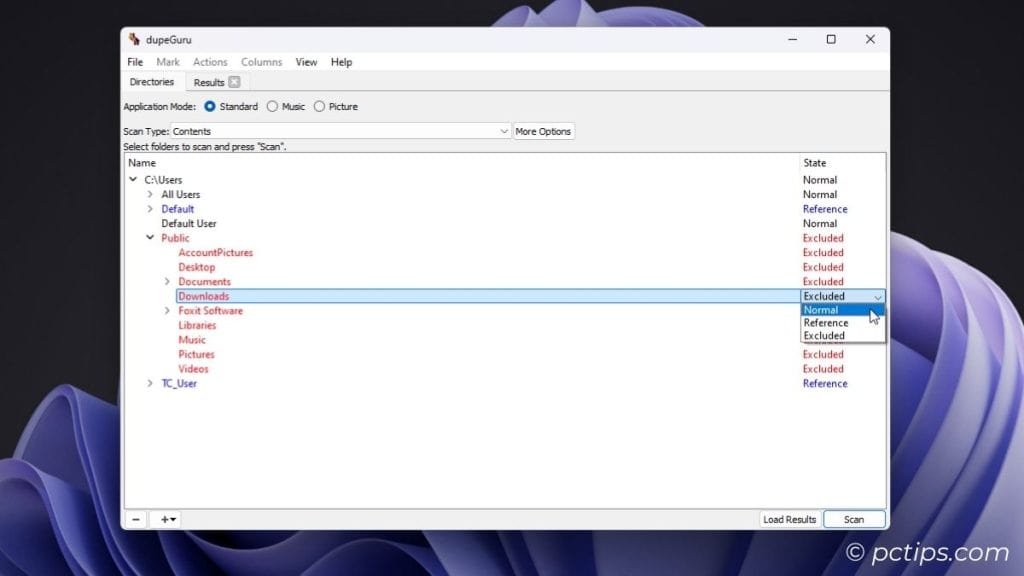
Files in Excluded directories are not included in the scan.
Duplicates in Reference directories are considered originals.
This option can protect certain files/folders from being considered duplicates and accidentally deleted. Excluding can also help speed up the scans.
Save and Export the Data
The sheer quantity of data can be overwhelming to some, and confusing to others.
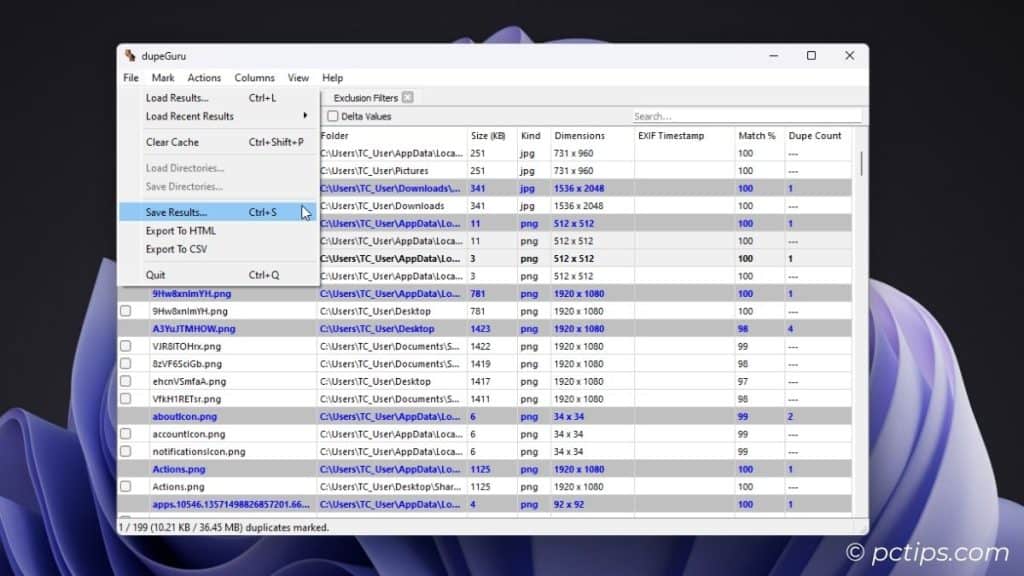
This is where the save, load, and export features come in:
- Save Directories: Save added directories so you can easily scan them next time.
- Save Results: Save scan results to analyze later or send to someone else.
- Export to HTML: Export results to an HTML file.
- Export to CSV: Export results to a CSV file.
- Load Results: Load saved results.
- Load Recent Results: Load recently saved result files without browsing.
- Load Directories: Load saved directories.
Real-World Examples
To conclude, let me share some real-world use cases of a tool like DupeGuru. I’ve mainly used it to:
- Find duplicate images in my photo collection (backup)
- Find duplicate files after data recovery operations
- Find duplicate files scattered across my PC
- Find duplicate downloads that accumulate over time
The DupeGuru FAQs page provides steps for some pretty cool examples too:
- How to remove files that are 300 KB larger/smaller than the original
- How to remove duplicate songs that are 3 seconds away from the original
- How to set the highest bitrate songs as the original, etc
All in all, this is a fantastic tool if you need help organizing your files and freeing up space.
Let me know if you have any questions regarding DupeGuru.
And if you’re interested in more such programs, check out these guides: