30 Windows Settings to Disable Right Now
Last Updated:
Windows is packed with settings, many of which are enabled by default but shouldn’t be.
Some raise privacy concerns, others hurt performance, and a few are just annoying.
Here’s my list of the top 30 Windows settings to turn off ASAP on your PC.
I’ve personally tested the impact of each of these and identified most people should disable right away.
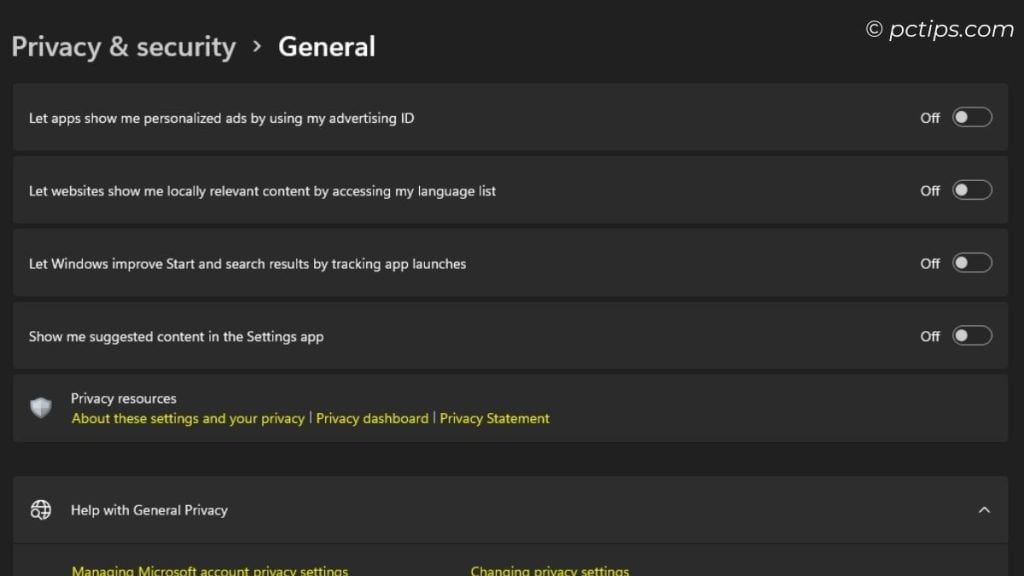
Disable Ad Tracking and Personalized Ads
Microsoft really wants to get to know you. Like, really know you.
Their advertising ID tracks your every move across apps and services to build a nice juicy ad profile.
Uh, no thanks!
Disabling it is a simple way to protect your privacy.
- Windows 10: Settings > Privacy > General > Toggle off “Let apps use advertising ID…”
- Windows 11: Settings > Privacy & Security > General > Toggle off all options
This is one of the first things I always do on a fresh Windows install.
Toggle that off already. Your activity is now your own business.
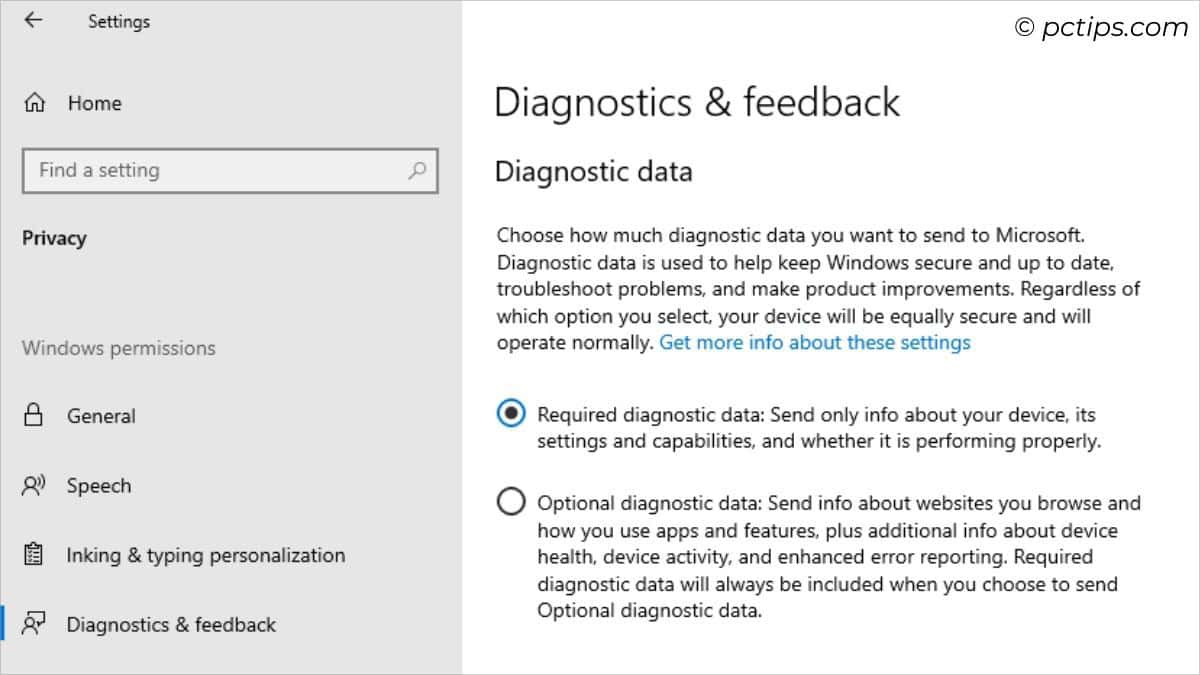
Limit Diagnostic Data Collection
Microsoft loves to collect data on how you use Windows, but we don’t have to play along.
Let’s shut down those nosy telemetry features:
- Windows 10: Settings > Privacy > Diagnostics & Feedback > Choose “Required diagnostic data” and toggle off “Tailored Experiences”, “View Diagnostic data”
- Windows 11: Settings > Privacy & Security > Diagnostics & feedback (under Windows permissions) > Toggle off “Diagnostic Data”, “Tailored Experiences”, “View Diagnostic Data”
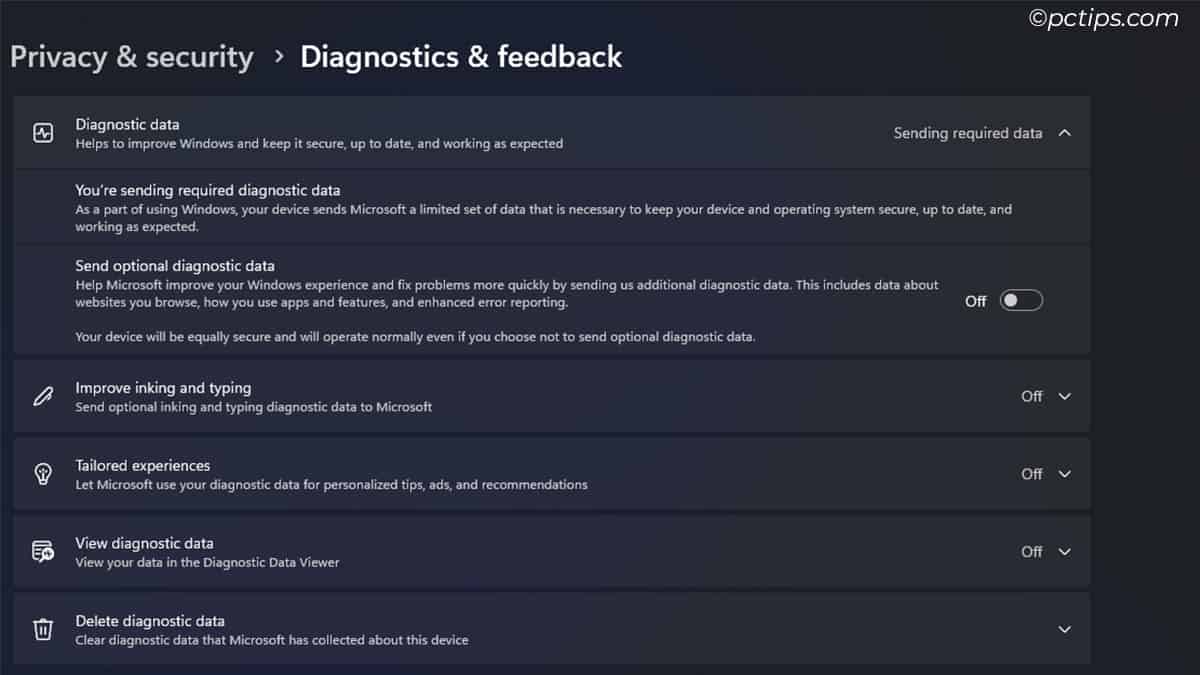
Not only will this keep your private usage data private, but it can also give your system performance a little boost.
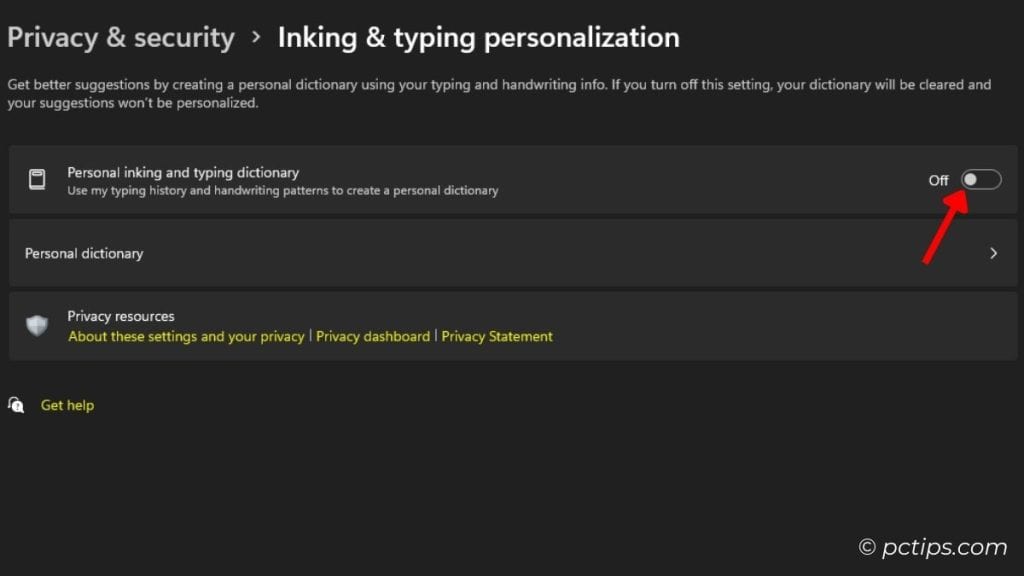
Turn Off Inking and Typing Personalization
Windows’ inking and typing personalization features use your input to train Microsoft’s AI models.
That’s helpful if you rely heavily on pen and touch, but otherwise, I say turn it off.
- Settings > Privacy > Inking & typing personalization > Toggle off
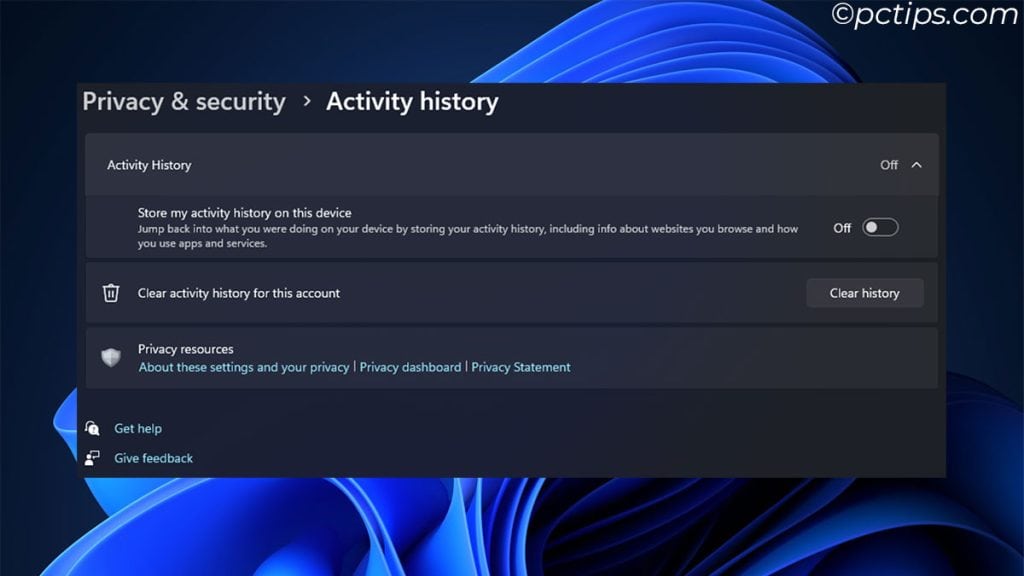
Wipe Your Activity History
By default, Windows sends Microsoft a log of everything you do, using it to personalize your experience.
Maybe a bit TOO personal if you ask me. I suggest clearing and disabling it:
- Settings > Privacy > Activity History > Clear activity history > Toggle off “Store my activity history on this device” and “Clear activity history”
Limit Location Access
Many apps tap into Windows’ location services to detect your whereabouts.
For most people, this is unnecessary (and creepy). You can turn it off entirely:
- Windows 10: Settings > Privacy > Location > Toggle off “Allow access to location on this device”
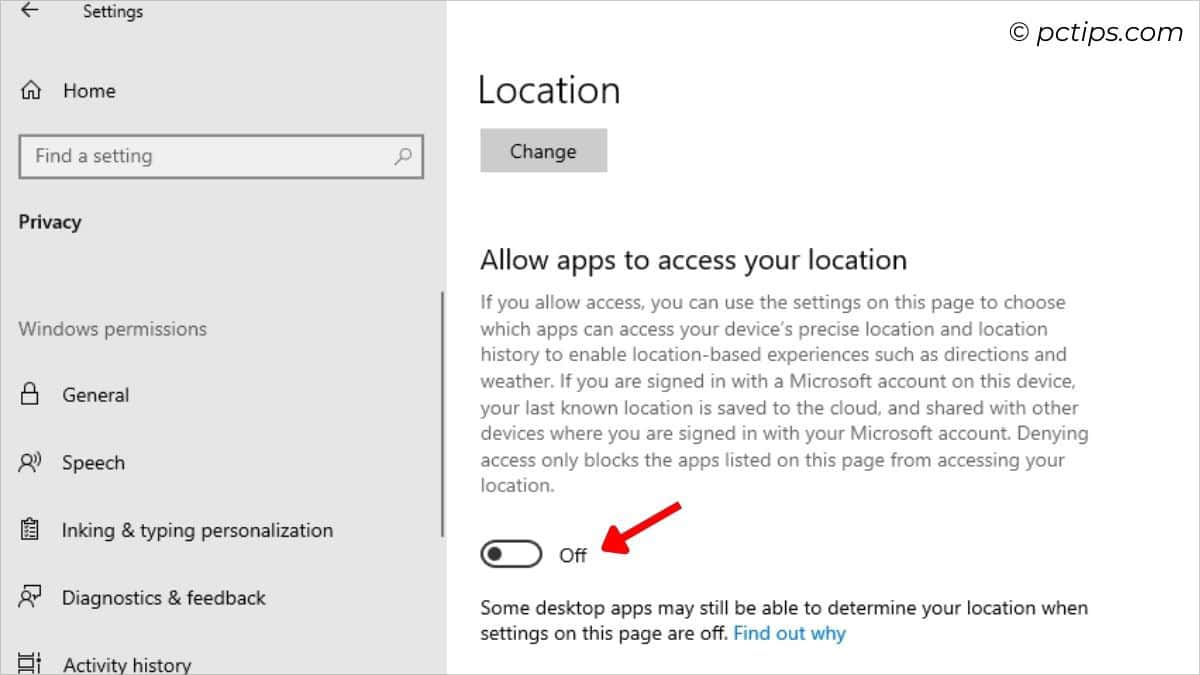
- Windows 11: Settings > Privacy & Security > Location > Toggle off “Location services”
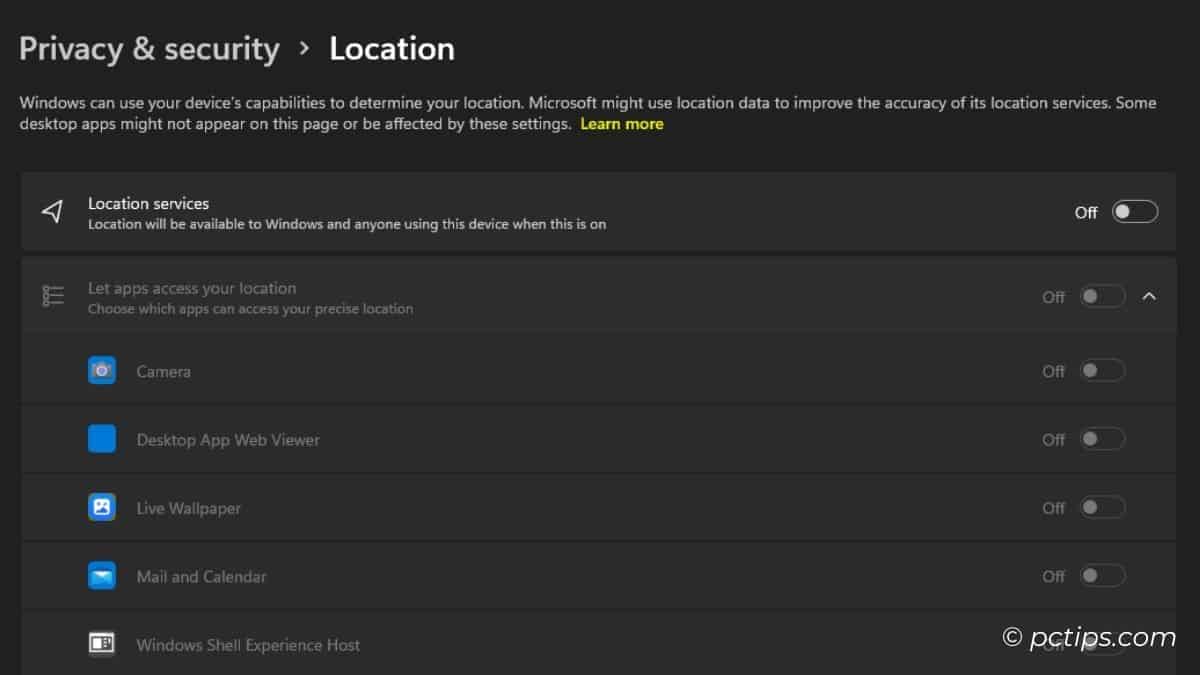
Or selectively choose which apps can access your locale.
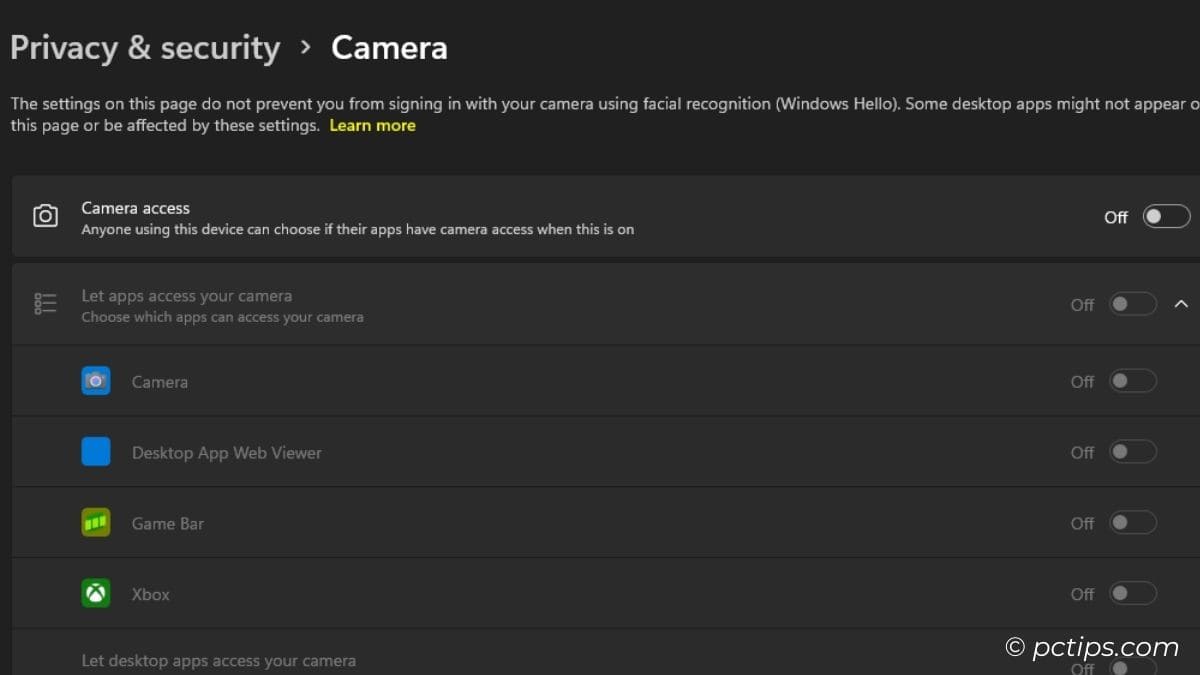
Prevent Apps from Using Your Camera
Call me paranoid, but I always like to keep my webcam covered or disabled when not in use.
Too many apps have been caught secretly recording users. Better safe than sorry!
- Windows 10: Settings > Privacy > Camera > Toggle off “Allow apps to access your camera”
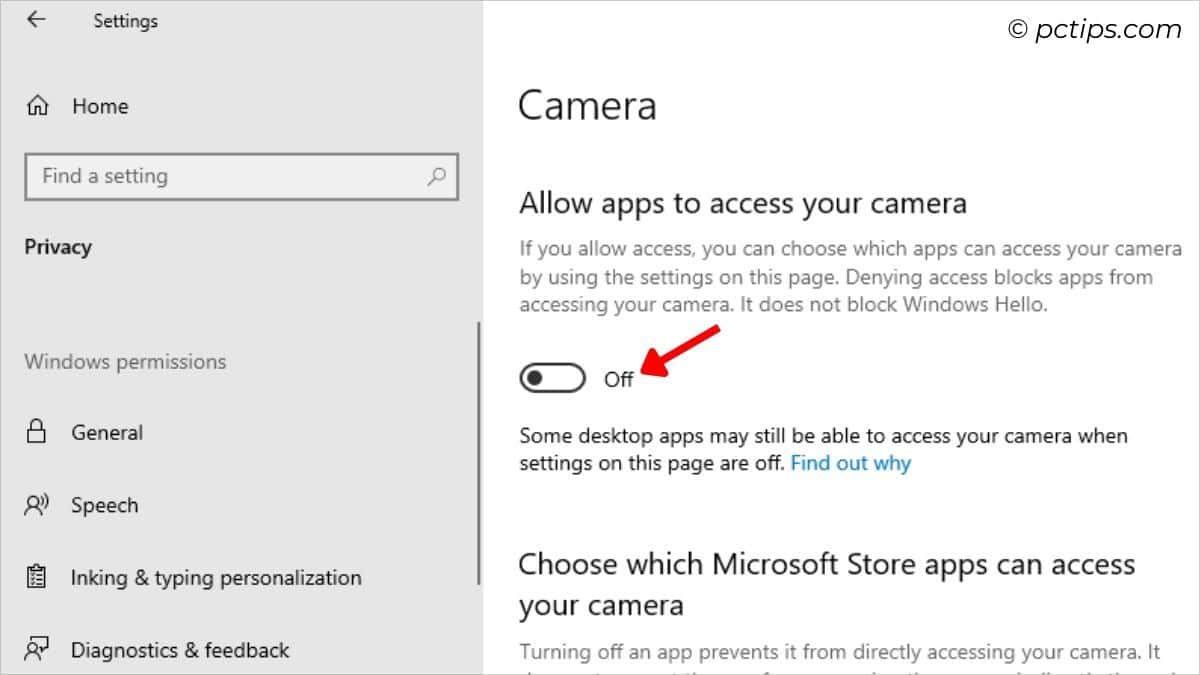
- Windows 11: Settings > Privacy & Security > Camera > Toggle off “Camera access”
For more tips on this, see my guide to Securing Your Webcam
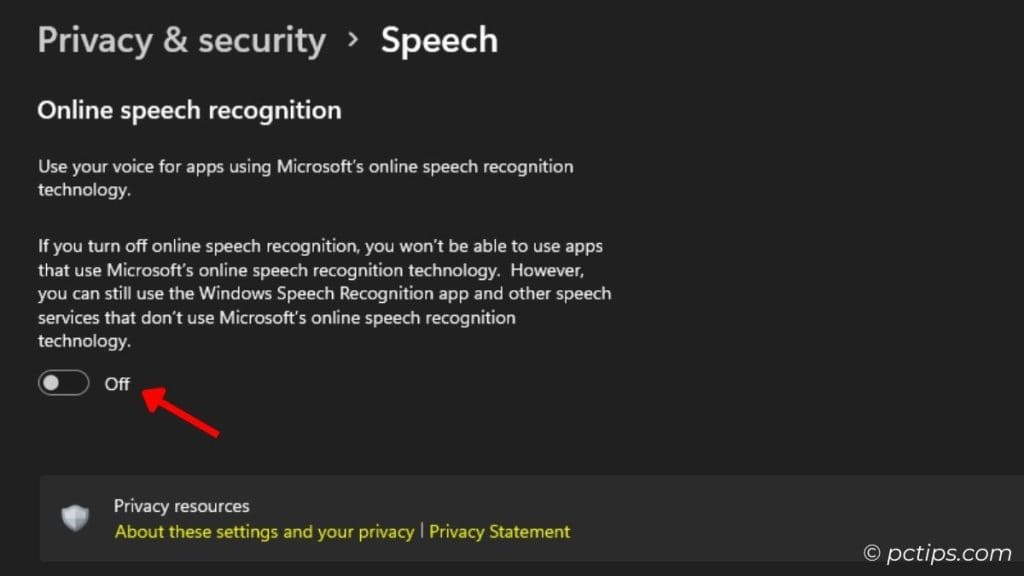
Disable Online Speech Recognition
Windows’ online speech recognition can be handy for dictation and accessibility.
But unless you use those features, there’s no reason to let Microsoft analyze your voice data.
- Settings > Privacy > Speech > Toggle off “Online speech recognition”
Restrict Account Info Access
Many apps will try to peek at your Microsoft account details, including name, picture, and other personal data.
In most cases, there’s zero need for this, so shut it down:
- Windows 10: Settings > Privacy > Account info > Toggle off “Allow apps to access your account info”
- Windows 11: Settings > Privacy & Security > Account info > Toggle off “Account info access”
Minimize Notification Distractions
We’ve all had our focus shattered by a sudden popup about plugging in a USB drive or an app demanding an update.
Unless you have apps that you need to hear from urgently, consider turning off notifications while you work.
- Windows 10: Settings > System > Notifications & actions > Toggle off “Get notifications from apps and other senders”
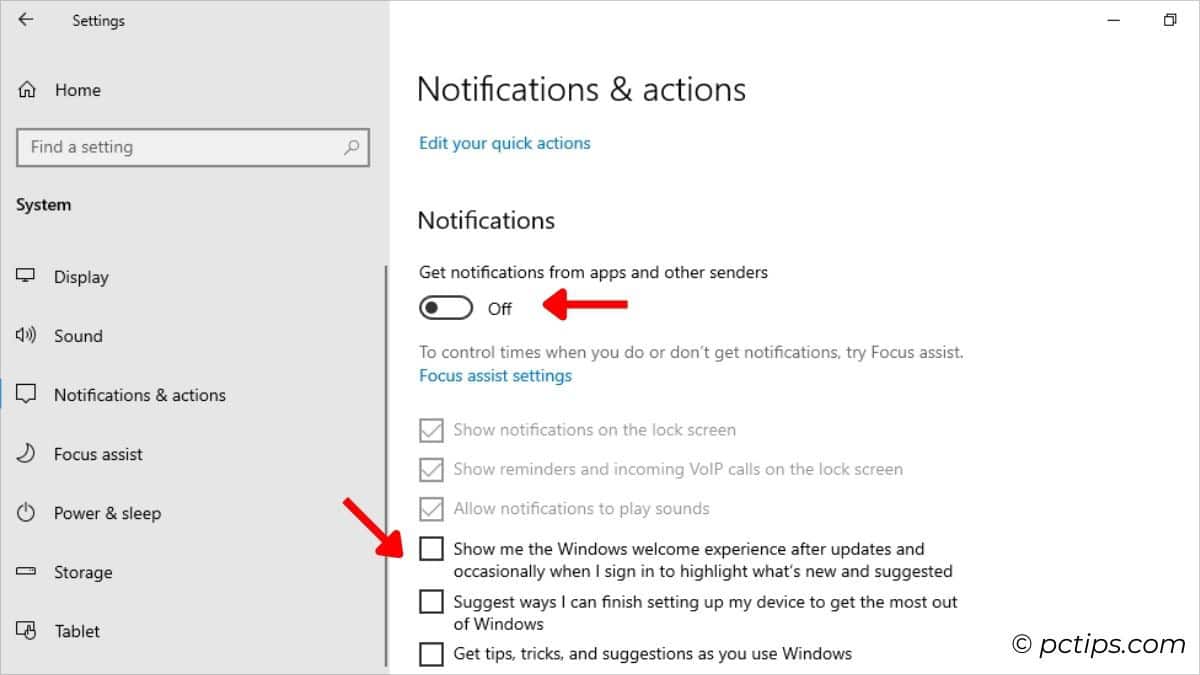
- Windows 11: Settings > System > Notifications > Toggle off “Notifications”
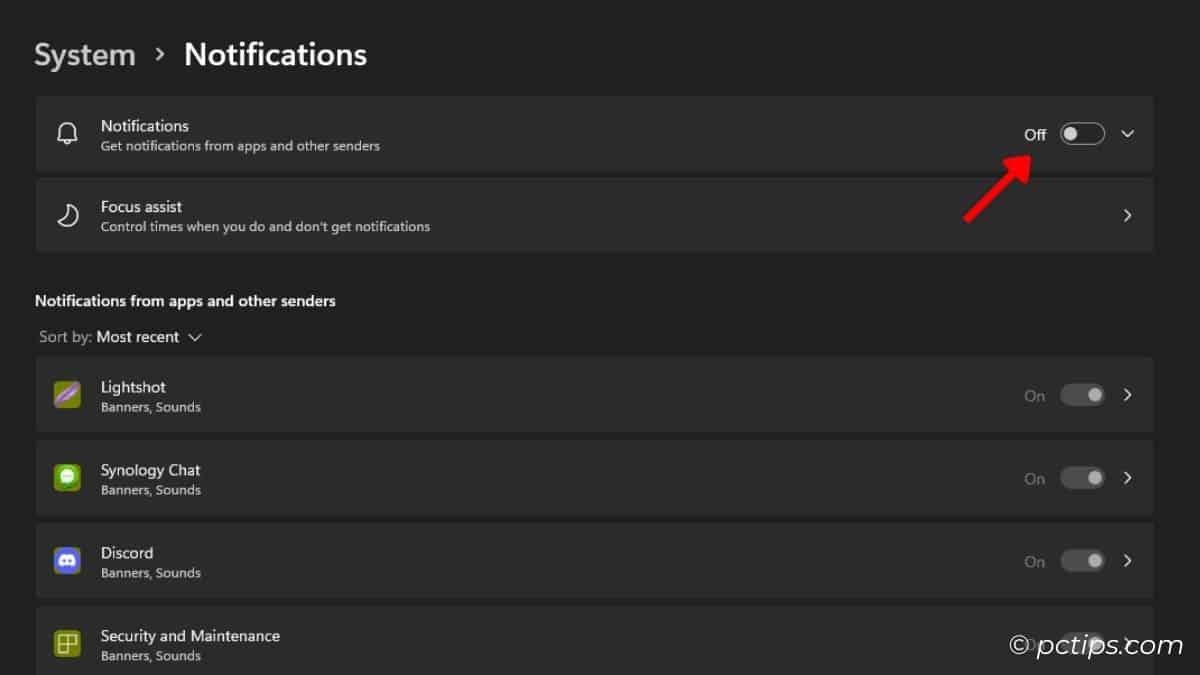
Tip: You can also use Focus Assist to automatically mute notifications during certain hours or when you’re doing full-screen activities like gaming or presenting.
Declutter the Start Menu
Does anyone actually use those web search results that appear in the Start menu? I sure don’t.
To get rid of the clutter, you’ll need to make a quick registry edit:
- Open Registry Editor (Win + R, type “regedit“)
- Navigate to
HKEY_CURRENT_USER\Software\Policies\Microsoft\Windows - Right-click and create a new key called “Explorer“
- Inside the new Explorer key, create a new DWORD value named “DisableSearchBoxSuggestions“
- Set the value to 1
- Reboot your PC
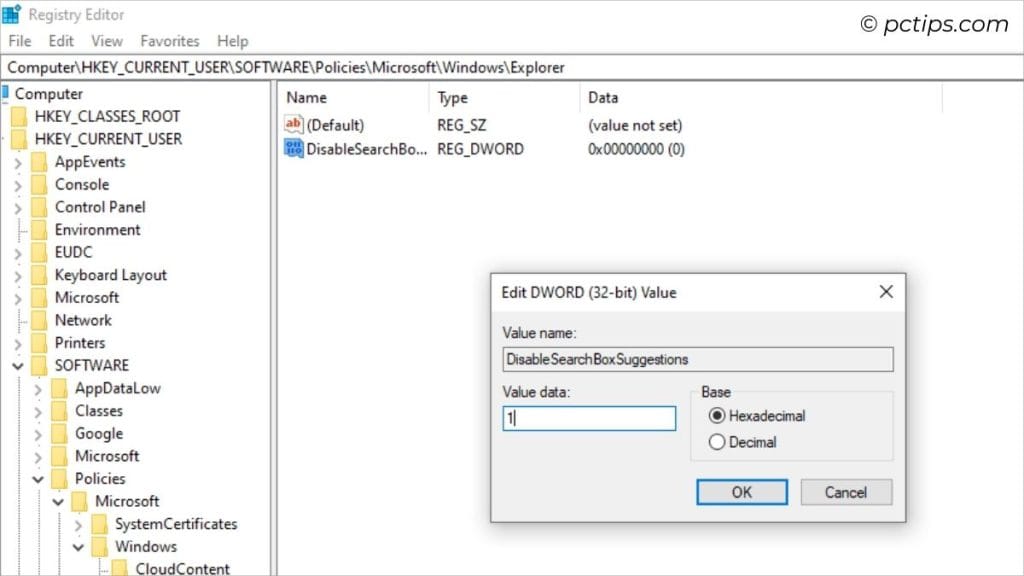
Now your start menu will be a Bing-free zone, as nature intended.
Silence Microsoft Store Suggestions
You know those annoying Start Menu ads and suggestions courtesy of the Microsoft Store? We can mute them with a quick Group Policy edit:
- Open Group Policy Editor
- Navigate to
Computer Configuration > Administrative Templates > Windows Components > Cloud Content - Find the “Turn off Microsoft consumer experiences” setting and set it to “Enabled“
- Restart your PC
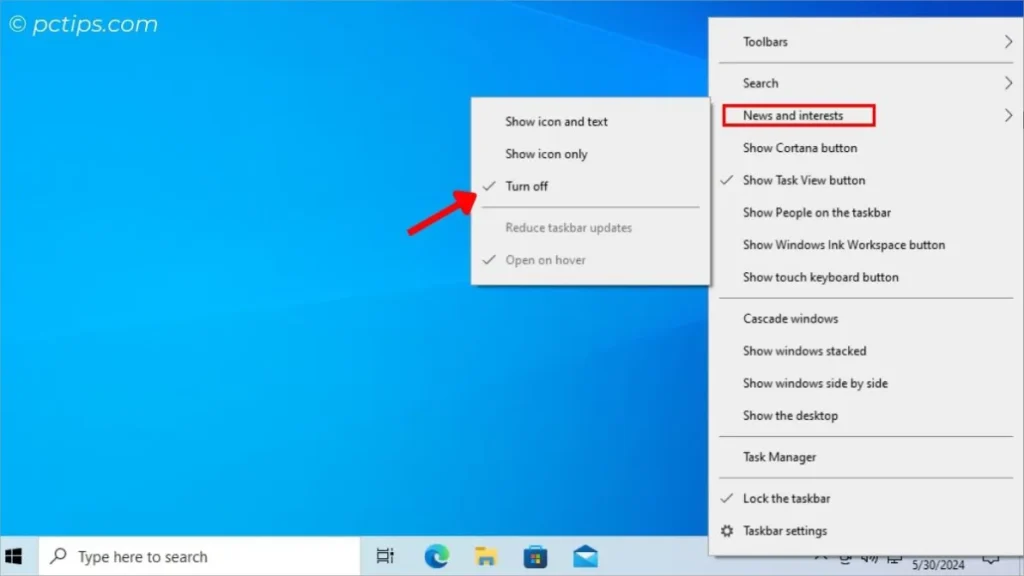
Disable News & Interests
When Microsoft first added the weather widget to the taskbar, I thought it was pretty handy.
But over time, the “News & Interests” feature has grown more bloated and distracting.
A few reasons I’m not a fan:
- The placement feels awkward – why isn’t it up by the clock?
- You can’t just have the weather; it’s all or nothing
- The news articles are often low-quality clickbait
If you want to streamline your taskbar, just right-click and turn off “News and interests.”
Trust me, you won’t miss it.
Disable Peer-to-Peer Windows Updates
By default, Windows uses your PC’s bandwidth to share updates with other computers on the internet.
Microsoft claims this P2P approach helps updates reach more people faster.
But it also opens the door for potential abuse.
To ensure your PC never uploads or downloads updates from strangers, adjust this setting:
- Windows 10: Settings > Update & Security > Delivery Optimization > Toggle off “Allow downloads from other PCs”
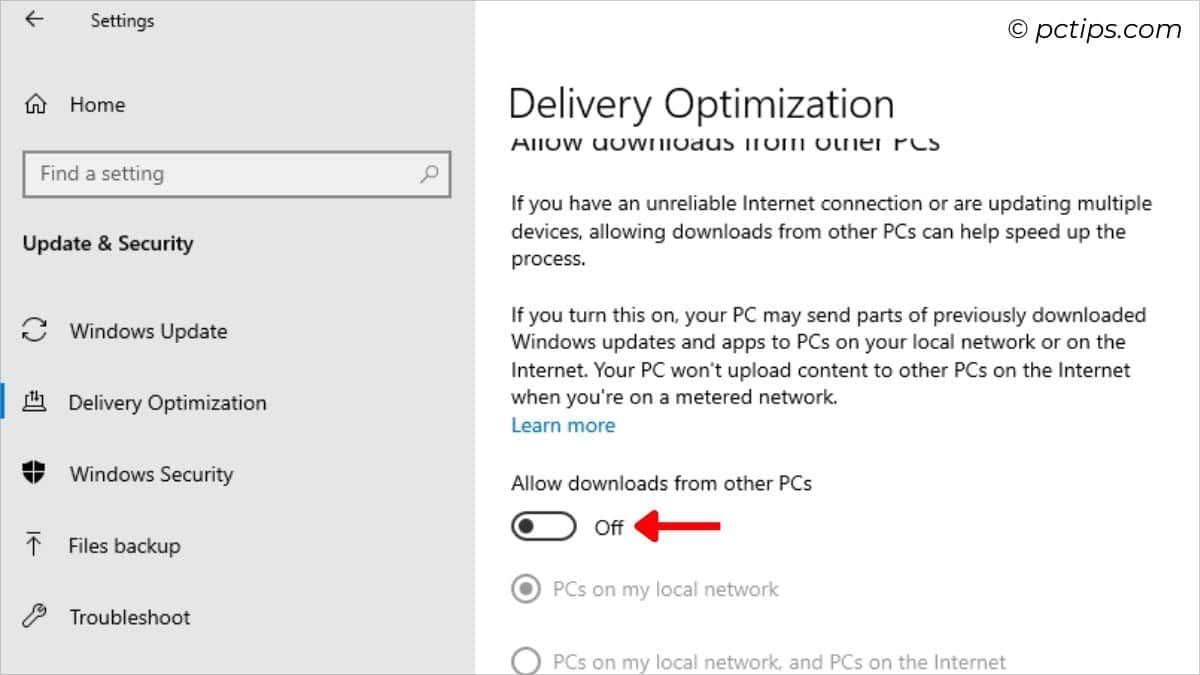
- Windows 11: Settings > Windows Update > Advanced options > Delivery Optimization > Toggle off “Allow downloads from other PCs”
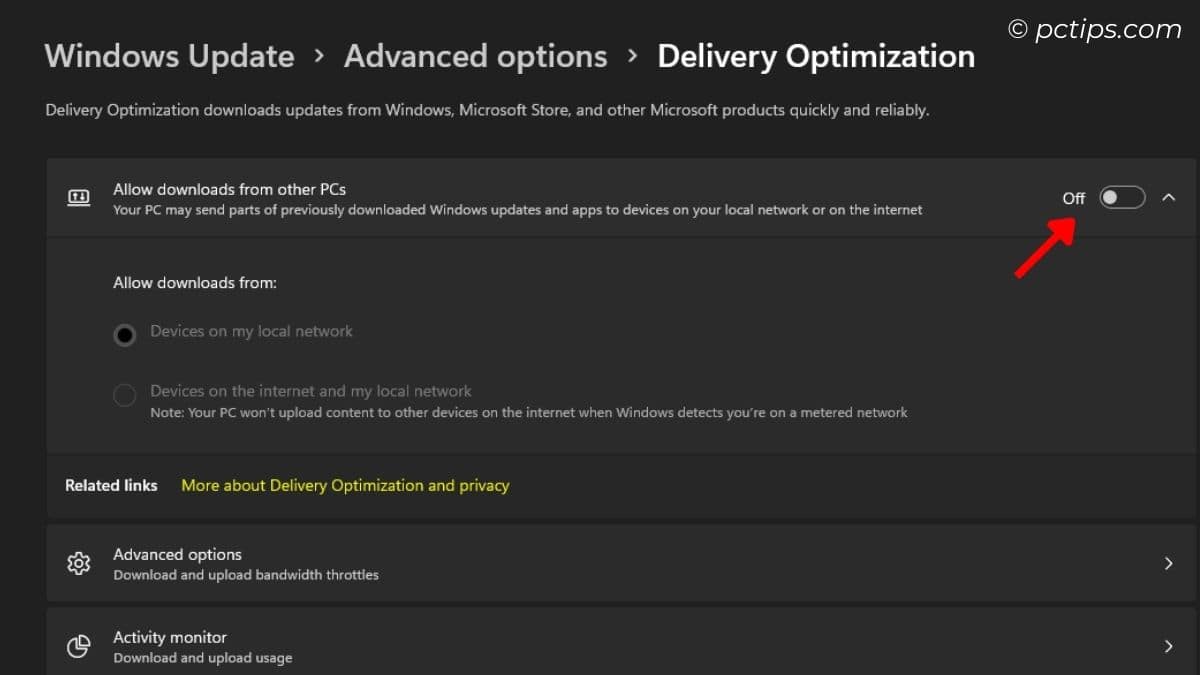
If you want, you can choose to only share with PCs on your local network instead of the general public.
But personally, I leave this off entirely. I pay for my internet, so I should control how it’s used!
On that note, check out these 30 genius ways to make your internet faster
Clean Up Your Desktop Icons
Nothing makes a PC feel dated quite like a desktop full of random icons.
To clean up the cruft:
- Right-click on the desktop and select “Personalize“
- Click “Themes” then “Desktop icon settings“
- Uncheck any system icons you don’t need (like Network, Recycle Bin, etc.)
Instant minimalism. For more tips on this, check out my article on Organizing Your Desktop Icons.
Dump the Taskbar Bloat
The Windows taskbar has becoming a dumping ground for all kinds of tools, widgets and icons over the years.
Right-click any blank space on the taskbar and open “Taskbar settings.”
From there you can hide things like:
- Task view button
- Widgets
- Chat
- Search
- Pen menu
- Touch keyboard
You can also streamline your system tray to only show the icons you actually click on a regular basis.
Marie Kondo would be proud!
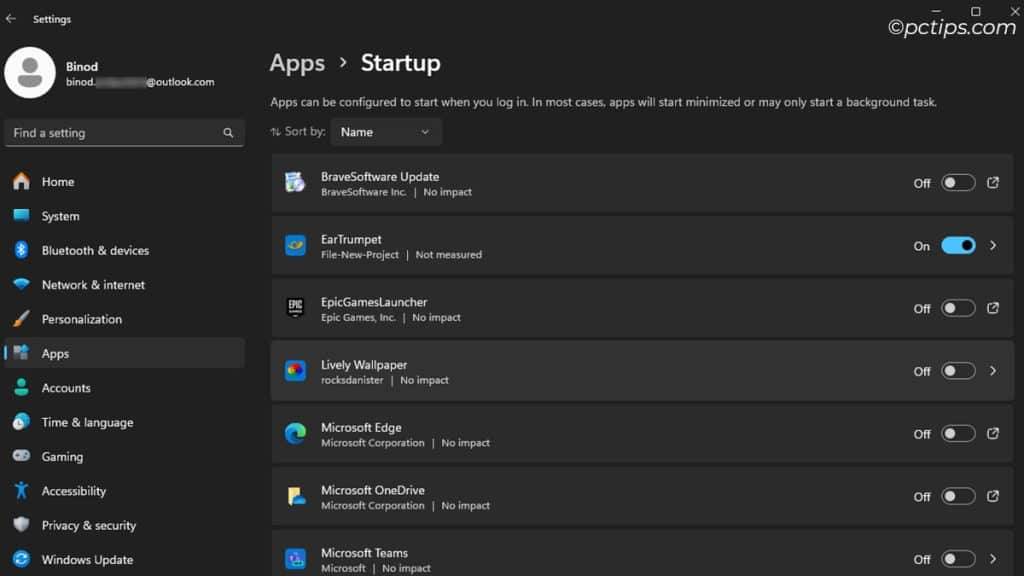
Prune Startup Programs for a Faster Boot
Every program seems to think it’s essential to start up with Windows.
Newsflash: most aren’t! Give your boot time a boost by pruning the startup list:
- Settings > Apps > Startup
- Toggle off any apps you don’t need launching at startup
For an even deeper clean, use Task Manager:
- Press Ctrl + Shift + Esc to open Task Manager
- Go to the Startup tab
- Right-click and disable any unnecessary startup programs
With your startup lean and mean, you’ll be ready to tackle the day in record time.
Common culprits include Spotify, Discord, Adobe Creative Cloud, and manufacturer bloatware.
The fewer things that have to load, the faster you’ll be up and running.
Disable Unnecessary Services
Windows runs a whole bunch of background services, many of which you’ll never use. Disabling them can free up system resources for the things you actually do use:
- Press Win + R and enter “
services.msc” to open the Services manager - Double-click on a service you want to disable
- Change the “Startup type” dropdown to “Disabled“
- Click “Stop” to shut down the service immediately
- Click OK and repeat for other unnecessary services
Some common services to disable include:
- Bluetooth Support Service (if you don’t use Bluetooth)
- Fax (when was the last time you faxed??)
- Print Spooler (if you don’t have a printer)
- Remote Registry (security risk)
- Touch Keyboard and Handwriting Panel Service (if you don’t use tablet mode)
- Xbox Accessory Management Service (if you don’t have any Xbox accessories)
Just be careful not to disable any essential services! When in doubt, leave it running.
Also Read: 100 Run Commands Every Windows User Should Know
Choose Full Shutdown Over Fast Startup
Fast Startup is a feature that hybridizes shutting down and hibernating.
This allows your PC to boot up faster but prevents it from fully powering off.
As a result, you can run into issues with drivers and Connected Standby power usage.
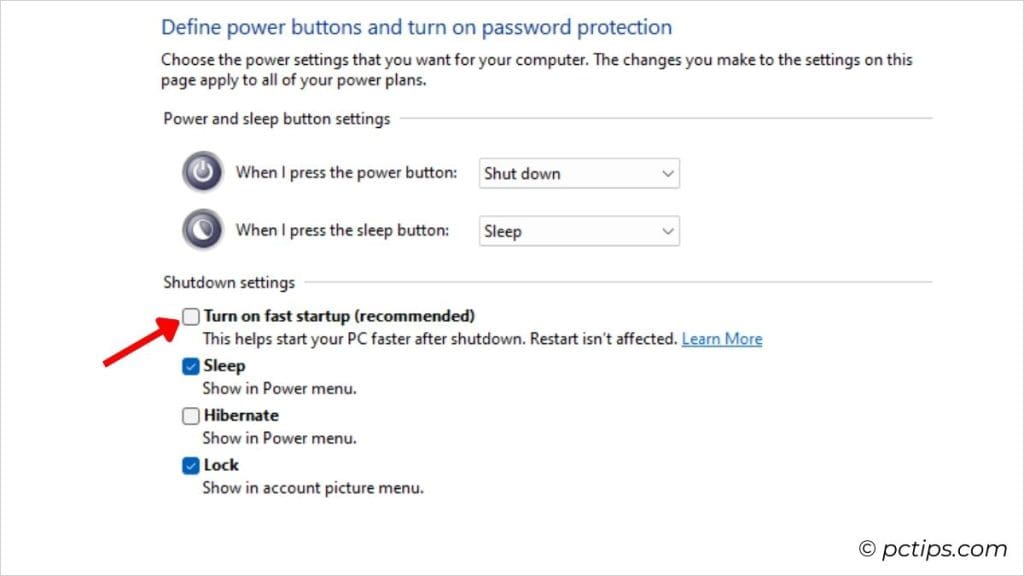
Unless you’re really impatient, I recommend disabling Fast Startup:
- Open Control Panel and go to Power Options
- Click “Choose what the power buttons do“
- Select “Change settings that are currently unavailable“
- Uncheck “Turn on fast startup” and save changes
Now when you shut down your PC, you can be confident it’s actually shutting all the way down. No more half-hibernating!
Save Disk Space by Disabling Hibernation
Speaking of hibernation, how often do you actually use it, especially with modern PCs that boot quickly from SSDs?
If the answer is “rarely” or “never,” you can disable hibernation to save several GB of disk space.
Here’s how:
- Open an admin Command Prompt
- Run the command:
powercfg /hibernate off
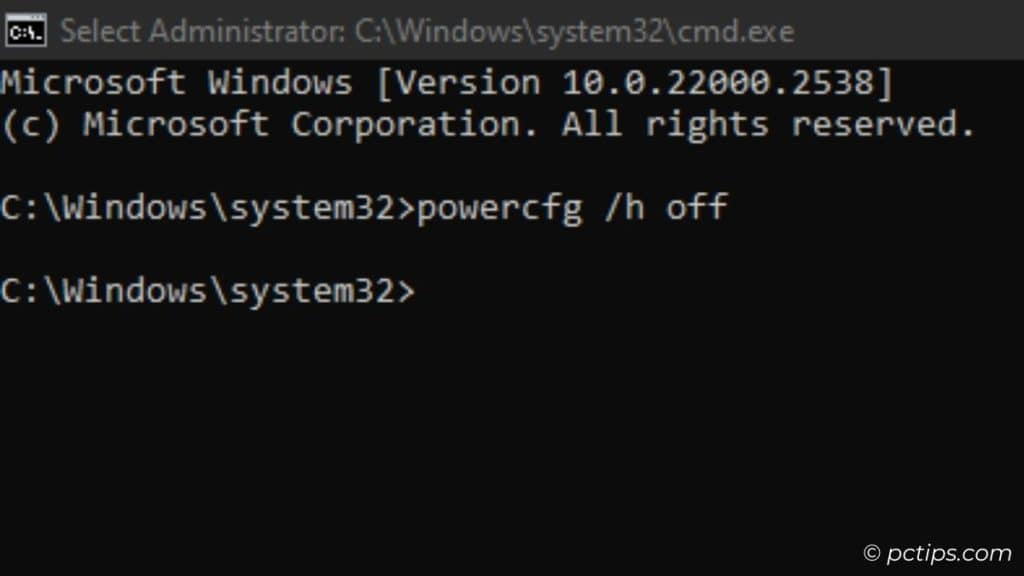
Note that this command will delete your current hibernation file.
So if you think you might change your mind later, consider moving the file somewhere safe instead of nuking it entirely.
Manage Virtual Memory Settings
Virtual memory, AKA the page file, causes endless controversy among Windows power users.
Some swear you need to manage it manually to optimize performance.
Others argue you should let Windows handle it.
After years of testing, I fall into the latter camp.
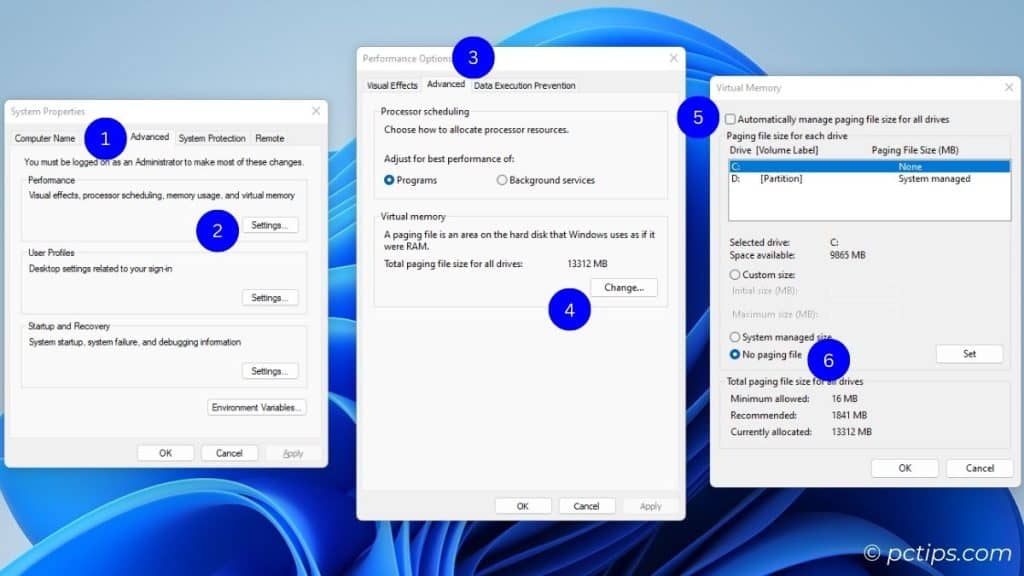
If your PC has under 8GB of RAM, stick with the default “Automatically manage” setting.
If you have 8GB+ RAM, you could try disabling the page file, but I honestly haven’t noticed a meaningful difference.
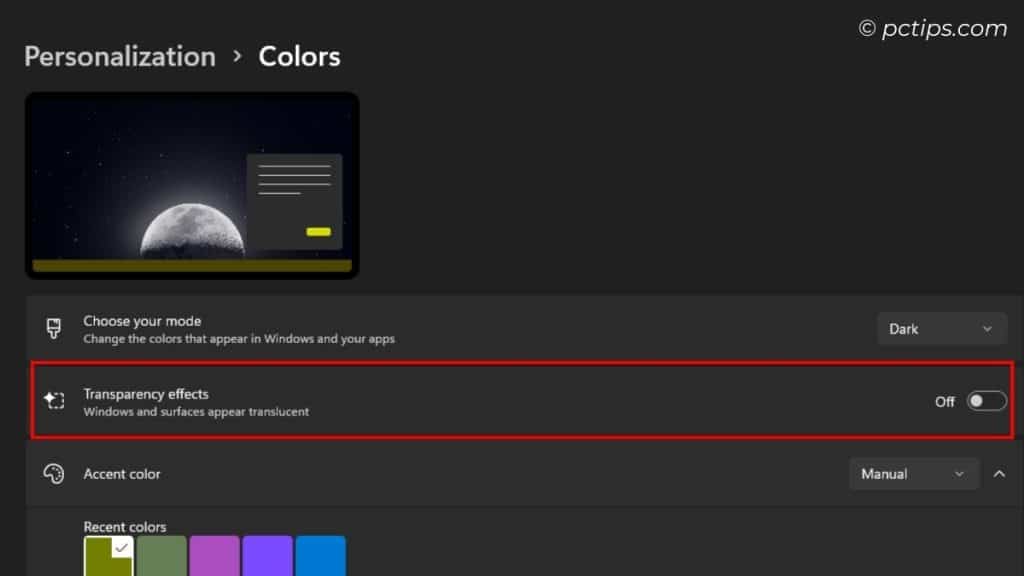
Disable Transparency Effects on Older Hardware
Windows 10 and 11 sure do look pretty with all those translucent window effects.
But if you’re running on a potato PC, disabling transparency can provide a noticeable performance boost, especially when rapidly switching between apps.
To turn off transparency:
- Settings > Personalization > Colors > Toggle off “Transparency effects”
On newer machines with robust CPUs and GPUs, you likely won’t see much difference.
But for aging systems, this is an easy way to eke out some extra speediness.
Optimize Visual Effects for Max Performance
If you’re rocking a high-end GPU, feel free to ignore this section.
But if you’re on integrated graphics or an older card, disabling some visual effects can give you a frames-per-second boost, especially in games.
To adjust visual settings for best performance:
- Open the System Properties dialog (
sysdm.cpl) - Navigate to the Advanced tab
- Under Performance, click Settings…
- Select “Adjust for best performance“
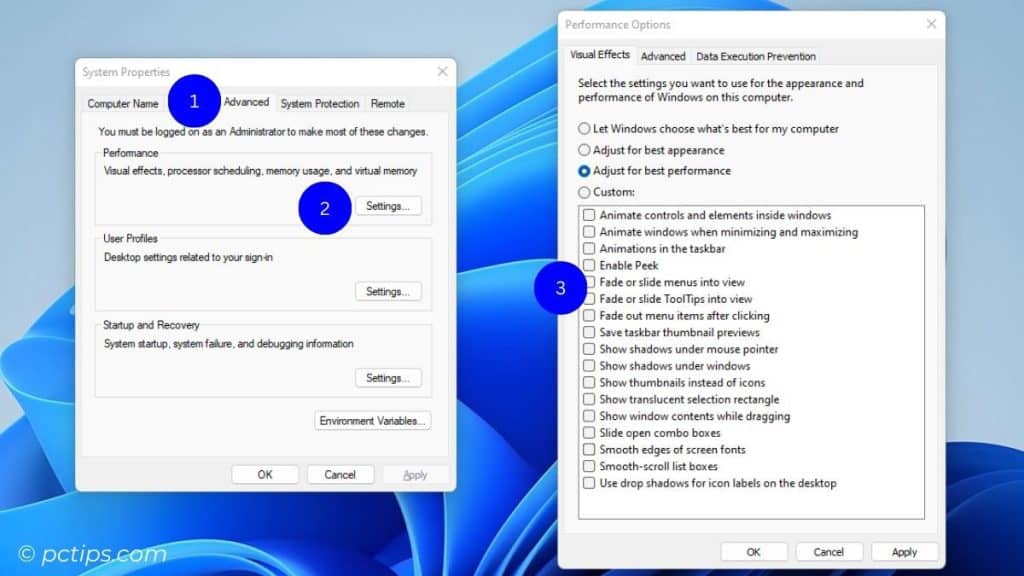
This will turn off things like window animations, dropdown shadows, and those flashy minimize/maximize effects.
Your PC may look a bit less snazzy, but it’ll run faster and use less resources. Worth it!
Exterminate Xbox Game Bar
The Xbox Game Bar is a neat idea…if you actually use it. For the rest of us, it’s just a resource-hogging annoyance. Time to show it the door:
- Windows 10: Settings > Gaming > Game Bar > Toggle off

- Windows 11: Settings > Gaming > Xbox Game Bar > Toggle off “Open Xbox Game Bar using this button on a controller”
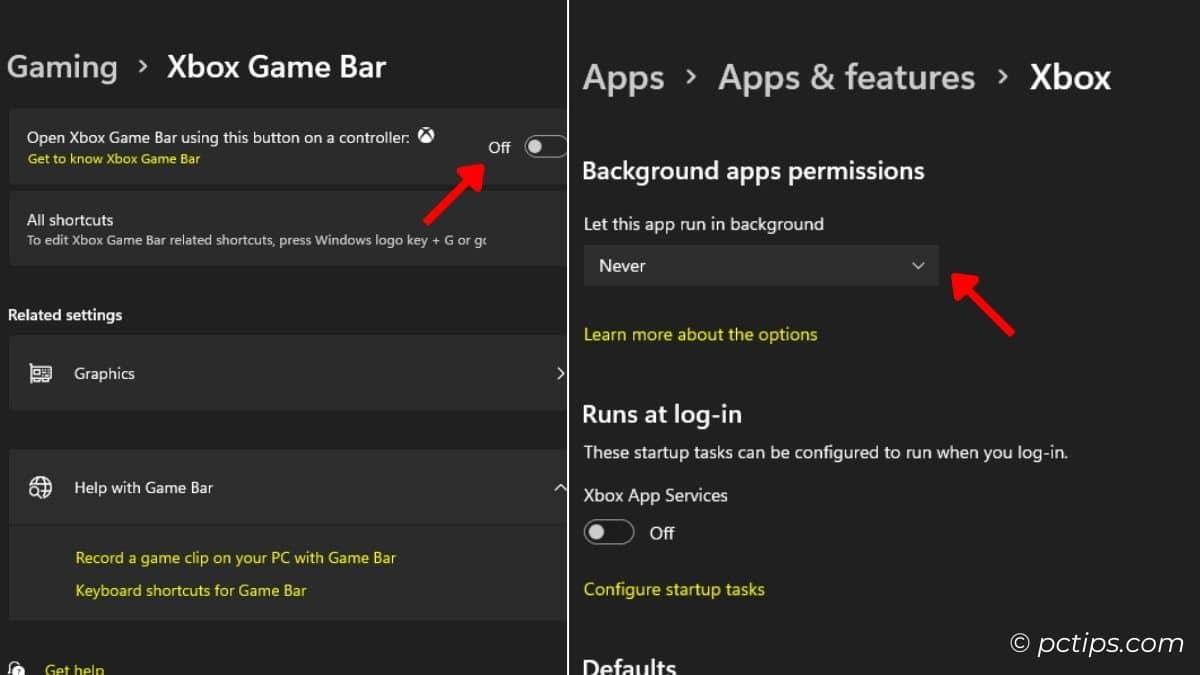
But wait, there’s more! To fully eliminate the Game Bar:
- Go to Settings > Apps > Apps & Features
- Find the Xbox Game Bar entry
- Click the three dots and select Advanced Options
- Set the “Let this app run in the background” option to “Never“
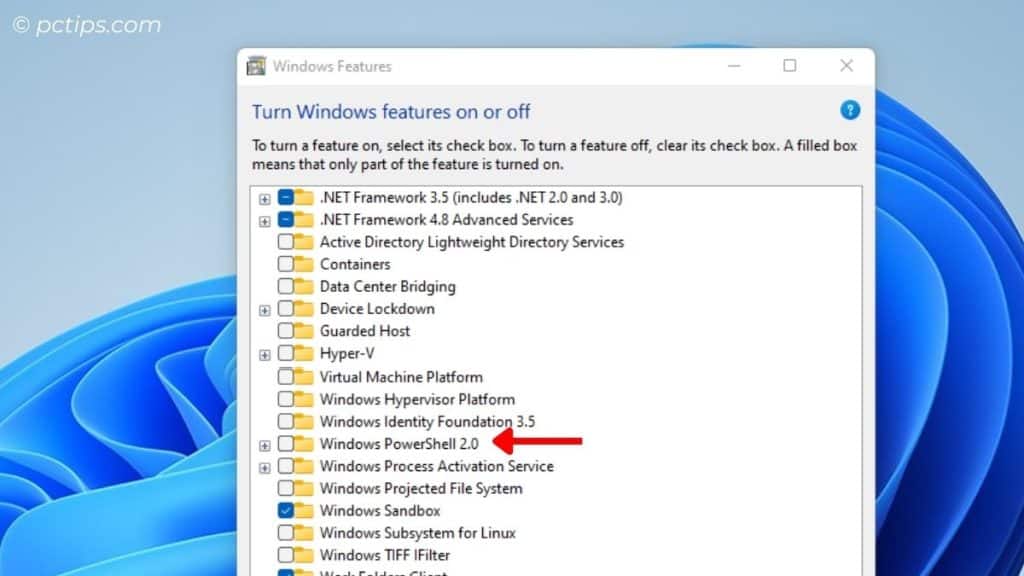
Remove Old PowerShell Versions
PowerShell is an awesome tool for automating tasks and managing your system.
But older versions like PowerShell 2.0 have known security vulnerabilities.
So if you’re not actively using it, it’s best to remove it.
To uninstall PowerShell 2.0:
- Open the “Turn Windows features on or off” dialog
- Uncheck “Windows PowerShell 2.0“
- Click OK and reboot
Rest assured, removing PowerShell 2.0 won’t affect your ability to use more recent versions.
It’s all about reducing your attack surface!
Ditch The Legacy Windows Media Player
Let’s be real: Windows Media Player is long past its prime.
These days, most people use more modern, feature-rich media apps like VLC or KMP.
If you don’t rely on WMP for anything, you can safely remove it to save a bit of disk space and declutter your app list:
- Open the “Turn Windows features on or off” dialog
- Expand “Media Features“
- Uncheck “Windows Media Player“
- Click OK and reboot
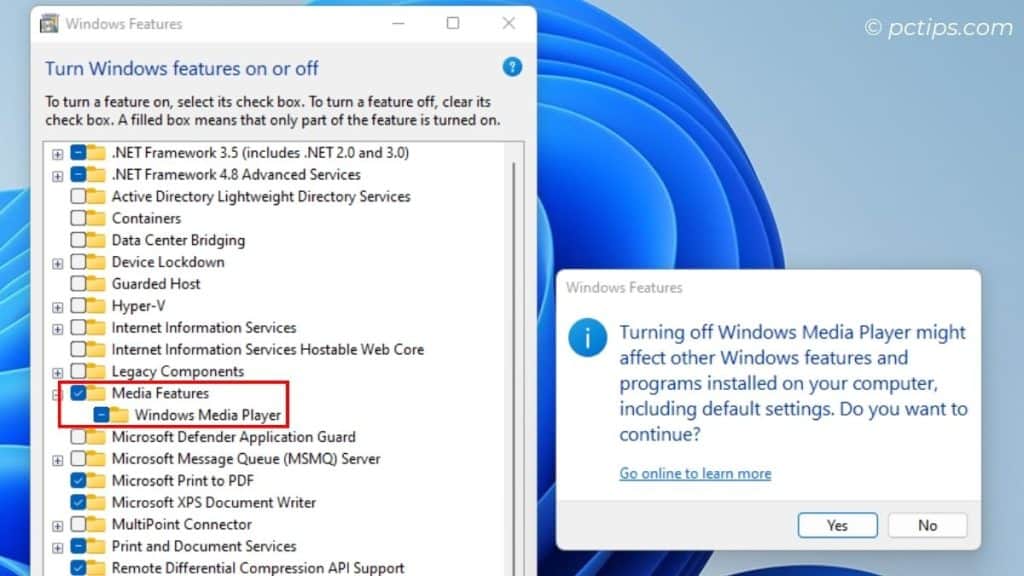
Note that this won’t affect the newer “Groove Music” or “Movies & TV” apps, which are separate from the legacy WMP.
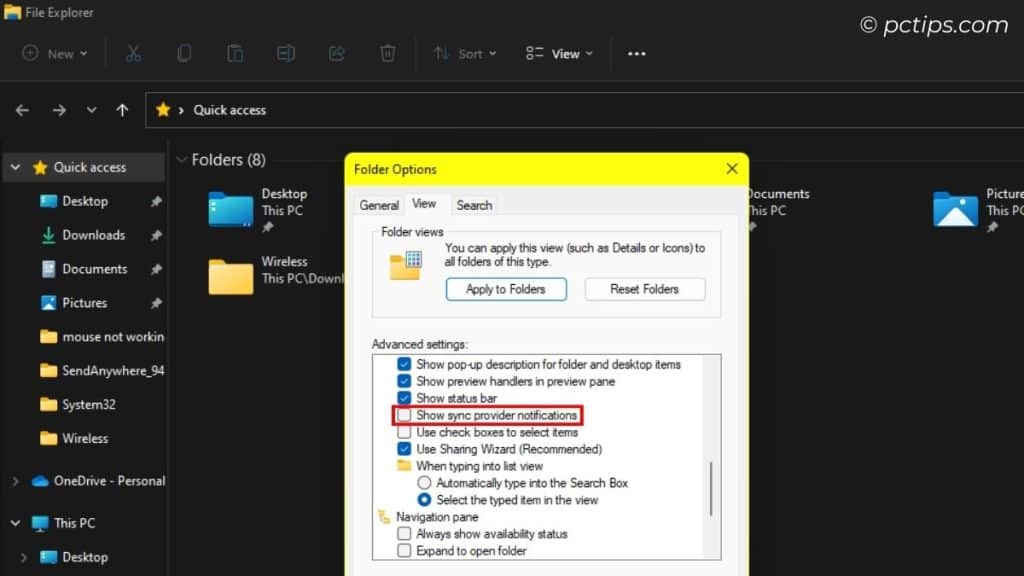
Hide OneDrive Sync Notifications
OneDrive is great for seamlessly syncing your files to the cloud.
But by default, it clutters up File Explorer with “OneDrive Status” notifications. Annoying!
To keep OneDrive running in the background without all the nags:
- Open File Explorer and click the ellipsis (…) menu
- Select “Options” then switch to the View tab
- Uncheck “Always show availability status” and “Show sync provider notifications“
- Click OK
Ahh, much better.
Now you can enjoy the benefits of cloud sync without the constant “Up to date!” spam.
Turn Off Search Indexing on Slow HDDs
Windows Search is undeniably useful for finding files, settings, and more.
But the indexing process can seriously bog down older mechanical hard drives.
If you’re still rocking an HDD and notice sluggish performance, try disabling indexing:
- Open File Explorer and right-click on your C: drive
- Select Properties then uncheck “Allow files on this drive to have contents indexed…”
- Click OK and choose to apply the setting to subfolders and files
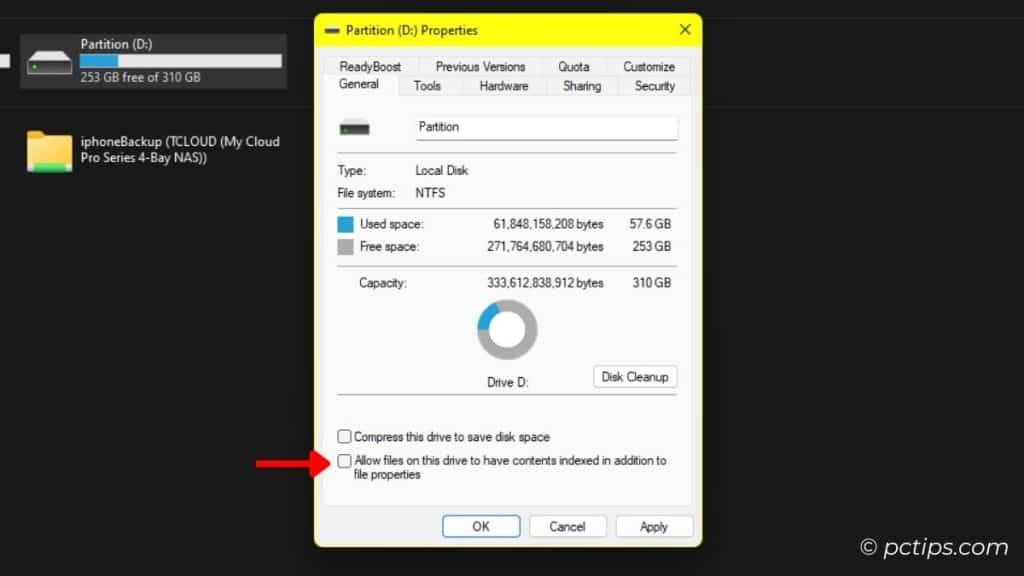
With indexing disabled, searches may take a bit longer, but overall system responsiveness should improve.
SSDs are exempt from this tip since they handle indexing like champs!
Bypass the Recycle Bin
When you delete a file, Windows doesn’t actually remove it from your hard drive.
Instead, it moves the file to the Recycle Bin for safekeeping.
This is handy for recovering accidental deletions, but it also means deleted files continue to occupy disk space.
If you’re confident in your deletion decisions and want to reclaim that space automatically, you can bypass the Recycle Bin entirely:
- Right-click the Recycle Bin and choose Properties
- Select “Don’t move files to the Recycle Bin. Remove files immediately when deleted.“
- Click OK
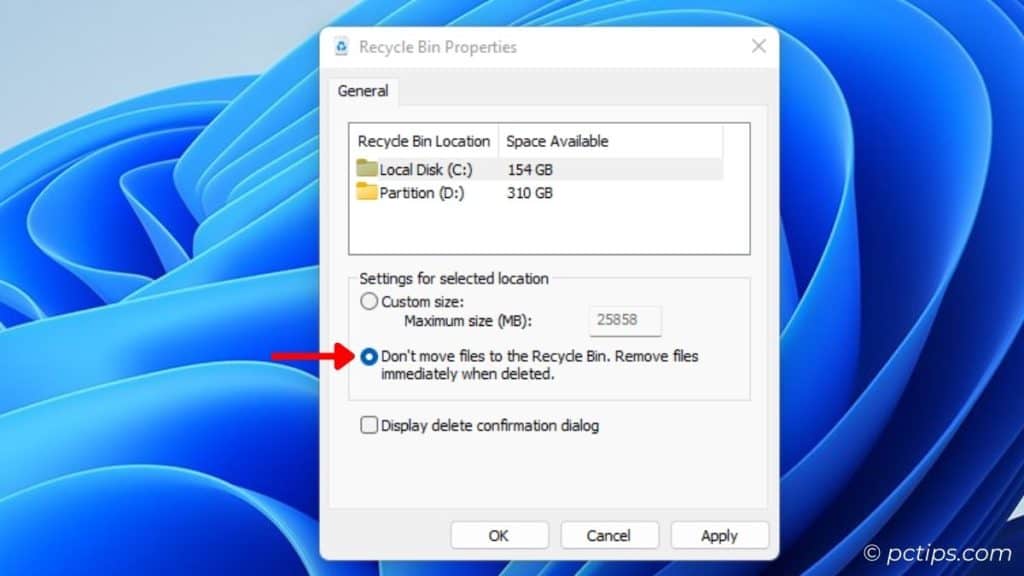
Now when you delete something, poof – it’s gone for good. Use this power wisely! (And maybe make a habit of Shift+Deleting instead of regular deleting, just to be extra sure.)
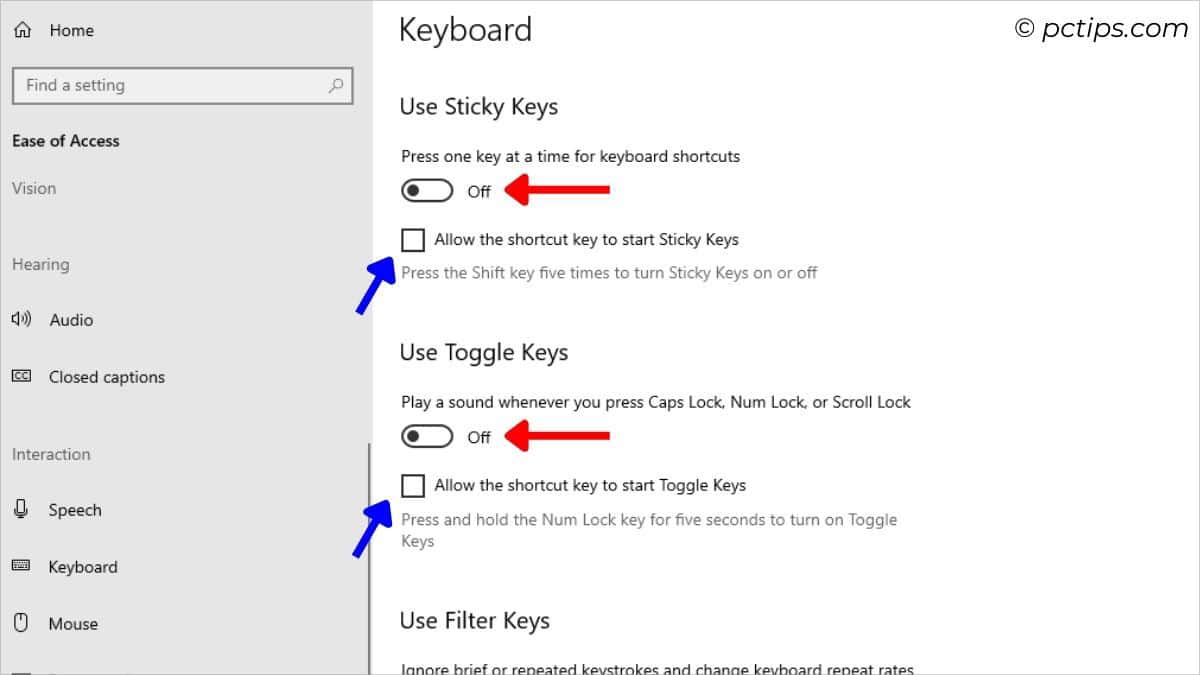
Disable Accessibility Keys If Unused
Sticky Keys, Filter Keys, and Toggle Keys are helpful accessibility features for users with physical impairments.
But if you don’t rely on them, they can actually get in the way.
To disable these keys and prevent accidental activation:
- Windows 10: Settings > Ease of Access > Keyboard > Toggle off “Use Sticky Keys,” “Use Filter Keys,” and “Use Toggle Keys”
- Windows 11: Settings > Accessibility > Keyboard > Toggle off “Sticky keys”, “Filter keys” and “Toggle keys“
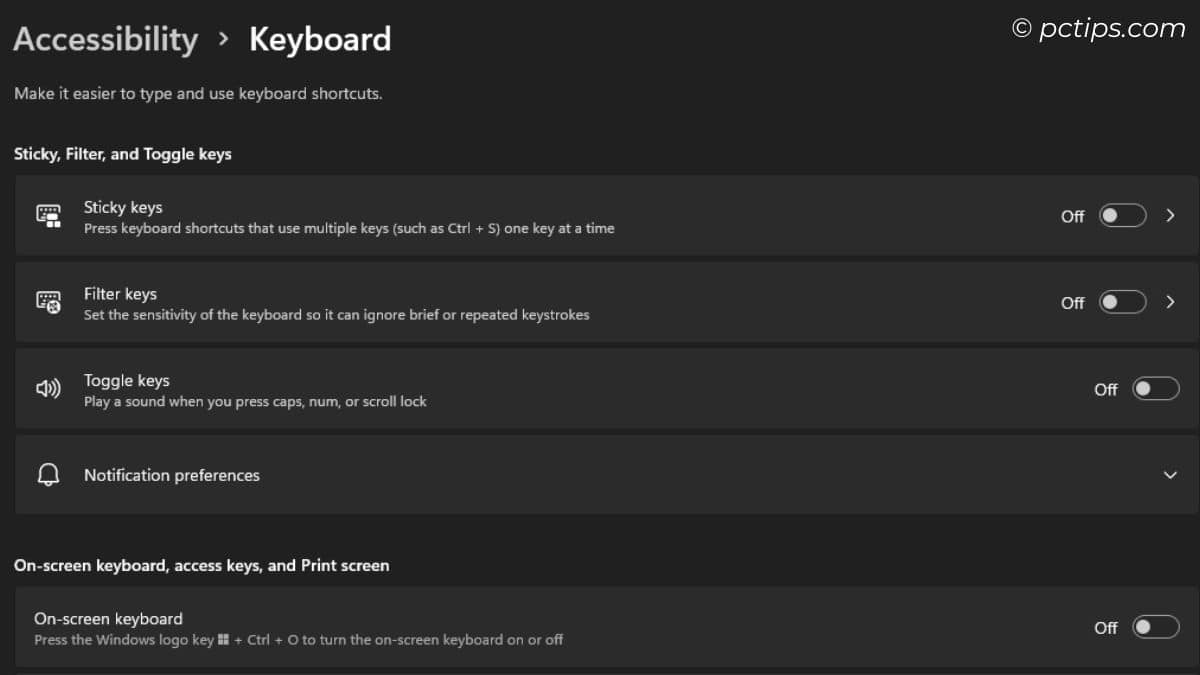
As a bonus, disabling these features also removes the pesky “Do you want to turn on Sticky Keys?” dialog that appears when you press Shift five times rapidly.
Disable Bluetooth When Not in Use
Bluetooth is incredibly convenient for connecting wireless peripherals.
But like any radio protocol, it introduces a potential attack vector for bad actors.
If you don’t regularly use Bluetooth devices, you can mitigate this risk by disabling Bluetooth when it’s not needed:
- Open the Settings app and go to Devices > Bluetooth & other devices
- Toggle off Bluetooth
- Click “More Bluetooth options” and uncheck “Allow Bluetooth devices to find this PC“

Now your PC will be invisible to nearby Bluetooth scanners, and you won’t have to worry about accidentally pairing with unknown devices.
What Settings Did You Nuke?
So now I’m dying to know: which of these did you decide to switch off?
If you enjoyed this article, you might also like my other guides:
- 18 Hidden Windows Features You Probably Didn’t Know About
- 18 Windows Settings You Should Change Now
- 17 Amazing Things You Didn’t Know Your Computer Could Do
If you found this guide helpful, your friends and followers might too.
Give it a quick share on your favorite social media.
Thank you, very helpful!!
Thank you very much for providing these great improving advices. You put lots effort to put photos showing the tool location. They help me to click the right selection. Thank you again for your help..