20 Device Manager Tricks for Windows PCs
Last Updated:
The Device Manager is a Windows component for managing hardware settings and drivers installed on your PC.
Most users think updating drivers is all it’s good for. But it can do so much more.
Did you know you can make your SSD faster via the Device Manager? Or improve your laptop battery life?
Or remotely turn on your PC using your phone? Or bypass MAC filtering to connect to a WiFi network that keeps blocking you?
Buckle up! I’ll share with you 20 tips and tricks to get the most out of the Device Manager’s hidden features.
How to Access the Device Manager
For anyone unfamiliar, the Device Manager lists all the devices you’ve connected so far along with their associated drivers.
You might want to get the latest GPU drivers for the best performance, troubleshoot a faulty audio driver, or enable advanced device features.
To do these, I like to press Win + X and select Device Manager from the poweruser menu. It’s usually the quickest way.
There are numerous other ways too. Pick whichever one you like:
- Press Win + R and enter any of these:
devmgmt.msccontrol hdwwiz.cplcontrol /name Microsoft.DeviceManager
- Search and open ‘device manager’ via Windows Search.
- Create a shortcut that you can pin to the taskbar or start menu for easy access.
- Right-click anywhere and select New > Shortcut.
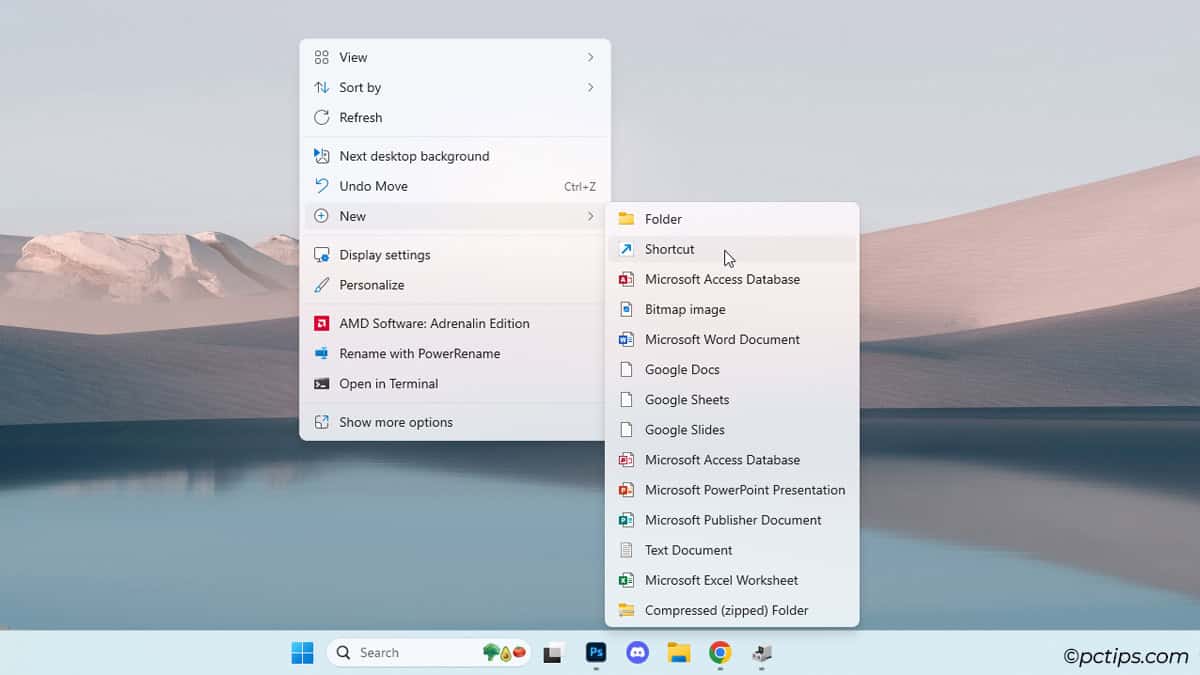
- Enter
devmgmt.mscas the location andDevice Manageras the name.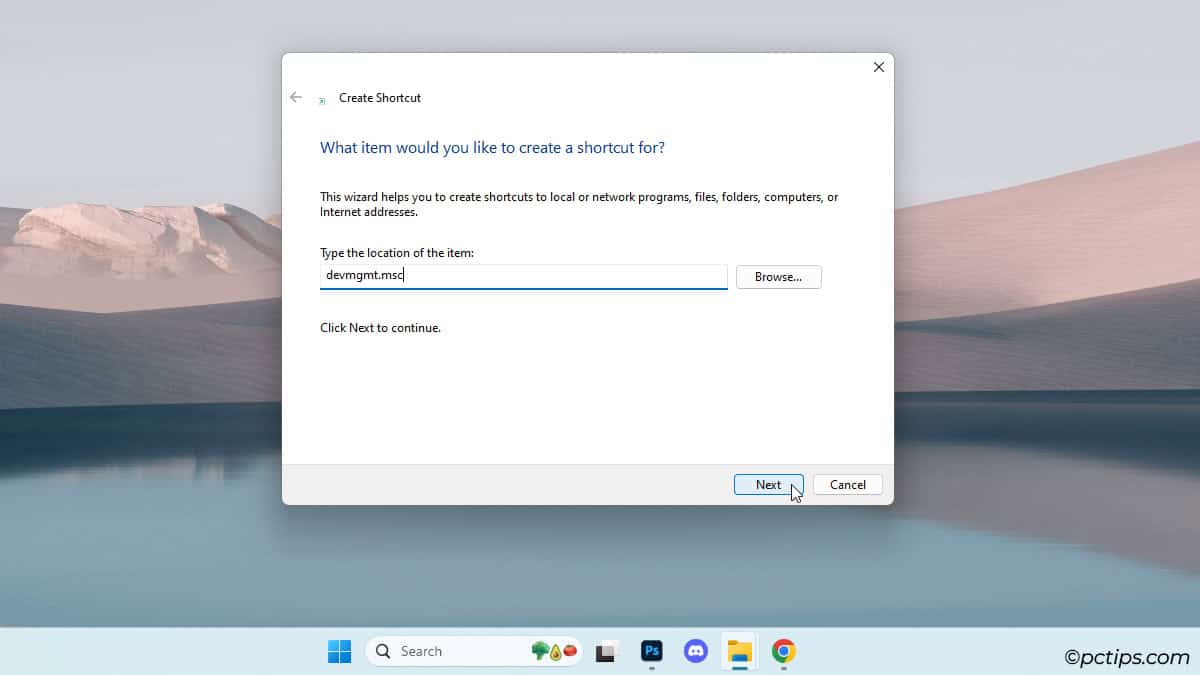
- Right-click anywhere and select New > Shortcut.
- Type any run command from method 1, but this time, press Ctrl + Shift + Enter. If you’re logged in to a standard account, this will launch Device Manager as Admin and give you access to ALL the settings.
- Enter
devmgmt.mscin CMD or PowerShell.
The Device Manager UI
By default, you’ll see devices categorized by hardware type (network adapters, printers, sound devices, etc).
This makes finding devices easy; simply expand the appropriate section.
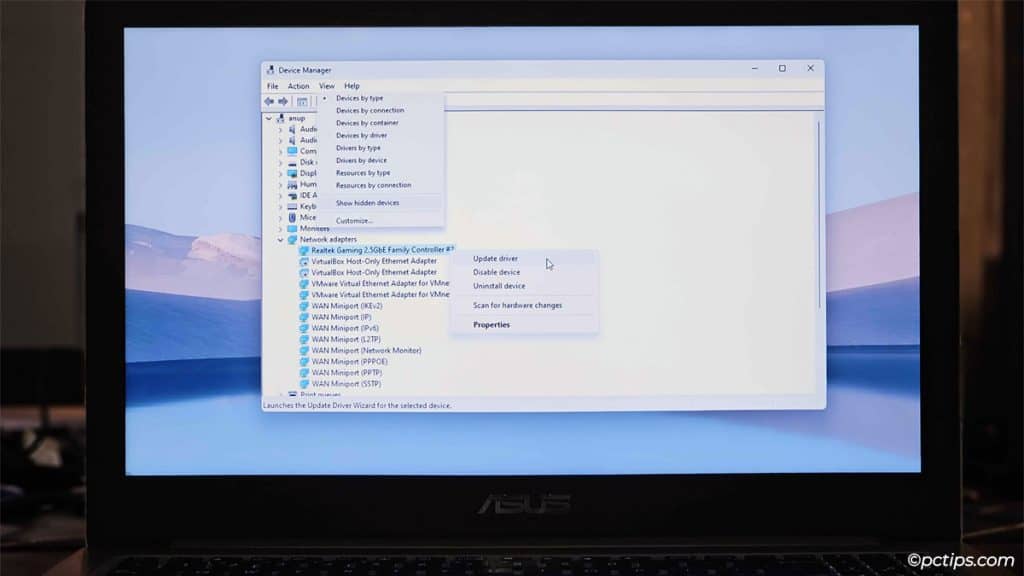
Right-click any device and you’ll find ways to:
- Update drivers
- Uninstall devices
- Disable devices
- Configure advanced properties
Feel free to try out different View modes too. You can list items by driver name, categorize drivers by device type, show hidden devices, and so on.
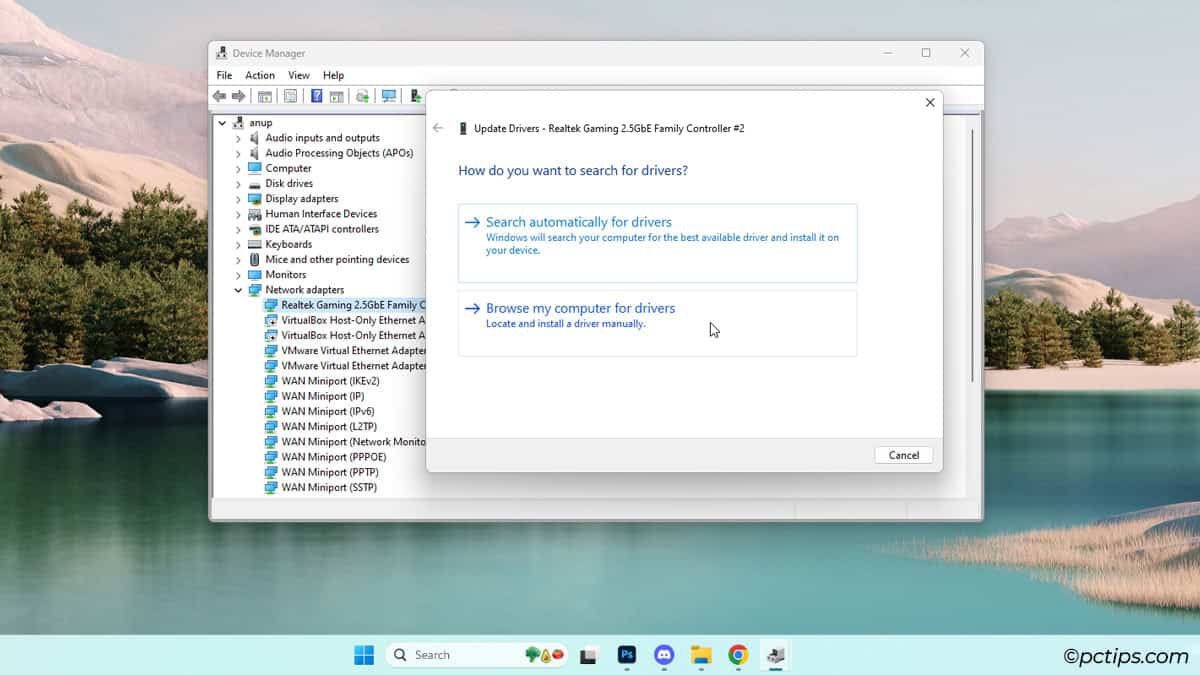
Update Drivers Automatically
Try this: right-click any device and select Update Driver > Search Automatically for drivers.
Windows will check the local driver store and search Microsoft’s online database (via Windows Update).

Normally, it’ll just say that the best drivers for your device are already installed. But,
- Maybe you connected a new device and Windows Update didn’t automatically find a driver for it
- Some current drivers are outdated
- Some drivers were recently uninstalled or rolled back
- You can’t identify the device (Unknown device error)
In such cases, it will find and install a suitable driver for the device.
So, contrary to popular belief, this method does work in the right circumstances. And the whole thing is automated, which is convenient.
Install Drivers Manually
You should install certain drivers like GPU or motherboard drivers from the device manufacturer instead of Microsoft.
This generally enables better performance and more features.
If they provide a Driver Manager or an installer package, sweet!
But sometimes, you might just find some INF, DLL, and SYS files that you can’t install normally. Or, older devices might provide the drivers in a CD.
To install these,
- Right-click the device and select Update Driver > Browse my computer for drivers.
- Click on Browse and locate the folder containing the drivers.
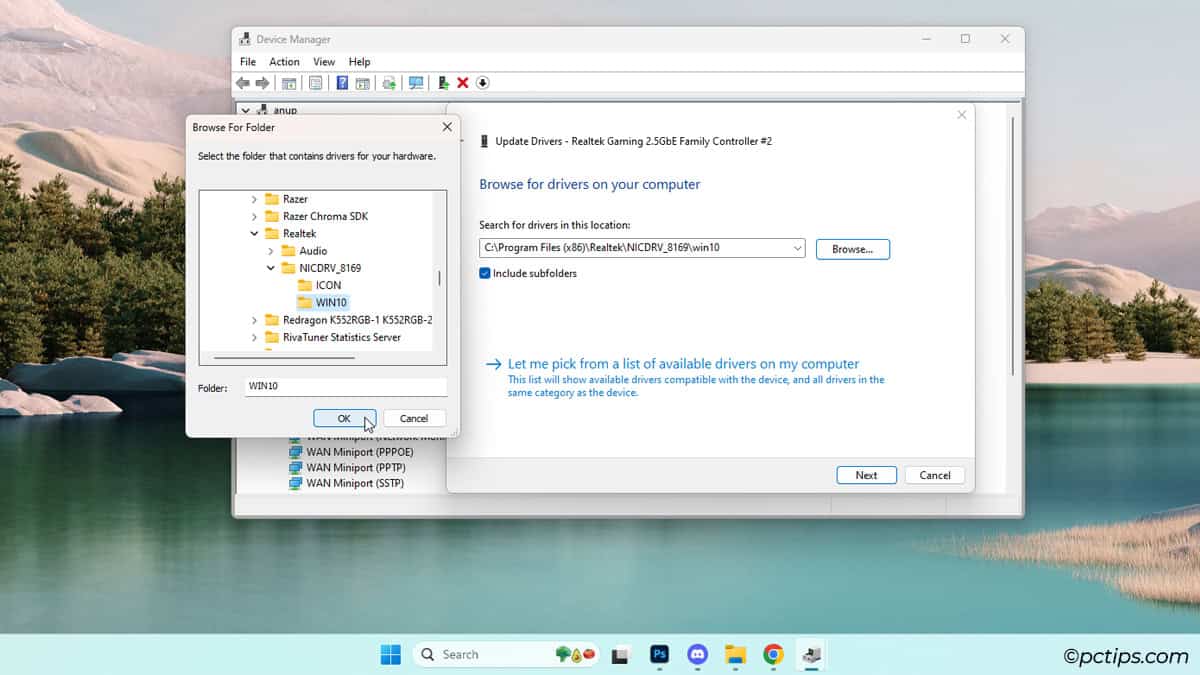
- Press Next and pick the drivers to install.
Roll Back Drivers
If a buggy update sneaks past Microsoft’s WHQL tests, you might find that you suddenly have audio problems or your internet no longer works.
It’s rare, but it does happen sometimes.
In such cases, utilize the Roll Back feature.
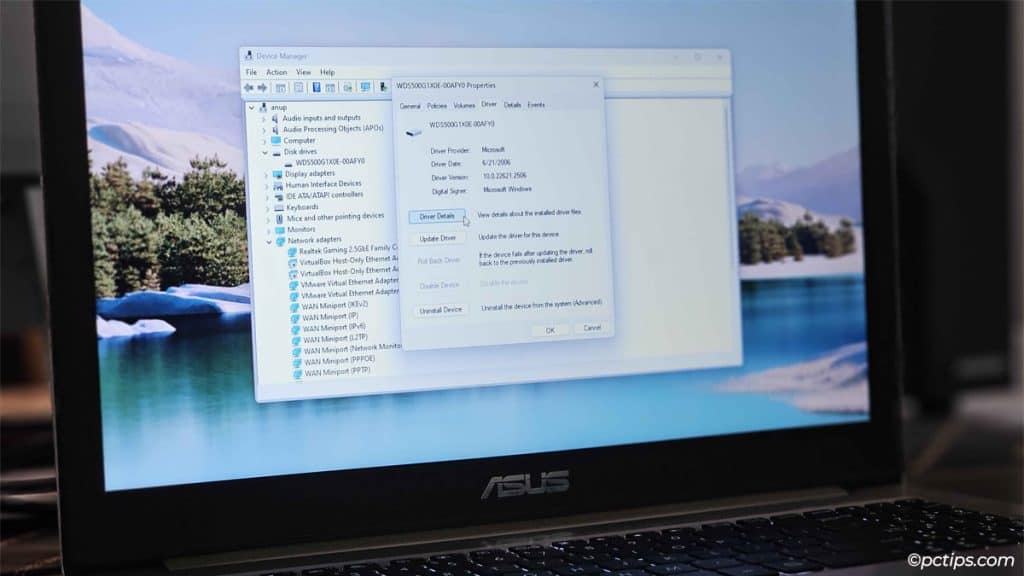
- Right-click a device and select Properties.
- In the Driver tab, click on Roll Back Driver. Select any reason for the rollback and press Yes.
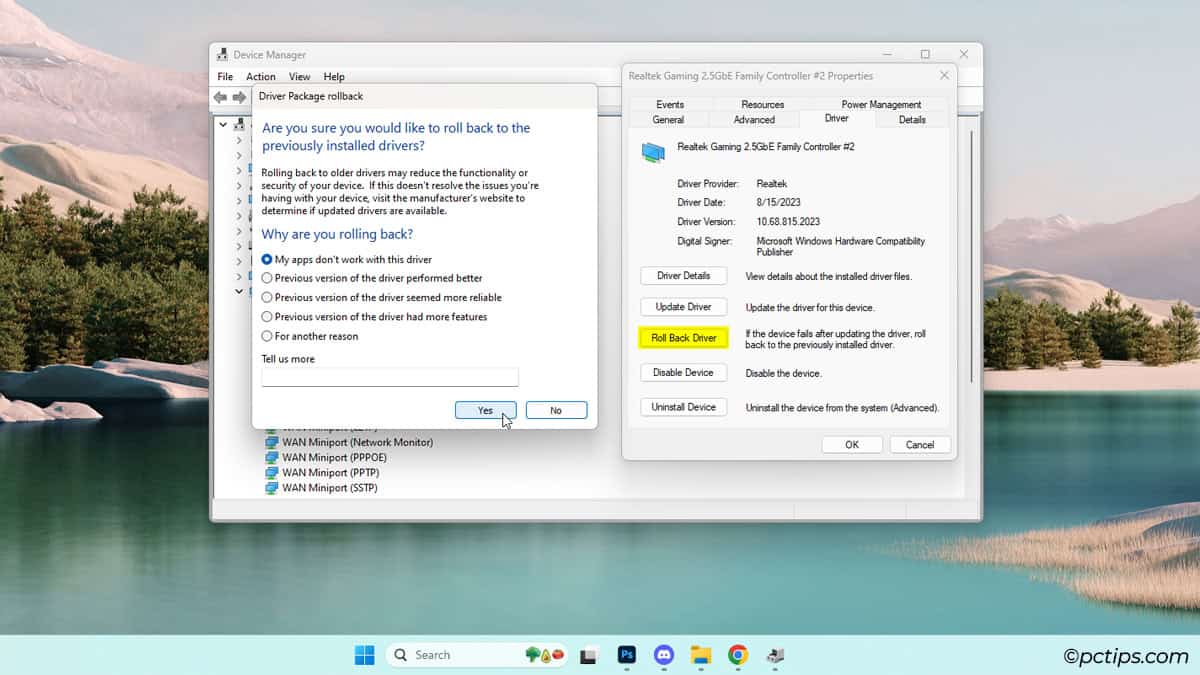
You can stick to this driver version for a while until the bug is patched.
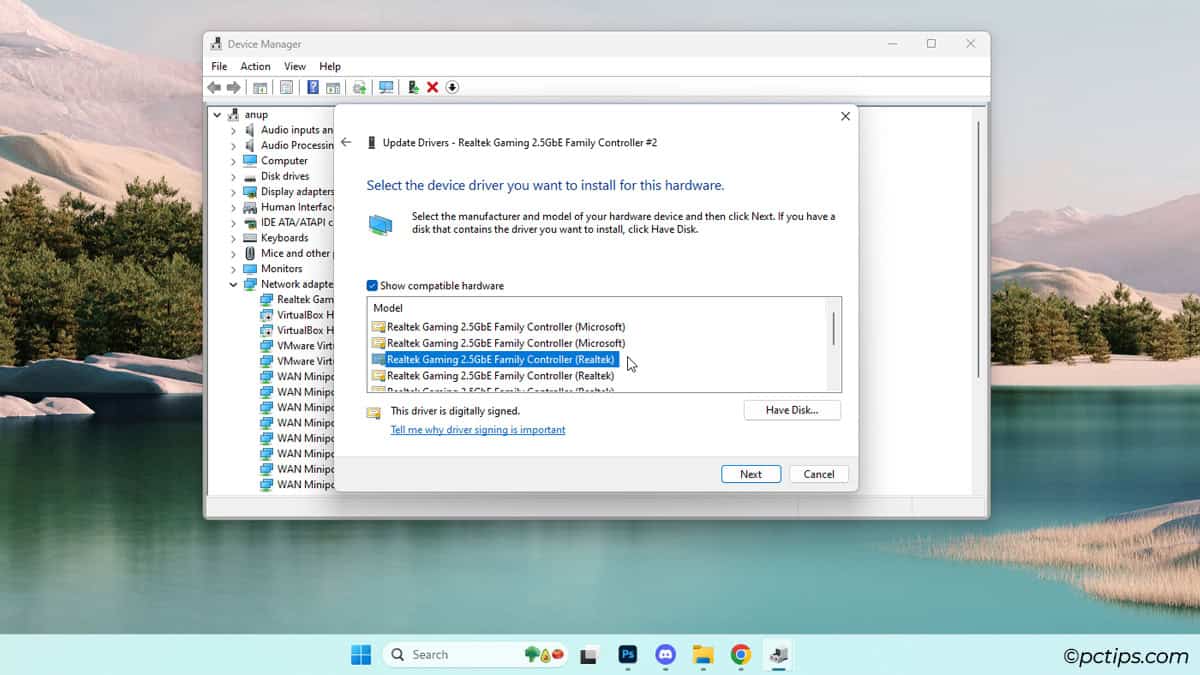
There’s an alternative way too.
- Follow the manual install steps from the previous section and choose to Pick from a list of available drivers.
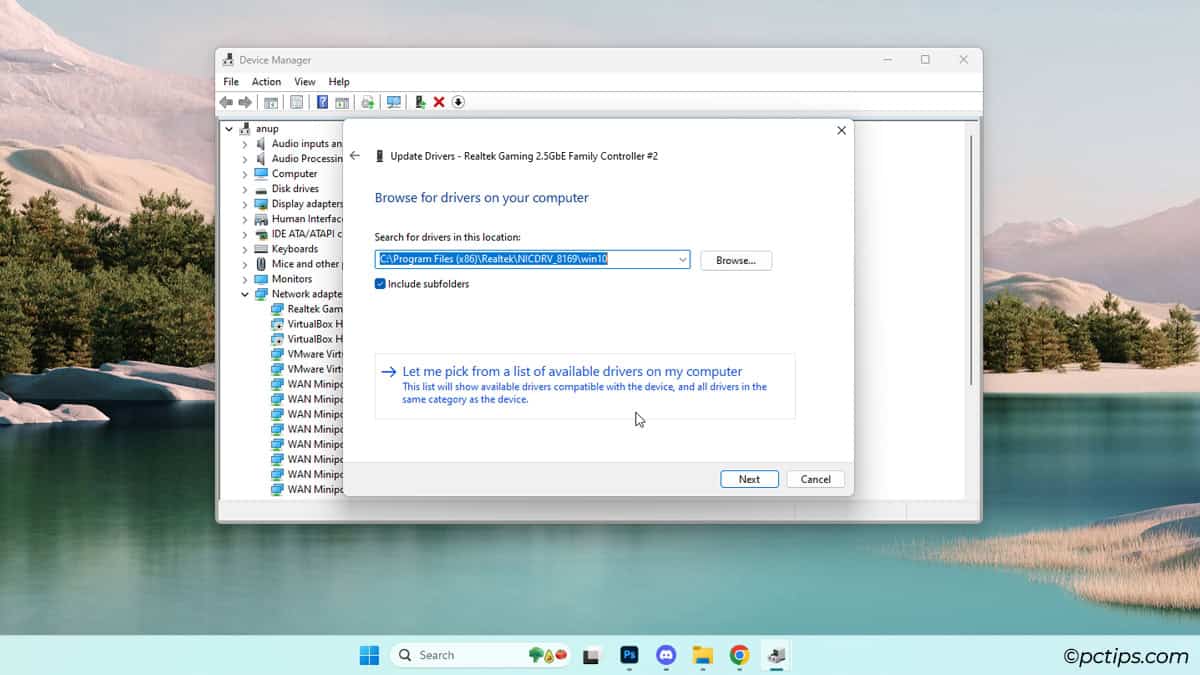
- Here, pick a specific older driver to install.
This happens if your PC doesn’t have any older drivers to revert to.
In this case, uninstall the current driver as shown below. This will revert the driver to the basic Microsoft version.
You can stick to this, or you can find a stable version to manually install.
Uninstall Devices
Drivers can get corrupted due to buggy updates, system corruption, interrupted/failed updates, malware, and various other reasons.
You might also have leftover drivers from devices you installed some time ago but no longer use. Such drivers sometimes conflict with other drivers and cause problems in your system.
The uninstall feature is helpful in such situations.
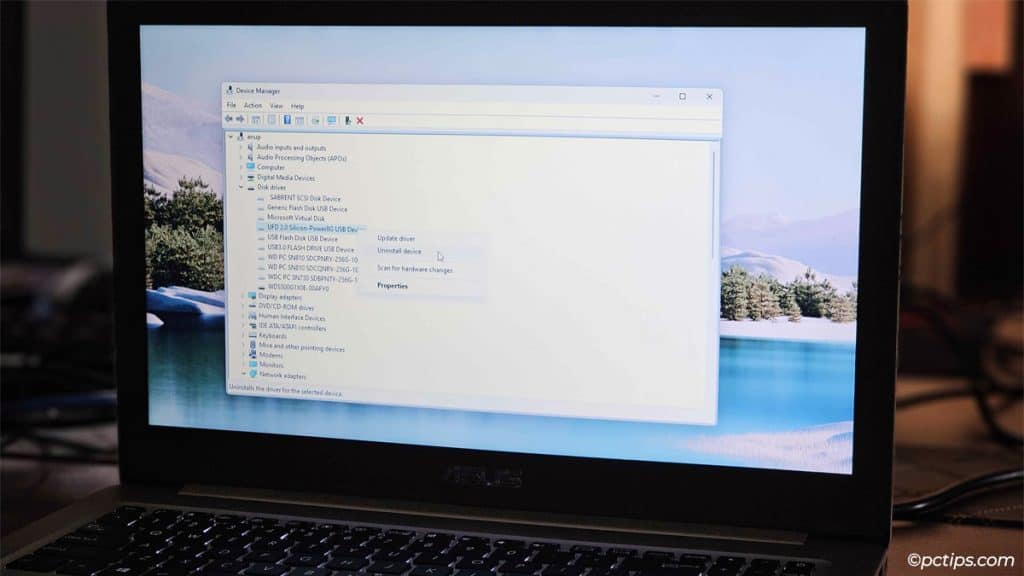
- Right-click a device and select Uninstall device.
- Enable the remove driver checkbox and click on Uninstall.

After Windows uninstalls the current driver, it’ll revert to a basic driver from Microsoft (if one is available). Otherwise, you’ll need to find a new driver yourself.
Scan For Hardware Changes
Occasionally, you might connect a printer or some other device to your PC but Windows won’t detect it. Or, you might uninstall a driver but Windows doesn’t detect the change.
One option would be to restart the PC so that the drivers get reloaded. But there’s an easier way.
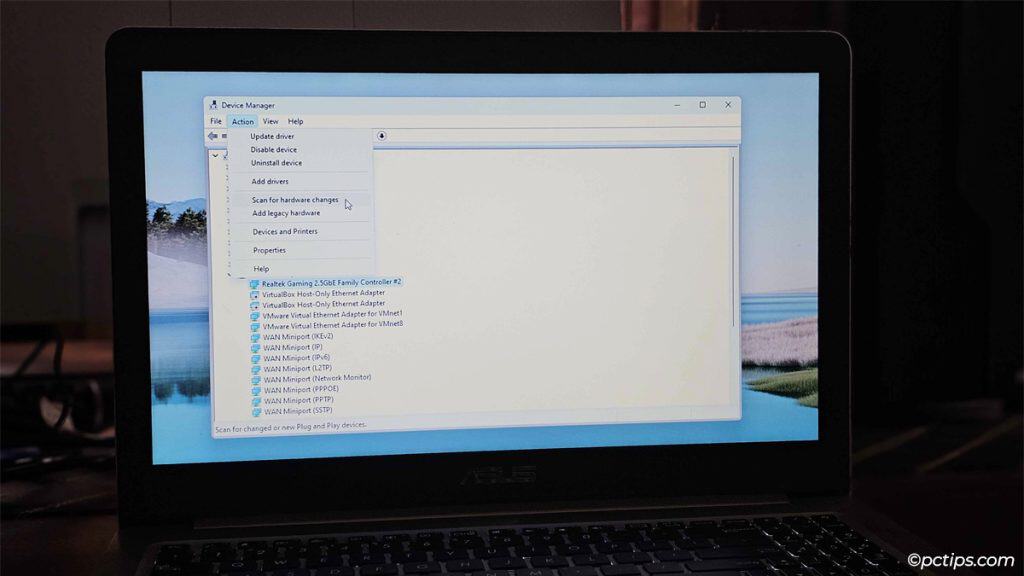
Select Action > Scan for hardware changes to scan for new devices and implement changes.
Enable/Disable Devices
Have you ever removed and reconnected the Ethernet cable to fix your internet? Or maybe restarting the PC did the trick?
These usually help because you’re reloading the network driver and resetting your network connection.
But why bother with physical effort? Just right-click a device and select Disable device instead. It’ll have the same effect.
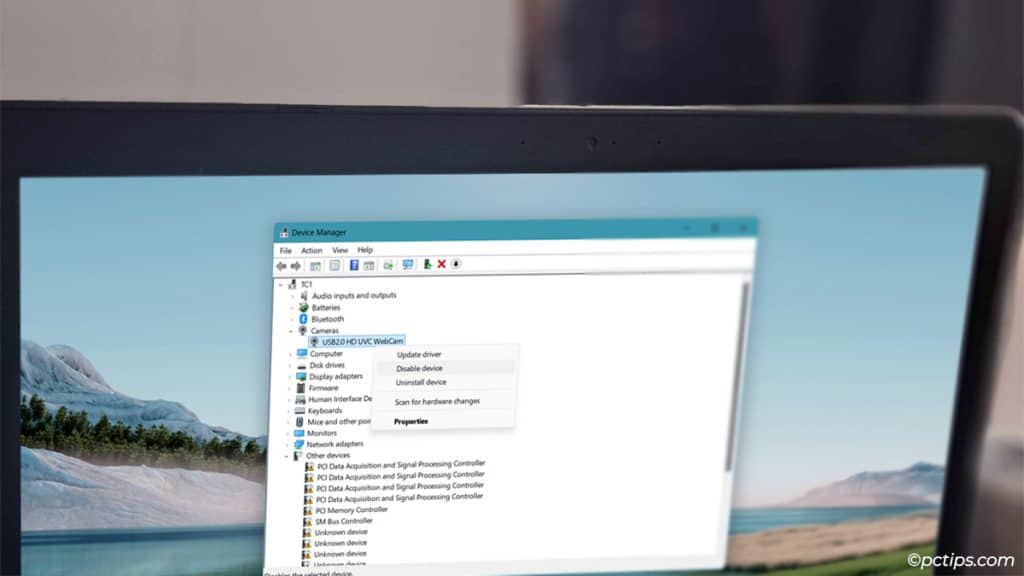
Right-click and select Enable device to re-enable it.
If you want to disable your webcam for privacy or any other problematic devices, this trick should still help.
Related: 20 Privacy Mistakes Everyone Makes (And How to Fix Them)
Explore Advanced Device Properties
Right-click any device and select Properties. Double-clicking it also works.
Here, you’ll have access to in-depth device info and features across multiple tabs. Let’s check out some of the best tweaks to make here.
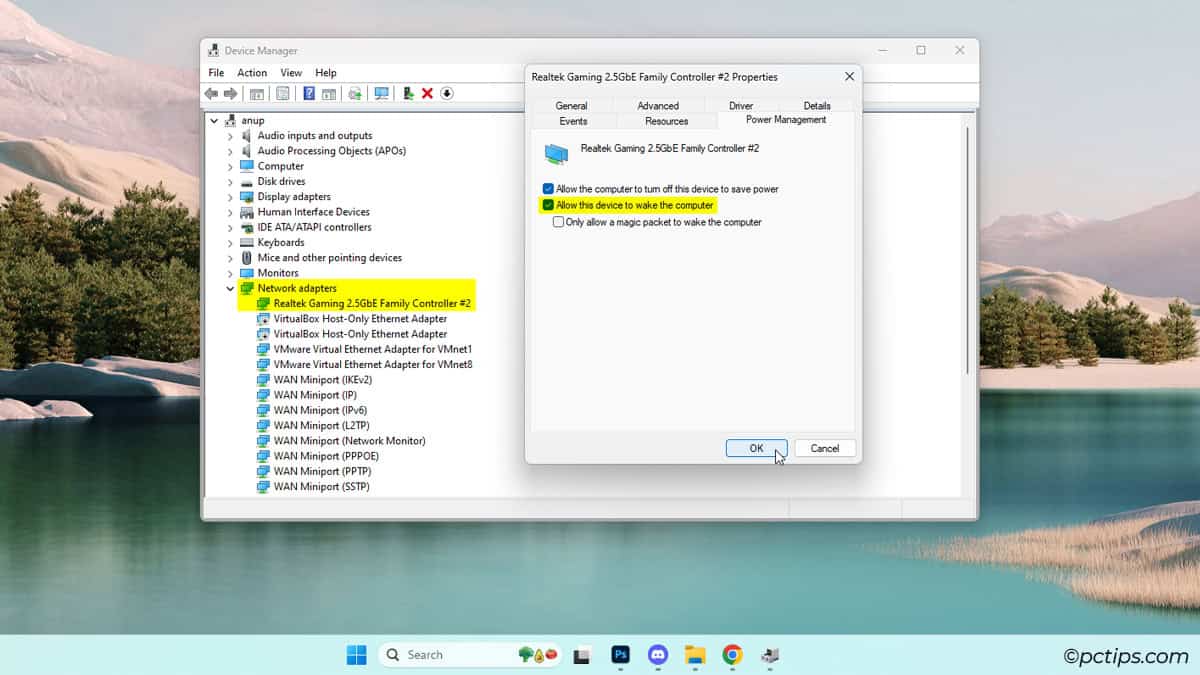
Wake Up Your PC Remotely
The power button isn’t the only way to turn on your PC.
With Wake-on-LAN (WOL), you can send magic packets from your phone to remotely wake up your PC.
If your PC is in a hard-to-reach spot, or you want it ready to go by the time you reach your desk, this is a handy feature.
To try it,
- Right-click your network adapter and select Properties.
- In the Power Management tab, enable the Allow this device to wake the computer option.
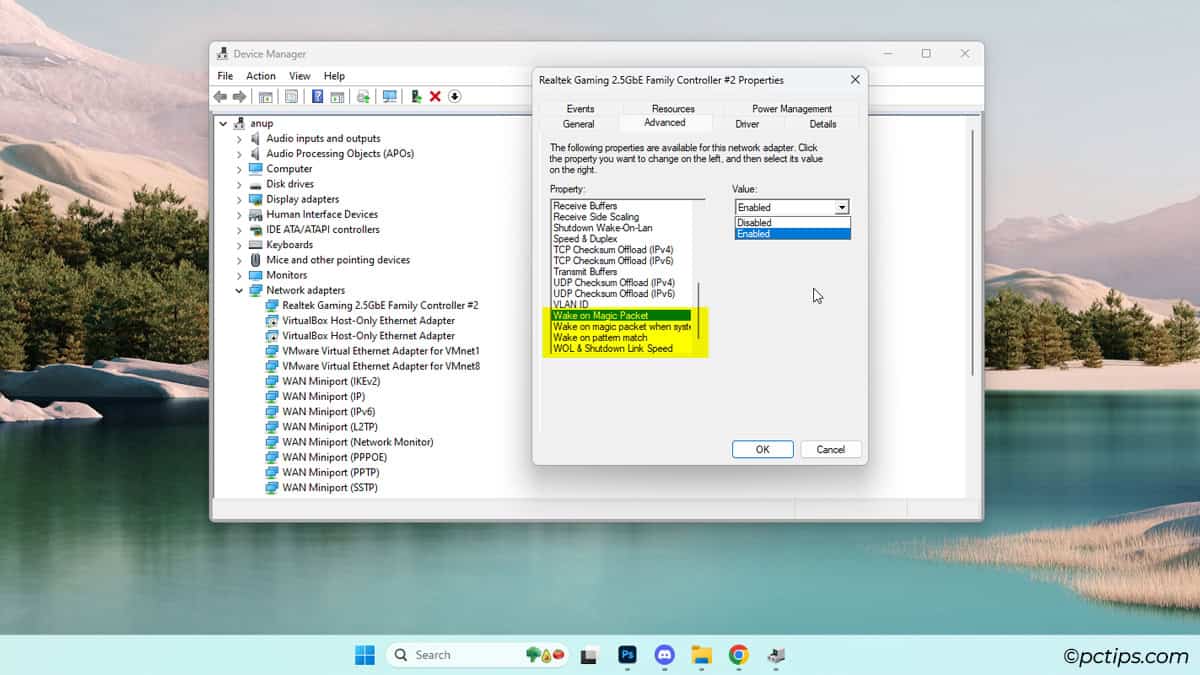
- Switch to the Advanced tab.
- Ensure Wake on Magic Packet and all the other WOL settings are enabled.
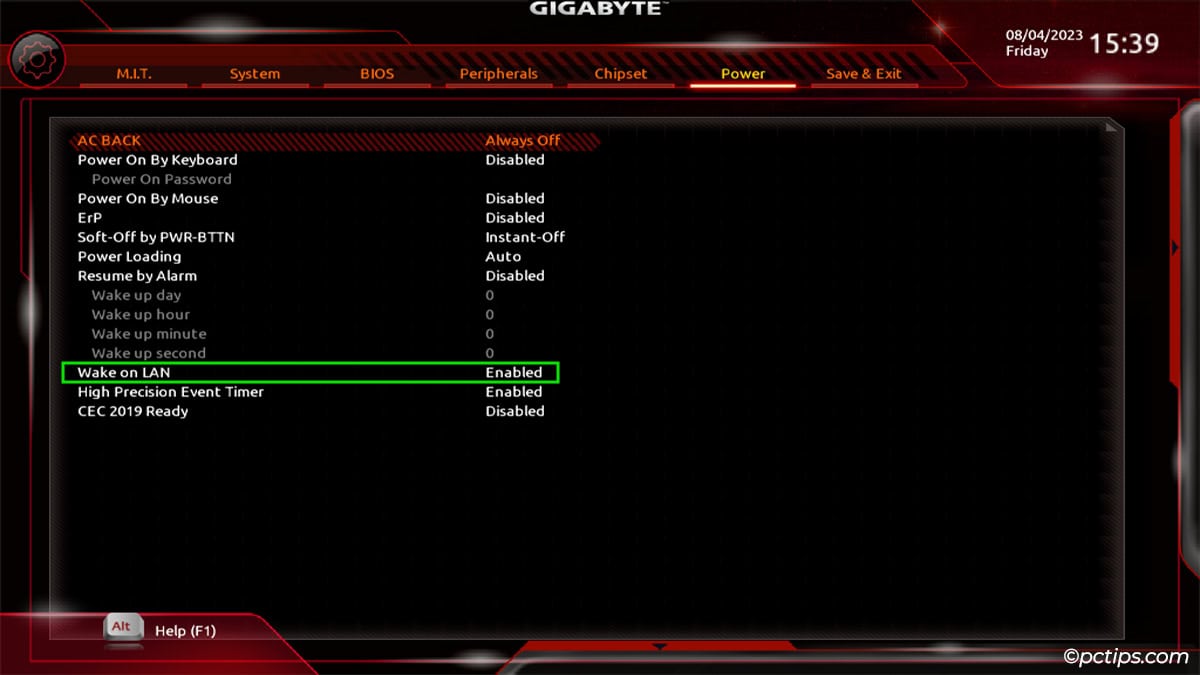
- Restart your PC and press the BIOS key to enter the BIOS (Del should work on most PCs).
- Enable Wake on LAN in the BIOS, save the changes, and exit. The feature might go by different names like Resume by PCI-E Device or LAN PXE Boot.
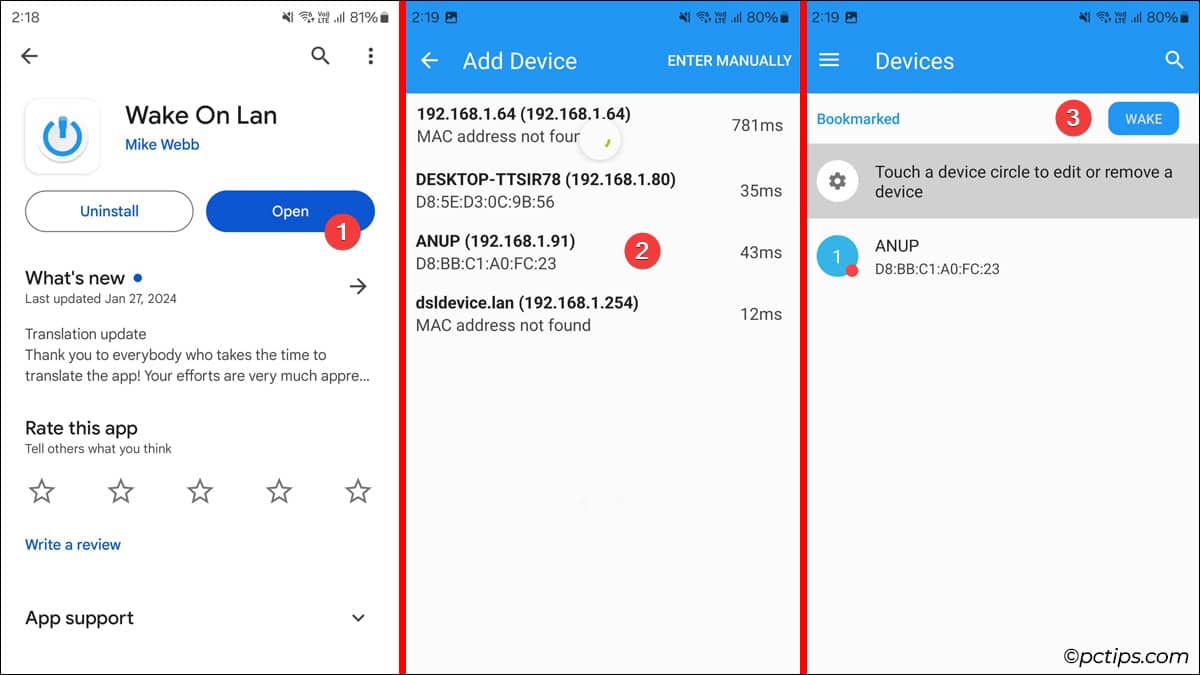
- Now, go to your phone’s official app store and download any WOL app.
- Open this app and add your PC to the app. Enter the IP address if needed.
- From now on, you can tap the wake-up button in this app to turn on your PC.
If you encounter any problems with this feature, leave a comment below. I’ll help you out and even bring a full step-by-step guide if needed.
Correctly Configure Write Caching
Write caching stores some write requests in the RAM before flushing them to the disk. This optimizes data writes and improves overall performance.
But the RAM is volatile memory (i.e. data is lost on power loss). So, there’s a tradeoff. If the device is abruptly disconnected, your data may get corrupted.
- Right-click your drive and select Properties.
- Switch to the Policies tab.
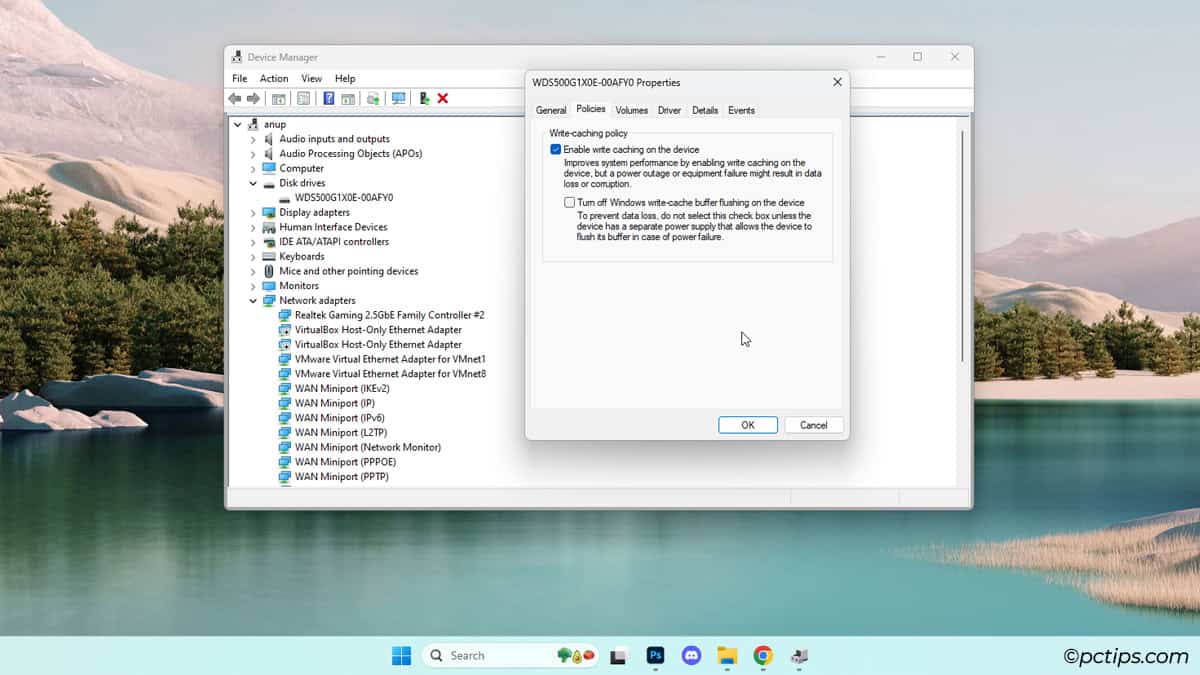
- By default, it should be:
- Internal HDD/SSD: Write Caching Enabled (for performance)
- External HDD/SSD: Write Caching Disabled and Quick Removal Enabled (for safety)
- But I’ve seen cases where PCs didn’t detect devices correctly. An external drive might have write caching enabled, putting it at increased risk of data loss. Take a moment to ensure this policy is correctly configured as done in Step 3.
Improve your Laptop’s Battery Life
If you want the biggest battery life gains, optimize your power plan and identify the heaviest battery drainers.
To squeeze out even more battery life, the Device Manager has a few features you could try:
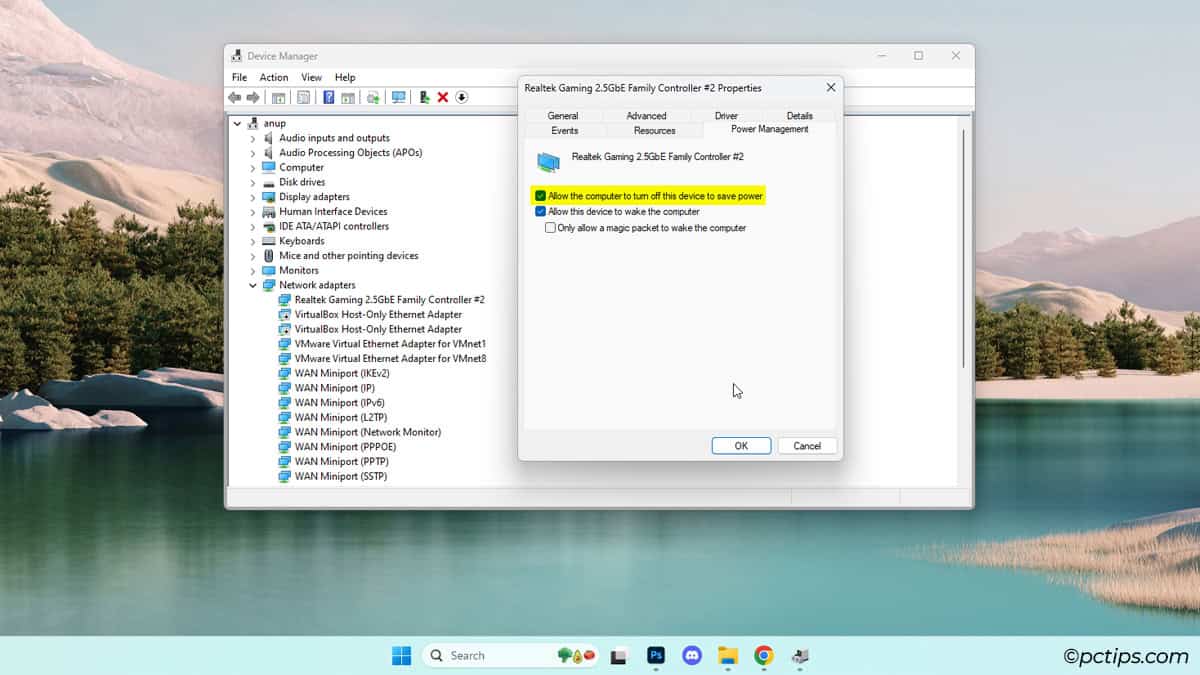
- Right-click your network adapter and select Properties.
- In the Power Management tab, enable the Allow the computer to turn off this device to save power option. When your device is suspended or hibernated (e.g., when your laptop lid is closed), it can now turn off the device to reduce power draw.
- Switch to the Advanced tab and enable these:
- Power Saving Mode
- U-APSD support
- Green Ethernet
- Energy-Efficient Ethernet
Remember though – these are only experimental features. If they don’t improve the battery life much, or start causing problems, feel free to revert them.
Spoof Your MAC Address
A network owner/admin can block devices from their network by blacklisting the MAC address (unique hardware ID).
If you can recall any situations where only your device didn’t work on some WiFi network, this was probably the reason.
To bypass MAC Address filtering, simply change the address like so:
- Open Network Adapter Properties > Advanced.
- Select Network Address.
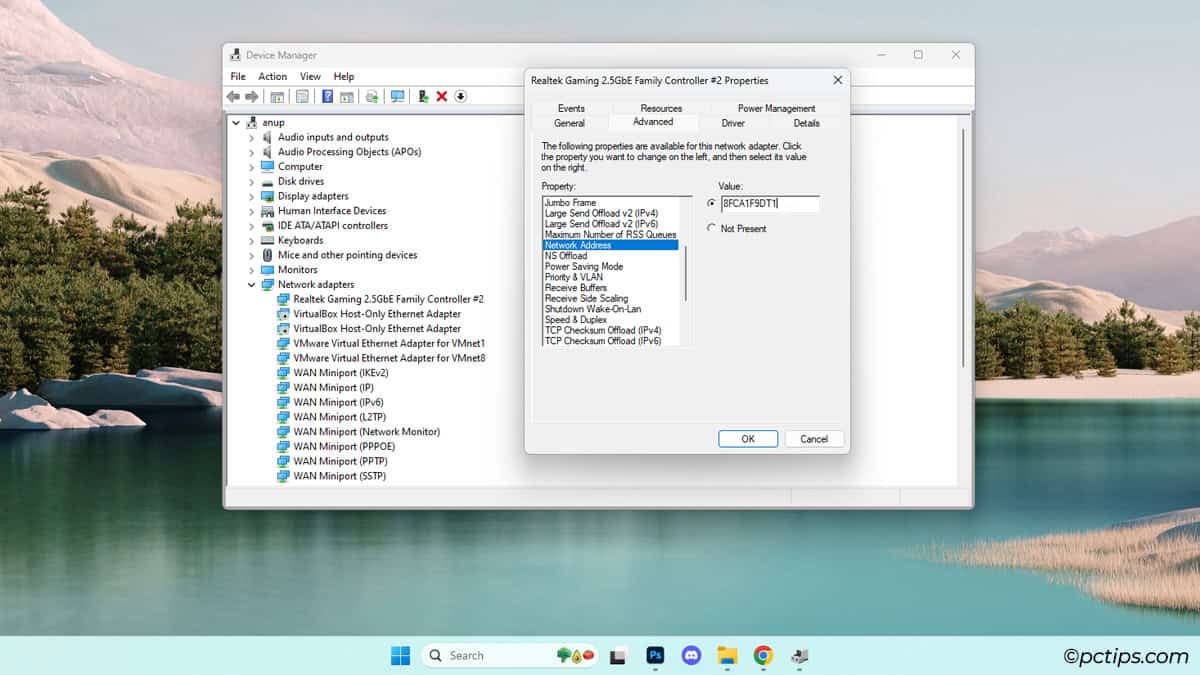
- Enter any random ten characters and press Ok.
Fine Tune the Transmit Power
By default, your WiFi adapter transmits at max power (meaning the highest possible range).
In crowded settings like apartments, reducing the coverage range can mean less interference (your device still connects well to your WiFi but stops detecting faraway networks).
- Open Network Adapter Properties > Advanced.
- Select Transmit Power.
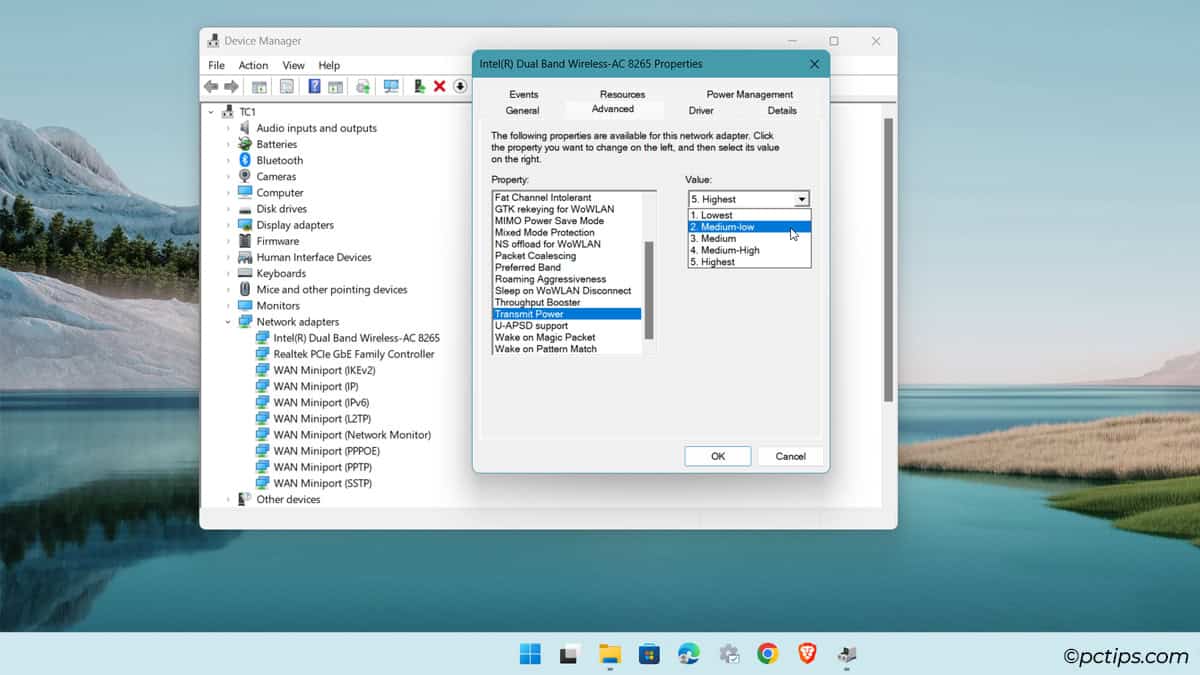
- Set it as low as optimal for you.
Increase Your Upload Speed
If you live stream or upload large files often, you could benefit from a higher upload speed. One way to achieve this is with packet bursting.
- Open Network Adapter Properties > Advanced.
- Enable Throughput Booster or Throughput Enhancement.
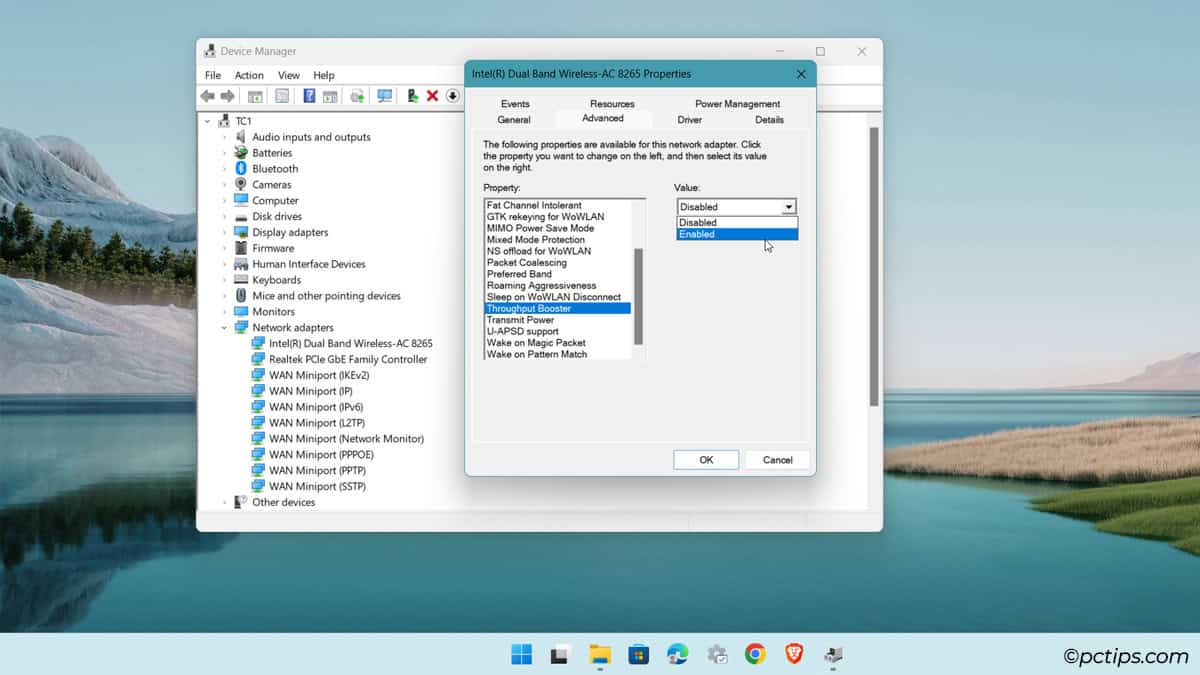
Note: If multiple devices on a network use this feature, it can lead to a noticeable performance impact for other clients. Make sure to keep an eye out for that.
Set the Preferred WiFi Band
There are likely a few WiFi networks your device regularly connects to (home, school, work, cafe, etc). Maybe you’ve noticed some trends.
The 5GHz network might be overcrowded, or the 2.4GHz WiFi might be slow due to a lot of interference.
In such cases, it’s worth picking a preferred WiFi band for your device:
- Open Network Adapter Properties > Advanced.
- Select Preferred Band.

- Pick 2.4GHz or 5GHz as you prefer.
Customize the Roaming Aggressiveness
The setting determines how low the WiFi signal strength must be before your device scans for another network.
- Open Network Adapter Properties > Advanced.
- Select Roaming Aggressiveness.
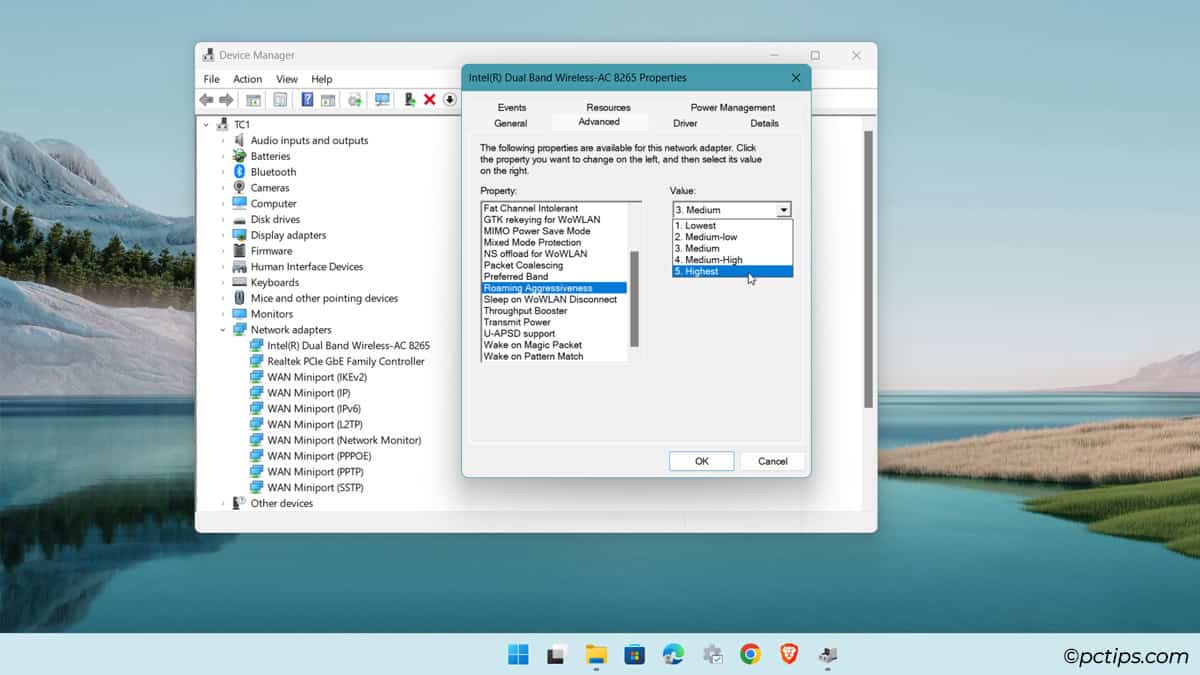
- Lowest triggers scans only when the signal drops very low. Highest triggers frequent scans even when the signal is fairly good, but may lead to slightly higher power consumption. Pick whichever feels right for your needs.
Limit Network Speed
If you’ve got any bandwidth hogs on your network, you can cap their max speed to minimize their impact.
- Open Network Adapter Properties > Advanced on that device.
- Select Speed & Duplex.
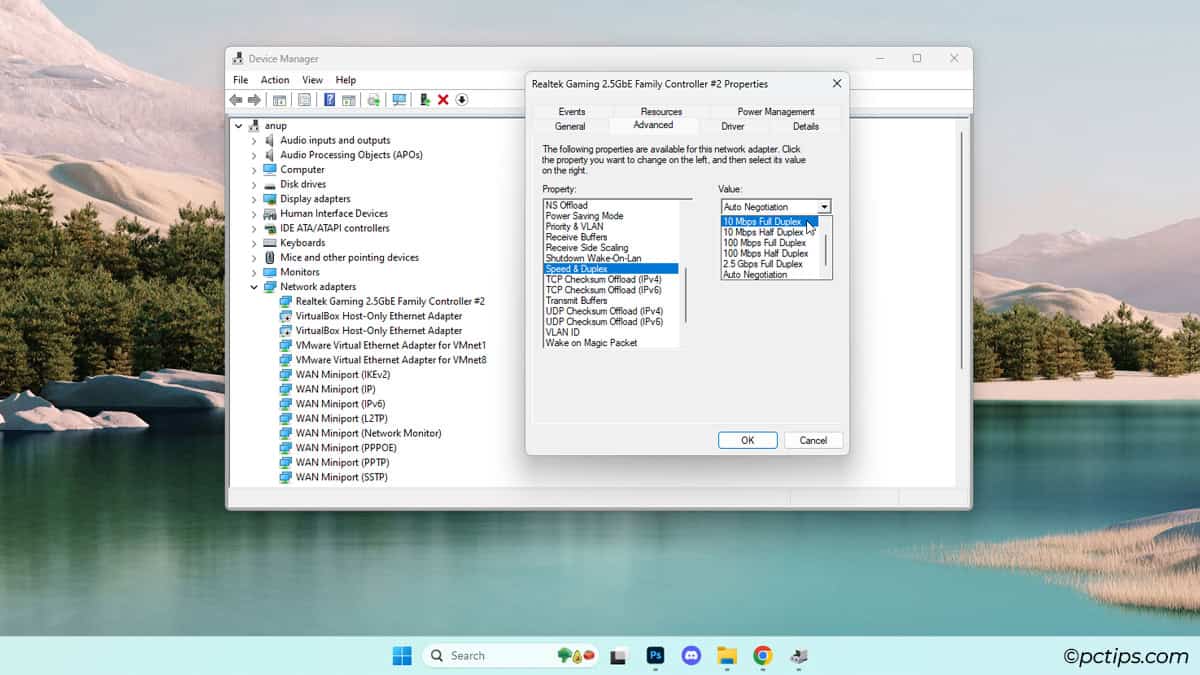
- Set it to 100 Mbps or 10 Mbps Full Duplex.
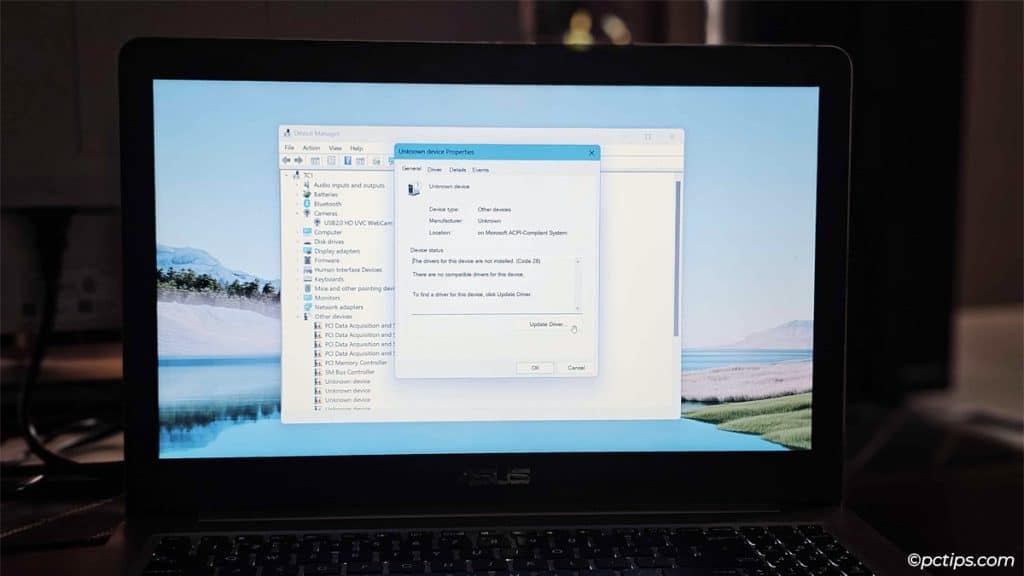
Identify Unknown Devices
You’ve likely noticed the driver version, date, signer, device status, and similar info so far. For more in-depth data, check the Details tab.
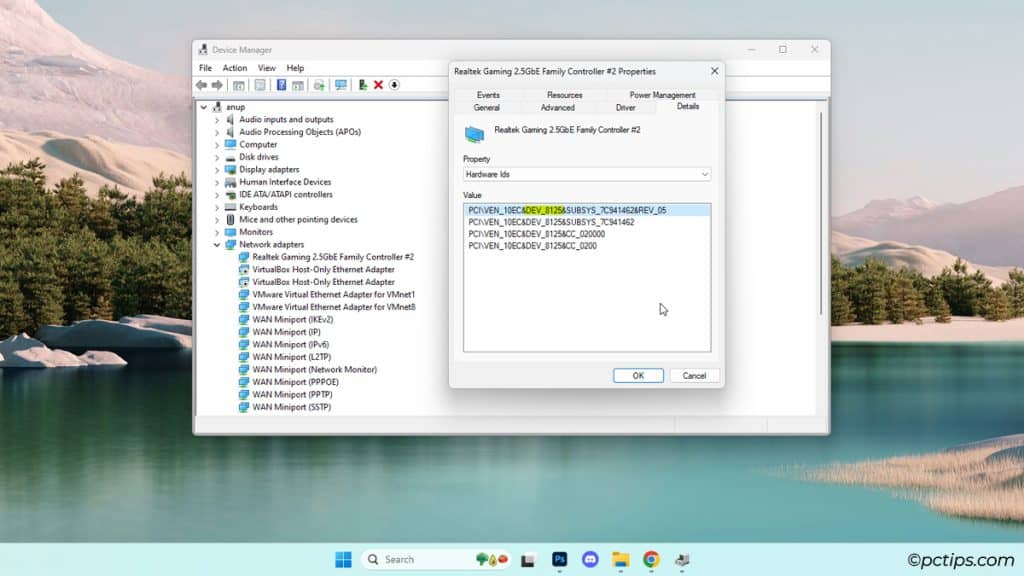
You’ll find properties like:
- Hardware ID
- Status
- Problem code
- Problem status
- First install date
- Location information, and more
Sometimes, you’ll be checking your PC specs and have trouble identifying the exact full component model. Or malfunctioned devices might even show up as Unknown device.
You’ll find this tab very helpful in such cases.
Why Are All Windows Drivers Dated to 2006?
Perhaps you’ve noticed that most Microsoft drivers are dated 6/21/2006, but when you try to update them, Windows says the best drivers are already installed.
This is a common concern, but don’t worry!
It’s simply a way for Microsoft to give priority to OEM drivers.
Suppose you just installed the latest motherboard drivers from MSI. Microsoft will release its own version of this driver very soon.
Dating Microsoft drivers to 2006 ensures that Windows doesn’t automatically overwrite the MSI drivers that you installed.
So, the Microsoft drivers aren’t actually from 2006; they’re just intentionally backdated.
Find Hidden Devices
The Device Manager only lists active devices by default.
But you’ve likely connected a LOT of devices so far (mouse and keyboards, USB drives, printers, monitors, headsets, etc).
Sometimes, these unused device drivers conflict with other drivers. The affected device typically doesn’t work (mouse not working, keyboard not working, etc).
To fix such problems, select View > Show hidden devices.
Then, right-click the device and select Uninstall device.
Handling Errors in Device Manager
The Device Manager is no stranger to errors.
If some of your devices are not working, double-click them and check the Device status. You’ll find the exact error message and code.
Look for it in Microsoft’s Device Manager Error Codes guide and you’ll find the recommended solution too.
If there’s anything else in the Device Manager that’s troubling you, leave a comment and I’ll help you out!
And if you’re interested in more Windows tips and tricks, check out some of my other guides: