Remove Windows 11 Bloat Without Breaking Anything
Last Updated:
Windows 11 comes with more bloatware than a Thanksgiving turkey!
All that junk can slow down your PC and invade your privacy.
After spending hours testing debloat scripts and tools, I’ve found the hands-down EASIEST way to clean up a fresh Windows 11 install – WinScript.
This free open-source program lets you automate the entire debloating process with just a few clicks.
What You’ll Learn
Before we dive into the details, here’s everything I’ll cover in this guide:
- How to safely remove pre-installed Windows 11 bloatware
- Which privacy settings actually matter (and which you can ignore)
- How to speed up your system by disabling unnecessary services
- Bulk installing your favorite apps
- What to do if something breaks
Finding and Installing WinScript
WinScript has a desktop version (recommended for most users) and an online version.
For this guide, we’ll focus on the desktop version.
Here’s how to get started:
- Click the “Get Started” button on the WinScript website
- You’ll be redirected to the GitHub page
- Download either the
WinScript-installer.exeor the portable version - Run the installer (you might see an “unknown publisher” warning — this is expected)
- Follow the installation prompts, selecting “Install for anyone using this computer“
- Run the installer as an administrator.
Important Note: Your browser will probably block the download at first since it’s from an unrecognized publisher. This is normal! Just click the three dots → Show more → Keep anyway. WinScript is open source, and I’ve personally scanned it to confirm it’s clean.
How WinScript Works
WinScript doesn’t make changes directly to your system.
Instead, it builds a customized script based on your selections.
Think of it like building a shopping list before going to the store.
When you check boxes and select options in each section, you’re just adding commands to this script.
Nothing actually happens to your system until you:
- Review the final script (highly recommended!)
- Click the “Run Script” button
- Confirm you want to proceed
This approach has two big advantages:
- You can review exactly what will change before anything happens
- You can save your configuration for future clean installs
The interface is divided into sections that build different parts of your script:
- Tools: Safety features and system preparation
- Debloat: App and feature removal
- Privacy: Data collection settings
- Telemetry: Tracking controls
- Gaming: Performance optimizations
- Performance: System tweaks
- Miscellaneous: UI customization
- Browse Apps: Software installation
- View Script: Final review
Let’s go through each section and I’ll tell you exactly which options I recommend enabling and why.
But before we start ripping out Windows features, there’s one CRITICAL first step…
Important Safety Step
WARNING: Before making ANY changes, create a restore point!
The Tools section is all about preparing your system safely.
Here’s what I recommend:
- Set your desired preset (Basic or Strict)
- Basic (RECOMMENDED): Perfect for most users – removes bloat while keeping important features
- Strict (NOT RECOMMENDED): Only use if you really know what you’re doing (can break things!)
- Check the “Create Restore Point” box (this is critical!)
Skip These (unless needed):
- Verify System Integrity: Runs system file checker to find corrupted Windows files
- Clear Browser History: Better to manage this in your browser
- Reset Network: Only use if you’re having network problems
- Run MAS: For Windows activation only
If you’re feeling extra cautious (and you should be), do a full system backup with Windows’ built-in backup tool before proceeding.
Debloating Windows 11
Head to the “Debloat” section.
This is where we’ll rip out all the unnecessary junk that comes pre-installed on Windows 11.
Here’s a breakdown of what I recommend disabling and why:
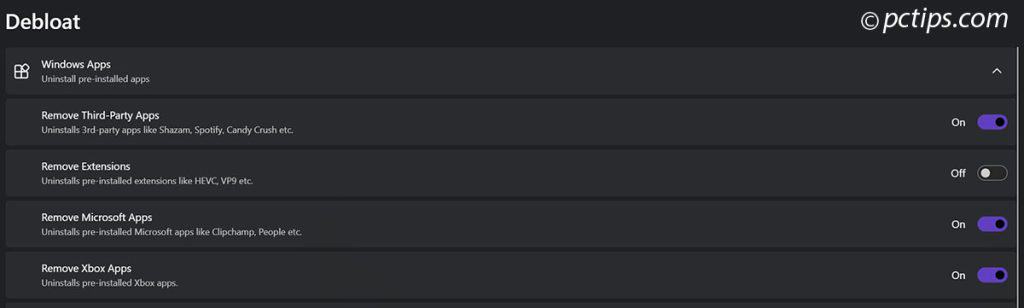
Under “Windows Apps”:
- Remove Third-Party Apps
- Removes promotional bloatware like Shazam, Spotify, Candy Crush, etc.
- Pro tip: Even if you use Spotify, remove it here and install the clean version later
- Remove Extensions
- Cleans out pre-installed extensions like HEVC and VP9 codecs
- Note: Only remove these if you’re sure you won’t need them for media playback
- Remove Microsoft Apps
- Strips out pre-installed Microsoft apps like Clipchamp, People, etc.
- Recommendation: Safe to remove unless you specifically use these apps
- Remove Xbox Apps
- Uninstalls all pre-installed Xbox applications
- WARNING: Keep these if you use Game Pass or play Xbox games on PC!
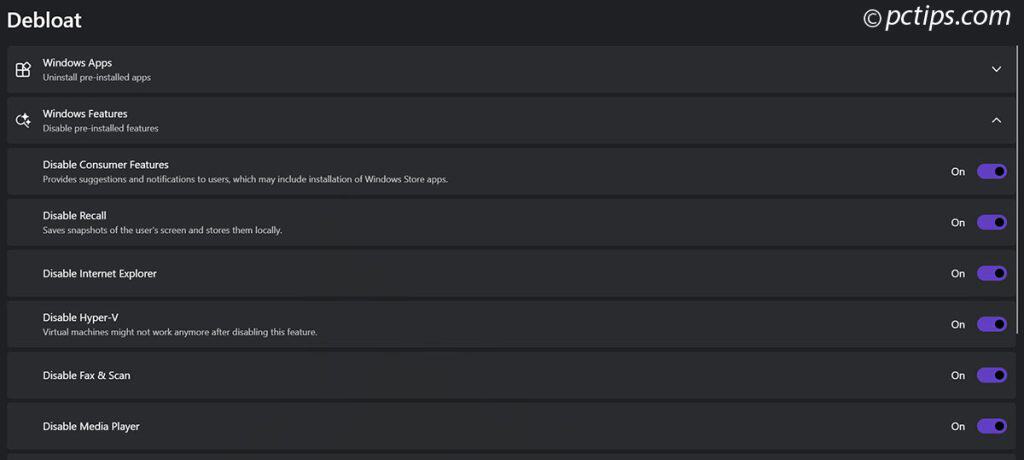
Under “Windows Features”:
- Disable Consumer Features: Strongly Recommended – Kills those annoying “suggestions” and notifications
- Disable Recall
- Windows Recall is a new AI tool that takes snapshots of your screen every few seconds
- While the data is stored locally, it still raises privacy concerns
- Note: Only available on Windows 11 Copilot+ PCs with NPU hardware
- Good for: Privacy-conscious users
- Disable Internet Explorer: It’s 2025 – you won’t miss it
- Disable Hyper-V: CAUTION – Only disable if you never use virtual machines
- Disable Fax & Scan: Unless you’re living in 1995…
- Disable Media Player: VLC is better anyway
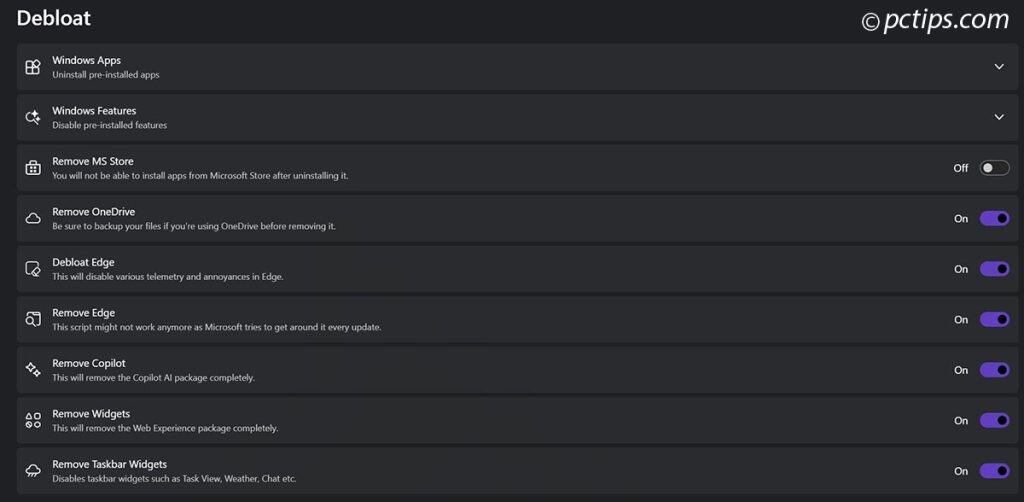
- Remove MS Store: Think twice! You won’t be able to install Store apps after removal
- Remove OneDrive: IMPORTANT – Backup your files first if you use OneDrive
- Debloat Edge
- Keeps the browser but removes telemetry
- Disables unnecessary features and “Recommended” content
- Recommended if you occasionally need Edge
- Remove Edge: Attempts complete removal (but Microsoft fights hard against this)
- Remove Copilot: Safe to remove if you don’t use AI features
- Remove Widgets: Improves system responsiveness
- Remove Taskbar Widgets: Disables Task View, Weather, Chat, etc.
Feel free to experiment with disabling other apps and features, but be careful not to nuke anything critical. When in doubt, leave it alone!
I’d leave “Disable Hyper-V” unchecked if you use virtual machines, WSL, Docker, or mobile emulators – they all need it to run.
Same with “Remove Microsoft Store” – without it, you won’t be able to install ANY apps from the Store.
Locking Down Privacy
Next, open the “Privacy” section.
This is where you can put a leash on all the ways Windows 11 spies on you.
For a complete guide to Windows privacy settings, check out my Windows privacy guide.
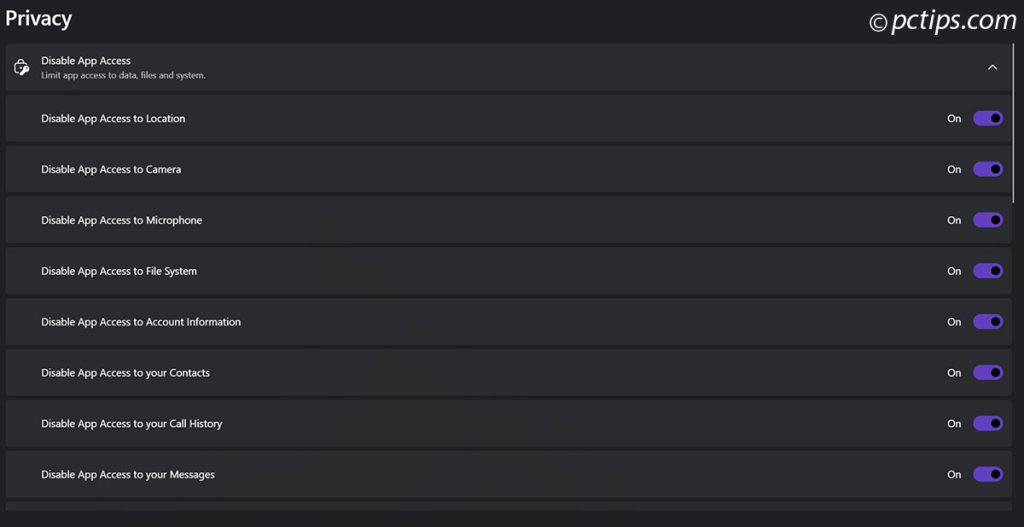
I recommend disabling access to all of these:
- App Access to Location, Camera, Microphone, Notifications, etc.
- There’s no good reason for any app to access this sensitive data without asking you first
- Legit apps will prompt for permission to use your camera or location if they really need it
- Disabling these prevents shady apps from snooping on you silently in the background
- Wifi Sense: Stops Windows from uploading info about your wifi networks
- Cloud Sync: Prevents settings sync to Microsoft servers
- Activity Feed: Disables the creepy “timeline” feature that tracks your activity
- Disable Notifications Tray: Removes the notification center and those annoying pop-ups
Disable Screen Recording: Disables Xbox Game Bar recording for better performance
Disable Automatic Map Downloads: Stops Windows from wasting bandwidth on offline maps - Lock screen Camera: No reason for apps to use your camera from the lock screen!
- Biometrics
- This controls whether you can log in with your face or fingerprint via Windows Hello
- It’s convenient, but also shares your sensitive biometric data with Microsoft
- There’s nothing wrong with a good old-fashioned password or PIN!
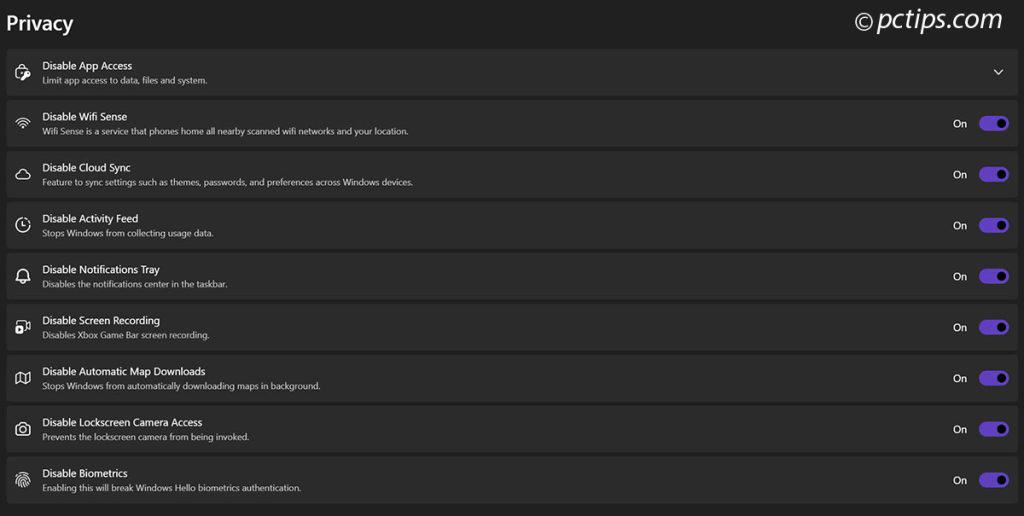
I strongly recommend disabling everything in the Privacy section by default.
You can always re-enable access later for individual apps that really need it.
Think Twice Before Disabling these:
- Camera/Microphone (needed for video calls)
- File System access (many apps need this)
- Cloud Sync (useful for multiple Windows devices)
- Biometrics (if you use Windows Hello)
Killing Telemetry
Telemetry is a fancy word for Windows phoning home to Microsoft with data about your usage.
You’d be shocked how much gets collected by default – everything from your typing habits to which news articles you read to suspected pirated games on your PC!
Luckily, we can nuke most of it from orbit with WinScript.
Under the “Telemetry” section:
- Check EVERY box under “Disable Windows Telemetry” (yes, all of them!)
- Disable telemetry for third-party apps like Nvidia, Adobe, and Google Chrome if you use them
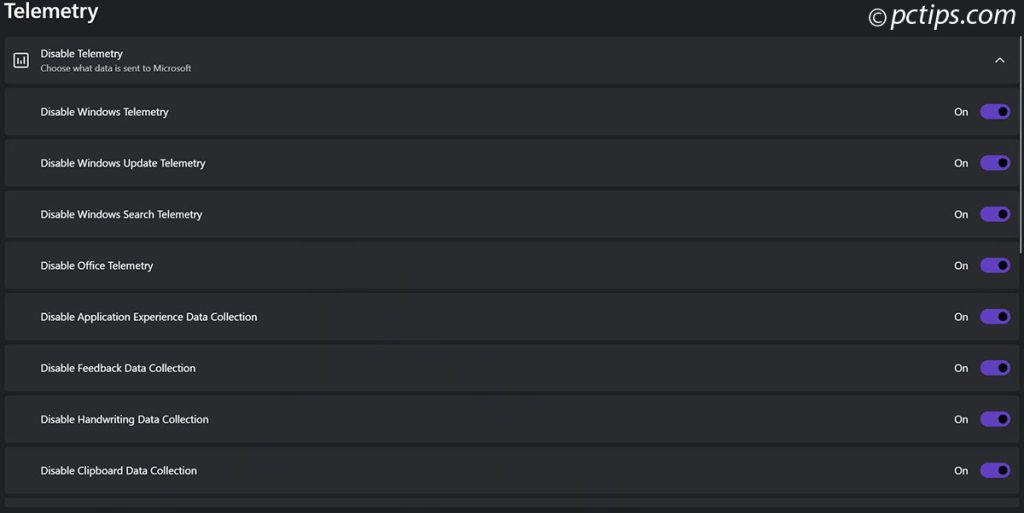
This will block Windows from siphoning a truly astonishing amount of data about your system and personal habits.
Disabling telemetry has no noticeable impact on functionality in my experience. I always disable EVERYTHING here on fresh installs.
Gaming Optimizations
Here you can disable things that get in the way of raw gaming performance, like:
- Disable Game Bar (I find it more annoying than useful)
- Disable mouse acceleration (for better accuracy)
- Disable Game Mode (ironically often hurts more than it helps)
- Disable fullscreen optimizations (another “optimization” that causes issues)
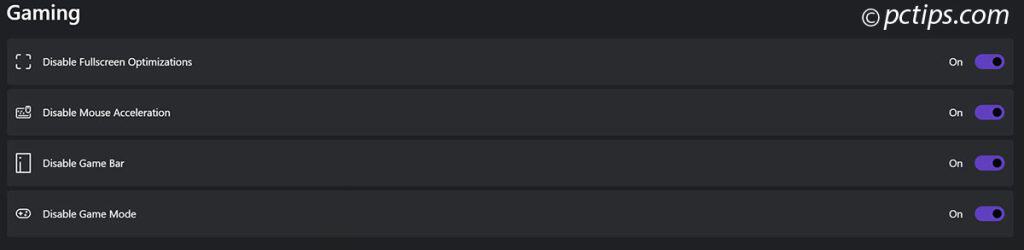
If you don’t game on your PC at all, feel free to check everything here for a small performance boost.
Performance Tweaks
Your PC can run so much faster with the right tweaks.
The Performance section is where we squeeze every last drop of speed out of Windows 11.
In the “Performance” tab, I suggest:
- Setting your DNS to Cloudflare or Google
- Your ISP’s default DNS is often slow and unreliable, leading to sluggish web browsing
- Google DNS: Rock-solid reliability
- Cloudflare DNS: Often the fastest option
- Quad9 DNS: Great for security
- OpenDNS: Good all-rounder
- AdGuard DNS: Blocks ads at the DNS level
- Pro tip: Run a DNS benchmark to find the fastest for your location
- Add Ultimate Performance power plan: Perfect for desktop PCs (skip on laptops)
- Set Services to Manual: Faster boot times and less background resource usage
- Disable HAGS
- Turns off Hardware-Accelerated GPU Scheduling
- Try this if: You’re experiencing stuttering in games
- Test before committing: Results vary by system
- Limit Defender CPU Usage
- Caps Defender at 25% CPU instead of 50%
- Great for: Systems that feel sluggish during scans
- Note: Still maintains security, just gentler on resources
- Disable Superfetch
- Stops Windows from “predicting” what apps you’ll open
- Perfect for: SSDs (they’re fast enough without it)
- Keep enabled: On systems with traditional HDDs
- Disable Storage Sense
- Prevents automatic deletion of temporary files
- Great for: Users who manage cleanup manually
- Perfect for: Systems with plenty of storage
- Note: Remember to clean temp files periodically
- Disable Search
- Turns off Windows Search indexing
- Great for: Older PCs or if you rarely search files
- Warning: Start menu search becomes slower
- Skip if: You frequently search for files
- Disable Hibernation
- Frees up disk space used for hibernate file
- NOT recommended for laptops
- Perfect for: Desktop PCs that always stay on
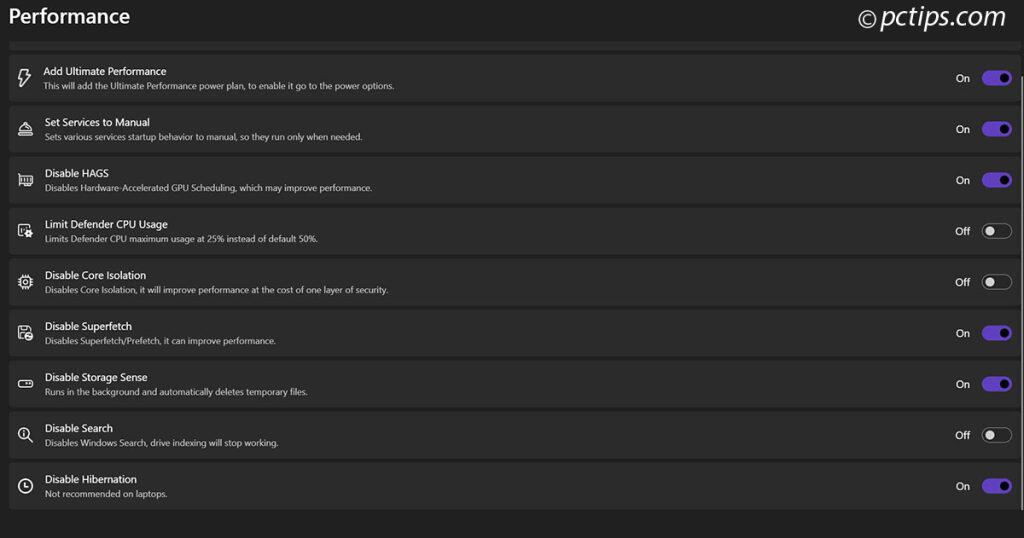
One setting to leave alone in this section is “Disable Core Isolation“.
This is a key security feature that protects against ransomware and zero-day threats.
In my opinion, the slight performance cost is well worth the added peace of mind!
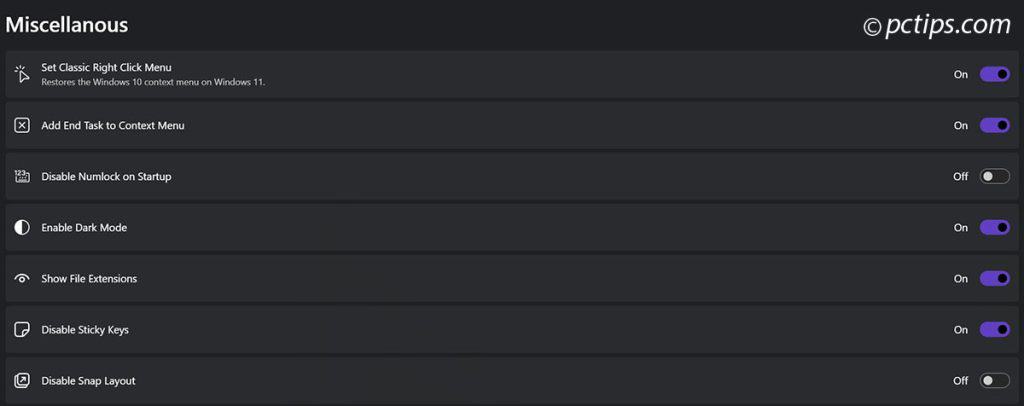
Quality of Life Improvements
Don’t skip the “Miscellaneous” section! It’s full of small UI tweaks that add up to a much nicer Windows 11 experience.
Here are the ones I always enable:
- Set Classic Right Click Menu
- Brings back the Windows 10 context menu
- Finally: No more clicking “Show more options”
- Benefit: Faster access to all your context menu items
- Pro tip: This is usually the first thing I enable on any Win11 system
- Add End Task to Context Menu
- Adds “End Task” option when right-clicking programs
- Perfect for: Quickly killing unresponsive programs
- Better than: Hunting through Task Manager
- Note: Right-click any window title to use
- Disable Numlock on Startup
- Prevents Numlock from auto-enabling at boot
- Useful for: Laptop users who prefer letter keys
- Skip if: You regularly use the numpad
- Enable Dark Mode
- Applies dark theme system-wide
- Easy on the eyes: Especially at night
- Note: Affects all Windows UI elements
- Pro tip: Pairs well with F.lux or Night Light
- Show File Extensions
- FINALLY see if it’s really “
vacation.jpg” or “vacation.jpg.exe“ - Essential for: Basic security and file management
- Why: Helps prevent malicious files masquerading as innocent ones
- Can’t believe: This isn’t enabled by default!
- FINALLY see if it’s really “
- Disable Sticky Keys
- Stops that annoying Sticky Keys popup
- Perfect for: Gamers who spam the Shift key
- Note: If you need accessibility features, keep this enabled
- Disable Snap Layout
- Removes the window management popup when hovering maximize
- Consider keeping: Great for organizing multiple windows
- Power user feature: Excellent for productivity
- Note: You can still use Win+Arrow keys if disabled
Install YOUR Favorite Apps
One of my FAVORITE features of WinScript is the ability to bulk install popular free apps using Chocolatey in the background.
Some of my personal must-haves:
- 7zip (powerful file archiver)
- ShareX (best screenshot tool, period)
- VLC (plays any video/audio format)
- Notepad++ (text/code editor)
- Libre Office (free MS Office alternative)
- Powertoys (amazing Windows enhancements from Microsoft)
- Everything (instant file search)
Pro tip: Save your WinScript config after adding your favorite apps. Next time you set up a PC, just load your saved config to auto-install everything in one shot.
Review and Run
Once you’re happy with all your choices, click “View Script” to see a full list of every change that’s about to happen.
I highly recommend reading through this carefully so there are no surprises. You can even copy/paste the script to a text file for safekeeping.
If everything looks good, take a deep breath and click “Run Script.” You’ll get one final warning about creating a restore point (do it!).
Then go grab a coffee while WinScript works its magic. Depending on how many things you selected, it can take 5-15 minutes to complete.
After Running WinScript
Once the script finishes, I strongly recommend rebooting your PC immediately.
This allows all the services changes to take effect and gives you a clean slate to verify everything still works as expected.
Some quick tips:
- If you’re not sure about a setting, leave it unchecked
- Some apps might reinstall with major Windows updates
- Keep the WinScript installer – you might want to run it again after updates
- Save your configuration for future use
- Don’t disable features you might need later (like the Microsoft Store)
- Keep track of what you’ve changed in case you need to revert
- Try your settings in a virtual machine first for extra safety
If Something Breaks
First, don’t panic! This is why we created that restore point, remember?
99% of the time, you can roll back any changes by going to:
- Settings → System → Recovery → Advanced startup → Restart now
- Select “Troubleshoot”, then “Advanced options”
- Choose “System Restore” and select the restore point you created before running WinScript
If that doesn’t work, you might need to reinstall Windows from scratch.
Let’s hope it doesn’t come to that!
This is why I also recommend a full system backup before using WinScript – it’s the ultimate safety net.
Don’t let this scare you off though – in dozens of runs across many PCs, I’ve never once had to do a full reinstall.
Have you tried WinScript or similar debloating tools?
Share your experiences in the comments below – I’d love to hear what worked (or didn’t work) for you!