I Found a Tool That Customizes Your Entire Start Menu
Last Updated:
Let’s be honest – the Windows 11 Start Menu and the taskbar is a major step backwards.
Microsoft took something that worked perfectly fine and somehow made it worse.
The centered, floating Start Menu is driving many users crazy.
While the tech giant seems unwilling to address these complaints, a powerful third-party solution has overcome these limitations.
Windhawk – an open source, powerful customization tool.
It puts you back in control of your PC without any technical hassle.
Best of all, it’s completely free and only takes a few minutes to set up.
What is Windhawk?
Windhawk is an open source utility that lets you customize Windows in ways Microsoft never intended.
Think of it as a framework that runs small pieces of code (called “mods”) that change how Windows looks and behaves.
Unlike some other customization tools that replace entire systems, Windhawk works by tweaking the existing Windows code.
This means it’s usually more stable and less resource-intensive than complete replacement shells.
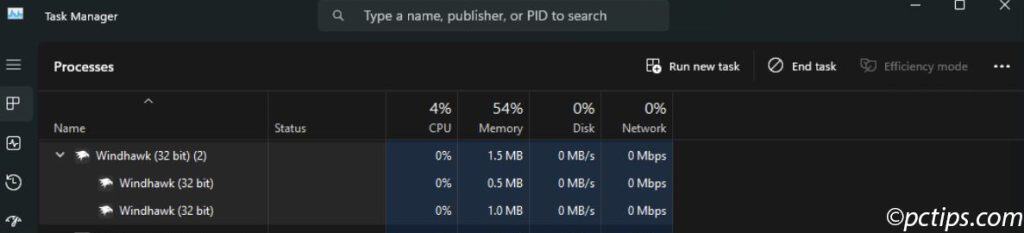
As shown below, it uses minimal CPU and memory resources even with several mods running, ensuring your system stays responsive.
Quick Tip: Always create a restore point before making system changes! Right-click Start > System > System Protection > Create. This 30-second habit provides a safety net in case anything goes wrong.
Getting Started with Windhawk
Let’s jump right in – head over to Windhawk’s official website and download the installer.
It’s a small file that won’t take long even on slower connections.
Pro Tip: Windows power users can skip the website entirely and install directly from the command line:
winget install ramensoftware.windhawk
Once the download finishes, run the installer and follow the simple prompts.
You’ll need to authorize the installation since it makes system changes (that’s the whole point!).
After a quick setup that takes less than a minute, Windhawk launches with a clean, intuitive interface that’s refreshingly easy to navigate.
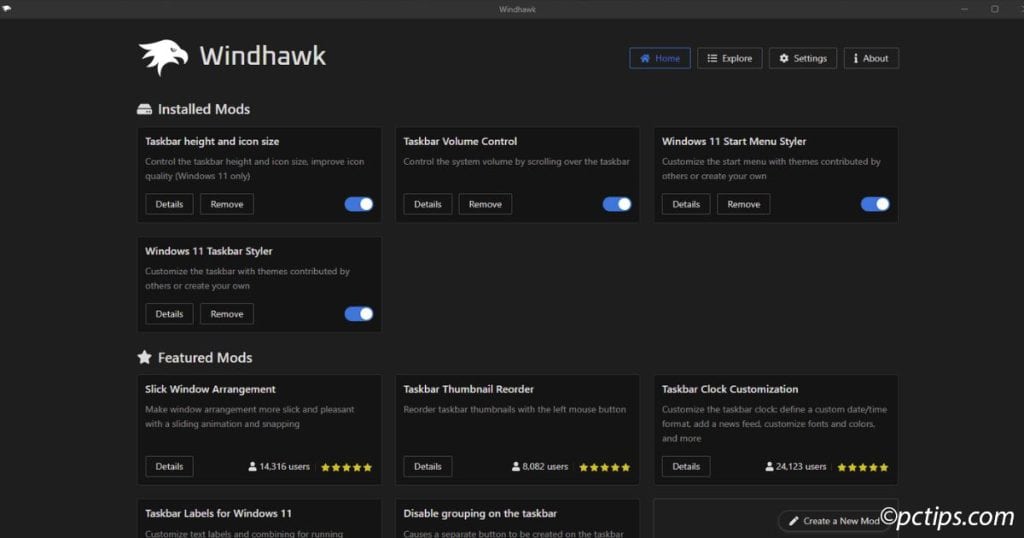
The ‘Explore’ section on the top right displays all available mods sorted by popularity – a thoughtful design choice that saves you significant time.
Instead of guessing which mods actually work well, you can see exactly what other Windows users have found helpful.
I particularly appreciate how the most-downloaded mods appear right at the top, as these tend to be the most reliable and useful options.
Safety First: I know many of you worry about installing unknown utilities (as you should!). That’s why I personally ran Windhawk through VirusTotal’s scanner before installing it on my PC.
The results confirmed what I expected from an open-source tool with a good reputation: it’s completely clean.
The Mods That Transformed My Start Menu and Taskbar
After getting Windhawk up and running, you’ll quickly realize how much it can reshape your Windows experience.
Here are the four mods that made the biggest difference for me:
- Windows 11 Start Menu Styler
- Windows 11 Taskbar Styler
- Taskbar Volume Control
- Taskbar Height and Icon Size
Installing and Customizing the Start Menu Styler Mod
Now that you have Windhawk running, let’s transform that Start Menu into something you’ll actually enjoy using.
Finding and Installing the Mod
- Click the “Explore” tab in Windhawk
- Look for “Windows 11 Start Menu Styler” – it’s typically right at the top of the list
- You’ll notice this mod has quite a few downloads, which is a good sign. Popular mods are generally more reliable and better maintained.
- Click on the details, then select “Install” at the top
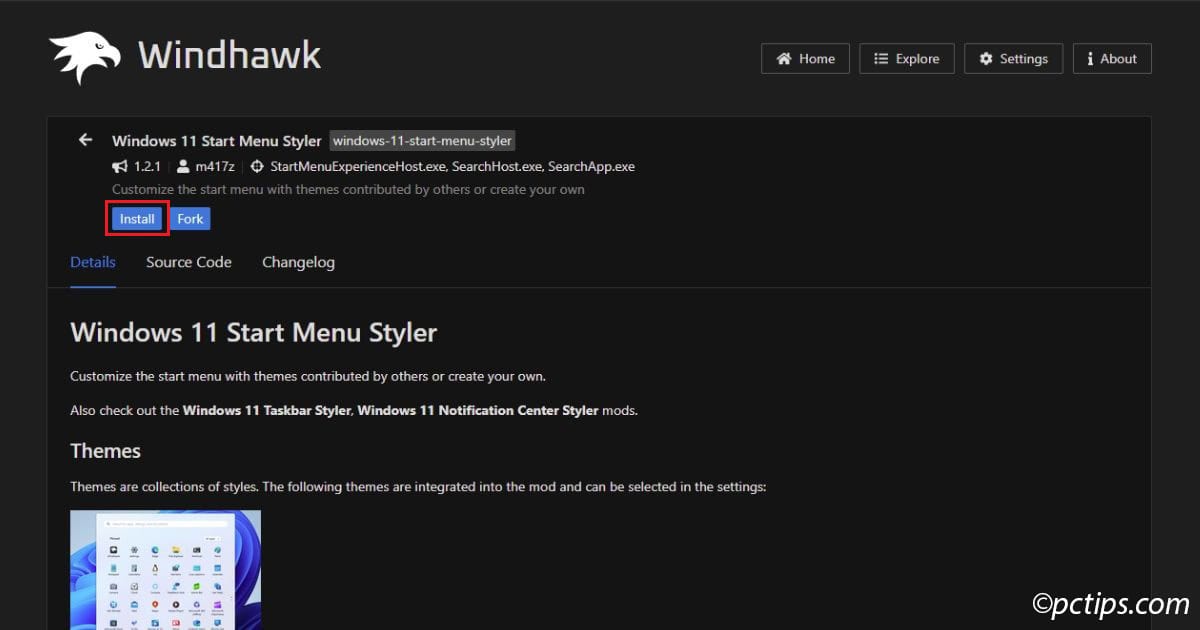
You’ll see a brief warning – this is normal for any mod. Just click through and within seconds, you’ll have the mod installed and ready to customize.
Exploring the Built-in Themes
Once installed, you have access to several pre-configured themes that serve as excellent starting points:
- Go to the “Settings” pane of the Start Menu Styler
- Look for the “Theme” section
- Click through the different theme options to find your preferred one
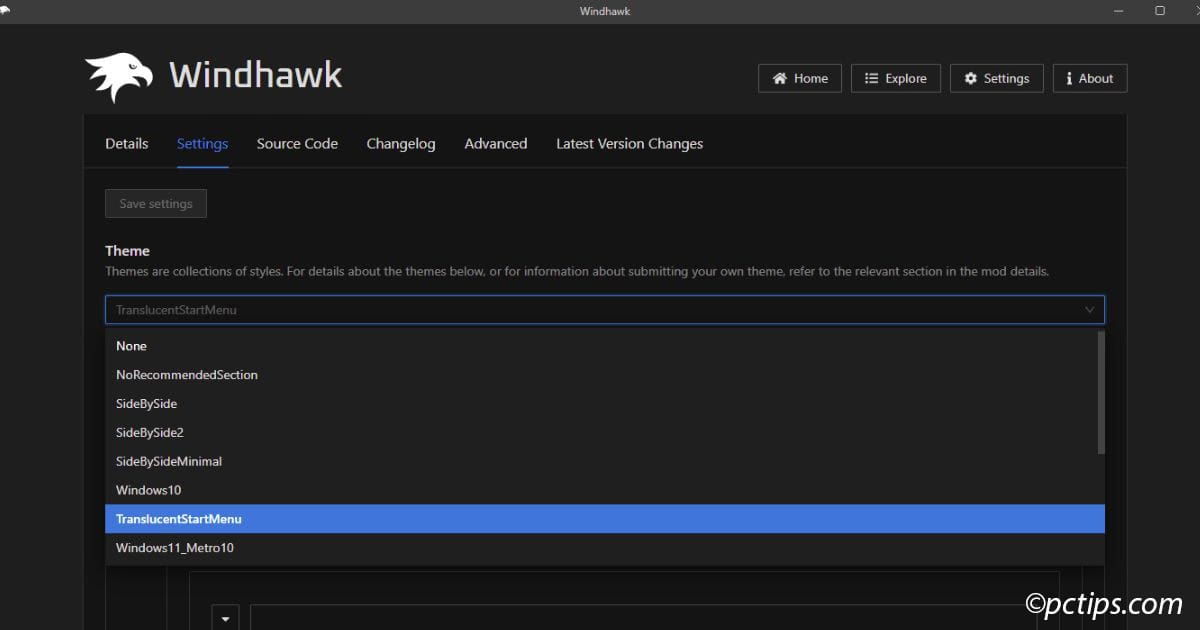
Some noteworthy built-in themes include:
- Side by Side: A practical two-column layout with pinned apps on one side and all apps on the other. There are two variations of this theme, checkout both for preference.
- SideBySideMinimal: A streamlined, space-efficient design for distraction-free layout
- Windows 10: A familiar theme that brings back the Windows 10 Start Menu layout
- NoRecommendedSection: Gets rid of the annoying recommended area that takes up valuable space.
- TranslucentStartMenu: Adds a stylish semi-transparent effect to your Start Menu that looks great with colorful wallpapers
Hit “Save settings” and your changes appear instantly, letting you quickly test different themes until you find your perfect match.
The Advanced Option: Using Custom Code
While the built-in themes are functional, there’s a custom theme available that truly transforms your Start Menu experience:
- Visit Vinstartheme.com (Author’s Note: I encountered an “Ad-blocker detected” message. Since my network has AdGuard, I couldn’t access the site until I temporarily disabled it)
- There you can select from various Windhawk styles
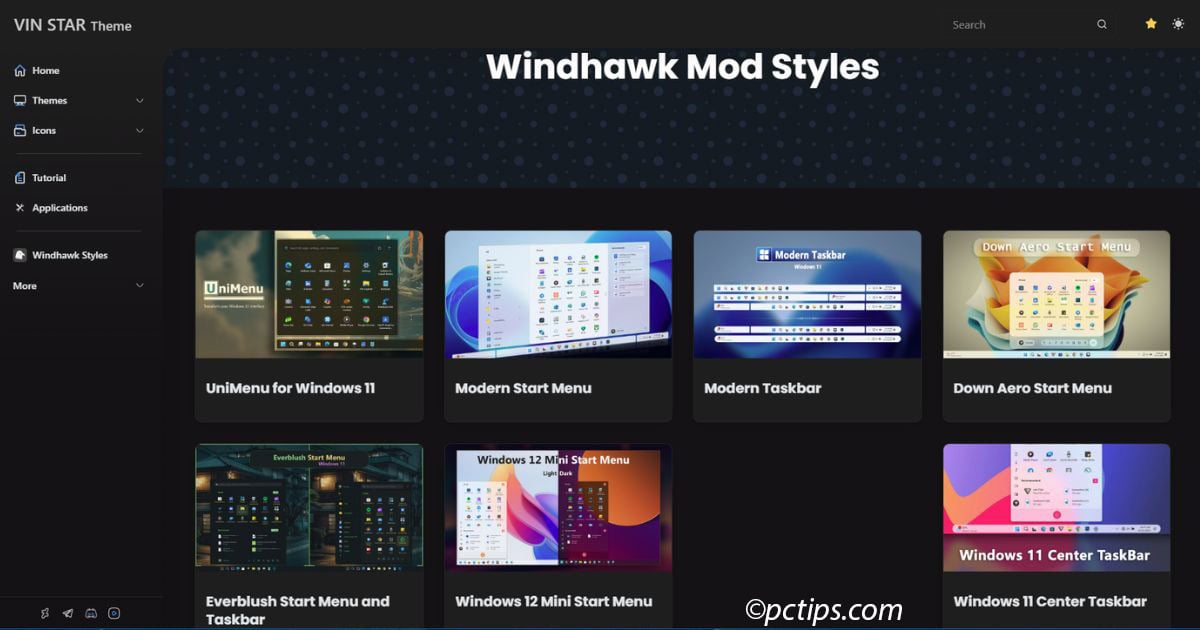
- Browse the list of mods with previews available
- Click on the one you like
- Scroll down to find the code for that specific style
- Copy the code
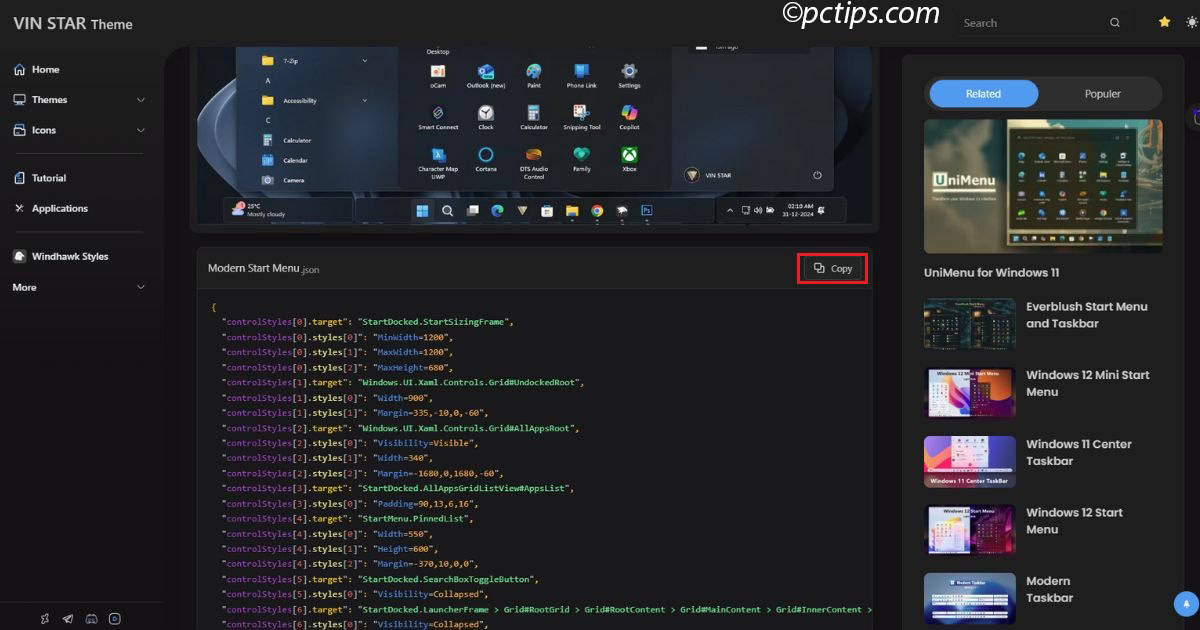
To apply this custom code:
- Return to Windhawk
- Click on the “Advanced” tab
- In the “Mod Settings” section, delete all the existing code
- Paste in the code you copied from your chosen style
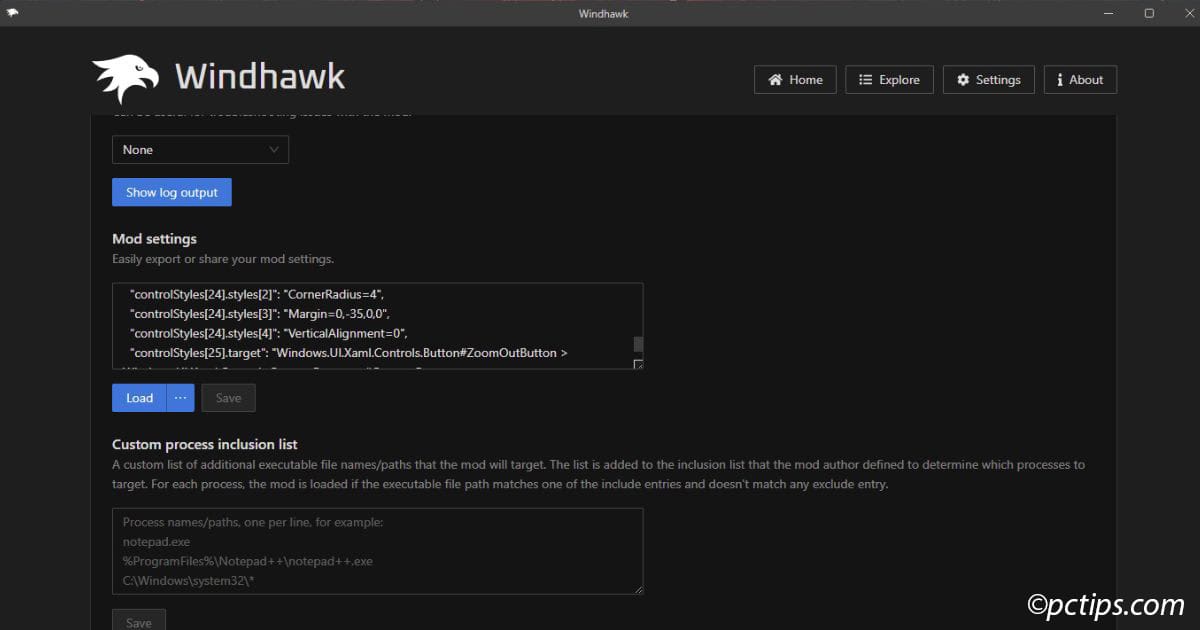
- Click “Save” and “load”
In seconds, your Start Menu transforms into something genuinely useful
Adding the Finishing Touches
We can make a few more tweaks to perfect our new Start Menu setup.
Step 9: Customize Windows Settings
- Open Windows Settings
- Go to Personalization > Start
- Turn off any “Show recently added apps” or “Show most used apps” options
- Click on “Folders”
- Enable the folders you want to appear along the bottom of your Start Menu
These folders give you quick access to important locations like Documents, Downloads, Pictures, etc. Having them readily available on your Start Menu saves clicks and makes your workflow much smoother.
Installing and Customizing the Taskbar Styler Mod
With your Start Menu looking sharp, it’s time to address that bland Windows 11 taskbar.
The Taskbar Styler mod lets you customize its appearance to match your personal style.
Setting Up the Taskbar Styler
Getting this mod installed is just as straightforward as the Start Menu Styler:
- Head back to the “Explore” tab in Windhawk
- Search for “Windows 11 Taskbar Styler” (it’s usually among the top 5 most popular mods)
- Click on the details, then select “Install”
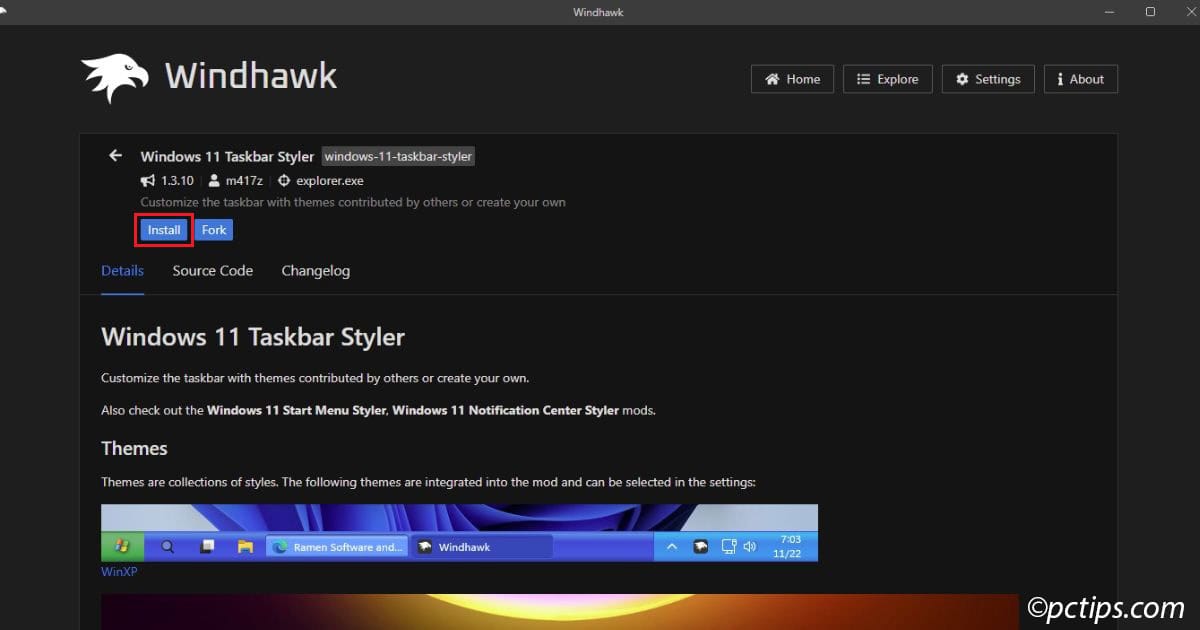
- Accept the usual warning prompt
I’ve been using this mod for some time now on three different PCs without a single hiccup.
It’s one of those rare tools that just works exactly as advertised – no crashes, no conflicts, no nonsense.
Customizing Your Taskbar
Once installed, you’ll find a wealth of options to customize your taskbar exactly how you want it:
- Go to the “Settings” pane of the Taskbar Styler mod
- You’ll see multiple sections for different aspects of taskbar behavior
Here are the themes I’ve fallen in love with:
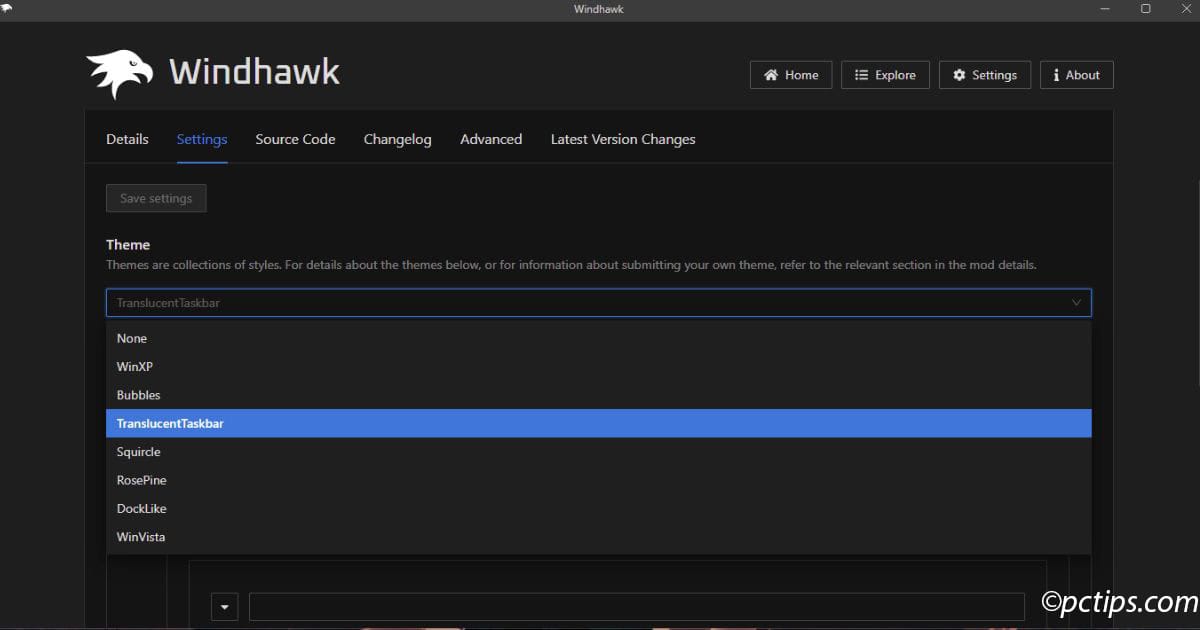
- TranslucentTaskbar: Creates a sleek, semi-transparent taskbar that blends beautifully with your desktop wallpaper. This is my personal favorite – it gives Windows 11 a premium, modern look.
- Windows XP: Brings back nostalgia with a classic Windows XP-style taskbar appearance. Perfect for those of us who still reminisce about the good old days of windows.
- Docklike: Transforms your taskbar into a macOS-inspired dock with smooth animations and grouping. Great if you work across platforms and want a more consistent experience.
- Bubbles: Adds a playful, rounded style to taskbar icons with bubble-like highlights for running applications
Apply your changes with “Save settings” and you’ll see the transformation happen instantly.
Adding the Taskbar Volume Control
While you’re tweaking your taskbar, there’s this tiny mod that delivers outsized benefits:
- Return to the “Explore” tab
- Search for “Taskbar Volume Control”
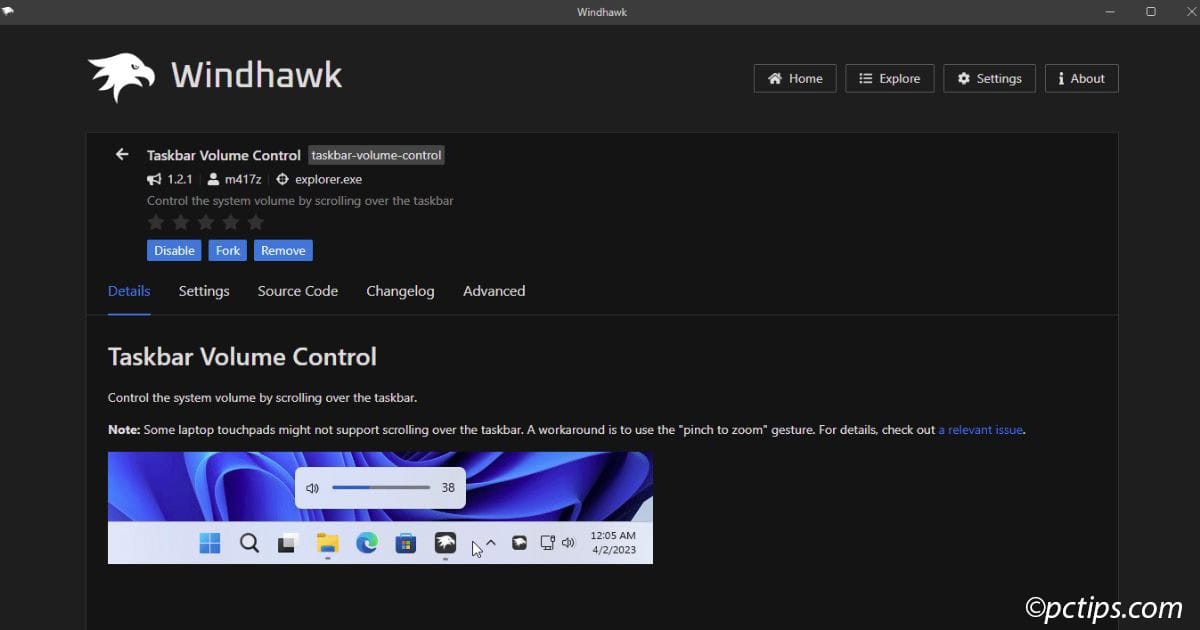
- Install it following the same steps as before
What makes this mod special is its brilliant simplicity. Once installed, you can:
- Hover your mouse anywhere over the taskbar
- Scroll up or down to adjust volume – no clicking required!

This tiny change saves me dozens of clicks every day.
Before, I’d have to click the tiny volume icon, then carefully position my mouse on the small slider – an unnecessary hassle just to turn down a too-loud YouTube video.
Now it’s just a quick scroll wheel flick, and I’m back to work. It’s the definition of a small change with big impact.
Custom Taskbar Height and Icon Size
While digging into Windhawk’s features, I found another tool that stands out and could be a great addition to your setup:
- Head to the “Explore” tab once more
- Search for “Taskbar Height and Icon Size”
- Install it using the same process as before
This simple but powerful mod gives you precise control over three critical taskbar elements:
- Custom Taskbar Height: Shrink that oversized Windows 11 taskbar to reclaim valuable screen space, or make it larger if you prefer bigger targets
- Icon Size Adjustment: Fine-tune the size of your taskbar icons independently of the taskbar height
- Taskbar Button Width: Adjust how wide your taskbar buttons appear – perfect for balancing between seeing more text in labels and fitting more buttons on screen
What I love about this mod is how it lets you find that perfect balance between visibility and screen real estate.
I personally reduced my taskbar to about 83% of its original size while keeping the icons slightly larger for better visibility.
The difference is subtle but meaningful – especially on laptops or smaller monitors where every pixel of vertical space matters.
Combined with the other mods we’ve installed, you now have complete control over your taskbar’s appearance and functionality.
Why These Tweaks Matter
Since implementing these Windhawk mods on my daily driver PC, I want to be clear about what these mods actually do.
They don’t add brand new features to Windows 11 – instead, they rearrange, resize, and customize what’s already there.
The question is, are these tweaks really worth your time?
Absolutely—these seemingly minor adjustments create a significantly more pleasant Windows experience:
- The interface feels logical again – things are where you expect them to be
- Visual clutter is reduced – no more wasted space with the “Recommended” section
- Fewer clicks needed to access your programs and settings
- Your personal preferences matter – you can arrange things based on how YOU work
I’m not suggesting these mods will revolutionize your productivity or save hours each day. What they do is remove those small frustrations that add up when you’re using your computer.
It’s about making Windows 11 feel less like something Microsoft imposed on you and more like a tool that adapts to your needs.
The Start Menu and taskbar are interfaces you interact with constantly – even minor improvements to them create a more pleasant experience overall.
Alternatives to Consider
While Windhawk is a powerful tool for customizing your Start Menu, it’s not the only option out there. Here are a few alternatives you might want to explore:
- StartAllBack: A paid tool ($4.99) that offers a seamless Windows 10-style Start Menu and taskbar experience. It’s a great choice if you miss the traditional look and feel but still want to stay within the Windows 11 environment.
- Start11: Another paid option from Stardock ($5.99) that provides extensive customization options for both the Start Menu and Taskbar. It’s perfect for users who want a modern yet personalized Windows 11 experience with flexibility in design.
- Open-Shell: A free, open-source tool that revives the classic Windows 7-style Start Menu. While it’s an excellent option for Windows 10 users, its compatibility with Windows 11 isn’t as seamless, and it might not provide the same level of polish as some paid alternatives.
After testing all of these tools, I’ve found that Windhawk offers the best combination of flexibility, performance, and value (it’s free!).
With custom code from Vinstartheme.com, it provides a Start Menu experience that outshines many paid options, giving you a truly tailored Windows experience.
From Compromise to Customize
I’m impressed by how this free tool transforms the Windows 11 experience.
It fixes what Microsoft broke while adding a level of personalization that should have been there from the start.
Skip the paid alternatives. Windhawk’s mod-based approach gives you complete customization without stability concerns.
Remember: Create a restore point first, start with popular mods, and don’t underestimate how small tweaks can transform your daily experience.
Don’t settle for Microsoft’s compromise. Customize your way to a Windows experience that actually works for you.
Have you tried customizing your Windows 11 interface? Which layout works best for you? Drop a comment below!
I have used start11 for some time. I like my task bar in the upper center of my screens with small icons. I like my start menu with listings of things like Settings and Control panel on the right and programs on the left. Start11 does this job nicely