The Right Way to Deep Clean Your Keyboard And Mouse
Last Updated:
The average keyboard harbors more bacteria than a toilet seat.
And that mouse you’ve been gripping for hours on end? Let’s just say it’s seen better days.
After noticing my own desk peripherals had reached a level of grime that could only be described as “unsettling.”
I set out on a mission to find the fastest, most effective way to get them sparkling clean without damaging them.
So I rolled up my sleeves and tested five different cleaning methods.
One method stood head and shoulders above the rest—taking just 4 minutes and using items you probably already have at home.
Ready to know which method won? Let’s dive in.
Why You Should Clean Your Keyboard and Mouse (Like, Right Now)
Before we get to the cleaning methods, let’s talk about why this matters:
- Health concerns — Keyboards can harbor up to 400 times more bacteria than a toilet seat. (Source)
If you eat at your desk, you’re basically having lunch with E. coli and Staphylococcus.(Source) - Performance issues — Dust, hair, and debris under keys can cause them to stick or stop working entirely.
- Longevity — Regular cleaning extends the life of your peripherals. A clean mouse tracks better and lasts longer.
- Appearance — A grimy keyboard just looks unprofessional, especially if someone else has to use your computer.
I started noticing my space bar was getting sticky and my mouse clicks felt “crunchy.” That was enough motivation for me to find a solution.
The 5 Methods I Tested
For this test, I acquired five identical keyboards and mice from my office colleagues. Each set received one cleaning method, and I judged the results based on:
- Time required
- Effectiveness
- Risk of damaging equipment
- Price
- Ease of execution
Here are the contenders:
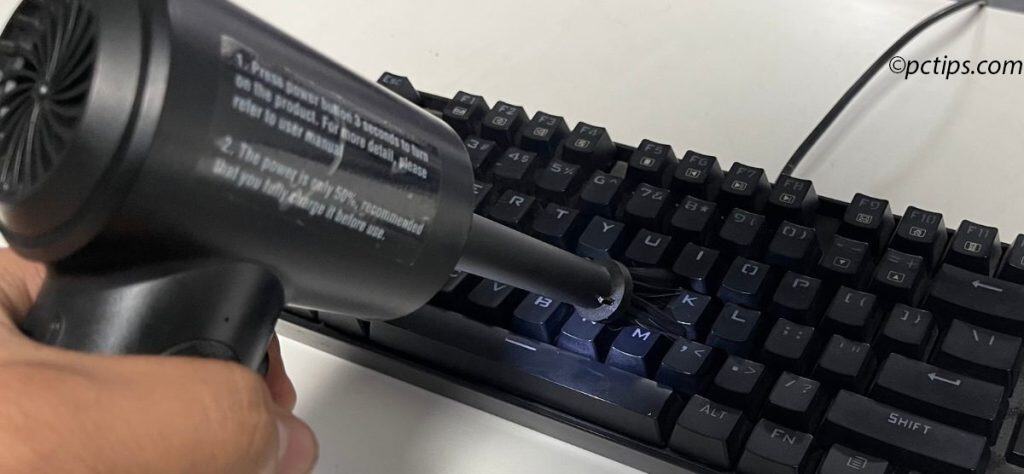
Method 1: Compressed Air Canister
Testing time: 6 minutes
I reached for the trusty compressed air canister first.
It’s my go-to quick fix when crumbs start affecting my typing.
There’s something oddly satisfying about watching dust fly out from between the keys!
This method is perfect for regular maintenance between deeper cleanings, especially if you’re like me and can’t resist snacking while gaming or working late nights.
Materials needed:
- Compressed air canister ($5)
Process:
- Unplug keyboard and mouse
- Turn keyboard upside down and shake gently
- Spray compressed air between keys, holding can upright
- Wipe down surface with a dry cloth
- Repeat process for mouse, paying special attention to seams
Results: This method was decent for removing loose debris, but didn’t touch the sticky residues or handle surface grime. The mouse still had visible finger oil marks afterward.
On the plus side, there’s zero risk of damaging electronic components. But for a thorough cleaning? You’ll need something more.
Effectiveness rating: 6/10
Method 2: Complete Disassembly and Deep Clean
Testing time: 45 minutes
I decided to go with the disassembly approach for my main mechanical keyboard – the one I’ve been using daily for the past three years.
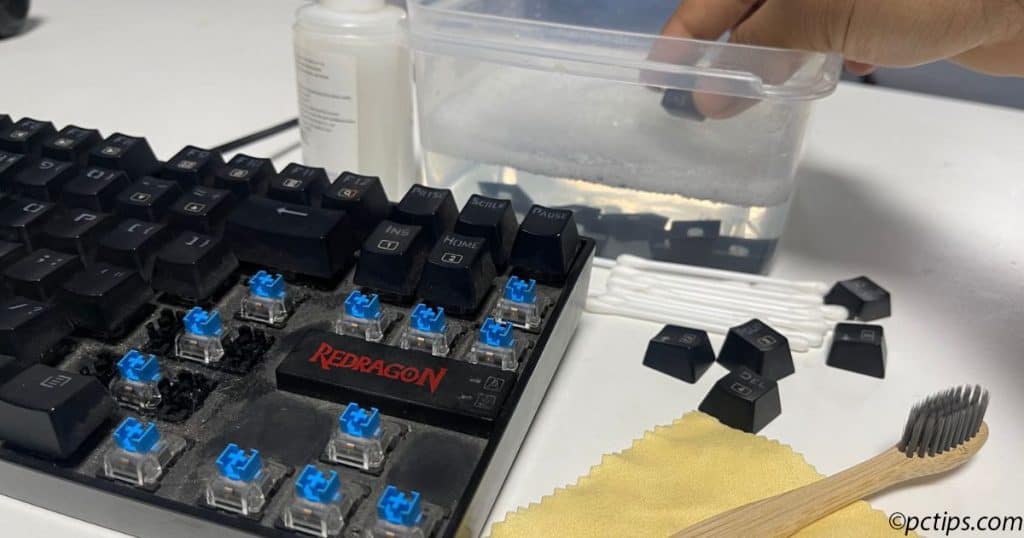
It was long overdue for a thorough cleaning, and I wanted to see just how much difference this method would make compared to the others I was testing.
Materials needed:
- Small screwdriver set
- Cotton swabs
- Isopropyl alcohol (70-99%)
- Microfiber cloths
- Bowl of warm, soapy water
- Toothbrush
- compressed air canister
Process:
- Unplug devices
- Take photos of keyboard for reassembly reference
- Remove keycaps using keycap puller or carefully with fingers
- Soak keycaps in warm soapy water
- Unscrew peripheral housings
- Clean circuit boards with compressed air only
- Clean plastic components with alcohol on cotton swabs
- Use toothbrush to remove debris from difficult areas
- Dry everything completely with microfiber cloth before reassembly
Results: This method resulted in a keyboard and mouse that looked fresh out of the box—no surprise there.
But it took a whopping 45 minutes, required technical knowledge, and carried the highest risk of permanently damaging the equipment.
I actually broke one of the keycap stems during removal (RIP Page Up key).
This is overkill for regular maintenance but might be worth it for a secondhand keyboard or severe cases of neglect.
Effectiveness rating: 10/10
Method 3: Keyboard Vacuum
Testing time: 8 minutes
I tried out one of those mini keyboard vacuums I’d been eyeing online for months.
For my test, I used it on a keyboard that has seen countless lunch breaks and snack crumbs.
I was curious if this device with it’s brush attachment would actually reach my expectation.
Materials needed:
- Mini vacuum designed for keyboards ($20-30)
Process:
- Unplug devices
- Run the vacuum between keys and over mouse surface
- Use brush attachment for stubborn debris
- Wipe down surfaces with microfiber cloth
Results: The vacuum was adequate at capturing loose debris between keys but completely failed against sticky residue.
My keyboard looked cleaner overall, but fingerprints and oils remained stubbornly.
The brush attachment helped dislodge particles but often just scattered them.
Unfortunately, budget options like mine simply lack the motor strength to remove debris effectively.
Premium models like the PeroBuno offer impressive suction power.
The main downside? Spending money on a single-purpose gadget that barely works better than your regular vacuum.
For best results, I’d recommend using a soft-bristle brush first to loosen debris before vacuuming.
Effectiveness rating: 5/10
Method 4: Commercial Cleaning Slime/Gel
Testing time: 5 minutes
I kept seeing those slimy cleaning gels in YouTube where people praised it for it’s effectiveness.
I thought I’d give it a try myself.
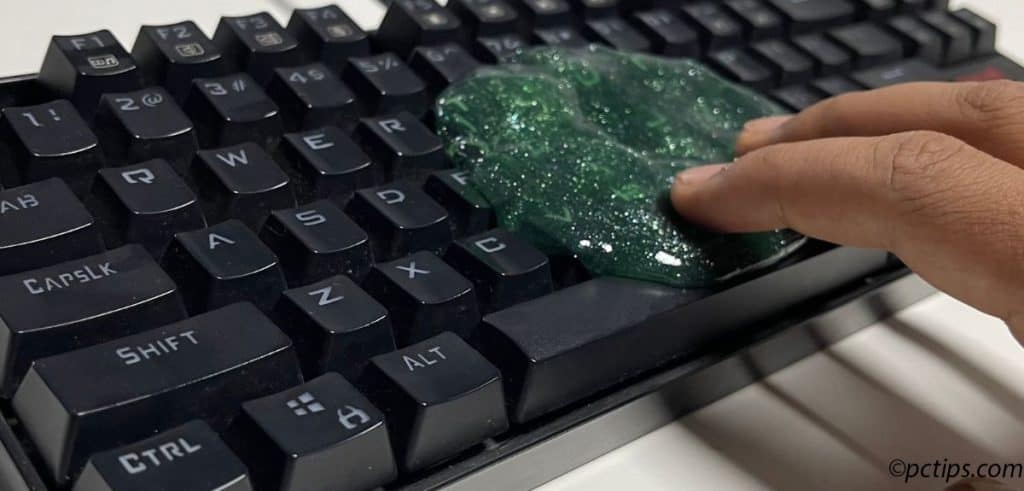
Materials needed:
- Keyboard cleaning gel ($8-12)
Process:
- Unplug devices
- Squeeze the cleaning gel to warm it up
- Press cleaning gel onto keyboard surface, between keys
- Lift slowly to pull out debris
- Repeat until gel becomes dirty
- Use on mouse seams and button areas
Results: The cleaning gel was strangely satisfying to use.
It took about a dozen pressings (around 5 minutes total) and did a surprisingly good job pulling dust and hair from between keys.
However, it did absolutely nothing for surface grime or sticky residues.
Bonus points for being fun to use, but it’s a one-trick pony.
Effectiveness rating: 7/10
Method 5: Alcohol Wipes + Interdental Brushes
Testing time: 4 minutes
I never would have thought that dental hygiene tools would completely revolutionize my keyboard cleaning routine.
This tip came from a tech forum where professionals shared their keyboard cleaning experience.
I was intrigued by the simplicity – no special equipment, no disassembly, and supposedly great results.
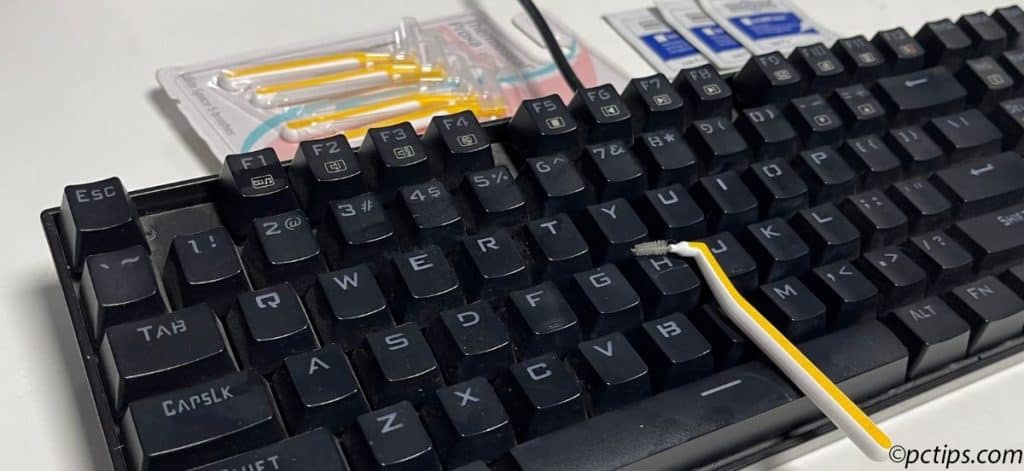
Skeptical but curious, I decided to try it myself.
Materials needed:
- Isopropyl alcohol wipes (70-99%) or pre-packaged alcohol wipes ($5-10)
- Interdental brushes (those tiny brushes for cleaning between teeth) ($3-5)
Process:
- Unplug devices
- Turn keyboard upside down and shake gently
- Use interdental brush between keys to loosen and remove debris
- Wipe entire keyboard surface with alcohol wipe
- Use fresh alcohol wipe for mouse, paying attention to seams
- Allow to dry completely
Results: This method was SHOCKINGLY effective for how simple it was.
It took near 4 minutes and left both keyboard and mouse looking nearly new.
The interdental brushes reached places compressed air couldn’t, and the alcohol wipes handled surface grime and disinfecting in one step.
The keyboard keys had a satisfying tactile feel afterward, and the mouse tracking actually improved!
Effectiveness rating: 9/10
The Clear Winner
After thoroughly testing every method, the humble combination of interdental brushes and alcohol wipes proves that sometimes the simplest solution is the best one.
At just 4 minutes to fully clean both keyboard and mouse, it’s highly effective and poses minimal risk to your devices.
It’s hard to beat this accessible approach for pure peripheral maintenance.
The combination of interdental brushes and alcohol wipes is perfect for three key reasons:
- Interdental brushes are designed to reach tiny spaces. They’re basically perfect keyboard cleaning tools in disguise.
- The brushes provide physical debris removal while the alcohol dissolves oils and kills germs.
- They come in multiple sizes, allowing you to match the right brush to different keyboard gaps
- It’s the quickest effective method.
The cleaning gel deserves an honorable mention. This satisfying and fun-to-use product has evolved into a truly impressive alternative.
But when it comes to accessibility, and universal compatibility, the interdental brush and alcohol wipe combination takes the win.
No special equipment required, no disassembly needed, no risk to components – just quick, effective cleaning.
The interdental brushes cost about $3-5 for a pack that will last years, and alcohol wipes are similarly inexpensive.
I keep both in my desk drawer now for weekly maintenance.
Quick Comparison Table
After testing all these methods extensively, here’s how they stack up against each other:
| Method | Time Required | Effectiveness | Materials Cost | Best For |
| Compressed Air Canister | 6 minutes | 6/10 | $5 | Quick maintenance, loose debris |
| Complete Disassembly | 45 minutes | 10/10 | $10-15 | Deep cleaning |
| Keyboard Vacuum | 8 minutes | 5/10 | $20-30 | Light dust removal |
| Cleaning Slime/Gel | 5 minutes | 7/10 | $8-12 | Hair and dust between keys |
| Alcohol Wipes + Interdental Brushes | 4 minutes | 9/10 | $8-15 | Regular maintenance, best overall value |
This comparison reveals why specific cleaning methods shine in different scenarios.
While time efficiency isn’t the only consideration, it remains a crucial factor when selecting the most appropriate technique.
The Best Method for Laptop Keyboards
While testing these cleaning methods on desktop keyboards, I realized laptop users face different challenges.
Laptop keyboards are more delicate, with less space between keys and direct connection to sensitive components underneath.
After additional testing on various laptop models, I found that Method 5 is clearly the best option for laptops too.
Laptop-Specific Adaptations:
- Always power down completely before cleaning
- Use compressed air to remove loose debris
- Hold the laptop at a slight angle so debris falls outward
- Use even gentler pressure with the interdental brushes
- Ensure alcohol wipes are barely damp, not wet
- Allow a full minute of drying time before powering back on
This method works well on almost every type of laptop.
It’s also safe for the surrounding touchpad and palm rest areas.
For particularly stubborn dirt or sticky keys, resist the temptation to pry up the keys.
Instead, use the interdental brush to gently work around the problem key, followed by a barely-damp alcohol wipe.
Your laptop keyboard deserves the same regular maintenance as your desktop peripherals.
Quick Tip: In case of laptops, less is more with alcohol wipes. A nearly dry wipe is all you need.
Quick Tips From My Testing
After spending way too much time cleaning keyboards and mice, I’ve learned a few things:
- Avoid eating directly over your keyboard. Crumbs easily fall between the keys and attract dirt and bacteria. If you must snack, keep your keyboard at a distance.
- Regular light cleaning beats occasional deep cleaning. A few minute session weekly is better than an hour-long ordeal annually.
- Compressed air works best at an angle. Hold the can at a slight tilt (not straight down) to blast dust out instead of pushing it deeper. Short bursts work better than holding the nozzle down.
- A soft toothbrush is a game changer. For stubborn grime around keys, a dry toothbrush dislodges debris without risking liquid damage. Pair it with isopropyl alcohol for deep cleaning.
- Microfiber cloths > paper towels. Paper towels leave lint behind, while microfiber cloths grab dust and oils better. For best results, lightly dampen with isopropyl alcohol.
- Cotton swabs reach the tightest spots. Dip a cotton swab in isopropyl alcohol and run it along key edges and in crevices where grime builds up.
- A keycap puller makes deep cleaning easier. If you have a mechanical keyboard, remove the keycaps once in a while for a thorough clean. Just take a picture first, so you remember where everything goes!
The Bottom Line
After all my testing, the 4 minute method has become a regular part of my maintenance routine.
It’s simple enough that I actually do it, effective enough that I can see and feel the difference, and cheap enough that there’s no excuse not to.
For heavily soiled keyboards, you might need to start with the complete disassembly and deep clean method once, then maintain with the 4-minute technique.
Remember: a clean keyboard and mouse aren’t just about aesthetics—they’re about health, performance, and longevity.
Your fingers spend more time touching these surfaces than almost anything else in your daily life.
They deserve a few minute of attention now and then.
Your Turn!
What’s your keyboard cleaning routine?
Have you tried any of these methods or do you have another technique I should test?
Are you going to try the 4-minute winner?
Let me know in the comments below!
And if this article has you glancing nervously at your keyboard… that’s probably a sign it’s time to give it a quick clean.