How to Visualize Your Disk Space in Seconds (Not Hours)
Last Updated:
Freeing up space involves 2 main steps – locating large/duplicate files and deleting the ones you don’t need.
Manually searching through the thousands of directories on your PC isn’t practical. And if you rely on cleanup tools, they’ll miss a lot of personal files (unnecessary videos, old game files, installers, etc).
This is where a disk usage analyzer like WizTree is useful.
It’ll scan your entire PC and portray the files in a graphical treemap format. Identifying the largest files is a breeze as they make up the largest rectangles.
Download WizTree, then install and launch it to see this in action.
Why Use WizTree
So, WizTree can tell you what’s taking up space. What else can it do – why should you bother trying it?
- Instead of searching through individual files, WizTree reads a drive’s Master File Table (like the Everything search tool). This means it’s over 40x faster than competitors like WinDirStat.
- Unlike many competitors, it’s actively developed (regular bug patches and new features).
- It’s free for personal use. The enterprise licenses are also affordable compared to other apps.
- It supports search filters to filter the results and quickly locate specific files.
- It has excellent compatibility. It can scan network drives, older file systems like FAT/FAT32, and even MTP devices like smartphones.
- The disk analysis report can be exported to a CSV or MFT file (which can be shared or used to review the report later).
- It also supports command-line exporting of CSV files (i.e., automated auditing, useful for admins).
Essentially, it’s great for visualizing space distribution, cleaning up junk, and freeing up space, as well as organizing files.
Try a Quick Scan
Launch WizTree and click on Scan to give it a test run.
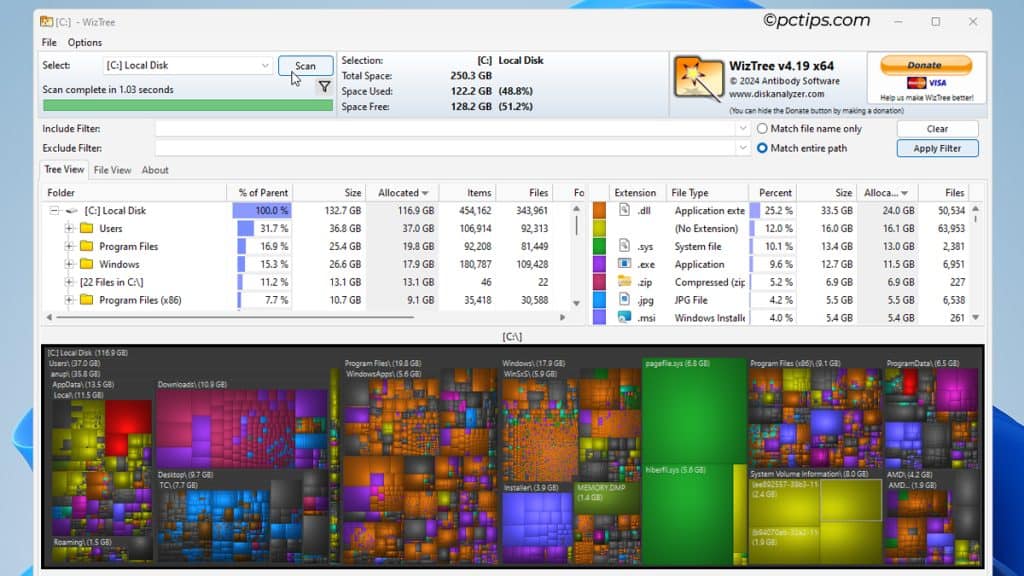
By default, it scans the C: drive and visualizes the space distribution in 3 forms:
- Top-left: Directory tree format that shows file count, attributes, % occupied, etc.
- Top-right: Shows space occupied by each file type (extensions).
- Bottom: Colorful treemap where large files are represented by large rectangular blocks.
Identify the Largest Files
The treemap is often the fastest way to find large files to delete.
Some old videos might be stored deep inside some subdirectory. Or, some recently downloaded files might be hiding in plain sight in your cluttered Downloads folder.
These will stick out like a sore thumb in the treemap. Just hover over the largest blocks to check what those files are.
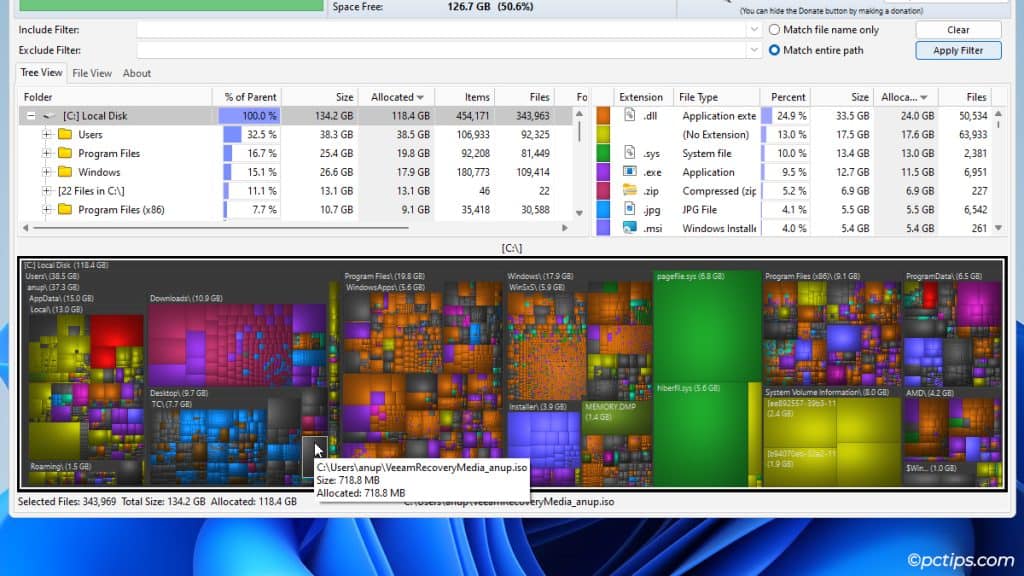
Within seconds, I was able to find old game files and ISOs that I no longer needed.
Right-click a block to interact with it – open File Explorer, CMD, copy/cut/delete it, and so on.
5 GBs freed up, just like that!
Search By File Type
Say you want to delete specific types of files (backup files, update files, media files, archives, etc).
Right-click an extension from the top-right and click on Select.
All files of that type will be highlighted in the tree map.
Explore the Directory Tree List
When trying to free up space, never forget about the system folders (AppData, Temp, Downloads, Desktop, etc).
Typically, you’ll want to open such folders, identify large unnecessary files, and delete them individually.
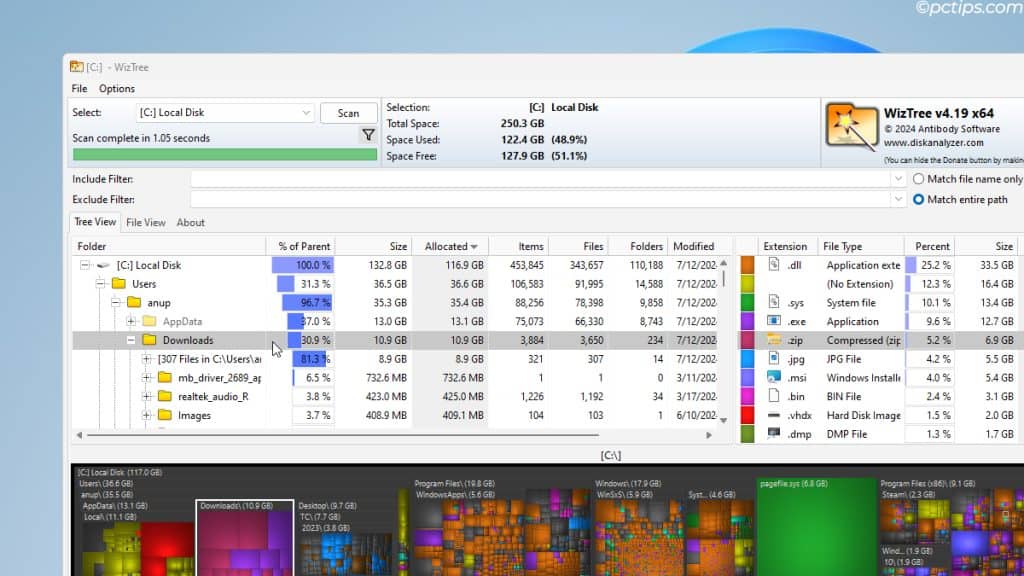
Tree View (top-left) lists directories and files sorted by size, which makes this super easy.
Find Duplicate Files
Click on File View and enable the Duplicates only filter.
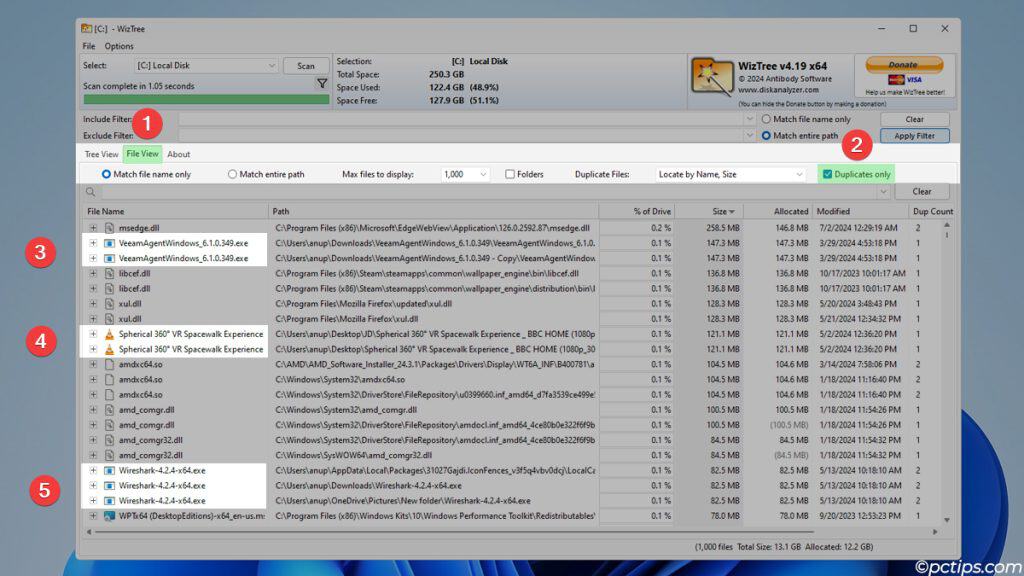
You’ll find a lot of duplicate DLLs and other system files here.
Don’t mess with those – multiple instances of those are used as backups and required for programs to work.
You’ll also find duplicate personal files (I found duplicate app installers and videos totaling over 2 GBs).
Assuming they’re not backups, feel free to delete these.
Note: WizTree finds duplicates based on the file name, size, and date info. It doesn’t compare the actual contents, so keep that in mind before deleting the files.
Delete Files Permanently
By default, WizTree sends deleted files to the Recycle Bin.
But WizTree is the kind of program people use regularly to find and delete space hogs.
Instead of emptying the Recycle Bin later, I prefer to permanently delete files from the get-go.
Select the file and press Shift + Del to do this.
Advanced File Search
There might be some old files whose location you’ve forgotten but you vaguely remember the name, or when you last accessed them.
WizTree’s search features could help you locate them. In File View, enter the filename into the search bar.
To narrow down the search, use advanced search operators like:
- Wildcards (e.g.,
ae*.pngto find all PNG files that start with ae) - Multisearch AND (e.g., separate
*.png resultwith a space to find all PNG files that contain the word result) - Multisearch OR (e.g.,
*.png|*.jpg “scan result”to find PNG or JPG files with the keywords scan result) - Search by Date (e.g.,
<2018/06/11to only show files modified before that date) - Search by Size (e.g.,
>=500k <=1mto find files between 500 KB to 1 MB) - Search by Filename/Path Length (e.g.,
pathlen>240to find files with path length over 240 characters) - NOT Operator (e.g.,
*.png !screenshotto find all PNG files that don’t have the word screenshot in the name)
There’s definitely a learning curve to advanced searching. But once you get the hang of it, you’ll be more efficient at searching for life.
You Might Also Like: 36 Windows Search Tricks to Find Any File in Seconds
Export Disk Usage Report
You might want to send the file data report to someone else. Or, you might want to analyze it yourself at a later date.
Select the directory to save and click on File > Export to .CSV file.
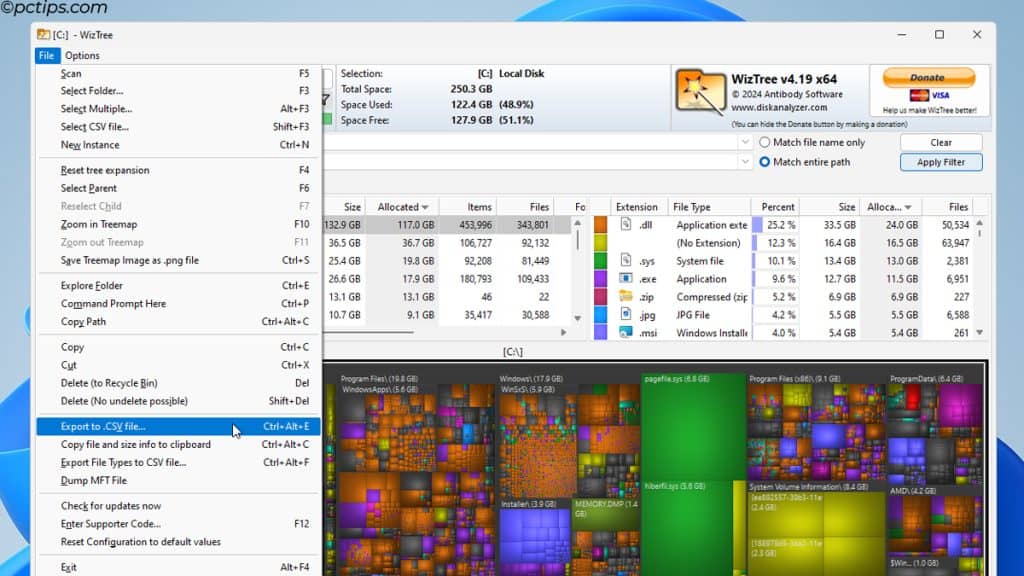
This CSV file can be viewed with spreadsheet apps like MS Excel or Google Sheets.
But I recommend sticking to WizTree for the most interactive and human-readable experience.
Alternatively, you can also dump the entire report to an MFT file.
Copy File Data to Clipboard
Sometimes, you’ll want to quickly text the file data to a friend, or post it on a forum.
To do this, expand a folder in the directory tree.
Then, right-click it and select Copy file and size info to clipboard.
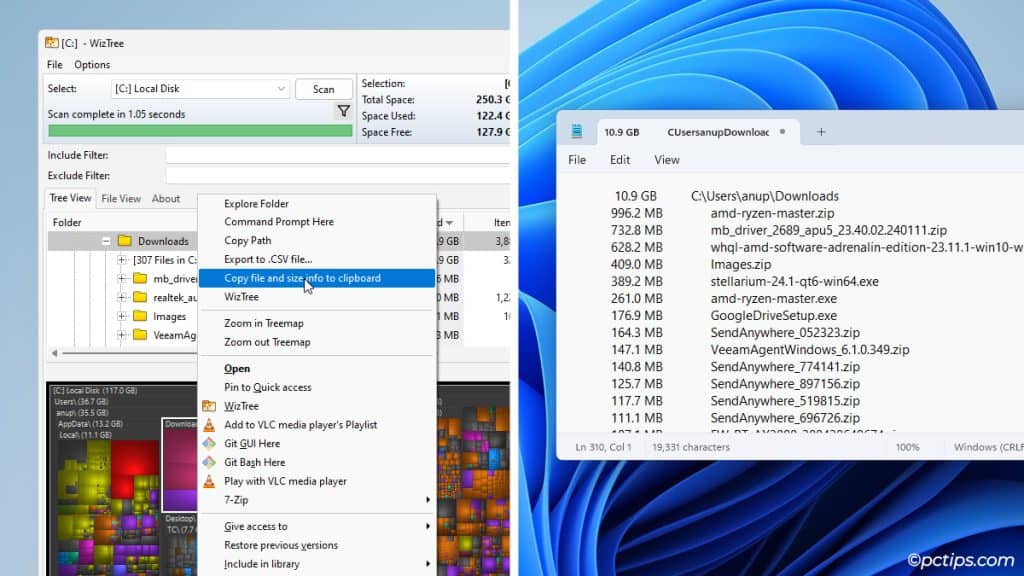
The data will be copied in a human-readable format, similar to what’s shown above.
Get Used to the Shortcuts
If you’ve liked WizTree so far, you might want to use it regularly to keep track of your PC’s disk usage. The sooner you get used to these core shortcuts, the better.
| Shortcut | Action |
| Ctrl + N | New Instance |
| F5 | Scan |
| F3 | Select folder |
| Shift + F3 | Select CSV file |
| F10 | Zoom in Treemap |
| F11 | Zoom out Treemap |
| Ctrl + S | Save Treemap Image as .png file |
| Ctrl + E | Open the folder in File Explorer |
| Ctrl + Alt + C | Copy path |
| Shift + Del | Delete files permanently |
| Ctrl + Alt + E | Export to .CSV file |
Related: 100 Most Useful Keyboard Shortcuts Everyone Should Know
Command-Line Features
As I said earlier, WizTree is an excellent affordable tool for enterprise environments. Admins can leverage its command-line capabilities to:
- Auto-export data to CSV files
- Export specific types of data (e.g., created and accessed dates)
- Export treemap as an image
- Dump the MFT file
- Modify WizTree installer settings and more
WizTree Tips & Tricks to Know
WizTree has a portable version too. It’s excellent for carrying around on a USB stick and analyzing PCs on the go.
Besides that, here are some pro tricks I’ve discovered after a year of using WizTree:
- Open any folder in File Explorer and right-click. Select Show more options > WizTree for instant scans from the explorer context menu.
- Press F8/F9 or click on Options to toggle the Treemap and File Types on and off.
- Click on Options > Colors. You can set the UI theme (e.g., change to dark mode), color blocks according to their extension instead of size, or enable colorblind mode here.
- Press Ctrl + S to save the Treemap as a
.pngimage. - Use F10 and F11 to zoom in and out of the treemap. Use F4 to reset the expansion.
- Try out the different Scan options. You can scan specific folders, multiple drives at once, network or external drives, and CSV/MFT files.
WizTree vs WinDirStat
WinDirStat has been around for decades – it’s a classic disk analysis tool. TreeSize and SpaceSniffer are fairly popular too.
All four of these tools are very similar and free for personal use. The way I see it, the deciding factor for the average user is speed.
WizTree claims it’s up to 46x faster than WinDirStat. I found this to be true in my own testing.
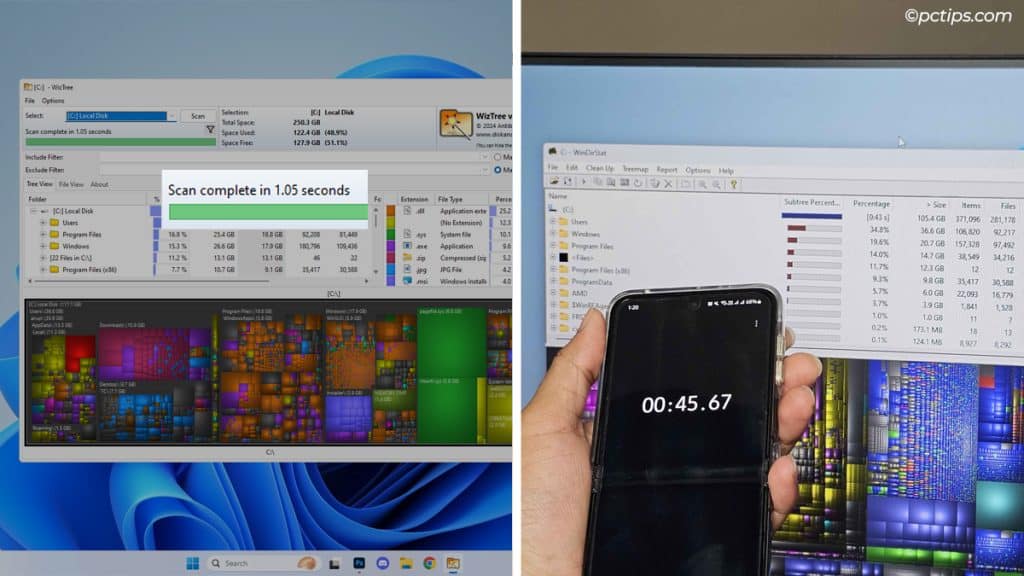
I scanned my 250GB C: drive partition with both apps multiple times. WinDirStat took 45 seconds or similar to finish the scan, while WizTree only took 1 second or so.
It was consistently over 40x faster.
Since it scans the NTFS MFT, it will also find everything on your system, unlike WinDirStat or TreeSize which occasionally miss some files that they can’t access.
Got Any Questions?
Some of you might have a few questions about WizTree – why are the Size and Allocated fields showing different values, or how do supporter codes work?
The WizTree FAQ page answers all such queries.
Of course, you can ask me too. If anything confuses you, just drop a comment and I’ll help you out.
In exchange, please consider sharing this guide with someone else who might find it valuable!